What is Python
Python is a high-level programming language built-in with multiple features. It is well known for its simplicity and easy to understand semantics.
“Python is an interpreted, object-oriented, high-level programming language with dynamic semantics. It’s high-level built-in8 data structures, combined with dynamic typing and dynamic binding, make it very attractive for Rapid Application Development, as well as for use as a scripting or glue language to connect existing components together. Python's simple, easy to learn syntax emphasizes readability and therefore reduces the cost of program maintenance. Python supports modules and packages, which encourages program modularity and code reuse. The Python interpreter and the extensive standard library are available in source or binary form without charge for all major platforms, and can be freely distributed.”— python.org
Programmers prefer Python because of their increased productivity. It does not have a compilation step and debugging can be done quickly in Python. Segmentation faults almost never occur in Python. Instead, when a bug is present, the interpreter raises an exception. When an exception is not found, a stack trace is printed.
Why should you choose Python?
- It’s versatile. Python can be used in almost any kind of environment and will barely face a performance issue. Python is used in mobile applications, desktop applications, hardware programming, and so on.
- It is incredibly easy to learn and use. Any person with basic English knowledge can learn Python with no hassle. There are a huge number of online courses and tutorials (including this one) that’ll teach you Python. The learning is endless.
- It has a well-populated and supportive community. Any queries you might have on Python, look it up and you’ll find plenty of answers in no time. Python was launched three decades ago and that has given the world of programmers enough time to build a strong community.
- It has a lot of libraries, especially for Data Science. A few of them are keras, matplotlib, seaborn, NumPy.
- One of the two majorly used languages for Data Science (the other being R).
- Has in-built data structures.
- Easy debug-edit cycles. You can always add a few print statements to debug your code if exceptions don't help.
- Integration with a web app or a database can be easily achieved using libraries. Examples include Flask for building a web app, Sqlite3 to integrate with a database, and FPDF to create and edit PDF files.
- Readable code and simple syntax. If you have never seen a piece of Python code compared to a piece of code performing the same task in Java, take a look at the example below. It could be the sole reason why Python is worthy of being the best programming language of all time.
class HelloWorld {
  public static void main(String[] args) {
	  System.out.println("Hello, World!");
  }
}
print("Hello, World!")
Python Installation and Setup
Like all else in Python, installation and setup can be done in various ways. Here, we present to you the fool-proof, basic, and most un-complex method of getting Python up and running on your computer.
To have Python on your computer, it is sufficient to install the dmg or exe file from the Python official site, but to actually use it, you will need an IDE. In this Python tutorial, we use an IDE called PyCharm consistently. You could set that up for yourself as well, or use any other IDEs available like IDLE, Jupyter Notebook, or Visual Studio. The Python course in Trichy at FITA Academy provides comprehensive training in the Python language, covering fundamentals to advanced concepts, all under the guidance of experienced Python professionals.
Python Notes: IDLE is installed by default while installing Python.
For macOS users:
- Installing Python:
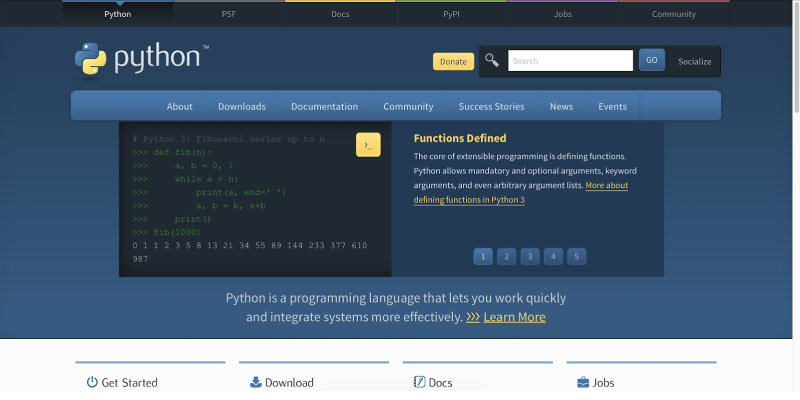
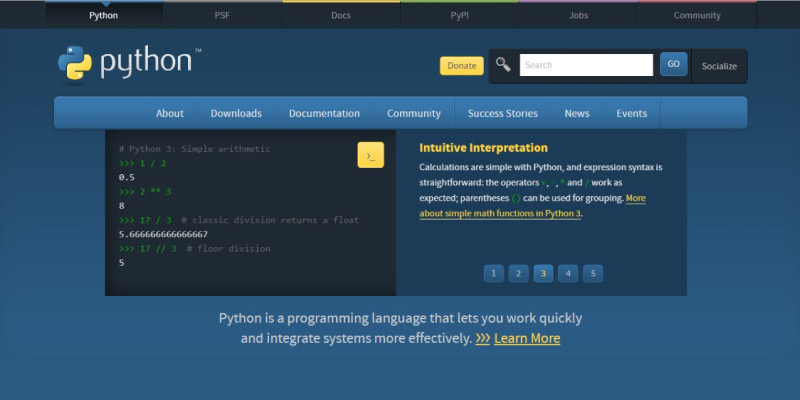
- Head over to the official Python webpage at https://www.python.org. The site should look like this:
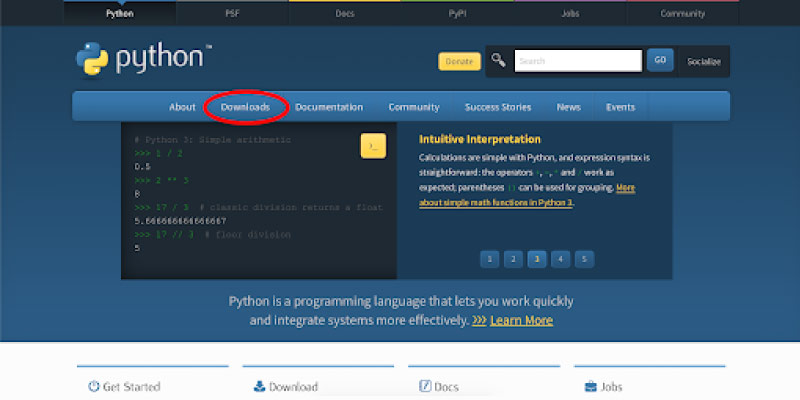
- Click on the Downloads tab circled in the picture.
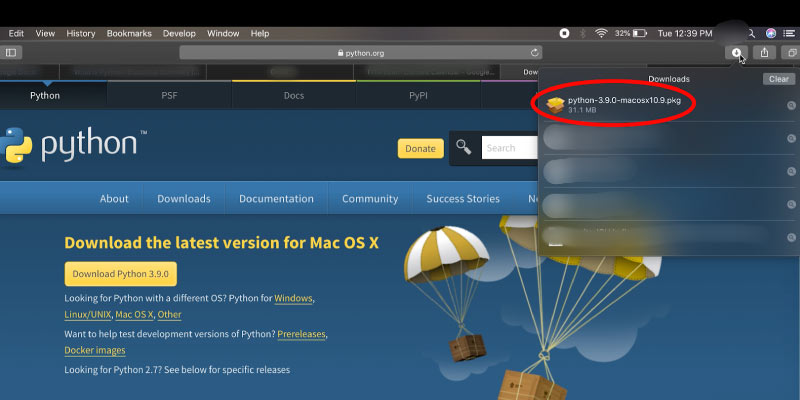
- It should lead to a page like the one shown below. Click on the button that says “Download Python 3.9.0” (the one in the red circle).
- Once your download is completed, click on the .pkg file.
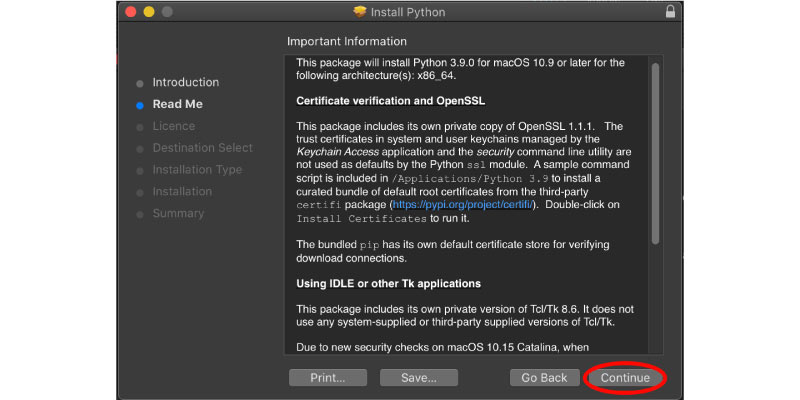
- An installer as shown in the picture would open up. Follow the steps to install Python.
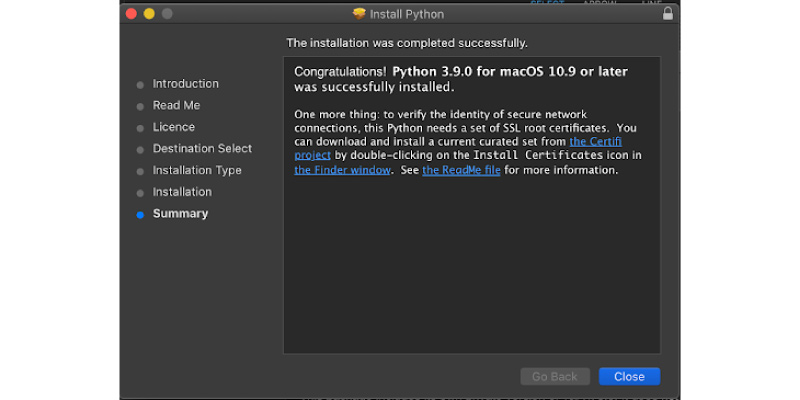
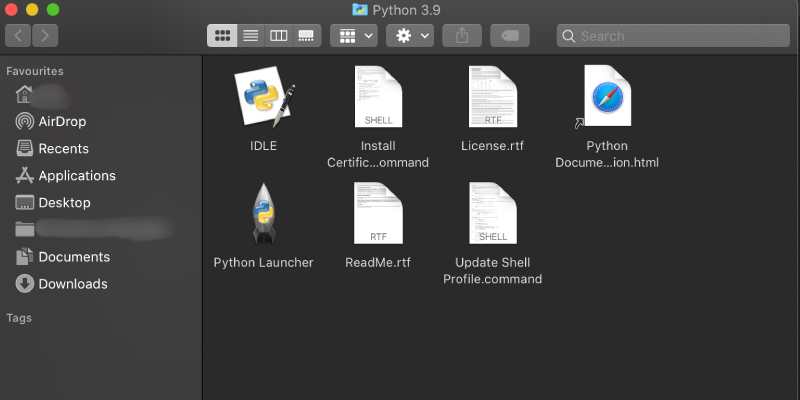
- Once you reach the summary tab, a new finder window opens up, like in the picture below:
- You have now successfully installed the latest version of Python on your macOS device.

For Windows users:
- Installing Python:
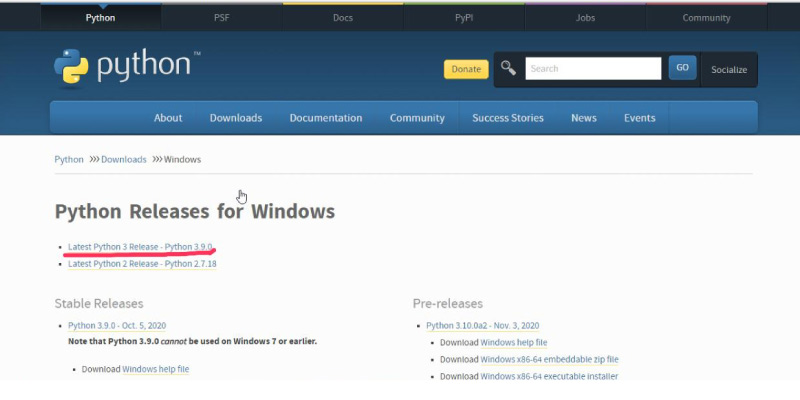
- Head over to the official Python webpage at https://www.python.org. The site should look like this:
- Click on the Downloads tab. Shown in the picture below:
- Click on the link leading to the latest version of Python as shown in the picture:
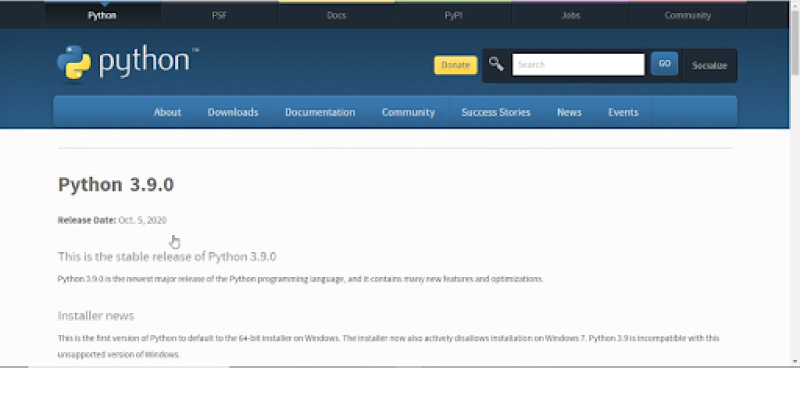
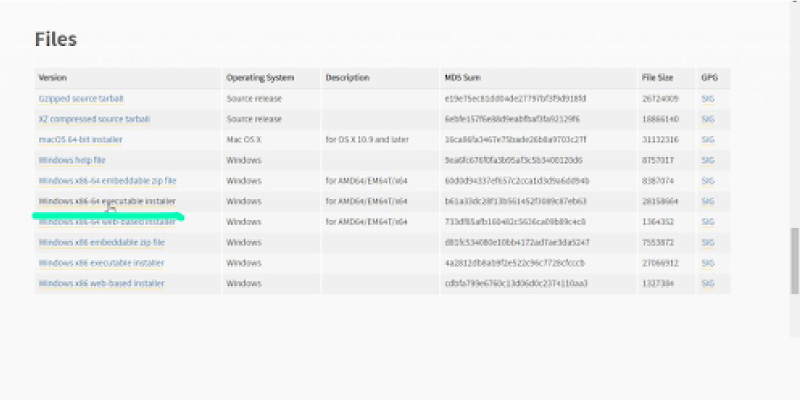
- This should lead to another page that looks like the first picture below. Scroll down to find the list of downloadable files, as shown in the next step:
- We will need to download an executable file, which contains the extension .exe; so, click on the link which reads ‘executable installer’, as shown in the picture.
- Then, an exe file would start downloading
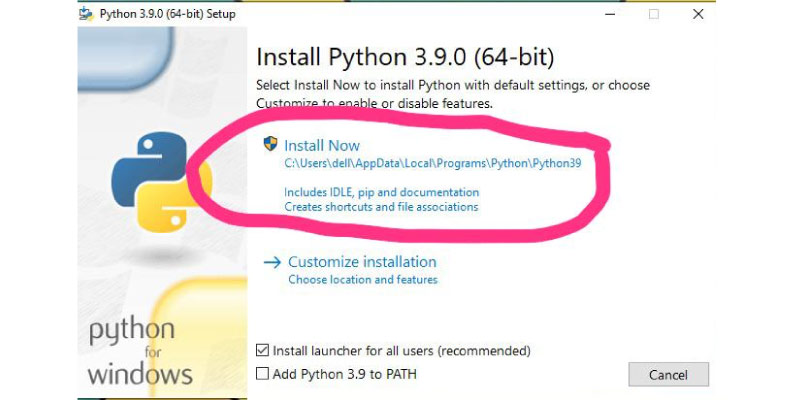
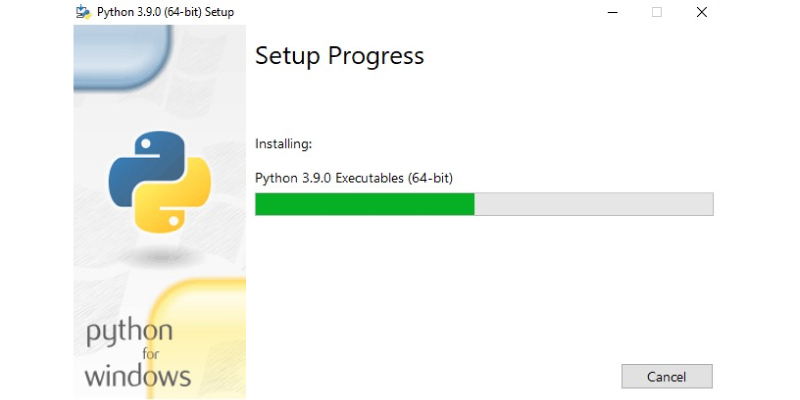
- Open it up and the file would open something like the picture shown below. Click on Install Now and the installation would start.
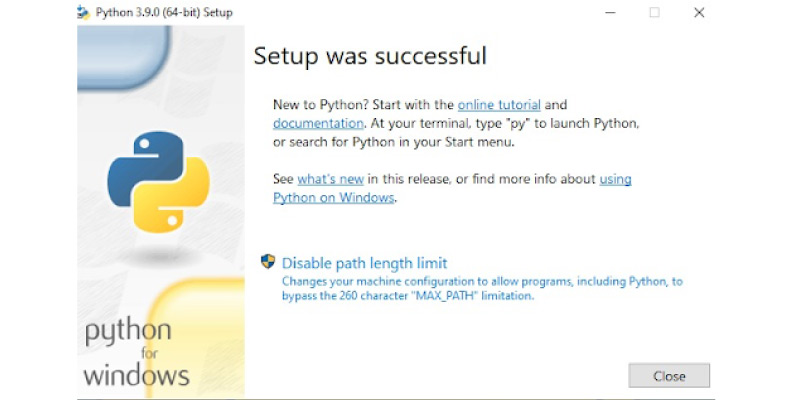
- Once the installation is done, you’ll see this on your screen:
- You have now successfully installed the latest version of Python on your Windows device.


Python - Basic Syntax
To start, Python can be run on the command line.

A Python file can have the extensions .py, .ipynb and .pyc. Majorly, we would be dealing with .py files.
Indentation in Python
An important point to always remember when using Python is that indentation is very important. Indentation, in simple words, is the space that is present before every line of your Python code.
In Python, every line must be properly indented.
If you are a Java programmer, an easy analogy would be to consider indentation as curly brackets (‘{}‘). Almost every time you open a ‘{‘, you’ll have to indent the next lines of code and almost every time you close a ‘}’, you’ll have to dedent the following lines.
It looks much simpler with an example:
Correct:
	if5 > 2:
	print("Five is greater than two!")
Output:
Five is greater than two!
Wrong:
	if5 > 2:
	print("Five is greater than two!")
Output:
IndentationError: expected an indented block
The number of spaces used is up to the programmer but it must remain constant throughout the block of code. The most common number of spaces used are 2 spaces and one tab space.
Correct:
	if5 > 2:
	print("Five is greater than two!")
	if5 > 2:
	print("Five is greater than two!")
Wrong:
	if5 > 2:
	print("Five is greater than two!")
	print("Five is greater than two!")
Comments in Python
A comment in a programmer’s code is used to keep the code readable for a new programmer who might work on a project or for self when they need to debug and fix the code. Though seemingly insignificant, comments are highly useful.
The syntax for comments in Python is as follows.
- Single line comment
- Starts with a ‘#’ and can extend as long as the editor allows in the same line.
- Comments can also be used to stop a line of code from being executed. For example,


- Multiline comments
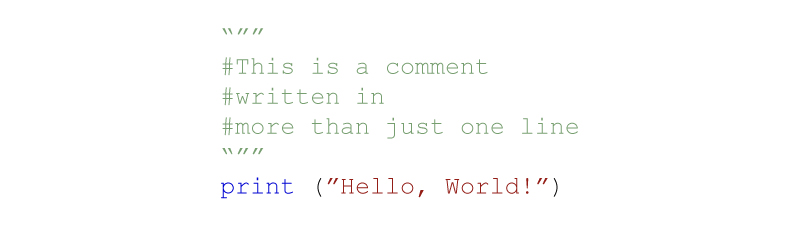
- To have comments that stretch over more than one line, you could do something like this:
- Or, you could use a simple and available syntax:
- The above example actually represents an unassigned multi-line data of the typed string. Any unassigned string is ignored by Python, hence we take advantage of this feature and utilize them as comments.

Python - Variables and Datatypes
Variables are used to store information to be referenced and manipulated in a computer program. They also provide a way of labeling data with a descriptive name, so our programs can be understood more clearly by the reader and ourselves. It is helpful to think of variables as containers that hold information. Their sole purpose is to label and store data in memory. This data can then be used throughout your program.
To declare a variable, there is no specific syntax in Python. You can just assign a value to the variable using the equal “=” sign.
For example:
	a9 = 10
	blue2 = True
	my_name = “Hello world”
	pi_val = 3.14
You also do not have to follow the declaration with a semicolon (;). However, if you want to declare more than one variable in the same line, then a semicolon must be used. For example:
a = 3; b = 4 ; c = 5 #they make a Pythagorean triplet!
The data type can be defined as the type of variable, input, or just any data that you, as a user, might define or the program by itself returns. There are various advanced data types in Python for the benefit of the user, but the most basic ones are listed below.
- Integer (int)
- A whole number is stored in your variable. It also includes negative numbers.
- Example,
- length_of_rectangle = 20
- x_value = -20
- String (str)
- Letters, white spaces, special characters, and numbers stored as just words. Numbers don't hold value, neither do the special characters have any function.
- Written within double quotes (“) or single quotes (‘’).
- For example,
- my_name = “Jane Austen”
- my_password = ‘ApplE@#12’
- A string can stretch over multiple lines. Such a string is enclosed within three openings and three closing single quotes (‘‘‘ ’’’).
- Example,
- some_text = ‘‘‘This is some text. This is some text. This is some text. This is some text. This is some text. ’’’
- Float (float)
- The float data type is used to store decimal values.
- Example,
- frac = 0.05
- frac2 = 21.6
- frac3 = -7.9
- Boolean (bool)
- Boolean data type stores only two values. It can either be True or False (note the capitalization). True is also represented as 1, while False is represented as 0.
- It is very commonly used in condition statements or to break a loop.
- Example,
- c = True
- y = 0
- x = False
Valuate Values & Variables
The bool () function permits you to assess any value and provides you the True or False value in return,
Example 1: Valuate a String and a Number:
	print(bool("FITA"))
	print(bool(20))
Example 2: To Valuate Two Variables
	X = FITA
	Y= 20
	print(bool(x))
	print(bool(y))
Maximum Values are True
- Any value that is evaluated is True when it consists of some content.
- All String is True, except the empty Strings.
- All Number is True, excluding 0
- All List, Set, Tuple, and Dictionary are True, excluding the Empty ones.
Example:
The succeeding will return True,
	bool(" TAT")
	bool (023)
	bool([" Mango," Orange", "Lemon"])
Some Values are False
Though there are no more values that evaluate to False, excluding the empty values like (), {},[], "", the number is 0, & the value is None.
Python Notes: The value False evaluates to False always.
Example:
The succeeding will return to False:
	bool(False)
	bool(None)
	bool(())
	bool({})
	bool([])
	bool("")
	bool(0)
If you have more than one value or object in that case, evaluate to False, and when you have an object that is made from the class with a__len__ then the function returns to False or 0:
Example
	class your class():
	def__len__(myself):
	return 0

	obj = your class()
	print(bool(myobj)
- Functions that can Return a Boolean
You can also create the functions that return the Boolean Value:
Example:
	Print the Answer to the function:
	def myFunction():
	return True

	print(myFunction())
It is also possible to execute the Code in Python based on the Boolean answer for the function:
	Print " Yes" when the functions return to True or else print "No!".
	def myFunction():
	return True

	if myFunction():
	print('Yes!")
	or else:
	print("No!")
Python consists of numerous built-in functions that can return the boolean value, such as the isinstance() function, and that can be used for determining the object of a particular data type:
Example
	Verify if the Object is Integer or not:
	x= 900
	print(isinstance(x,int))
Python Operators
Python Programming language has a special set of symbols that can perform different types of operations like Mathematical Operations, Logical Operations, much more and these symbols are also called Python Operators. For each Operator or Symbol, there is a separate kind of operation. The values in which the operators perform their corresponding operations are called operands. There are numerous types of Operators in Python and they are,
- Arithmetic Operator
- Logical Operator
- Comparison Operator
- Assignment Operator
- Membership Operator
- Bitwise Operator
- Identity Operators
Arithmetic Operator
|
Operators |
Name |
Example |
|
+ |
Addition |
x+y |
|
% |
Modus |
x%y |
|
_ |
Subtraction |
x-y |
|
* |
Multiplication |
x*y |
|
/ |
Division |
x/y |
|
** |
Exponentiation |
x**y |
|
// |
Floor Division |
x//y |
Logical Operator
The Logical Operators are primarily used in combining the Conditional statements. The three major logical operators are mentioned below.
|
Operator |
Description |
Example |
|
or |
It returns the value if only one of its value is True |
x<8 or X<5 |
|
and |
It returns the value if both the statements are True |
x<7 or x< 9 |
|
not |
It reverses the results and returns it as False when the results are true |
not (x<6 or x<10) |
Comparison Operators
These Operators are used primarily for comparing two values.
|
Operator |
Name |
Example |
|
== |
Equal |
x == y |
|
> |
Greater than |
x > y |
|
!= |
Not equal |
x != y |
|
< |
Less than |
x < y |
|
<= |
Less than or equal to |
x <= y |
|
>= |
Greater than or equal to |
x >= y |
Assignment Operators
The Assignment Operators are used for assigning the values to the Python variables. The Assignments are done directly and at times the operators initially perform some sort of mathematical operations and later assign the values to the operand.
|
Operator |
Operator Name |
Example |
|
*= |
Multiply then assign |
x *= 3 x = x * 3 |
|
= |
Assignment |
x = 5 x = 5 |
|
+= |
Add then assign |
X+ = 3 x = x+3 |
|
/= |
Divide the assign |
x/=3 x= X/3 |
|
-= |
Subtract then assign |
x- =3 x= x-3 |
|
%= |
Modulus then assign |
x%= 7 x = x% 7 |
|
//= |
Floor Division then assign |
x// =9 x= x//9 |
|
**= |
Exponent then assign |
x**=5 x= x**5 |
Membership Operators
The Membership Operators are used for testing the value whether they are placed in sequential order. The order can be of any sequence Python List, Python Tuple, Python Dictionary, Python String, and Python Set.
|
Operator |
Description |
Example |
|
in |
This returns true when it finds out a variable in the sequence |
x in y |
|
not in |
This returns true when it does not find the variable in the sequence |
x not in y |
Bitwise Operator
It is used for performing bit-by-bit operations.
|
Operator |
Operator Name |
Description |
Example |
|
| |
Binary or |
When one of the bits is 1 then 1; otherwise 0. |
1 |J 0001 1110 |
|
& |
Binary And |
When both bits are 1, then 1; otherwise 0 |
1 | J 0000 0000 |
|
^ |
Binary XOR |
When both the bits are the same, then 0, or else 1 |
I ^ J 0001 1110 |
|
<< |
Binary left Shift |
The left operand is moved to the left based on the number of bits that are mentioned on the right operand |
I << 3 340 i.e. 1111 0000 |
|
~ |
Binary Complement |
When the bits are 1 then it makes 0, and when the bit is 0 then it makes 1 |
~I 1111 0101 |
|
>> |
Binary Right Shift |
The Left Operand is moved on the right based on the number of bits specified on the right operand |
I >> 2 15 i.e. 1111 |
Identity Operators
The Identity Operators are not Symbols but they are Phrases. Every Python object is allowed with the required space on computer memory. The Address memory of the location is acquired by the built-in id() function. If it has above 1 variable then it refers to the same location. The below-mentioned identity operators explain if the id() values of both the objects are the same or different.
|
Operator |
Description |
Example |
|
is |
Returns True if both variables are the same object |
x is y |
|
is not |
Returns when both the variables are not similar object |
x is not y |
Python Training in Chennai at FITA Academy is the best platform to have a holistic understanding of the Python Coding and Programming concepts.
Python Loops
Every Computer Program follows a default continuous flow in the execution of the Statements. At times, the flow of the program can skip a few of theStatements while they are used namely else/ if statements. When the program flow is guided to any of the precedent statements then it constitutes a loop.
Below are the topics that are covered in the Python Loop module
- While Loop in Python
- Else While Loop in Python
- Infinite While Loop in Python
- Python While Loop Interruptions
While Loop in Python:
The While Loop Statements in Python are used for executing repeatedly few statements as long as the conditions mentioned in the While Loop statements remain true. The While Loops in the Program control in iterating the block over a code. In this Python Tutorial for beginners, let's see how the While Loop is used in Python.
Syntax
The Syntax for the While Loop in the Python Programming Language is
	While Expression
	  statement (s)
Over here, the statement (s) can be a single statement or block of statements. The conditions can be any expression, and true is the non-zero value. The Loops iterates when the conditions are true and when the conditions turn out to be false, the program controls the pass to the next immediate following loop. In the Python Programming language, every statement is intended by a similar number of character spaces after the programming construct and is considered to be a part of a specific block of code. Python mostly uses indentation as a method for grouping statements.

Python While Loop Interruptions: Python offers the two keywords that can be terminated earlier in the loop iteration.
Break:
This keyword can be used for terminating the loop and transferring the control at the end of the loop.
Example:
	a = 1
	while a <5:
	a += 1
	if a == 3:
	break
	print(a)

	Output:
	2
Continue: This keyword is used for terminating the ongoing transfers and iterations to control the top of a loop and the loop condition is valued again. When the condition is true, then the next iteration commences.
Example
	a = 1

	while a <5:
	a += 1
	if a == 3:
	continue
	print(a)
	Output:
	2
	4
	5
Decision Making
Decision Making is the contemplation of the conditions that occur during the execution of a program. It specifies the actions that must be taken following the conditions. Generally, the Decision Structures assess numerous expressions that produce the "TRUE" or "FALSE" outcome. And so you should determine the actions by choosing the statements which produce the outcome, as " TRUE" or " FALSE" contrarily.
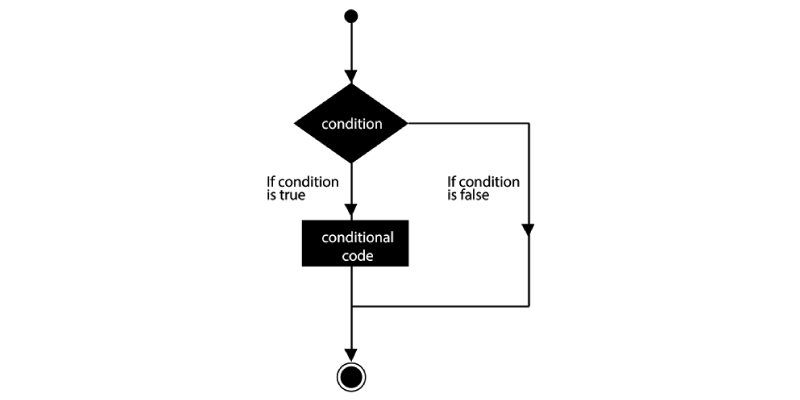
Usually, the following is the most common form of regular decision-making structure which is found predominantly in the majority of the programming languages.
The Python Programming Language ascertains any Non-null and Non-zero values as TRUE, and when it is either Null or Zero, then it is presumed as FALSE value. The Python Language renders the consecutive methods for decision-making statements.
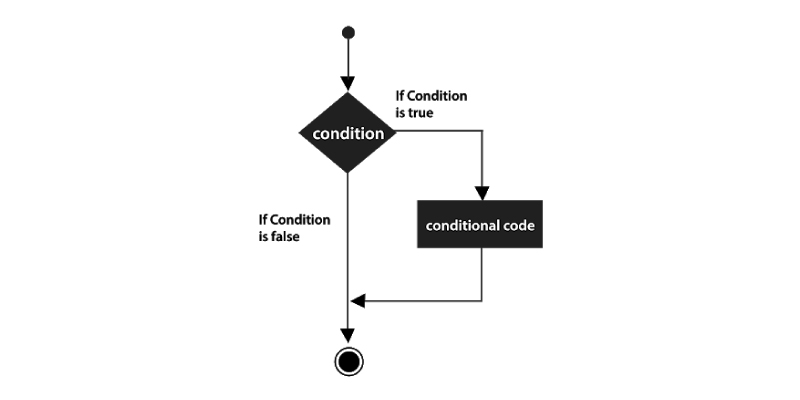
1) if statement: The if statement consists of the Boolean expression that is succeeded by one or more statements.
This is identical to other languages as well. When an if statement consists of Logical expression using which the data is compared and these decisions are made out based on the results obtained from the comparison.
Example
	var1 = 300
	if var1:
	   print "1 - True Value"
	   print var1

	var2 = 0
	if var2:
	   print "2 - True Value"
	   print var2
	print " Bye!"
Output
	1 - True Value
	300
	Bye!
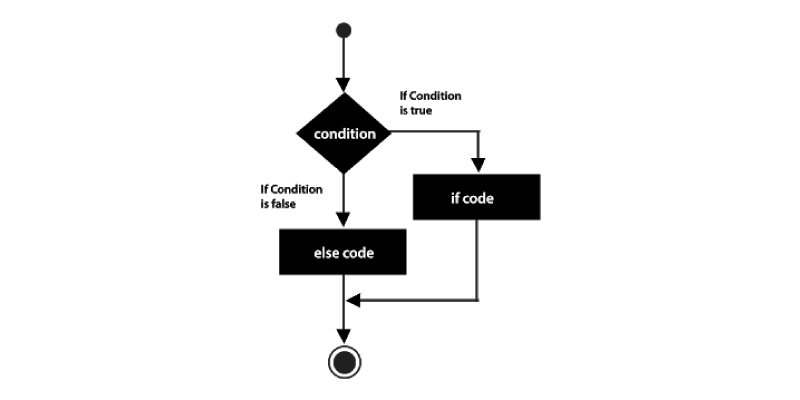
2) if...else statement: The if statement is succeeded by the optional else statement, that executes the boolean if the expression is "FALSE".
The else statement is joined with the if statement. The else statement comprises the block code that executes the conditional expression when the if statement resolves to FALSE or 0 value. Also, the else statement is the optional statement, and that there could probably be only 1 else statement following the if condition.
Syntax
The syntax used for the if...else statement is −
	if expression:
	   statement(s)
	else:
	   statement(s)
Example
	#!/usr/bin/python

	var1 = 500
	if var1:
	   print "1 - True Value"
	   print var1
	else:
	   print "1 - False Value"
	   print var1

	var2 = 0
	if var2:
	   print "2 - True Value"
	   print var2
	else:
	   print "2 - False Value"
	   print var2

	print "Adieu!"
Output
	1 - True Value
	500
	2 - False Value
	0
	Adieu!
The elif Statement
An elif statement permits you to verify various expressions for "TRUE" & executes the block of the code soon when one of the conditions assessed to be "TRUE".
Likewise, for the else, the elif statement is the optional one. Yet, unlike the else, for which there are possibilities that there can be only one statement, and also it can have an arbitrary number of the elif statements succeeding the if.
Syntax
if expression1:
   statement(s)
elif expression2:
   statement(s)
elif expression3:
   statement(s)
else:
   statement(s)
Python Notes: Core Python doesn't provide the option to switch or case statements as those are available in the other programming languages. However, you can make use of the if..elif statements to prompt the cases given below-
Example
	#!/usr/bin/python

	var = 100
	if var == 200:
	   print "1 - True Value "
	   print var
	elif var == 150:
	   print "2 - True value"
	   print var
	elif var == 100:
	   print "3 - True value"
	   print var
	else:
	   print "4 - False value"
	   print var

	print " Bye!"

		Output
	3 - True value
	100
	Bye!
3) Nested if:
You are allowed to use only one else if or if statement inside the other else if or if statement(s).
Chances are there you may be pushed to position to check the other condition when the condition solves to true. During that time, you can make use of the nested if construct.
In the nested, if construct, you may have if...elif...else construct inside the other if...elif...else construct.
Syntax
The Syntax used for the nested if...elif...else construct is,
	if expression1:
	statement(s)
	if expression2:
	  statement(s)
	elif expression3:
	  statement(s)
	elif expression4:
	  statement(s)
	else:
	  statement(s)
	else:
	statement(s)
Example
	#!/usr/bin/python

	var = 100
	if var < 200:
	   print "Expression value less than 200"
	   if var == 150:
		  print "150"
	   elif var == 100:
		  print " 100"
	   elif var == 50:
		  print " 50"
	   elif var < 50:
		  print "Expression value less than 50"
	else:
	   print " True Expression"

	print "Adieu!"

		Output:
	Expression value less than 200
	Which is 100
	Adieu!
Single Statement Suites
When the suite of the if clause has only one line, chances there it can move to the same line in the header statement.
Example of the one-line-if clause-
	#!/usr/bin/python

	var =678
	if ( var ==678 ) : print "Value 678"
	print " Adieu!"

		Output:
	Value 678
	Adieu!
Python Online Course at FITA Academy trains the students with exhaustive hands-on training practices of the Python Codes and Scripts under the mentorship of Python Programming Experts.
Python Numbers
The Numbers and Data types in Python are used for storing the Numeric values. Generally, the Numbers in Python are of immutable data types. For example, When you change the value of a number that is already allocated, then it results in a newly designated object.
Below are the topics that are covered in this module
- Sections of Number Data Type
- Integers used in Python
- Long Integers that are used in Python
- Hexadecimal and Octal used in Python
- Complex Numbers used in Python
- Floating-point in Python
- Number Type Conversion
Sections of Number Data Type
The number of Data types are categorized based on the kind of numeric value that is stored in it. When a variable in Python consists of a numeric value, then the data kind of that variable comes under one of the categories of the number data type for the value designated to that variable.
In Python, the Number Data Type is divided into the following types:
- Integer
- Long Integer
- Hexadecimal and Octal
- Complex Numbers
- Floating-point Numbers
Integer
The Integers in Python are the whole numbers, whose range depends on the hardware in which the Python is running. The different kinds of integers are,
- Positive
- Negative
- Zero
- Long
Example
	D = 456 # Positive Integer
	R = -78 # Negative Integer
	K = 0 # Zero Integer
Long Integers
The alphabet "L" is used as a suffix for representing the long integer in Python. The Long Integers are used for storing large numbers without missing the precision.
Example
E = 444444444L
Hexadecimal and Octal
In the Python Programming language, you have another number of data types named Hexadecimal and Octal.
For representing the Hexadecimal Numbers i.e (base 17) in Python, you can add the preceding 0x. So that the decoder can understand that you want the value to be present in base 17 instead of base 10.
Example:
	I = 0x11
	print (P)
		Output:
	18
For representing the Octal Number that has base 8 in Python, you can add the preceding 0 (zero) so that the decoder can understand that you want the value to be in the base 8 instead of base 10.
Example:
	I = 11
	#Then in Octal you should write –
	I = 011
	print (U)
		Output:
	9
Complex Numbers
The Complex Numbers are in the form of, 'a+bj', where a is the real part of floating value & b is considered to be the imaginary part floating value and j represents the square root of -1.
Example:
3.5 + 2j
Floating-point Numbers
The Floating-point numbers symbolize the real number that is written within the decimal point and divides the fractional and integer parts.
The Floating-point Numbers can also come with a scientific notation like E or e which indicates the power of 10.
Example:
	5.6e2 that means 5.6 * 102.
	I = 2.5
	J = 7.5e4
Number Type Conversion
Some built-in Python functions let you convert the same number distinctly from one type to another one. It can also be termed as coercion. The conversion from one type of number to the other one becomes essential when you perform specific operations that need parameters of a similar type. For instance, programmers may be required to perform Mathematical Operations such as Addition & Subtraction between the values of various number types like float and integer.
Follow the below built-in functions for converting one number to another:
- Use long(x), to convert the x to a long integer value
- Use int (x), to convert the x into an integer value
- Use Float (x) to convert the x into a floating-point number
- Use complex (x) to convert the x into a complex number and where the imaginary part remains 0 and x turns to be the real part.
- Use complex (x,y) to convert the x and y to a complex number where the x turns out to be the real part and the "y" the imaginary part.
Example
	a = 3.5
	b = 2
	c = -3.5
	a = int(a)
	print (t)
	b = float(b)
	print (t)
	c = int(c)
	print (t)
		Output:
	3
	2.0
	-3
While converting the float data types into integer data types, usually the values are converted into an integer value that is closest to zero.
Python Strings
The Strings are the popular types in the Python Programming language. You can create them easily by enclosing the characters in quotes. Generally, Python treats the single quote the same as the double-quotes. Creating Strings is simple just assigning the values to the variables.
For instance,
	var 1= " Hello JERRY"
	var 2= "Python Programming"
Accessing Values to the Strings
Usually, Python doesn't support one character type; they are usually considered as strings of the length one, and also it is considered as a substring. For accessing the Substrings, you should use the Square brackets to slice with the indices or index to obtain the Substring.
For example −
	var1 = 'Hello Jerry!'
	var2 = "Python Programming"

	print "var1[0]: ", var1[0]
	print "var2[1:5]: ", var2[1:5]
		Output
	var1[0]:  H
	var2[1:5]:  ytho
Updating the Strings
You can " update" the existing string using the (re) assigning a variable to the other string. The new values are related to the previous value or to entirely different strings altogether.
For Example,
	#!/usr/bin/python

	var1 = 'Hello Jerry!'
	print "Updated String :- ", var1[:6] + 'Python'
		Output
	Updated String:-  Hello Python
Escape Characters
Mentioned below is the list of non-printable or escapable characters that can be performed with backlash notation. The Escape characters are presented; in a single-quoted & the double-quoted string as well.
|
Backlash Notation |
Hexadecimal Character |
Description |
|
\a |
0*07 |
Bell or Alert |
|
\b |
0*08 |
Backspace |
|
\cx |
Control - x |
|
|
\C-x |
Control -x |
|
|
\e |
0*1b |
Escape |
|
\f |
0*0c |
Form Feed |
|
\M-\C-x |
Meta- control x |
|
|
\n |
0*0a |
Newline |
|
\nnn |
Octal Notation, where is within the range of 0.7 |
|
|
\s |
0*20 |
Space |
|
\r |
0*0d |
Carriage return |
|
\t |
0*09 |
Tab |
|
\v |
0*0b |
Vertical Tab |
|
\x |
Character x |
|
|
\xnn |
Hexadecimal notation, where n is within the range of a.f,0.9, or A.F |
String Special Operators
Presume that the string variable a holds ' Hello' and the variable b holds ' Python'
|
Operator |
Description |
|
+ |
This is also known as the Concatenation Operator that is used for joining the Strings that are given on either side of an operator. |
|
[ ] |
This is a Slice Operator. It can be used for accessing the Sub-Strings of the specific string |
|
= |
This is also known as the repetition operator. It concatenates on different copies of the same string |
|
[ : ] |
It is the Range Splice Operator. This is used for accessing the characters that are in the specified range |
|
not in |
This is a Membership Operator and it performs the exact reverse in it. It returns to true if the particular substring is not presented in a specified string |
|
in |
This is also a Membership Operator. It returns to a particular substring which is present in a specified string |
|
% |
This is used in performing the String formatting. It utilizes the format that the Specifiers used in C Programming such as %f & %d to map the values in Python. |
|
r/R |
This is used for Specifying the Raw String. The Raw Strings are used in cases where we should print the exact meaning of escape characters like "c://python". For defining any string as a raw string the character R or r is followed by a string. |
String Formatting Operators
In this Core Python tutorial we are going to see one of Python's finest features and that is the string format operator %. This operator is unique to strings and makes up for the pack having functions from C's printf() clan.
Example
	#!/usr/bin/python

	print "My name is and favorite fruit is %d!" % (' Tom', Berry)
		Output
	My name is Tom and fruit is Berry
Below is the list of the set of symbols that can be used with % -
|
Format Symbol |
Conversion |
|
%c |
Character |
|
%i |
Signed Decimal integer |
|
%s |
String Conversion through str() before formatting |
|
%o |
Octal Integer |
|
%d |
Signed Decimal Integer |
|
%u |
Unsigned Decimal Integer |
|
%e |
exponential notation (with lowercase 'e') |
|
%x |
hexadecimal integer (lowercase letters) |
|
%X |
hexadecimal integer (UPPERcase letters) |
|
%f |
floating point real number |
|
%E |
exponential notation (with UPPERcase 'E') |
|
%g |
the shorter of %f & %e |
|
%G |
%G the shorter of %f and %E |
Other Supporting Functionalities & Symbols are listed below:
|
Symbol |
Functionalities |
|
- |
Left Justification |
|
<sp> |
Provide a Blank Space before a Positive Number |
|
* |
Argument Specifies Precision or Width |
|
+ |
Display the Sign |
|
0 |
Pad from the left zeros (rather than spacing) |
|
% |
%% permits you with 1 literal % |
|
# |
Add hexadecimal leading ‘0x’ or the octal leading zero (0) based on whether the ‘x’ or ‘X’ are used |
|
m.n |
M is the minimum width & n is the total number of digits displayed after the decimal point. |
|
(var) |
Mapping variable |
Other Supporting Functionalities & Symbols are listed below:
Triple Quotes
The Python's triple quote is for the rescue to allow strings to spur numerous lines, that includes TABs, other special characters, and verbatim NEWLines.
The Syntax that is used in triple quotes contains 3 consecutive single or double-quotes.
Syntax
#!/usr/bin/python
para_str = '''" is a long string that is made upon numerous lines & non-printable characters like TAB (\t) and it will be shown up while displayed. NEWLINEs within a string if distinctly presented like this within a bracket [\n], or just a NEWLINE within a variable assignment shows up.
"""
print para_str
If the above code is executed, it gives the following result.
Python Notes: Look how all the single special characters have been converted to a printed form, down to the last NEWLINE by the end of a string between the 'up". and the closing triple quoted. Besides, note that the NEWLINES recurs either with a distinct carriage return by the end of the escape code (\n)- or a line.
Output:
is a long string that is made upon numerous lines & non-printable characters like TAB () and it will be shown up while displayed. NEWLINEs within a string if distinctly presented like this within a bracket [], or just a NEWLINE within a variable assignment shows up.
Raw String doesn't treat the backslash as a special character at all. All the characters you place in a raw string remains the same way as you wrote.
Example:
	#!/usr/bin/python

	print 'C:\\Go Green'
		Output:
	C:\ Go Green
Further, if you use the raw string we can place expression in r'expression' as follows-
	#!/usr/bin/python

	print r'C:\\ Go Green'
		Output −
	C:\\ Go Green
Unicode String
The Normal String in Python is used for storing internally the 8 -bit ASCI, where the Unicode Strings are Stored in 16-bit Unicode. It permits for a different set of characteristics, which also include Special Characters from many languages across the globe.
	#!/usr/bin/python

	print u' Hello, Earth!'

		Output −
	Hello, Earth!
Note: As you see when the Unicode strings use the prefix u, similar to raw strings use the prefix r.
Python String Functions
Python enables its users with numerous in-built functions that are basically used for string handling.
|
Method |
Description |
|
casefold () |
This returns the version of s that is appropriate for the case-less comparisons. |
|
Center (fill chair, width) |
This returns the space [added string with the original string focused with equal right and left spaces. |
|
capitalize() |
This capitalizes the first character of the string. |
|
count(string, end, between) |
This counts the number of recurrence of the Substring between the beginning and end index. |
|
Encode () |
Encode s use the codec for registering the encoding. The default encoding is UTF 8. |
|
decode(encoding= ‘UTF8’, errors =’strict’) |
It decodes the string using the codec for encoding. |
|
Expandtabs (tabsize =9) |
It specifies the tab in Strings for multiple spaces. The default space value is 9. |
|
endswith (suffix, begin=0, end=len(string)) |
This returns the Boolean value if a string terminates the provided suffix between the beginning and end. |
|
format(value) |
This rebuts the formatted version of S, using a passed value. |
|
find(begin index, substring, end index) |
It rebounds the value of the string, where the substring is identified between the beginning and end index |
|
index(substring, begin index, and end index) |
This throws an exception when the string is not found. This functions the same as the find() method. |
|
isalpha () |
This rebuts to true if all the alphabets are characters and that if there is 1 character, or else it is false. |
|
isalnum () |
It rebounds to true when the characters that are in the string are alphanumeric which means numbers or alphabets and if it has 1 character. Or else it turns out to be false. |
|
isdecimal () |
This returns to true when all the characters of the string are in lowercase or else it is also false. |
|
isdigit () |
This returns true when all the characters are digits and if there is at least 1character or else it is false. |
|
isdecimal () |
This returns true if every character in the string is decimals. |
|
isidentifier () |
This is bound to true when the string is a valid identifier. |
|
isnumeric() |
This returns true when the string consists of only numeric characters. |
|
islower () |
It turns to be true when the characters of the string are present in the lowercase. |
|
isupper() |
It turns to be false when the characters of the string are in the upper case, or else it is false |
|
isprintable () |
This returns to true when every character of the s is empty or printable, or else otherwise. |
|
istitle() |
This returns to true only if the strings are titled properly or false otherwise. The Title string is one that the first characters are upper-case while the other characters are lower-cases. |
|
isspace () |
This returns to true when the characters of the string are white-spaced, or else it is false. |
|
lenstring() |
It rebounds to the length of the string. |
|
join(seq) |
This merges with the strings representation within the given space. |
|
lower() |
This converts all the characters of the string to the lower case. |
|
|just(width,[ Fill char]) |
It rebounds the space padded strings to its original string and left justified for the given width |
|
istrip () |
This removes all the leading whitespace of the string that shall also be used in removing the specific characters from the leading. |
|
marketrans () |
This rebounds the translation table for using them in the translation function. |
|
partition () |
This searches for the separator sep in the S, and rebounds the part prior, the separator itself, and the part that is next to it. When the Separator is not found, it returns S and two empty strings. |
|
rsplit(sep=None,maxsplit =-1) |
It is similar to split() however it processes the string from a backward direction. Then it rebounds the list of words in a string. If the Separator is not mentioned then the string splits based on the white space. |
|
split(str,num=string.count(str)) |
The Split String differs from the delimiter str. The String also splits based on the space when the delimiter is not given. This returns the list of the substring that is concatenated with a delimiter. |
|
swapcases() |
This inverts the case of each character in the string. |
|
upper() |
This converts each character of the string to the Upper case. |
|
title() |
This is used for converting the string to the title-case which means the string meErut is converted to Meerut. |
|
replace(old,new[,count]) |
This replaces the old sequence of the characters with a new sequence. The max characters are replaced if max is provided. |
|
rindex9str,beg= , end =len(str)) |
This the same index but with traverses of the string in the backward direction |
|
rjust(width,[,fillchar]) |
Rebounds the space padded string and has an original string that is justified to the number of the characters specified. |
|
translate(table,deletechars =") |
This translates the string based on the translation table passed on the function. |
|
zfill(width) |
It returns to the original string left padded with zeros for a total of width characters; focused for numbers, zfill() and retains the sign given (less one or zero) |
Python Lists
Python's lists are placed in a more flexible order of the collection object type. This is also referred to as the sequence that is of an ordered collection object that can anchor objects of any data kind like Python String, Python Numbers, and Nested lists as well. Lists are the most commonly used and are the versatile Python Data Types.
Below is the list of topics that is going to be covered in the Python Programming tutorial for list,
- Creation of Lists in Python
- Python List Comprehension
- Creation of Multidimensional Lists in Python
- Python Lists Extension
- Accessing the List
- Common List Operations
- Python List Methods and Functions
Creation of Lists in Python
The list shall be created by placing the value inside a square bracket & the values are separated by the commas.
List_name =[value1, value2,...., value n]
On the contrary to strings, the lists consist of some sort of objects: strings, numbers, and other lists. The Python lists are as follows:
- Accessed by offset
- Ordered collections of the arbitrary objects
- An array of the Object References
- Of variable length, arbitrarily nestable, and heterogeneous
- Confined between the Square brackets'[]'
- Mutable Sequence, Of the Category
- Data Types on which the elements are stored on the index basis with beginning index as 0
Example:
	list1 = [1,2,3,4,5]
	list2 = [“hello”, “FITA”]
Python Training in Bangalore at FITA Academy provides in-depth training of the Python language under the mentorship of a real-time Python developer.
Python Lists Comprehension
It aids in constructing the lists entirely in a simple and natural method.
Example
	List = [ 5,4,3,2,1]
	List 1 = [i for i in range (5)]
	print(List1)
		Output:
	[0,5,4,3,2]
Some of the Complex Python List Comprehensions Example is given below:
Example 1:
	print ([a+b for a in 'jug' for b in 'mud'])
		Output:
	('jm', 'ju', 'jd', 'um', 'uu', 'ud', 'gm', 'gu','gd',)
Example 2:
	list_vegetable = [ " Carrot", "Potato", "Yam", "Tomato"]
	first-letters = [ vegetables[0] for vegetables in list-vegetable]
	print(first_letters)

		Output:
	["T", "P", "Y", "C"]
Creation of Multidimensional Lists in Python
The list can hold the other lists which result in multi-dimensional lists. Further, you will also learn how to create multi-dimensional lists, one after another.
One dimension lists
	init_list = [0]*5
	print(init_list)
		Output:
	[0, 0, 0, 0, 0]
Two-dimensional lists
	two_dim_list = [ [0]*4 ] *4
	print(two_dim_list)
		Output:
	[[0, 0, 0], [0, 0, 0,],[0, 0, 0,] [0 0,0,]]
Three-dimensional lists
	two_dim_list = [[ [1]*2 ] *2]*2
	print(two_dim_list)
		Output:
	[[[1, 1, 1], [1, 1, 1], [1, 1, 1]],
	[[1, 1, 1], [1, 1, 1], [1, 1, 1]]
Python Lists Extension
The Python permits the lists to resize in numerous ways. With this, you can just do it by adding two or more of them.
Example:
	two_dim = [[0]*2 for i in range(2)] print(two_dim)
	[[0, 0, 0], [0, 0, 0]]
	two_dim[0][2] = 1
	print(two_dim)
		Output:
	[[0, 0, 1], [0, 0, 0]]
extend():
You can also extend it by using the extend() method.
For example:
	S1 = [ '1', '2']
	S2 = ['3','4']

	S1.extend(S2)
	print(L1)
		Output:
	[‘1, ‘2’, ‘3’, ‘4’]
append():
You can append the value to the list by using the append() method.
Example:
	P1 = [‘5, ‘6’]
	P2 = [‘7’, ‘8’]
	P1.extend(P2)
	print(P1)
		Output:
	[‘5, ‘6’, ‘7’, ‘8’]
Accessing Lists
This is more similar to the string, you can use the index numbers for accessing the items in the lists as illustrated below.
Example:
list1 = [ a,b,c,d,e]
Accessing the Lists using the Reverse Indexing
For accessing the lists in the reverse order, you should have to use the indexing right from -1, -2... But here, -1 means the last item in a list.
	print(list1[-1])
	print(list[-3])
Accessing a List Using Reverse Indexing
To access the list in reversal, order, we have to use indexing from −1, −2…. Over Here, −1 represents the last item in the list.
	print(list1[-1])
	print(list1[-3])
		Output:
	e
	C
Common List Operations
Following is the list of common list operations in Python with its description and examples.
- Slicing Python Lists
- Add or Update Elements in Python List
- Iteration via Python lists
- Remove the elements from the lists in Python
- Sorting the lists in Python
- Remove the duplicate from lists in Python
- Reverse the lists in Python
Slicing Python Lists:
The Slicing Operation is utilized for printing a list that is up to a specified range. Also, you can make use of the slice operation by including the start index and the end index of the range that you need to print separated by the colon as illustrated below:
Example:
	list[3:5]
	output:
	[3,4]
	list1[2:1]
		Output:
	[3, 4]
	list1[:2]
		Output:
	[1, 2]
Add or Update Elements in Python List
You can add the element by using the appends() method and you can update or add a specific item for different items of a list using the slice operations as illustrated below.
Example:
	list1[4] = 'number print(list1)list[4:7] = [ "Black", "Brown", "Blue"]
	print(list1)list1.insert(0,33)
	print(list1)list1.insert(6,29)
	print(list1)
		Output:
	[1, 2, 3, 4, ‘number’]
	[1, 2, 3, 4, " Black, "Brown", "Blue"]
	[33, 1, 2, 3, 4, " Black, "Brown", "Blue"]
	[33, 1, 2, 3, 4, " Black", 29, " Brown", "Blue"]
Iteration via Python lists: Performing Iteration is simple in the lists. You can use Python for loop to iterate, as given below
	list1 = [5,4,3,2,1]
	for element in list1:
	print(element)
		Output:
	5
	4
	3
	2
	1
Remove the elements from the lists in Python:
The three methods of removing the elements from the lists are using the remove () method, by using the del keyword for removing a specific element, and finally by using the pop () method, as illustrated below:
	list1 = [5,4,3,2,1]
	list1. remove(4)
	print(list2)

	list2 = [5,4,3,2,1]
	del list1[2]

	list3 =[5,4,3,2,1]
	print(list 3.pop(1))
	print(list3)
		Output:
	[5,4,2,1] [5,4,3,1]
	2
	[5,3,2,1]
Sorting the lists in Python:
The Python list refers to the sort () method for placing (in both the descending and ascending order) its elements in the place.
Sorting in the descending order
	list1 = [5,4,3,2,1]
	for element in list1:
	print(element)
		Output:
	5
	4
	3
	2
	1
Remove the duplicate from lists in Python
The illustration given below helps you to know how to remove the duplicate lists from Python.
	mylist = [ "d", "e", "h" "d", "c"]
	mylist = list(dict.fromkeys(mylist))
		Output:
	[" d", "e", "h", "c"]
Reverse the list in Python
	lst = [ 1,2,3,4,5]
	list.reverse ()
	print(lst)
		Output:
	[ 5,4,3,2,1]
Python List Methods and Functions
Firstly, in this Python Tutorial for beginners let us have a clear understanding of the different types of Python Functions for the lists with the following table which consists of a set of different functions with the description.
|
Method |
Description |
|
max(lit_name) |
Rebounds the largest value from the list in Python |
|
min(lit_name) |
Rebounds the minimum value from the list in Python |
|
cmp(list1,list2) |
It compares the two lists in Python |
|
list. sort |
Sorts the lists in Python |
|
len(list_name) |
Rebound the Number of lists that are in the Python |
|
list.reverse() |
Reverse the lists in Python |
|
list(sequence) |
It basically converts the sequence of the lists in Python |
|
list.remove(value) |
It helps in removing the value from the Python list |
|
list.append(value) |
It aids in adding a value to the list i Python |
Python Tuple
A tuple is a compilation of objects that are immutable and ordered. The Tuples are the sequences that are similar to the lists. The major difference between the Tuples and Lists is that the Tuples can't be changed like the lists and moreover the Tuples predominantly use the parentheses, where the Lists make use of square brackets.
Furthermore, creating a Tuple is a simpler function like inserting various comma-separated values. It is discretional that you can insert these comma-separated values amid parentheses too.
For example:
	tup1 =('history', 'geography', 1998, 2000);
	tup2 =(5,4,3,2,1)
	tup3 = "a", "b", "c", "d";
An empty tuple is written as 2 parentheses that contains nothing -
tup1 =();
For writing a tuple consisting of a single value you should include the comma, though if there is only 1 value -
tup1 =(80,);
Just like the String indices, the tuple indices also begins with 0, and it can be sliced, or concatenated.
Access Values in Tuples
For accessing the Values in Tuple, you should use the Square brackets to slice along the index or the indices to gain values that are available at the index.
For example -
	#!/usr/bin/python
	tup1 =('history', 'geography', 1998, 2000);
	tup2 =(5,4,3,2,1)
	print "tup1[0]: "tup1[0];
	print "tup2[5:1]: ", tup2[5:1];
		Output:
	tup1[0]: history
	tup2[5:1]: [4,3,2,1]
The Tuples are immutable that means you cannot modify or update the values of any tuple elements. You can take the portions of the actual tuple for creating new tuples. The below illustration will explain to you clearly how to do it:
Example
	#!/usr/bin/python

	tup1 = (14,24.56);
	tup2 = ('def', 'stu')

	# Coming action is not applicable for tuples
	# tup1[0]= 100;

	# Creating a New Tuple
	tupe3 = tup1 +tup2;
	print tup3;
		Output:
	(14.24.56, 'def', 'stu')
Deleting Tuple Elements
As the Tuples in Python are immutable data types, Discarding a single Tuple element is impossible. However, the complete tuple shall be discarded using the del keyword.The Python course in Erode at FITA Academy offers an in-depth training program that spans from basic to advanced Python concepts, all facilitated by seasoned professionals in the field.
Example:
	tup1 = (' FITA', 'Python', 'Tutorial')

	print (tup1)
	del tup1
	print (tup1)
		Output:
	('FITA', Python', 'Tutorial')
	Traceback (most recent call last):
	File “, line 1, in
	NameError: name ‘tup1’ is not defined
Basic Tuples Operations
The Tuples reciprocate to the * and + operators more like the strings. It means repetition and concatenation here. And the result is the new tuple and not the string.
Also, the tuples acknowledge every common sequence operations that are used on the string earlier -
|
Python Expression |
Description |
Results |
|
(1+2+3) + (4+5+6) |
Concatenation |
(1,2,3,4,5,6) |
|
3, in (1,2,3) |
Membership |
True |
|
len(1,2,3) |
Length |
3 |
|
For y in (1,2,3) print y |
Iteration |
1 2 3 |
|
(‘Hey’,) *3 |
Repetition |
( ‘Hey’!, ‘Hey’!, ‘Hey’) |
Slicing, Matrixes, and Indexing
As the Tuples are the sequences slicing and indexing the same way the tuple does for the strings. Presume the following inputs -
R = ( 'Spam', 'spam', 'SPAM!')
|
Python Expression |
Description |
Results |
|
R[2] |
Neutralization starts at Zero |
‘SPAM’ |
|
R[-2] |
Negative: compute from the right |
‘Spam’ |
|
R[1:] |
Slicing Fetches Section |
[‘Spam’, “SPAM’] |
No Enclosure of Delimiters
Any set of various objects, written without identification symbols, comma-separated, that is the parentheses for tuples, brackets for the lists, and much more.
Example
	#!/usr/bin/python
	print ' cde', -3.34e93, 17+5.5j, 'tuz';
	x,y = 1,2;
	print" the value of the x , y : ', x,y;
		Output
	cde', -3.34e93, (17+5.5j), 'tuz
	Value of x , y : 1:2
Dictionaries
The Python Dictionary is also a compilation of elements that are not properly sequenced. Like the lists, the Python dictionaries can not be modified but the Python lists the values that are in the dictionaries which are accessed using the keys and not by the positions. Each key in the dictionary is mapped to the respective values. The value shall be of any data kinds in Python. Mentioned below are the topics that are explained in-depth in this module,
- Creation of Dictionary in Python
- Operations in Dictionary
- Access of Items in Dictionary
- Common Python Dictionary Methods
Creation of Dictionary in Python
When creating a dictionary in Python, there are few rules that you should be aware of and they are,
The keys are usually separated from their respective values using a colon (:) and in between, them all the key-value pairs should be separated using the commas (,)
The values in the dictionaries shall be redundant, but the keys are always distinct
Each item is enclosed using the curly braces
The value shall be of any data type, yet the keys must be of an immutable type that is Python Number, Python String, and Python Tuples)
Examples
	dict1 = {" Brand". "nike"," Industry"." sports"," year". 1964}
	print(dict1)
		Output:
	{'Brand'. ''nike', 'Industry'. 'sports', 'year': 1964}
You can also declare the empty dictionary as given below
dict2 ={}
And you can create the dictionary using the in-built method dict () as illustrated below
dict3 = dict([(1, ‘FITA’), (2,’Python’)])
Operations in Dictionary
There are numerous operations in the dictionary and here you will understand some of the basic and frequently used operations like
- Loop via a Dictionary
- Add Items to the Dictionary
- Discard items from the Dictionary
- Delete the complete Dictionary
- Python Dictionary Length
- Verify all the keys in the Dictionary
Loop via a Dictionary
For iterating via a dictionary you can utilize Python" for loop". For instance, let us assume that you are in the need to print all the elements in the dictionary, then you must use the "for loop" as illustrated below:
Example:
	squares = {1:1, 2:4, 3:6, 4:8, 5:10}
	for u in squares
	print(squares[u])
		Output:
	1
	4
	6
	8
	10
Add Items to the Dictionary
The Python Dictionary is the mutable data type that indicates you can change the value or add new elements to it. Throughout the time of existing and adding values, you have to use keys. When the key is present already, the value will be updated. If the key doesn't exist, then the new key-value pair will be generated.
Example
	dict1 = {"Brand"."nike","Industry"."sports","year".1964}
	print(dict1)
	# create a new key-value pair
	dict1['product'] = " Athletic Shoes"
	print(dict1)
	#update the prior value
	dict1['industry'] = "Sports and comfort"
	print(dict2)
		Output:
	{'Brand'. 'nike', ' Industry'. 'sport', 'year': 1964}
	{'Brand'. 'nike', 'Industry': 'sports', 'year': 1964, 'product: Athletic Shoes"}
	{'Brand'.'nike','Industry': 'Sports & Comfort', 'year': 1964, 'product': Athletic Shoes}
Discard items from the Dictionary
There are numerous methods through which you can discard the elements from the dictionary like using the pop() method, using the del keyword, or the popitem() method. Now, we can see in-depth on how to use these methods.
Using the pop() method
You can use the pop () method to discard a specific element from the dictionary and by providing the key element as the parameter to the method given below:
	squares = {1:1, 2:4, 3:6, 4:8, 5:10}
	print(squares.pop(4))
	print(squares)
		Output:
	8
	{1:1, 2:4, 3:6, 5:10}
You can also use the del keyword for deleting the items as illustrated below:
	squares ={ 1:1, 2:4, 3:6, 4:8, 5:10}
	del squares[5]
	print (squares)
		Output:
	{ 1:1, 2:4, 3:6, 4:8}
Removing the elements using the pop item () method
	You can use the pop item() method for removing the unaimed elements as given below:
	squares = { 1:1, 2:4, 3:6, 4:8, 5:10}
	print(squares.popitem())
	print(squares)
		Output:
	(5, 10)
	 {1:1, 2:4, 3:6, 4:8}
Python Dictionary Length
For checking the length of the dictionary, you must check how many key-value pairs are present in the dictionary. You should use the len() method as given below:
	dict1 ={ Brand'. 'Nike', ' Industry'. 'sport', 'year': 1964}
	print(len(dict1))
		Output:
	3
Verify all the keys in the Dictionary
For identifying the particular key or to verify the specific key that exists in the dictionary you can use the 'in' keywords and the Python if statement as mentioned below:
	dict1 ={ Brand'. 'Nike', ' Industry'. 'sport', 'year': 1964}
	if "Sport" in dict1:
	print('Yes, ' Sport is one among the keyword in the dictionary named dict1")
		Output:
	Yes, ' Sport is one among the keyword in the dictionary named dict1
Discard all the Elements using the Clear() method:
You can use the clear() method and it would delete or clear all the elements from the dictionary at once.
Example:
	squares = { 1:1, 2:4, 3:6, 4:8, 5:10}
	squares.clear()
	print(squares)
		Output:
	{}
As mentioned earlier, the curly braces without anything inside represent the empty dictionary. As the clear() method clears all the elements at once. And the output of the printing of the dictionary upon using the clear() method over it is the empty dictionary. i.e {}
Delete the complete Dictionary
As you have already seen, you can use the keyword for deleting the particular item by passing the key of the specific item, but it is not all that you can do using the del keyword. You can use the delete to delete whole dictionary at one shot by using the del keyword as illustrated below:
	squares = {1:1, 2:4, 3:6, 4:8, 5:10}
	squares.del()
	print(squares)
		Output:
	Traceback (most recent call last):
	File “”, line 1, in
	NameError: name 'squares' is not defined
Access of Items in Dictionary
For accessing elements in the dictionary, you have to make use of the keys rather than the indexes. There are two different methods of using the keys for accessing elements as given below:
1) By using the key inside the square brackets like you used the index inside the square brackets.
Example:
	dict1 = { Brand'. 'Nike', ' Industry'. 'sport', 'year': 1964}
	print(dict1['year'])
		Output:
	1964
2) By using the get() and passing the key as the parameter inside this method.
	ict1 = { Brand'. 'Nike', ' Industry'. 'sport', 'year': 1964}
	print (dict1.get(‘year’))
		Output:
	1964
Common Python Dictionary Methods
|
Method |
Description |
|
copy() |
This method returns the copy of a dictionary |
|
fromkeys () |
This method returns the dictionary with a specified values and keys |
|
clear() |
This method removes all the elements in the dictionary |
|
items() |
This return the list that contains the tuple for every key-value pair |
|
get() |
This method returns the value of the speicifed key |
|
pop() |
This method removes the element within a specified key |
|
keys() |
This method returns the list that consists of the dictionary’s key |
|
Set default() |
This method rebounds the value of the Specified key |
|
update() |
This methods updates the dictionary within the specified key-value pairs |
|
popitem() |
This method removes the lastly inserted, specified key-value pairs |
|
values() |
This method returns the list of all the values in the dictionary |
Python Training in Hyderabad at FITA provides the students with in-depth training in Python coding and programming practices under the guidance of real-time Python developers.
Data and Time
Python provides the Data & Time module to work with the real dates in real-time. Python allows us to schedule the Python script to run at any specific timing. Here in this Python tutorial section, you will understand how to work with the date and time objects in Python.
The Datetime classes are diversified into 6 main classes and they are:
date - This is the simple ideal date. This consists of the month, year, and days as its attributes.
time - The timings are also set easily in Python and normally (24*60*60). It contains minute, hour, microseconds, seconds, and the tzinfo as attributes.
timezone - This is inclusive of the new version of Python. This is the class that deploys a tzinfo abstract base class.
time delta- It displays the differences between the two dates time or the date-time instances to perform the microsecond resolution.
tzinfo - It gives the time zone information objects.
Tick
The time instants in Python are counted from 12 AM, 1 st January 1970. And the function time() of the module time returns the total number of ticks that are spent since 1st January 1970, 12 AM. The tick is the smallest unit that is used for measuring time.
Example:
	import time;
	#print the number of the ticks spent since st January 1970, 12 AM.
	print(time.time())
		Output:
	1585928913.6519969
Getting the current time
The localtime() function of a time module is used for getting the current time tuple. Follow the below illustration:
Example
	import time;

	# returns the time tuple

	print(time.localtime(time.time())
		Output:
	time.struct_(tm_year=2019, tm-tue=4, tm-tday=3, tm-hour=21, tm-min=21, tm-min=21, tm-sec=40, tm-wday=4,tm_yday=94,tm-insdst=0)
Time Tuple
The time is considered as the tuple of 9 numbers. Now, let us go through the members of a time tuple.
|
Index |
Values |
Attributes |
|
0 |
4 digit (for example 2017) |
Year |
|
1 |
1 to 12 |
Month |
|
2 |
0 to 31 |
Day |
|
3 |
0 to 23 |
Hour |
|
4 |
0 to 59 |
Minute |
|
5 |
0 to 60 |
Second |
|
6 |
0 to 7 |
Days of Week |
|
7 |
01 to 366 |
Day of year |
|
8 |
1, 0, -1 |
Daylight Savings |
Get the formatted time
The time shall be formatted using the asctime() function of the time module. It can return back the formatted time for the time tuple that is being passed.
Example
	import time
	 #returns the formatted time

	print(time.asctime(time.localtime(time.time())))

		Output:
	Tue Oct 18 14:37:39 2018
Python Sleep Time:
The Sleep() method is used in stopping the execution of the script for the provided amount of time. The Output can be delayed for the number of seconds that are provided as the float.
Example
	import time
	for r in range(0,5):
	print(r)
	#Each element will be printed after 1 second
	 time.sleep(1)
 		Output:
	0
	1
	2
	3
Creation of Date Objects
You can create the Date objects by fleeting the desired date on the DateTime constructor for which the date objects are created.
Example
	import datetime
	#returns the datetime object for the particular date
	print(datetime.datetime(2019,08,08))
 		Output:
	2019-08-08 00:00:00
You can mention the time with the date for creating the DateTime object.
Example
	import datetime

	#returns the datetime object for the specified time

	print(datetime.datetime(2019,5,4,1,26,40))

 		Output:
	2020-05-04 01:26:40
For the above code, the DateTime() function, the following are the in a sequential manner
- year
- month
- day
- hour
- minute
- millisecond
The DateTime Module
The DateTime module permits you to create custom date objects for performing different operations on the dates for the comparison.
To work on the dates as the date objects you must import the DateTime module in the Python Source code.
Example:
	import DateTime
	#return to the current DateTime object
	print(datetime.datetime.now())
 		Output:
	2020-05-04 13:19:35.252578
Comparison between two dates
You can compare the two dates using the comparison operators such as >=, >, <=, and <.
Example:
	from the DateTime, import the DateTime as dtc
	# compare the time. When the time is between 9 AM and 6 PM, it will be printed as working hours, or else it would be printed as fun hours
	if
	dt(dt.now().year().dt.now()month,dt.now().day,7 dt.now()Output:
	fun hours
Calendar Module
Python provides the Calendar Object which contains different methods for working with the calendar.
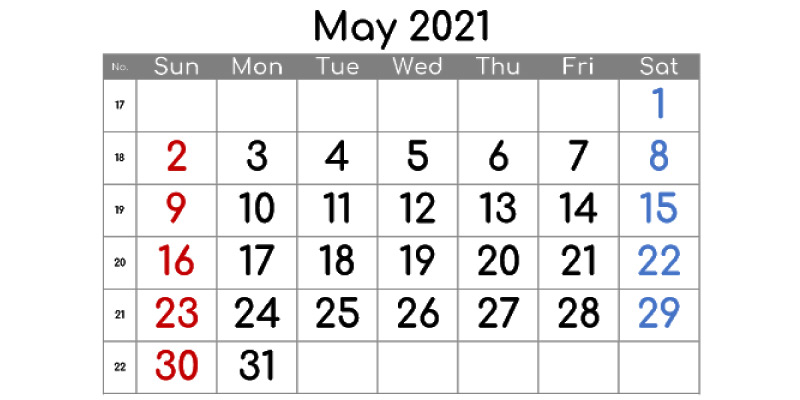
Example
Consider the print of the calendar of May 2021
Output
Print of the Calendar of the complete year
The prcal() method is used for the calendar module and it is used for printing the calendar of the entire year. You can print the calendar by using the below method.
Example:
	import calendar
	#printing the calendar of the year 2020
	s = calendar.prcal(2021)
Output:

Functions
The Functions are used for grouping certain numbers of the related instructions. The Functions are the reusable codes of the block that is used for executing the particular task. The Function may or may not need inputs. Mostly the functions are executed only when it is called explicitly. Based on the task of the function it is supposed to execute, it may or may not return the value.
In this function module, you will have an in-depth understanding of the below topics:
- What is a Function?
- Definition of Function
- Calling in a Function
- Addition of Docstring in Function
- Role of the Variables in the Python Functions
What is a Function?
The Functions in Python are a compilation of related statements that are grouped for executing the specific task. Including the functions in the program aids you in organizing and managing it seamlessly. In particular, in case you are working on a larger program, having modular chunks and smaller codes of blocks helps in increasing the readability of the code, and also it can be reused easily.
The 3 major types of Functions are:
- User-defined Function - These are the functions that are created by the users for the specific requirements.
- Python Built-in function - These are the functions that are created already and it is a predefined function that you can not change.
- Anonymous Function - This is the function that has no name.
Definition of Function
There are a certain set of protocols and rules that are to be followed while defining the function in Python,
All the Function block should start with the keyword def which is later followed by the name & parentheses() function that consists of the arguments that are passed by the users along with a colon in the end.
Once adding the colon, the body of a function begins with the intended block in the new line.
The Return statement usually sends the result object back to the respective caller. The return statements without any arguments are equal to the return of none statement.
	Syntax for writing the function
	def(arg1,arg2,… argN):
	return
Calling in a Function
When it comes to functions it is not always about defining the functions and starting it to use in our programs. Usually, defining the function enables only in structuring the code and provides the function with a name. For executing the function, all we have to do is call it. When it is specifically called, the functions execute and provide the required output.
There are two different ways through which you call the function, after defining it. You can call it with the Python prompt functions or call it through other functions.
Example:
	# defining the function
	def printOutput (str):

	#This function prints a passed string
	print (str)
	return;

	#calling the function
	printout("Welcome to FITA")
Output:
Welcome to FITA
Addition of Docstring in Function
The initial statement or a string in any of the Python functions is known as the docstring. This is used in briefing and defining what actually a function does. The "Docstring" is the contraction for the "documentation string'.
Though including the docstring into a function is optional, this is termed to be one of the best practices that increase the readability of the code and help it to be easily understood by others. You can use the triple quotes throughout the string for writing the docstring. The docstring is capable of extending to different lines.
Example:
In the previous example for calling the function, we used the only comment to describe the function and what it is going to perform. Over here also we are going to do the same, but we would use the docstring for describing what the function is going to perform.
	#define the function
	def printOutput(str):
	"This function prints the passed string"


	print (str)
	return;


	#calling a function
	printOutput(“Welcome to FITA")
Output:
Welcome to FITA
Role of the Variables in the Python Functions
The role of variables is the part of a program, where the variable is recognized. The variable that is explained within the function is mostly recognized only inside that particular function. The duration of the variable is there still when the variable exists in memory. The variables are mostly defined inside a function and it exists only until the function is executed. The life of the variable is defined inside when a function returns or ends or when the control gets out of the function.
Example
	def func():
	x = 7
	print(“value of x inside a function”,x)


	#calling the function
	x = 11
	func()
	print(“value of x outside function”,x)
Output:
	value of x inside a function 7
	value of x outside a function 11
Modules
When you write a program in the Python Shell or Python Interpreter and when you exit from the shell, all the definitions that are included in the program may be lost. You can't use these definitions again. When you are more familiar with the language it may not be of a very big hindrance for you to handle it. But, in a few cases like working on a project that accord with long programs, it is simpler to use the create scripts of the py extension or the text editor.
If you are using the same function in various programs, you will not need to define them again and again. You can just create the script that consists of the function and import that particular script in all programs that uses the functions. These scripts are also called the modules in Python.
Here in this complete python tutorial, you will get to know the following topics,
- What is a Python Module?
- Reason to use the Python Modules
- Import the Modules in the Python
- Built-in Modules of Python
What is a Python Module?
The Python Modules permits you to reasonably organize the Python code. Classifying the related code into a specific module makes it easier to code and also understand it at ease. The modules define the classes, variables, and function. The module may also include a runnable code.
Modules are processed using two new statements and with one important built-in function and they are:
- From - Allows the Client to fetch details regarding a specific name from the module.
- Import - Allows the Clients to Obtain the Module as a whole.
- Reload - Provides a path to reload a code of module by not stopping the Python.
Reasons to use the Python Modules
The modules in Python are used for the three major purposes that are mentioned below:
- Reusability of Code
- Partitioning of the System namespace
- For implementing the Shared Data or Services
Import the Modules in the Python
For importing the Modules in Python, you can use the import keyword,
Syntax:
    Exampleimport
    def FITA():
    print "Hi FITA"
You can save the file using the py extension. In case if you save the above script underneath the name hi.py. Once you have saved the above file, you can import them by using the important keyword as illustrated below:
    import hi
    hi.FITA()
Output:
hi FITA
For importing the Specific Attribute from the Module, the from.... import is used.
Syntax:
from module-name import atr1,atr2,…atrn
For importing the complete module, you can use the preceding syntax
Syntax:
from module-name import*
Built-in Modules of Python
|
Functions |
Description |
|
exp(n) |
Returns back to the usual logarithm, e raised for a given number |
|
ceil(n) |
Returns the adjacent integer of the provided number |
|
floor(n) |
Returns the previous integer of the provided number |
|
sqrt(n) |
It returns the square root of the provided number |
|
pow(baseto) |
It returns the base that is raised to the exp power |
|
logn(baseto) |
It returns the usual logarithm of the number |
|
sin(n) |
It returns the sine of the provide radian |
|
tan(n) |
This function returns the tangent of the given radian |
|
cos(n) |
It returns the cosine of the provided radian. |
Python - FileIO
Here in this Python Programming Tutorial you will get to know about Python's built-in functions print() and input() perform the write/read operations with the standard IO streams. The input() function reads the text into a memory variable from the keyboard that is defined as sys. stdin and it sends the data for displaying the devices that are spot as sys. stdout. The sys module is used for presenting the definition of the objects.
Rather than the standard Output device, when the data is saved in a perpetual computer file, then it shall be used subsequently. The File is the named location of the computer's non-volatile storage devices like the disk. The Python's built-in function open() the returns file object that is mapped to the file on the lasting storage such as a disk.
Printing to the Screen
The easiest way to produce the output using a print statement where you can pass the expressions that are separated by commas or zero. This function helps in converting the expressions you pass in a string and then write the results based on the standard output:
Example
	 #!/usr/bin/python
	 print"Python is the best programming language"
Output:
Python is the best programming language
Reading Keyboard Input
Python provides two built-in functions for reading a line of the text from the standard input. It appears by default on the keyboard and the functions are:
- input
- raw_input
Input
An input ([prompt]0 function is equal to the raw-input, except it assumes that the input is the valid Python Expression and it returns the evaluated results for you.
     #!/usr/bin/python

     str = input("Enter input:")
     print"input is :",str
Output:
    Enter input:[x*5 for x in range(2,10,2)]
    Received input is :[10, 20, 30, 40]
Raw_Input
The raw_input([prompt]) function reads a line from the standard input and it returns it back as a string( discarding the trailing newline).
    #!/usr/bin/python

    str = raw_input("Enter your input: ")
    print " input is :",str
Now, it pop-ups you to enter any string and this would display the same string on a screen. When you type " Hello FITA!", the output will be like
    Enter your input: Hello FITA
    Received input is: Hello FITA
Opening and Closing of Files
So far, you have seen how to read and write the standard input and output. Now, let us drive-deep into how to use the actual data files.
Python enables the basic function and methods that are required for manipulating the files by default. To perform the file manipulation you can use a file object.
Open Function
Before you write or read a file, you should open it using the built-in open() function of Python. And this function creates the file object that can be utilized for calling the other supportive methods that are associated with it.
Syntax:
file object = open(file_name[,access_mode][,buffering])
The details of the Parameters are:
- access_mode - The access_ mode resolves the mode through which the file should be opened, i.e., write, append, and read, etc. The complete list of the possible values is provided in the below table. It is an optional parameter and it is the default file through which the access mode is read (r).
- file_name - The file_name argument is the string value that consists of the name of the file which you want to access.
- buffering - When the buffering value is set at 0, there is no chance of buffering taking place. But, when the buffering value is at 1, then the line buffering is executed while accessing the file. When you mention the buffering value is the integer which is greater than 1, the buffering action is executed with an indicated buffer size. But, when it is negative, the buffer size of the system turns to be the default size.
Below are the kinds of the modes used for opening a file
|
Modes |
Description |
|
r |
|
|
r+ |
|
|
rb |
|
|
rb+ |
|
|
wb |
|
|
w |
|
|
wb+ |
|
|
a |
|
|
a+ |
|
|
ab+ |
|
|
ab |
|
|
w+ |
|
File Object Attributes
When the file is opened and when you have only one file object, you can receive different information that is associated with the file. Following are the list of attributes that are associated with the file object
|
Attributes |
Description |
|
file.mode |
It returns the access mode within which the file was opened |
|
file.name |
It returns the name of a file |
|
file.closed |
It returns true when the file is closed, or else it is false |
|
file.softspace |
This returns to False when space certainly requires the print, or otherwise. |
Close() method
The close() method of the file object clears the unwritten information and also closes the file object, after which there can be no more writing can be performed. Python immediately closes the file when a reference object of the file is not reallocated with another file. This is the best practice for using the close() method for closing the file.
Syntax:
fileObject.close()
Example:
     #!/usr/bin/python

     # Open a file
     fo = open("tee.txt","wb")
     print "File name:",fo.name

     # Close opened file
     fo.close()
Output:
File Name: tee.txt
Reading and Writing the Files
The file object gives the users a compilation of access methods that makes the work of the programmer easier. Now, let us see how to use the write() and read() methods for writing and reading the files.
write() method
Usually, a write() method writes the strings to open a file. A point to be noted here is that the Python strings can consist of binary data and not only text. The write() method can not add the newline character('\n') at the end of the string-
Syntax
fileObject.write(string)
Example
     #!/usr/bin/python

     # Open a file
     fo = open("tee.txt","wb")
     fo.write("Python is the best programming languagee.\n Yeah, it is the best!!\n")

     # Close opened file
     fo.close()
Output
     Python is the Best Programming Language
     Yeah,it is the best!!
read() method
Usually, the read() method reads the string from the open file. An important point to be noted is that the Python Strings can have both text and binary data.
Syntax
fileObject.read([count])
The passed parameters are the number of bytes that should be read from an opened file. This method begins reading from the start of a file and if any count is found missing, it tries to read maximum till the end of the file.
Example
     #!/usr/bin/python

     # Open a file
     fo = open("tee.txt","r+")
     str = fo.read(10);
     print "Read the String is :",str
     # Close opened file
     fo.close()
Output
Read String the is:Python is
File Positions
Generally, a tell() method explains the current position of the file, in other words, the next write or read occurs at many bytes from the start of a file.
A seek(offset[, from]) method can change the current file position. The offset argument implies the number of bytes that should be moved. The argument defines the reference position from where bytes should be moved to.
In case if the form is affixed at 0, then it means you can use it from the beginning of a file as the reference position. Over here 1 means to use the present position for the reference position and when it is 2 at the end of the file it would be considered as the reference position.
Example
     #!/usr/bin/python

     # Open a file
     fo = open("tee.txt","r+")
     str = fo.read(30)
     print"Read the String is :",str

     # Check Present position
     position = fo.tell()
     print"Present file position :",position

     # Reposition pointer at the opening again
     position = fo.seek(0,0);
     str = fo.read(30)
     print"Again read the String is :",str
     # Close opened fi
Output
     Read the String is:Python is
     Present file position:30
     Again read String is:Python is
Deleting and Renaming Files
Python OS module gives the methods to help you perform the file processing operation like deleting and renaming files. For using this module you should import first and you shall call any of the related functions.
remove() method
You shall use the remove() method for deleting the files by supplying it to the name of a file that can be deleted just like the argument.
Syntax
os.remove(file_name)
Example
     #!/usr/bin/python
     import os

     # Delete file test2.txt
     os.remove("text2.txt")
rename method()
The rename() method takes two arguments and they are
- current filename
- new filename
Syntax
os.rename(current_file_name,new_file_name)
Example
     #!/usr/bin/python
     import os

     # Rename the file from test1.txt to test2.txt
     os.rename( "test1.txt","test2.txt" )
Python Course in Coimbatore at FITA Academy provides extensive training of the Python language from its basics to the advanced level under the guidance of professional Python Experts.
Exception
The Exception can be demonstrated as the unusual condition in the program that results in interruption of the flow in a program. On any occasion, if the program stops the execution and when the code is not executed further. An exception is usually the run-time error that is incapable of handling the Python script.
The Exception is the Python Object which represents the error. Python provides numerous methods to handle the exception and the code shall be executed without any interruption. When you can't handle the exception, the interpreter doesn't execute the code that is present after the exception.
Python has numerous built-in exceptions that allow your program to run with no interruption and provides the output. In this Python tutorial, let us see the different exceptions used in it.
Common Exceptions
The Python gives numerous built-in exceptions, over here we have highlighted the common standard exceptions that are used predominantly. The set of common exceptions that could be used for the Standard Python program are,
- NameError - This occurs when the name is not identified. This can be local or global.
- ZeroDivisionError - This takes place only when the number is divided by zero.
- IOError - This occurs when the Input-Output operations fail.
- EOFError - This takes place when it reaches the end of the file and when the operations are performed.
- IndentationError - This takes place when an incorrect indentation is provided.
The Problem that occurs without exception handling
As mentioned earlier, the exception is the abnormal condition which stops the execution of a program.
For instance, if you have two variables b and c that take the input from a user and execute the division for these values and what if when the user entered 0 as the denominator. It will surely interrupt the program's execution and via a Zero Division exception. The below example will explain to you clearly,
Example
     b= int(input("Enter b:"))
     c = int(input("Enter c:"))
     d = b/c
     print("b/c = %e" %d)

     #other code:
     print("Hi, how you doing?")
Output
     Enter b:30
     Enter b:0
     Traceback (most recent call last):
     File "exception-test.py",line 3,in
     d = b/c;
     ZeroDivisionError:division by zero
The above is syntactically right, but, it is through the error and it is because of the uncommon input.This type of program is not preferable or recommended for the projects as it requires uninterrupted execution. And this is the major reason why the exception-handling occupies an essential role in managing the unexpected exceptions. You can also manage this exception in the ways that are given below.
Exception handling in Python
The try-except Statement
When the Python Program consists of the Suspicious code which may heave the exception, we should place that code in a try block. A try block should be followed with an except statement, and it contains the block of code that can be executed when there are few exceptions in the try block.

Syntax
     try:
     #block of code

     except Exception1:
     #block of code

     except Exception2:
     #block of code

     #other code
Example
     try:
     b = int(input("Enter b:"))
     c= int(input("Enter c:"))
     d= b/c
     except:
     print("Impossible to divide with zero")
Output:
     Enter B:10
     Enter c:0
     Impossible to divide with zero
You can also make use of the else statement with a try-except statement in which you can place the code that will be executed in the scenario when no exception takes place at the try block.
This Syntax utilizes the else statement with a try-except statement on which you can place code and it will be executed in the suitable place where no exception takes place at the try block.
The Syntax that is used in the else statement with a try-except statement is presented below
    try:
    #block of code

    except Exception1:
    #block of code

    else:
    #this code executes when no except block is executed
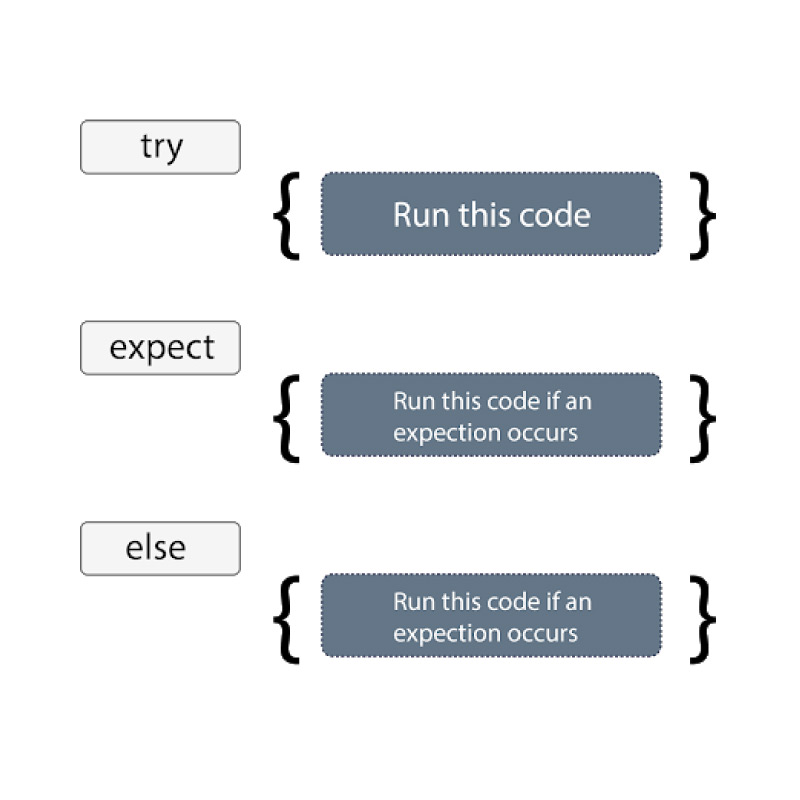
Example
    try:
    b= int(input("Enter b:"))
    c  = int(input("Enter c:"))
    d= b/c
    print("b/c = %e"%d)

    # Using  the Exception except statement. If we print(Exception) it will return exception class
    except Exception:
    print("Impossible to divide by zero")
    print(Exception)
    else:
    print("Hi I am Earth")
Output:
     Enter b:10
     Enter c:0
     Impossible to divide by zero
The Except Statements with the no Exception
Python gives convenience to the users to not mention the name of the exception with an exception statement.
Example
     try:
     x = int(input("Enter x:"))
     y = int(input("Enter y:"))
     z = x/y
     print(x/y =%d"%C)
     except:
     print(" impossible to divide by zero")
     else:
     print("Its me else block")
Except Statements applying the Exception Variable
You can utilize the Exception variable with an except statement. This is operated by using the "as" keyword. This Object shall return a cause of the exception.
Example:
     try:
     x = int(input("Enter x:"))
     y = int(input("Enter y:"))
     z = x/y
     print("x/y =d%"%c)
     # Operating the exception object with an except statement
     except Exception as e:
     print("impossible to divide by zero")
     print(e)
     else:
     print("Its me else block")
Output:
Enter x:10
Enter y:0
impossible to divide by zero
division by zero
Python Notes:
- Python helps us in not mentioning the exception while using the except statement.
- You can declare numerous exceptions on the except statement as they try block may consist of the statements that shove the various kinds of exceptions.
- You can also mention that the else block is with a try-except statement, that will execute when there is no exception and it is raised to the try block.
- Usually, the statements which don't throw an exception must be placed into the else block.
Example:
     try:
     # this will throw the exception when the file is not present.
     fileptr = open("file.txt","r")
     except IOError:
     print("File is not Found")
     else:
     print(The file is opened successfully")
Output
The file is not found
Declaring Multiple Exceptions
Python permits you to declare the multiple exceptions with an except clause. Declaring the multiple exceptions is helpful in the cases where the try block delivers multiple exceptions.
Syntax
     try:
     #block of code
     except (, , ,...)
     #block of code
     else:
    #block of code
Example
     try:
     x = 20/0
     except(Arithmetic Error,IOError):
     print(" Arithmetic Exception")
     else:
     print(" completed successfully)
Output:
Arithmetic Exception
try...finally block
Python gives the optional finally statement, which is used with a try statement. This is executed when there is no matter of what exception takes place and it is used in releasing the external resources. The finally block gives assurance of the execution.
You can use the finally block with a try block in which you can measure the required code that must be executed prior to the try statement that throws an exception.
Syntax
    try:
    #block of code
    #it may throw an exception
    finally:
    #block of code
    # it will always be executed
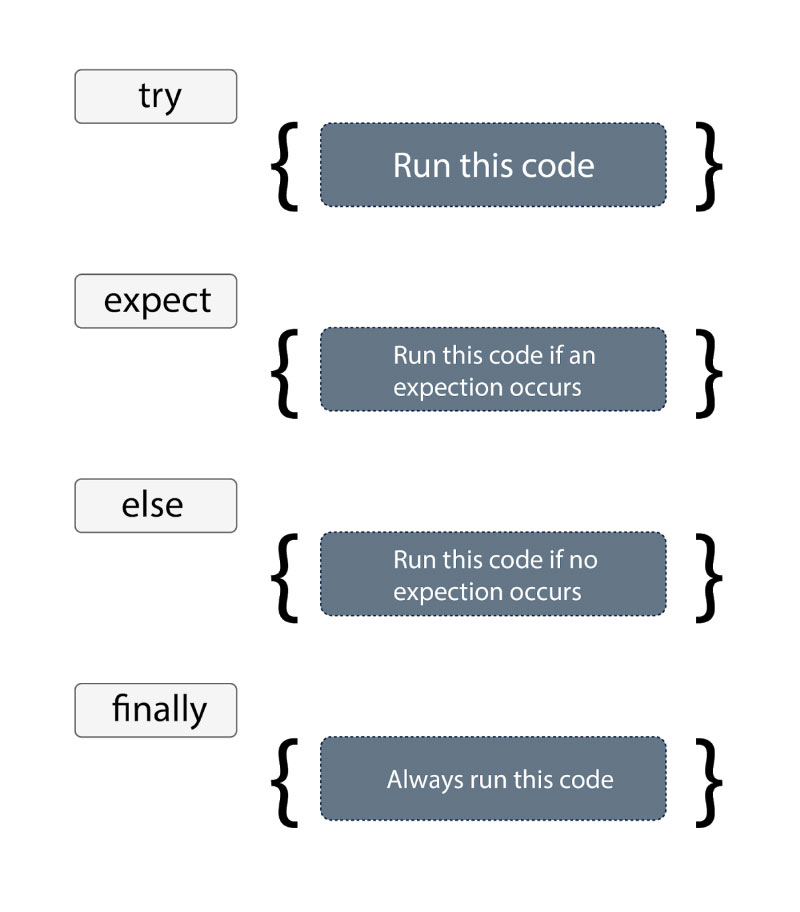
Example
     try:
     fileptr = open("file2.txt","r")
     try:
     fileptr.write(" I am doing great")
     finally:
     fileptr.close()
     print("file closed")
     except:
     print("Error")
Output:
    file closed
    error
Raising Exceptions
The exception can be raised by force using the raise clause in Python. This is useful in that specific scenario where you are required to raise the an exception to pause the execution of a program.
For instance, if there is a program that needs 3GB memory of execution, and when the program lays the effort to occupy the 3GB of memory, you can raise the exception to cease the execution of a program.
Syntax:
raise Exception _class,
Python Notes for Beginners:
- For raising an exception, the raise statement should be used. Generally, an exception class name pursues it.
- The Exception is also provided with the value that it can be provided with a parenthesis.
- For accessing the value, the "as" keyword is utilized. "e" is utilized as the reference to the variable that stores the value of the exception.
- You can pass the value to the exception for specifying the exception type.
Example:
     try:
     age = int(inout("Enter your age:"))

     if(age<18):


     raise ValueError

     else:
     print(" age is valid")

     except ValueError:
     print( age is not valid")
Output:
    Enter your age:15
    age is not valid
Raising an Exception with message/strong>
try:
     num = int(input("Enter a Negative integer:"))
     if(num <=0):
     #You shall pass a message in the raise statement
     raise ValueError( It is a Positive Number!")
     except ValueError as e:
     print(e)
Output:
     Enter a Negative Integer: 8
     It is a Positive Number
Custom Exception
Python permits you to create exceptions that shall be raised from a program and can be captured while using the except clause. Yet, you can read this section once visiting the Python Classes and Objects.
Example:
    class ErrorInCode(Exception):
    def_init_(self,data):
    self.data = data
    def_str_(self):
    return repr(self.data)
    try:
    raise ErrorInCode(2000)
    except ErrorInCode as ae:
   print("Received as error:",ae.data)
Output:
Received error: 2000
Advanced Python Tutorial
Over the period, Python has propelled excellently in terms of popularity and extensibility. Here in this, Advanced Python Tutorial you will be covered with advanced topics that will aid you to gain knowledge and skill sets that will make you stand out & unique from the pool of Python Developers.
Python Object-Oriented
It is a well-known fact that Python is an object-oriented programming language and mostly every entity in Python programming language is an object, which indicates the programmers invariably use the objects and classes during the coding in Python. The objects in Python are primarily the encapsulation of the Python functions and variables, which they receive from the classes.
In this module, you will be covered with topics such as
- Classes & Objects in Python
- Benefits of using the Classes
- Defining the Class
- Creating the Object
- __init__ () function
Classes & Objects in Python
The class is nothing but the simple and logical entity that performs as a template or prototype for creating objects, and whereas the objects are just the compilation of Python functions and variables. Generally, the functions and variables are described inside a class and it is accessed using the objects. These functions and variables are collectively called attributes.
Now, let's consider an example of our day-to-day objects, let's say a bike. As mentioned earlier, you know that a class consists of data and functions that are described inside it, and all those data and functions shall be treated as the actions and features of an object respectively. It means the features (data) of the bike i.e (object) such as color, price, brand, etc. An action i.e(function) of the bike(object) includes speed, mileage, applications of brakes, and much more. Multiple objects with various functions and data can be associated with them and they are created using the class as interpreted below in the diagram.
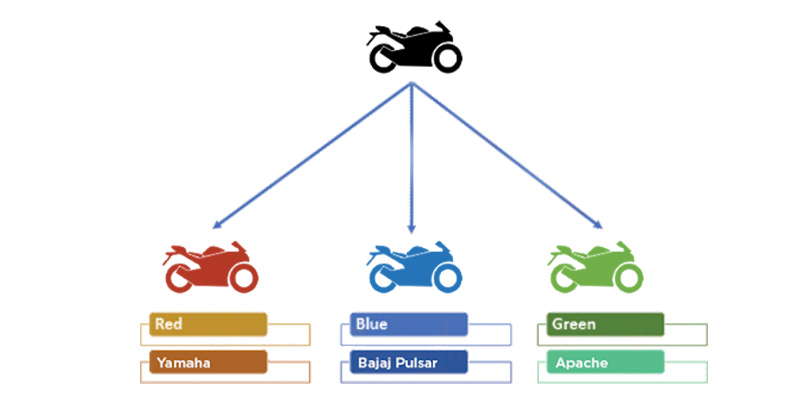
Benefits of using Classes in Python
- Classes enable a smooth way of managing the data methods and members together in a place, and that subsequently helps in managing the program in an organized manner.
- Using the Classes also has another functionality of this oops paradigm and that is, nothing but the inheritance.
- Using the Classes also has another functionality of this oops paradigm and that is, nothing but the inheritance.
- Using the classes gives the capability to reuse the codes that make the program to function more efficiently.
- Functions that are related to grouping and managing them in one place i.e (inside the class) give a clean structure for coding and increases the readability of a program.
Defining the Class in Python
Similar to a function that is defined in Python using the keyword, the class in Python programming is also described using the class keyword, and also it is followed by a class name.
More or less like functions, in the classes also we make use of the docstrings. Though it is not required to use the docstrings, it is still preferred since this is termed to be one of the good practices for including a brief description of the class to increase the understandability and readability of a code.
The below illustration explains clearly how to define the class in Python:
     class FITAClass:
     “‘Doctring statement here'”
A create class statement would create the local namespace for every attribute that includes the special attribute and that begins with double underscores (__). For instance, __doc__(), __init__(). Soon when a class is created, the class objects are also created and it is used for accessing the attributes in a class.
Example
    class FITAClass
    a = 7
    def function1(self):
    print(‘Welcome to FITA’)


    #access the attributes using the class object of same name
    FITAClass.function(1)
    print(FITA Class.a)
Output:
    Welcome to FITA
    7
A class is more or less like the object constructor or the "blueprint" for creating an object.
Creating a Class
For creating the class, you can use the keyword class:
Example:
    Create the class named MyClass, with the property named as x:
    class MyClass:
    x = 7
Output
Create the Object
You can make use of the class named MyClass for creating the objects:
Example
    Creating the object named q1, to print the value of x:
    q1 = MyClass()
    print(q1.x)
Output
7
__init__() Function
- The examples that are mentioned above are the objects and classes are in the simplest form and this won't be of great help while using them in a real-time application.
- To understand the terminology of the classes, you have to first understand what is a built-in __init__() function.
- Every class has the function called __init__() and it is always executed if a class is initiated.
- Use a __init__() function for assigning the values for the object properties or to the other operations that are required to perform when an object is being created.
Example
     Create the class named Person, use the __init__()function for assigning the values for the age and name:
	 class Person:

     def __init__(self,age,name):
     self.age = age
     self.name = name

     q1 = Person ( 23," Tara")

     print(q1.name)
     print(q1.age)
Output
     23
     Tara
Python Notes: An __init__() function is called immediately all the time when the class is created for a new object.
Object Methods
This method can also consist of methods. The Methods in the objects are the function that originates to an object. For a better understanding, let us now create the methods in a Person Class:
Example
    Insert the function prints the greeting and execute it to the q1 object:
    class Person:
    def__init__( self,name,age):
    self.name = name
    self.age = age

    def myfunc(self):
    print("Hi my name is" + self.name)

   q1 = Person("Tara",23)
   q1.myfunc()

   Hi my name is Tara
Self Parameter
A self parameter is a reference to the present instance of a class, and it is utilized in accessing the variable that is associated with a class. It need not be named as self, you call it as you want, but ensure that it is the first parameter of any function in a class:
Example
Use words like abc and mysillyobject rather than self:
    class Person:
    def __init__(mysillyobject,name,age):
    mysillyobject.name = name
    mysillyobject.age = age

    def myfunc(abc):
    print("Hi my name is" + abc.name)

    p1 = Person("Tara",23)
    p1.myfunc()
Output:
Hi my name is Tara
Modifying the Object Properties
Follow the below method to modify the Object Properties
Example
     Set the age of q1 to 40:
     q1.age = 40

    class Person:
    def __init__(self, name, age):
    self.name = name
    self.age = age

    def myfunc(self):
    print("Hi my name is " + self.name)

    q1 = Person("Tara, 23)

    q1.age = 40

    print(q1.age)
Output:
40
Delete Object Properties
We can delete the properties on the object by using a del keyword:
Example
    Delete the name property from the q1 object:
    del q1.name

    class Person:
    def __init__(self,name,age):
    self.age = age
    self.name = name


    def myfunc(self):
    print("Hi I am" + self.name)

    q1 = Person(23,"Tara")

    del q1.age

   print(q1.age)
Output
     Traceback (most recent call last):
     File "./prog.py",line 13,in
     AttributeError: 'Person' object has no attribute 'name'
Delete Objects
You can delete the objects by utilizing the del keyword:
Example
    Delete the q1 object:
    del q1
Pass Statement
Generally, the class definitions can't be kept empty. However, if the class definition is empty i.e without content for any reason, place them in a pass statement for overcoming the chances of getting the error.
Example
    class Person:
    pass
Regular Expressions
Python RegEx or Python Regular Expressions are the models that allow you to 'match' different string values in different ways.
A model is nothing but one or more characters that depicts a group of possible match characters. In a regular expression matching, you use the character or the group of characters for representing the strings you need to match in a test.
In the Python RegEx Tutorial, you will learn the important aspects of the RegEX or Regular Expression and they are:
- Regular Expression Characters
- Special Sequence Characters of the RegEx
- Match Functions of RegEx
- Search Functions of RegEx
- Regular Expression Modifiers of Python
Regular Expression Characters
|
Symbol |
Meaning |
|
^ (caret sign) |
It matches the beginning of any string of the provided regular expression in the Python programming language. |
|
* asterisk |
This symbol is used for matching the repetitions or zeros of the given regular expressions. |
|
. (period) |
It matches any character asides the new line character in the provided regular expressions. |
|
$ ( dollar sign) |
It matches the end of any string for the given regular expressions. |
|
{} |
It is used as either {m}. Over here the m indicates that match i.e exactly to the ‘m’ instance of the earlier regular expressions. Or as the {m,n} where the n>m indicates to match between the ‘m’ and ‘n’ instances of the previous regular expressions. |
|
? |
It matches the Zero of the prior or previous regular expressions. |
|
\ (blacklash) |
Either the Special character like one among the other regular expressions characters ( \* matches the asterisk) or it matches one of the sequences of the special regular expressions. |
Special Sequence Characters of the RegEx
There are 6 important Sequence characters and they are
- \D - It matches any of the non-decimal digits. It is the compilation of all characters that are not presented in the [0-9] and it will be written as [^ 0-9].
- \d-This helps in matching any decimal digit. It is similar to the writing [0-9] but it is performed often and it has its shortcut sequence.
- \W: - It meets any of the non-alphanumeric characters. It is the reverse of the \w sequence that is mentioned below.
- \w: - It helps in matching the alphanumeric characters. It is the compilation of all the numbers and letters that are used both in the uppercase and lowercase.
- \S: - This helps in coordinating with the non-whitespace characters. It is the reverse of the \s sequence as mentioned below.
- \: - This helps in coordinating any white space character. The White Space Character is generally defined as the carriage return, tab, space, & non-printable character. And this is the white space that detaches the words in the provided sentence.
Match Functions of RegEx
The Match Function matches with the Python RegEx pattern with the string using the optional flags.
Syntax:
re.match(pattern,string,flags=0)
Where the "pattern" is the regular expression that has to be matched and it is the second parameter with the Python String that is searched to match with the pattern from the beginning of a string.
Example of the Python regex match:
     import re
     print re. match(“i”,“FITA”)
Output:
<-sre.SRE-Match object at 0x7f9cac95d78>
The Python then outputs the line that signifies the new object that is sre.SRE type has been created. A hex number following is the address at which this was created.
import reprint re. match(“b”,“fita”)
Output:
None
Search Functions of RegEx
This searches for a primary occurrence of the Regular Expression of a pattern that is within the string with the optional flags.
Syntax:
re.search(pattern,string,flags=0)
Example of regex search:
     m = re.search(‘\bopen\b’,‘'Adieu'’)
     print m
Output:
None
The above output occurred because the '\b' escapes the sequence that is treated as the special backspace character. Metacharacters are the characters which include "/".
import re
m = re.search(‘\\bopen\\b’,“Adieu”)
print m
Output:
<-sre.SRE-Match object at 0x00A3F058>
Regular Expression Modifiers of Python
The Table that is given below consists of the compilation of Python RegEX or the Python Regular modifiers with its description.
|
Modifier |
Description |
|
re.L |
This helps in interpreting the words based on the current locale. This analysis affects the boundary behavior (\b and \B) and the alphabetic group (w\ and W\). |
|
re.l |
It aids in performing the case intensive matching. |
|
re.S |
It helps in period(dot) to match with any character inclusive of the new line. |
|
re.M |
It helps $ to match at the end of the line and makes ^ match at the beginning of the line. |
|
re.X |
It permits ‘cuter’ regular expression syntax. |
|
re.U |
This helps in interpreting the letters based on the Unicode of the character set. And it affects the flag behavior of \b,\B, \w and, \W. |
CGI Programming
The CGI stands for Common Gateway Interface, which is the set of protocols that explains how the information is exchanged between a custom script and the webserver. The specs of the CGI are currently handled by the NCSA. The latest version CGI/1.1 and CGI/ 1.2 is presently under development.
Web Browsing
To comprehend the concepts of CGI firstly, in this Python tutorial for beginners, let us understand what happens when you click the hyperlink for browsing the specific URL or Web page.
- Firstly, your browser connects with the HTTP Web Server and it demands the URL, i.e filename.
- The Web Browser accepts a response from the webserver and it features either the received or error file message.
- The Web Servers infer the URL and its views for a filename. In case if the file name is identified then it assigns it back to the browser, or otherwise, it forwards the error message that indicates you have asked for the wrong file.
CGI Architecture Diagram
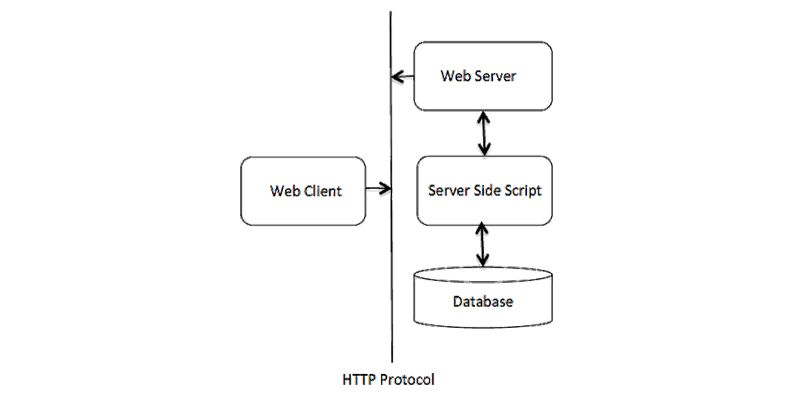
Further, it is possible to set the HTTP server so whenever the file is in the specific directory, it is requested that the file should not be sent back rather it should be executed as the program, and whatever the program outputs are directed back to the browser for the display. The functions are termed as Common Gateway Interface and these programs are named CGI Scripts. The CGI programs can generally be any of the following - PERL Script, Shell Script, C C++, and Python Script.
Configuration and Web Server Support
As you proceed with the CGI Programming, ensure that your Web Server supports the CGI and its configuration for handling the CGI programs. All CGI programs shall be carried out by an HTTP server and it is kept in a pre-configured directory. The Directory is also conventionally called the CGI Directory and, this is named as /var/www/cgi-bin. The CGI files have extensions as cgi, however, you can keep the files with the Python extensions.py too. The Linux server is configured by default for running the only scripts in the cgi-bin directory in /var/www. In case if you want to specify the other directory for running the CGI scripts, you can comment on the following lines in the httpd.conf file-
   AllowOverride None
   Options ExecCGI
   Order allow,deny
   Allow from all


   Options All
First CGI Program
Below is the simple link that is linked to the CGI script called hello.py. And this file is placed in the /var/www/cgi_bin directory and consists of the following content. Before starting to run your CGI program, ensure that you have changed the mode of the file using the chmod 755 hello.py, and to make the file executable you can use the Unix command.
#!/usr/bin/python
print "Content-type:text/html\r\n\r\n"
print ''
print ''
print 'Hello Earth - First CGI Program '
print ''
print ''
print 'Hello Earth! It is my first CGI program
'
print ''
print ''
When you click the hello.py then it gives the following output
Hello Earth! It is my first CGI program
The hello.py script is the simple Python script that writes its output on the STDOUT file, which is the screen. You have an additional and important feature here and it is the first line that has to be printed Content-type:text/html\r\n\r\n. Mostly, this line is sent back to a browser and it mentions the content type that has to be displayed on the browser screen. The CGI script can interact with any external system and it can also exchange information like RDMS.
HTTP Header
The line Content-type:text/html\r\n\r\n is the part of the HTTP header that is sent to a browser for interpreting the content. Every HTTP header are in the below form-
HTTP Field Name: Field Content
For Example
Content-type: text/html\r\n\r\n
Below are the important HTTP headers, that you can use adequately in CGI programming.
|
Header |
Description |
|
Content-type |
The MIME String interprets the format of the file that is being returned. For instance: Content-type:text/html |
|
Location: URL |
The URL is generally returned rather than the URL that is being requested. This field can be used for redirecting the request to any specific file. |
|
Expire: Date |
It decides when the page needs to be refreshed. Usually, the valid date string should be in the format of 3rd Feb 1997 12:00:00 GST. |
|
Last modified: Date |
It is the date of the last modification of a resource. |
|
Set- Cookie: String |
It sets the cookies that pass via the strings |
|
Content - Length |
The Length, in the bytes, of the date is returned. The browser uses this value for estimating the downloaded time of the file. |
CGI Environment Variables
The CGI programs do have access to the following environment variables. The variables play a major role in writing the CGI program.
|
Variable Name |
Description |
|
HTTP__ COOKIE |
It returns the set cookies in the form of value pair & key. |
|
PATH _ INFO |
It is the Path for the CGI Script |
|
CONTENT_ TYPE |
It is the data type of the content. It is utilized when a client sends an annexure to the server. For instance, file upload. |
|
CONTENT __LENGHT |
It is the length of the query information and this is available only for the POST requests. |
|
QUERY__STRING |
The URL encodes the message and it is sent with a GET request. |
|
REMOTE__HOST |
The fully qualified name of a host makes the request. And if the information is not found, then a REMOTE__ADDR is used in getting theIR Address. |
|
REMOTE __ ADDR |
The IP Address of a remote host in making the request. It is useful for authentication or logging |
|
SCRIPT_FILENAME |
It is the complete path of the CGI Scripts. |
|
REQUEST_METHOD |
This method is used in making the request. The methods that are used commonly are POST and GET |
|
SCRIPT_NAME |
It is the name of the CGI Script |
|
SERVER_SOFTWARE |
This is the server and name of the software version which is running. |
|
SERVER_NAME |
It is the server IP address or the host name. |
|
HTTP_USER_AGENT |
An User-Agent request-header consists of details about a user agent who is originating the request and also the name of the Web browser. |
GET & POST Methods
You could come across many instances where you are required to pass on certain information from your browser to a Web Server and your CGI Program. Usually, the browser uses two different methods to pass the information and they are GET and POST Method.
Passing on the Information using the GET method
A GET method is used for sending the user information that is encoded for appending the page request. Generally, the encoded information and the page are separated using the? character as given below:
http://www.test.com/cgi-bin/hello.py?key1=value1&key2=value2
A GET method is a default method that is used for passing on the information from a browser to a web server and this produces the long string that displays on your browser's Location: box.
Also, it is not advisable to use a GET Method when you have confidential information or a password while passing on the server. Further, the GET Method has some size restrictions: i.e it is possible to send only 1024 characters in the request string.
A GET method passes on the information using a QUERY_STRING header and the above can be accessed in your CGI Program via QUERY_ STRING environment variable.
To pass on the information, you can use the HTML tags for passing, or also you can pass the information simply by concatenating the value and key pairs with any URL.
Below is the simple URL that passes two values for the hello. get py program using the GET Method
/cgi-bin/hello.get.py?first_name=TONY&last_name=STARKExample
#!/usr/bin/python
# Import modules for CGI handling
import cgi, cgitb
# Create instance of FieldStorage
form = cgi.FieldStorage()
# Get data from fields
first_name = form.getvalue('first_name')
last_name = form.getvalue('last_name')
print "Content-type:text/html\r\n\r\n"
print ""
print ""
print "Hello - Save Water "
print ""
print ""
print "Hello %s %s
" % (first_name, last_name)
print ""
print ""
Output
Hello TONY STARK
Simple FORM Example: GETMethod
This example passes 2 values using the HTML FORM & the submit button. Over here also you can use the CGI script hello_get.py to handle this input.
Below is the definite output of the above form, enter the details respectively in the name column and click the Submit button to get the results.
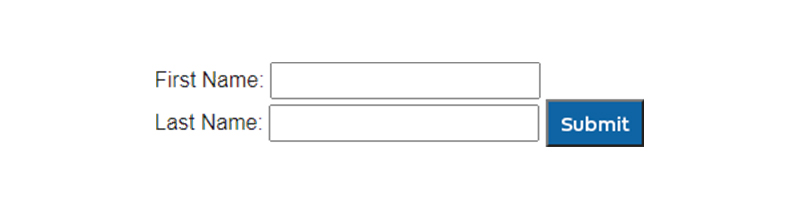
Passing on the information using the POST Method
This is the most secure method of passing the information to the CGI Program. The POST Method also packages the information exactly as the GET methods, but rather than sending this as the text string or URL the post method uses a separate message. And this message appears in the CGI Scripts in the method of standard input.
#!/usr/bin/python
# Import modules for CGI handling
import cgi, cgitb
# Create instance of FieldStorage
form = cgi.FieldStorage()
# Get data from fields
first_name = form.getvalue('first_name')
last_name = form.getvalue('last_name')
print "Content-type:text/html\r\n\r\n"
print ""
print ""
print "Hello - SAVE EARTH "
print ""
print ""
print "Hello %s %s
" % (first_name, last_name)
print ""
print ""
Again, let us consider the same example that is given above that passes two values using the Submit button and HTML FORM. You can use the same CGI Script hello_get.py for handling the input.

Python - Network Programming
Python provides 2 levels of entrance to the network services. At the lowest level, you could access the fundamental socket support at the root operating system, which permits you to implement servers and clients for both the connectionless protocols and connection-oriented.
Python consists of libraries that enable high-level access to the application-level network customs like HTTP, FTP, and many others.
Sockets
It is the deadline of the bidirectional communication channel. A socket is capable of communicating amidst
- a process of the same machine,
- or amid the process of various continents,
- and within a process.
These sockets can be applied over multiple channel kinds: TCP, UDP, and Unix domain sockets. The Socket library gives certain classes for managing the common transports and the generic interface to handle the rest.
|
Term |
Description |
||
|
Type |
A type of communication is between 2 endpoints and they are STOCK_STREAM and STOCK_DGRAM for the connectionless protocols. |
||
|
protocol |
|
||
|
Domain |
It is the set of protocols that are used for transporting the mechanism. The values include constants like PF_INET, PF_UNIX, AF_INET, PF_X25, and much more. |
||
|
Hostname |
The Identifier of the Network Interface are:
|
Port
|
Every Server listens to the clients calling on at least one or even more ports. The port shall be the Fixnum port number, the name of the service, or the string that contains the port number. |
Socket Module
For creating the Socket, you can use the socket.socket() function that is found in the socket module, that uses the common syntax -
s = socket.socket (socket_family, socket_type, protocol=0)
Given below are the detailed description of the parameters:
- socket-type - It is either SOCK-DGRAM or STOCK_STREAM
- socket_family -It is either AF_INET or AF_UNIX
- protocol - In general this is left out, defaulting to 0.
When you have the Socket Object, you can use the other required functions for creating your server or client program. Below are the set of functions that are required:
Server Socket Methods
|
Method |
Description |
|
s.listen() |
It is used for starting and setting the TCP Listener |
|
s.bind() |
It is used in binding the address to the socket. |
|
s.accept() |
This method without resistance accepts the TCP Client connection and it waits until the connection arrives. |
General Stock Methods
|
Methods |
Description |
|
s.send() |
It transmits the TCP Message |
|
s. close() |
It closes the socket |
|
s.recv() |
It receives a TCP message |
|
s.sendto () |
It transmits the UDP message |
|
s.recvfrom () |
This method transmits the UDP message |
|
socket.gethostname () |
It returns the hostname |
Client Stock methods
|
Method |
Description |
|
s.connect() |
It actively initiates the TCP Server connection. |
Send Email
The mail server is the application that manages and transfers the email through the Internet. The Mail servers are of 2 kinds and they are:
- incoming mail servers
- outgoing mail servers.
The Incoming mail servers deliver in two types and they are:
- Post Office Protocol (POP3)
- Internet Message Access Protocol (IMAP)
An outgoing mail server is also called Simple Mail Transfer Protocol or SMTPs. The SMTP is the Internet Standard of email transmission.
Python's Standard Library consists of the 'smtplib' module and it defines the SMTP client session as the object that is used for sending the mail through the Python program.
smptlib.SMTP() function:
This method returns the object of the SMTPclass. It encloses and handles the connection to an ESMTP or STMP server. Below is the function that is taken under the following arguments:
|
host |
It is the name of the remote host to which it associates. |
|
local_hostname |
It is utilized as the FQDN of the local-host in which the EHLO/HELO commands. |
|
port |
This mentions the port to where it is connected. By default, smtplib. SMTP_PORT is utilized. |
|
source_address |
A 2- tuple (port,host) object the socket to bind. |
The succeeding are the methods that support SMTP operations:
|
quit() |
It eliminates the SMTP sessions |
|
connect (port,host, source_address) |
It helps in establishing the connection between the host and the port. |
|
Login(user.password) |
It login to the SMTP server that requires authentication. |
|
docmd(cmd, args) |
It sends a command and also the response code |
|
data(msg) |
It transfers the message data to a server. |
|
ehlo(name) |
The hostname is identified by itself |
|
getreply () |
This receives the reply from the server that consists of the server response code. |
|
send_message(msg, |
It converts the message with a byte string and forwards it on to the sent email. |
|
putcmd(cmd.args) |
It delivers the command to the server. |
|
sendmail(self, from_addr, to addr,msg) |
It is used to perform the complete mail transaction. |
|
starttls() |
This places the connection to the STMP server into the TLS mode. |
For exhibiting the above-mentioned functionality, go through the script that is given below that makes use of google's smtp (mail server) for sending the email message.
Firstly, all the SMTP objects are used in setting up using Gmail's SMTP port and server 527. The SMTP object later identifies itself by the invoking ehlo() command. You can also activate the Transport Layer Security for an outgoing mail message.
The next login () command is invoked on passing the credentials as the arguments to it. Later, the mail message is gathered by attaching it to the header that is in a pre-defined format and is sent using the Sendmail() method. The SMTP objects are closed later,
    mport smtplib
    content="Beautiful World"
	mail=smtplib.SMTP('smtp.gmail.com',587)
	mail.ehlo()
	mail.starttls()
	sender='pythonalways@gmail.com'
	recipient='batman@gmail.com'
	mail.login('pythonalways@gmail.com','m15v5l61')
    header='To:'+receipient+'\n'+'From:' \
    +sender+'\n'+'subject:testmail\n'
	content=header+content
	mail.sendmail(sender, recipient, content)
	mail.close()
Python Notes:
Prior to running the above script, the sender's Gmail account should be configured certainly to grant access to "less secure apps":
Refer to the below link:
https://myaccount.google.com/less
secureapps
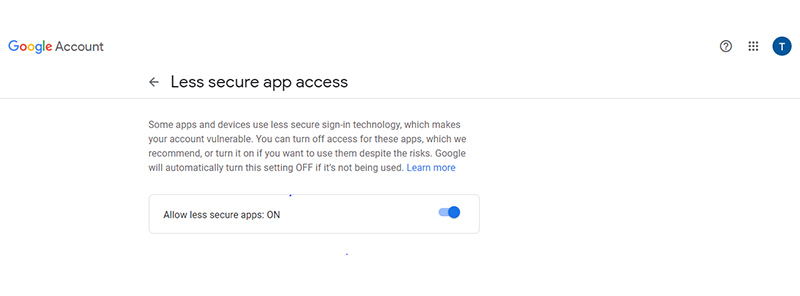
- Turn on the Shown Toggle button to ON.
- When everything moves well, then you can execute the above script. The message must be delivered to the respective recipient's inbox.
Multi threading
Running different threads is similar to that of running different programs consequently. In this Python Programming Tutorial let us see in-depth about the Multi-threads concepts.
The Multiple threads within the process share the similar data space that is within the main thread and it can further share the information and communicate with others easily when compared if it is in a separate process.
The threads at times are called light-weight processes and it does not require more memory overhead and it is cheaper than the processes.
The thread is the beginning and conclusion of the execution sequence. It has the instruction pointer that records where the context is running presently
- It can be annexed (interrupted)
- It can be kept on hold (sleeping) when the other threads run.
Beginning a New Thread
To create a new thread, you should call the following methods in the available thread module.
thread.start_new_thread (function, args[, kwargs])
This type call allows the fast and efficient method for creating the new threads on both windows and linux.
The Method Call automatically rebounds and the child thread begins the call function with a passed set of args. If a function returns, then a thread eliminates.
Over here, the args is the tuple of arguments that is used as an empty tuple for calling the function by not passing any arguments. "kwargs" is the optional dictionary of the keyword arguments.
Example
    #!/usr/bin/python

    import thread
    import time

    # Define a function for the thread
    def print_time(threadName,delay):
    count = 0
    while count < 5:
    time.sleep(delay)
    count += 1
    print "%s: %s" % (threadName,time.ctime(time.time()))

    # Create two threads as follows
    try:
   thread.start_new_thread( print_time,("Thread-1",2,))
   thread.start_new_thread( print_time,("Thread-2",4,))
   except:
   print "Error: not able to begin a thread"

   while 1:
   pass
Output
        Thread-1: Wed Jan 22 15:42:17 2020
	Thread-1: Wed Jan 22 15:42:19 2020
	Thread-2: Wed Jan 22 15:42:19 2020
	Thread-1: Wed Jan 22 15:42:21 2020
	Thread-2: Wed Jan 22 15:42:23 2020
	Thread-1: Wed Jan 22 15:42:23 2020
	Thread-1: Wed Jan 22 15:42:25 2020
	Thread-2: Wed Jan 22 15:42:27 2020
	Thread-2: Wed Jan 22 15:42:31 2020
	Thread-2: Wed Jan 22 15:42:35 2020
Though it is more appropriate for low-level threading, however, the thread module is limited when compared with the newer threading module.
Threading Module
The newer threading module consists of Python 2.4 and it enables robust-level support for the threads. A threading module aids in revealing every method of a thread module and it provides the following additional methods:
- threading.currentThread() - It rebounds the number of thread objects that are present on the caller's thread control.
- threading.enumerate() - It rebounds the list of every thread object that is actively present.
- threading.activeCount() - It rebounds the active number of the thread objects.
- start() - It is the start() method that begins the thread by calling a run method.
- run() - A run() method is the beginning point of a thread.
- join([time]) - It awaits for the thread to eliminate.
- getName() - It is used in returning the name of the thread.
- isAlive() - It is used in verifying whether the thread is still executing.
- setName() - A setName() method aligns the name of the thread.
Additionally, the threading modules consist of the Thread class which basically deploys threading. The following are the threading modules that are offered by the thread class:
Thread Synchronization
In the multi-threaded program, you can encounter a situation where more than one thread bids to obtain access from the same resource. And chances are high where you can get an unexpected result. For instance, when multiple threads try to read/write an operation on the same file, it results in data inconsistency as one of the threads shall change its content before the previous thread's file closing operation is not completed. So such concurrent handling of the shared resources like function or file should be synchronized in the way that it has created only a single thread and that can access the resource at a specific point of time.
- Lock Object - The lock object gives a synchronization mechanism. This is not owned by any specific thread when it is locked. The Lock objects always are in either of the following two states i.e 'locked' or 'unlocked'. Usually, at the time of the creation, it is in the unlocked state. Further, it has two primary methods of release() and acquires ().
- acquire() - When the state is unlocked, this method modifies the state to the locked and it returns automatically. The method takes the optional blocking argument. If it is set to False, it indicates do not block. If the call that is within the blocking is set to TRUE shall block it and return to FALSE immediately; or else, it sets the lock to the locked and rebounds to TRUE.The Return value of this type is TRUE when the lock is acquired successfully, and FALSE if not.
- release () - If the state is locked, then this method in another thread modifies it to unlocked. The release () method must be called only in the locked state. If the attempt is made and if it is released to an unlocked lock, the Runtime Error is raised.
When a lock is locked, it is reset for unlocking and returning. When any other threads are blocked, then waiting for the lock to turn unlocked, permit only one of them to proceed further. This method has no return value.
XML Processing
This session of the Python Tutorial covers about XML, which is an open-source language that is portable and it permits the programmers to build applications that can be actively read by other applications irrespective of the development language and the OS.
The (XML) Extensible Markup Language is the markup language that is more similar to HTML or SGML. It is recommended by the WWW consortium and it is available as the open standard. The XML is more useful for tracking the small to medium size data that does not require the SQL-based backbone.
Python's Standard Library has an XML package and this package follows the modules that describe the XML processing APIs:
- Simple API for the XML
- Document Object Model (DOM)
- SAX2 Convenience function and baseless classes.
Element Tree Module
The XML is the tree-like ordered data format. It consists of two classes for this purpose - the 'Element Tree' treats the complete XML document as a tree and the ' Element' here denotes the single node in the tree. Writing and Reading Operations on the XML files are performed at the ElementTree level. Interaction with the single XML Elements and with its sub-elements are performed at the entry-level.
For creating the XML file using an ElementTree:
The tree is the ordered structure of the elements that begin with the root and it is followed later by the other elements. Every element is created using the Element () function of the module.
import xml.etree.ElementTrees as xml
e=xml.Element('name')
All the elements are characterized using the attrib and tag attribute that is a dict object. For Tree's beginning element, attrib is the empty dictionary.
	 >>> root=xml.Element('students')
	 >>> root.tag
	 'students'
	 >>> root.attrib
	 {}
Now, you should set at least one or more child elements that are required to add under the root element. Add them using a Subelement() function and describe its text attribute.
	 child=xml.Element("student")
	 nm = xml.SubElement(child,"name")
	 nm.text = student.get('name')
	 age = xml.SubElement(child,"age")
	 age.text = str(student.get('age'))
Every child is added to the root by the append() function
root.append(child)
Once you have completed adding the needed number of the child elements, construct the tree object using the elementTree() function:
tree = xml.ElementTree(root)
The complete tree structure it is written to the binary file by the tree object's
	 write() function:
	 f=open('mytest.xml',"wb")
	 tree.write(f)
For Parsing XML File
The below method creates the new parser object and also returns it. The parser object created will mostly be of the first parser type of the system that identifies it.
xml.sax.make_parser( [parser_list] )
parser_list_ The optional argument consists of the set of parsers that are used to implement the make_parser method.
Parse Method
Below are the methods that are used for creating the SAX parser and it is used in parsing the document.
xml.sax.parse (xmfile, contenthandler[, errorhandler])
A detailed description of the parameters:
- contenthandler - It is the ContentHandler object
- errorhandler - It is used for specifying the error handler and it must be the SAX ErrorHandler object.
- xmlfile - It is the name of an XML file you can read from.
Parse String Method
Parse String Method is the other method that is used for creating the SAX parser and to parse a specified XML string.
xml.sax.parseString(xmlstring, contenthandler[, errorhandler])
A detailed description of the parameters:
- contenthandler - It is the ContentHandler object
- errorhandler - It is used for specifying the error handler and it must be the SAX ErrorHandler object.
- xml file - It is the name of an XML file you can read from.
Python GUI
Python gives numerous options in developing the (GUIs)- Graphical User Interfaces. The important features are mentioned below:
- Tkinter
- wxPython
- JPython
There are more interface available which you can find on the internet
Tkinter Programming
It is the popular GUI library that is used for Python. Python when it is combined with the Tkinter gives the fastest and easiest path to create the GUI Applications. Tkinter provides a robust object-oriented link for the Tk GUI toolkit.
Example
    #!/usr/bin/python

    import Tkinter
    top = Tkinter.Tk()
    # Code to add widgets will go here...
    top.mainloop()
And this would create the following window
Tkinter widgets
The Tkinter enables different controls like labels, text, and button boxes that are used in the GUI application and these controls are called widgets. Tkinter has 15 widgets and we present you with these widgets as a detailed description:
Operators & Description
- Canvas - A Canvas widget helps in drawing shapes like ovals, rectangles, and polygons in your application.
- Button - A button widget is used for demonstrating the buttons on your application.
- Check button - It is used in showcasing the number of options like checkboxes.
- Frame - A frame widget is utilized as the container widget for placing the other widgets.
- Entry - An Entry Widget is used for displaying the single-line text field to accept the values from a user.
- Label - A Label Widget is used in providing the single-line caption to other widgets. It also consists of images.
- Menu button - A menu button widget is used for demonstrating the menus to your application.
- Listbox - It is used in providing the set of options to the user.
- Message - It is used in exhibiting a multiline text field to accept the values from a user.
- Menu - A menu widget is used for providing numerous commands to the user. These commands consist of the inside Menu button.
- Scale - A scale widget is used for providing the slider widget.
- Scroll - A scrollbar widget is used for accumulating and scrolling the capacity of multiple widgets like list boxes.
- Toplevel - It is used in detaching the window container.
- Paned Window - The Paned Window is the container widget that consists of a number of panes that are sequenced vertically or horizontally or horizontally.
- Spinbox -A Spinbox is a widget that is the alternative to the basic Tkinter Entry Widget that can be used for selecting the affixed number of values.
- Text - A text widget is used for demonstrating the text in different lines.
- Label Frame - It is a plain container widget. It is the primary purpose that functions as the container or spacer for the complex window layouts.
- tkMessagebox- It is the module that is used for showcasing the message boxes on your applications.
Python Extensions
Any code that we write using compiled languages such as Java, or C C++ shall be imported or integrated into the Python script as another one. These kinds of codes are termed as"extensions".
The Python Extension modules are nothing much, they are more or less similar to the C library. With the Unix machines, the above-mentioned libraries end in as .so i.e ( for the shared object), and on the Windows machine, they end in as .dll, i.e (dynamically linked library).
Prerequisites to write the Extensions
- To begin with, writing the extensions, you need the Python header files
- On the Unix Machines, usually, this requires the installation of the package python2.5 dev.
- The Windows users need the headers as part of a package when it is used as the binary Python installer.
- Furthermore, you should have demonstrable knowledge of C C++ for scripting the Python Extensions using C program.
The initial process of the Python Extension
To have the initial overview of your Python Extension module, you should sequence the codes into 4 major parts and they are:
- A Header file in Python.h
- The C function which you need to link from your module.
- Table mapping the name of functions as Python Developers allows you to watch the C function in the inner portion of the extension module.
- The Initialization function.
Header File in Python.h
You must insert the Python.h header file on your C source file, which grants you access to the Python API's internal functions and is used for hooking the module to the interpreter.
Ensure that you include the Python.h before other headers that you need. You must also comply with the includes that function that you need to call from Python.
C Function
The application of C on your functions usually takes one among the three following forms:
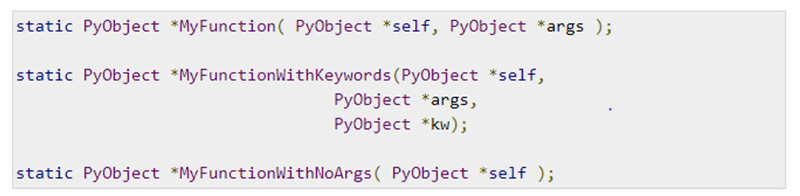
All the precedent declarations rebound to the Python object. There are no such void functions in Python as you can find in the C. When you don't want your functions to return the value, rebound the C equivalent of Python's None value. A Python header specifies the macro, Py_RETURN_NONE.
The names of the C function shall be whatever you prefer as it won't be visible outside the extension module and it is elucidated as the Static function.
The C function is generally named on merging the Python function and module names in sync and it is displayed below:

It is the Python function called 'func' inside the module. You will be placing the Pointers to the C function into a method table for a module that commonly comes after your source code.
Method Mapping Table
A Method Mapping table is an elementary set of PyMethodDef Structures. And this structure looks like this:

A detailed description of the Member Structure is presented below
- ml_name - It is the name of a function. Since the Python Interpreter represents this while it is applied in the Python programs.
- ml_Flags - It shows the interpreter that is used by the 3 major ml-meth is using:>
- This Flag generally consists of the value METH_VARARGS
- It could be the bite OR'ed with METH_KEYWORDS when you permit the keyword arguments into a function.
- It can also have the value of the METH_NOAGRS that implies it is not mandatory to accept all the arguments.
- ml_doc - It is the docstring of a function, that can be NULL when you don't want to write.
- ml_meth - It must be an address to the function that consists of any one of the impressions that are defined in the above section.
The Tables should be discarded with the sentinel that comprises 0 and NULL values for assigned members.
Example

Initialization Function
The ending portion of your extension module is the initialization function. It is called by a Python interpreter while the module is being loaded. A function should be named as initModule, where a Module is considered as the name of the module itself.
Firstly, the initialization function is required to be shipped from the library you are going to build. Python header specifies the PyMODINIT_FUNC for inclusive of the assigned formulas that have to take place in the specific situation while compiling. All that is required is that you have to use it while defining a function.
The C initialization function consists of the overall structure that is displayed below:
A brief explanation of the Py_InitModule 3 function:
- module_methods - It is the mapping table name that is explained above.
- docstring - It is the comment that you would want to give on your extension.
- nc- It is the function that needs to be exported.
Example:

Installing and Building Extensions
A distutils package eases the process of the distribution of both Python modules; it can be any extension module or pure Python, in a pre-defined procedure. The modules are distributed on source built and form are installed through the setup script that generally calls up for setup.py as mentioned below:

Now, make use of this preceding command that would help in performing all the required linking and compilation steps, with the proper set of linker and compiler commands, copies, and flags to result in the dynamic library to the appropriate directory.
$ python setup.py install
Python Notes:
Only while applying this on the Unix Systems, you should run this command from its source to get access for scripting the site-package directory. When it comes to the Windows system there are no such issues.
Importing Extension
Upon installing your extension, you can call and import the extension in your Python script as follows −
     #!/usr/bin/python
     import helloearth

      print helloearth. helloearth()
Output:
Hello, Python extensions ! !
Passing Functions Parameters
Since most likely you would want to describe the functions that can accept the arguments, you shall use any one or the other signature for the C function.
For instance, the function that is mentioned below accepts a few numbers of parameters and it will be like:

You can utilize the API PyArg_ParseTuple function for extracting the arguments from one PyObject pointer and pass it to your C function.
A first argument to the PyArg_Parse Tuple is an args argument. It is the object that you would parse. The 2nd argument is the format string that defines arguments as you prompt it to appear. Every argument is portrayed by more than one character in a format that strings follow:
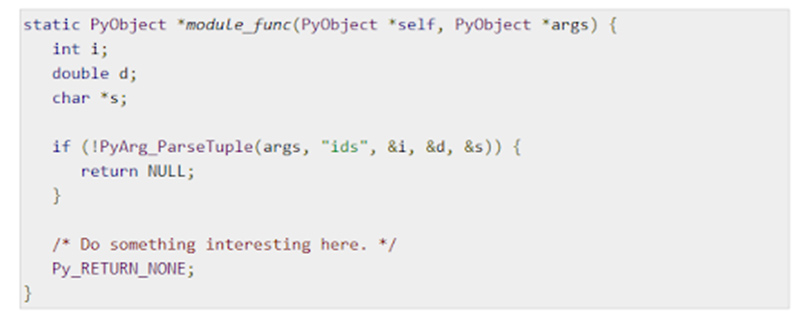
Compiling the recent version of your module and importing them permits you to request a new function with several arguments of any kind

A PyArg_ Parse Tuple extension
Here is the syntax of the PyArg_ Parse Tuple extension:
int PyArg_ParseTuple(PyObject* tuple,char* format,...)
Mostly this function rebounds 0 for the errors, and its values are not equivalent to zero for success. Over here format is the C string that defines optional and mandatory arguments.
Below are the set of format codes for the PyArg_ParseTuple
|
C type< |
Code |
Description |
|
double |
d |
The Python floats turn to be the C double. |
|
char |
c |
The Python String of the length turns to be 1 |
|
long |
l |
Python int develops the C long |
|
float |
f |
The Python float turn into be the C float |
|
Int |
i |
The Python int turns to be the C int |
|
Long long |
L |
The Python int develops into C long long |
|
char* |
s |
Python String that are without embedded nulls to the c Char |
|
PyObject* |
O |
It takes the non-Null acquired reference for Python Argument |
|
char*+int |
t# |
It can read-only the single segment buffer till the C length and address |
|
char*+int |
s# |
All Python String to the C address and length |
|
Py_UNICODE* |
u |
The Python unicode with the embedded nulls to C |
|
Py_UNICODE*+int |
u# |
All Python Unicode C length and address |
|
char* |
z |
It is like “s”, but still accepts None (It sets the C char* for null) |
|
as per ... |
(...) |
Python concatenation is considered as each argument per item. |
|
char*+ int |
w# |
It can write/read the single portion buffer to length and address of C |
|
|
| |
These arguments are optional |
|
|
; |
The Format end that is succeeded by the complete error message text |
|
|
: |
The Format end, that is succeeded by the function name for the error message |
|
char*+int |
z# |
Just like the s# this also accepts none and it sets the C char * to NULL |
Returning Values
A Py_BuildValue comes in the format string that is more similar to the PyArg_ParseTuple. Rather than forwarding the addresses of the values for the building, you can pass the actual values. Given below is the example for implementing the add function:
Example
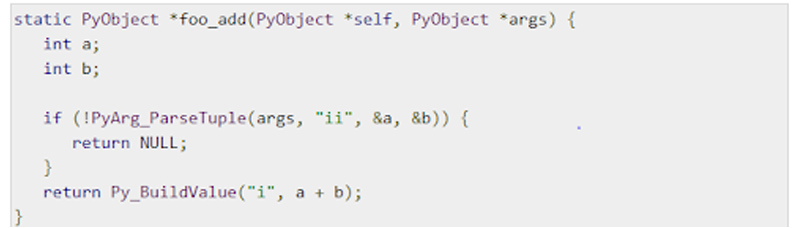
Output

A Py_BuildValue Function
The Standard syntax for the Py_BuildValue function −
PyObject* Py_BuildValue(char* format,...)
Now, in this place, the format is the C string that defines the Python object for building.
A PyObject* gives the results of the new reference
Python Training in Gurgaon at FITA equips the knowledge of the students from the fundamentals to the advanced level under the mentorship of real-time Python Developers.
Other Useful Resources
Python Questions and Answers
This part of the Python tutorial is devised with a special focus on aiding both the students and professionals to prepare themselves for numerous certification exams and interviews.
Enlist the important features of Python?
- Python supports both the Structured and Functional programming methods OOP.
- Python can be integrated with Java, C, C++, ActiveX, and COBRA seamlessly.
- Python can be used as the compiler bytecode that is used for developing larger applications.
- Python provides the feature of automatic garbage collection.
- Python enables high-level data types and also allows the users to perform dynamic type checking.
What is the need for the PYTHONSTARTUP environment variable?
It comprises the gateway of initialization of files that consists of the Python source code. This is executed each time you begin the interpreter.
For more questions click the link given below
Python Interview Questions and Answers
Python Tool and Utilities
A Standard Library usually comes with numerous modules that can be utilized both as the modules and command-line utilities
A dis Module
The dis module is a Python disassembler. It converts the byte codes to a pattern that is easier for a human to learn and consume. One of the benefits of the disassembler is that you can run it from the command line itself. It comprehends the furnished scripts and prints the disassembled byte codes for the STDOUT. A dis function holds the method, function, class, or the code for objecting it as a single argument.
Example

Output
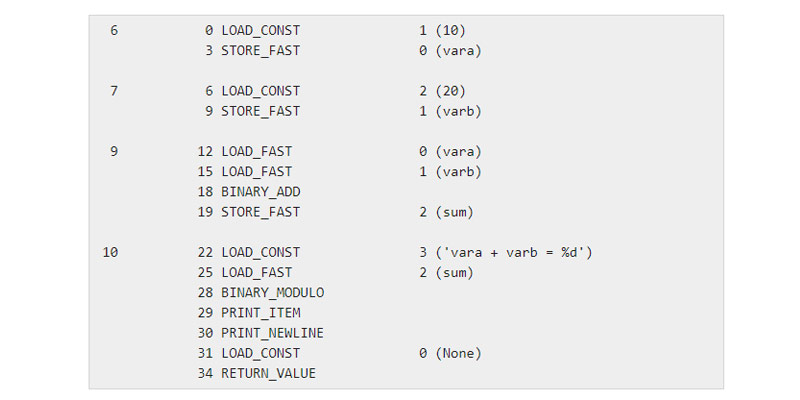
The pdb module
A pdb module is an ideal standard Python debugger. This is based on a bdb debugging framework.
You can run a debugger right from a command line and go to the next line and aid to get the set of available commands.
Example
Prior to running your pdb.py, set your way properly to the Python lib directory.
A Profile Module
A Profile Module is a typical Python profiler. You can run this profiler from a command line -
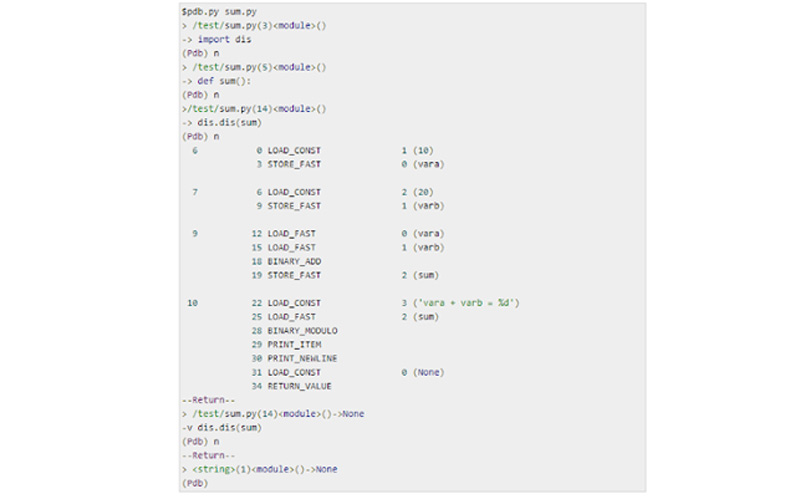
Example
Let's try the Profile to run the program
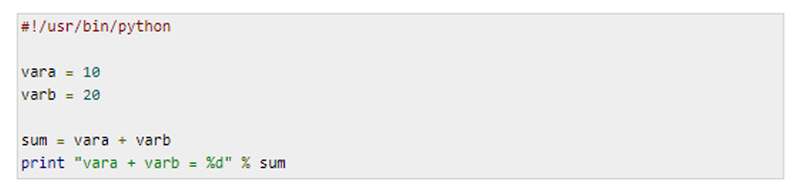
Now, try running the cProfile.py over the file sum.py
A Tanbanny Module
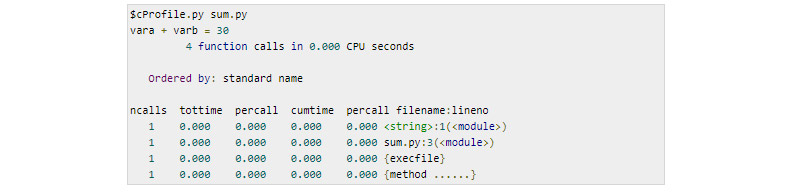
A tabanny module verifies the Python source file for the equivocal indentation. If the file mixes the spaces and tabs in a way that it throws the indentation, irrespective of the tab size you use it complains
Example
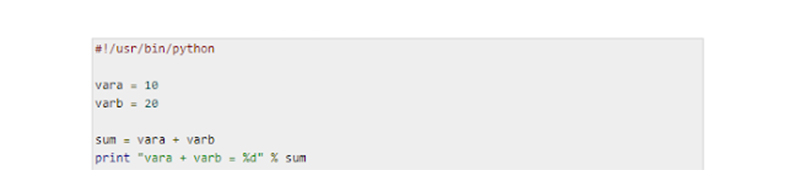
When you try the correct file with the tabnanny.py, then it doesn't complain as given:

Python Useful Resource
- Python.org - It is the Official Page of Python where you can find the entire list of installation, tutorials, and documentation.
- Think Python- It is a free book where you get the idea of the complete Python coding and scripts.
- Python & XML - It is the Guide that links to coding and documentation to handle the XML in Python.
Python Books
In this blog, we have compiled python books for beginners as well as the best Python Books for Beginners to advanced learners. To learn more about Python, we compiled the best Python books for beginners and advanced programmers. Additionally, we also compiled python books for beginners as well as best python books for beginners to advanced learners. These books will enhance your Python programming language, coding knowledge, Python library modules for performing tasks, Python tools, python framework, web application, and its concepts, variables, functions, fundamental concepts of machine learning, programming skills in Python 3 and you can learn many concepts.
Interview Questions
Interview Questions on Digital Marketing Java Interview Questions For Experienced Selenium Interview Questions and Answers For Experienced Hadoop Interview Questions and Answers For Experienced Python Interview Questions and Answers For AWS Interview Questions and Answers For Experienced DevOps Interview Questions and Answers Oracle Interview Questions PHP Interview Questions For Freshers AngularJs Interview Questions RPA Interview Questions Software Testing Interview Question and Answer Mobile Testing Interview Questions and Answers Salesforce Interview Questions Networking Interview Questions and Answers Pega Interview Questions NodeJS Interview Questions Ethical Hacking Interview Questions Data Science Interview Questions and Answers Javascript Interview Questions Blue Prism Interview Questions SEO Interview Questions Android Interview Questions MS Excel Interview Questions Cloud Computing Interview Questions Cyber Security Interview Questions Interview Question on Tableau Power BI Interview Questions and Answers Artificial Intelligence Interview Questions and Answers Azure Interview Questions and Answers SQL Interview Questions and Answers Full Stack Interview Questions and Answers Dot Net Interview QuestionsFull Stack Interview Questions and Answers UI UX Interview Questions and Answers ReactJs Interview Questions Full Stack Interview Questions and Answers Linux Interview Questions
Contact Us
For Business
Testimonials
Resources
Follow Us
TRENDING COURSES
JAVA Training In Chennai Core Java Training in Chennai Software Testing Training In Chennai Selenium Training In Chennai Python Training in Chennai Data Science Course In Chennai C / C++ Training In Chennai PHP Training In Chennai AngularJS Training in Chennai Dot Net Training In Chennai DevOps Training In Chennai German Classes In Chennai Spring Training in ChennaiStruts Training in Chennai Web Designing Course In Chennai Android Training In Chennai AWS Training in Chennai
iOS Training In Chennai SEO Training In Chennai Oracle Training In Chennai RPA Training In Chennai Cloud Computing Training In Chennai Big Data Hadoop Training In Chennai Digital Marketing Course In Chennai UNIX Training In Chennai Placement Training In Chennai Artificial Intelligence Course in ChennaiJavascript Training in ChennaiHibernate Training in ChennaiHTML5 Training in ChennaiPhotoshop Classes in ChennaiMobile Testing Training in ChennaiQTP Training in ChennaiLoadRunner Training in ChennaiDrupal Training in ChennaiManual Testing Training in ChennaiWordPress Training in ChennaiSAS Training in ChennaiClinical SAS Training in ChennaiBlue Prism Training in ChennaiMachine Learning course in ChennaiMicrosoft Azure Training in ChennaiSelenium with Python Training in ChennaiUiPath Training in ChennaiMicrosoft Dynamics CRM Training in ChennaiUI UX Design course in ChennaiSalesforce Training in ChennaiVMware Training in ChennaiR Training in ChennaiAutomation Anywhere Training in ChennaiTally course in ChennaiReactJS Training in ChennaiCCNA course in ChennaiEthical Hacking course in ChennaiGST Training in ChennaiIELTS Coaching in ChennaiSpoken English Classes in ChennaiSpanish Classes in ChennaiJapanese Classes in ChennaiTOEFL Coaching in ChennaiFrench Classes in ChennaiInformatica Training in ChennaiInformatica MDM Training in ChennaiData Analytics Courses in ChennaiFull Stack Developer Course in ChennaiHadoop Admin Training in ChennaiBlockchain Training in ChennaiIonic Training in ChennaiIoT Training in ChennaiXamarin Training In ChennaiNode JS Training In ChennaiContent Writing Course in ChennaiAdvanced Excel Training In ChennaiCorporate Training in ChennaiEmbedded Training In ChennaiLinux Training In ChennaiOracle DBA Training In ChennaiPEGA Training In ChennaiPrimavera Training In ChennaiTableau Training In ChennaiSpark Training In ChennaiGraphic Design Courses in ChennaiAppium Training In ChennaiSoft Skills Training In ChennaiJMeter Training In ChennaiPower BI Training In ChennaiSocial Media Marketing Courses In ChennaiTalend Training in ChennaiHR Courses in ChennaiGoogle Cloud Training in ChennaiSQL Training In Chennai CCNP Training in Chennai PMP Training in Chennai OET Coaching Centre in Chennai
Are You Located in Any of these Areas
Adambakkam, Adyar, Akkarai, Alandur, Alapakkam, Alwarpet, Alwarthirunagar, Ambattur, Ambattur Industrial Estate, Aminjikarai, Anakaputhur, Anna Nagar, Anna Salai, Arumbakkam, Ashok Nagar, Avadi, Ayanavaram, Besant Nagar, Bharathi Nagar, Camp Road, Cenotaph Road, Central, Chetpet, Chintadripet, Chitlapakkam, Chengalpattu, Choolaimedu, Chromepet, CIT Nagar, ECR, Eechankaranai, Egattur, Egmore, Ekkatuthangal, Gerugambakkam, Gopalapuram, Guduvanchery, Guindy, Injambakkam, Irumbuliyur, Iyyappanthangal, Jafferkhanpet, Jalladianpet, Kanathur, Kanchipuram, Kandhanchavadi, Kandigai, Karapakkam, Kasturbai Nagar, Kattankulathur, Kattupakkam, Kazhipattur, Keelkattalai, Kelambakkam, Kilpauk, KK Nagar, Kodambakkam, Kolapakkam, Kolathur, Kottivakkam, Kotturpuram, Kovalam, Kovilambakkam, Kovilanchery, Koyambedu, Kumananchavadi, Kundrathur, Little Mount, Madambakkam, Madhavaram, Madipakkam, Maduravoyal, Mahabalipuram, Mambakkam, Manapakkam, Mandaveli, Mangadu, Mannivakkam, Maraimalai Nagar, Medavakkam, Meenambakkam, Mogappair, Moolakadai, Moulivakkam, Mount Road, MRC Nagar, Mudichur, Mugalivakkam, Muttukadu, Mylapore, Nandambakkam, Nandanam, Nanganallur, Nanmangalam, Narayanapuram, Navalur, Neelankarai, Nesapakkam, Nolambur, Nungambakkam, OMR, Oragadam, Ottiyambakkam, Padappai, Padi, Padur, Palavakkam, Pallavan Salai, Pallavaram, Pallikaranai, Pammal, Parangimalai, Paruthipattu, Pazhavanthangal, Perambur, Perumbakkam, Perungudi, Polichalur, Pondy Bazaar, Ponmar, Poonamallee, Porur, Pudupakkam, Pudupet, Purasaiwakkam, Puzhuthivakkam, RA Puram, Rajakilpakkam, Ramapuram, Red Hills, Royapettah, Saidapet, Saidapet East, Saligramam, Sanatorium, Santhome, Santhosapuram, Selaiyur, Sembakkam, Semmanjeri, Shenoy Nagar, Sholinganallur, Singaperumal Koil, Siruseri, Sithalapakkam, Srinivasa Nagar, St Thomas Mount, T Nagar, Tambaram, Tambaram East, Taramani, Teynampet, Thalambur, Thirumangalam, Thirumazhisai, Thiruneermalai, Thiruvallur, Thiruvanmiyur, Thiruverkadu, Thiruvottiyur, Thoraipakkam, Thousand Light, Tidel Park, Tiruvallur, Triplicane, TTK Road, Ullagaram, Urapakkam, Uthandi, Vadapalani, Vadapalani East, Valasaravakkam, Vallalar Nagar, Valluvar Kottam, Vanagaram, Vandalur, Vasanta Nagar, Velachery, Vengaivasal, Vepery, Vettuvankeni, Vijaya Nagar, Villivakkam, Virugambakkam, West Mambalam, West Saidapet
FITA Velachery or T Nagar or Thoraipakkam OMR or Anna Nagar or Tambaram or Porur or Pallikaranai branch is just few kilometre away from your location. If you need the best training in Chennai, driving a couple of extra kilometres is worth it!
© 2024 FITA. All rights Reserved.