
Overview
In 2009, Adam Abrons and Misko Hevery created AngularJS for the first time. However, it is now maintained by Google. Angular is entirely a JavaScript framework that is used for building dynamic and interactive applications. It is one of the popular front-end frameworks that is predominantly used for creating SPAs - Single Page Web Applications. Today, Angular is one such framework that has owned a remarkable position in the Web Development industry. Also, it is persistently evolving with the emerging needs in the industry and has also offered better solutions and support for developing Web applications for the front-end developers. Here in this Angular tutorial, you will have access to know about Angular and its role in the front-end development industry.
Intended Audiences: This AngularJS Tutorial is tailored for aspirants who want to kick-start their career in the Web Development domain and also for the Software Professionals who wish to become familiar with AngularJS concepts.
Prerequisites: There are no requisites for learning the Angular Concepts. However, knowing HTML, Javascript, AJAX, and CSS will help you grasp the ideas more quickly.
Reasons to learn AngularJS
AngularJS is the most popular open-source and front-end Web Application framework. It is a structural framework that is used for developing dynamic web applications. It permits you to make use of the HTML as the fundamental template language and allows you to extend HTML syntax for expressing the application components in a precise manner. It has the feature of dependency injection and data binding and it eliminates all the code that you are required to write. Also, all this takes place within the browser and thus makes it the best option for the server technology.
Here in the AngularJS Tutorial session, you will get to know about the features, advantages, and disadvantages of the AngularJS framework.
Common Features of the AngularJS
The common features of AngularJS are listed below:
- It is an efficient framework that could be developed using Rich Internet Applications.
- AngularJS offers the developers a wide range of options for writing client-side applications with the support of Javascript and it offers the clean Model View Controller.
- The Applications that are written in AngularJS are compatible with cross-browsers. AngularJS is capable of handling all the JavaScript code that is perfect for all browsers.
- AngularJS is completely free and it could be used by thousands of developers across the world. It is released under the Apache License 2.0.
- On the whole, AngularJS is the framework that is used for developing large-scale and high performance, and easy-to-handle web applications.
Core Features
Given below are the important features of the AngularJS
Scope - These are the set of objects that indicates the model. They usually act as a glue between the view and controller.
Data Binding - It is the automatic synchronization of data between view components and models.
Services - The AngularJS comes with numerous built-in services like $http for making the HTTP requests. These are the singleton objects that are instantiated only once in the app.
Controller - This is the list of JavaScript functions that are bound for a specific scope.
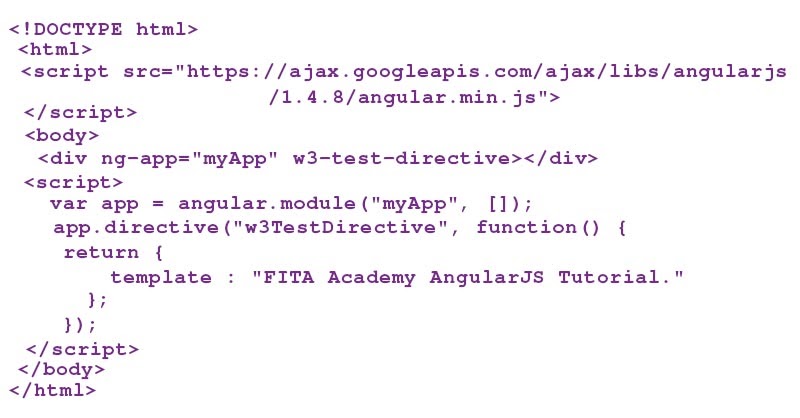
Directives - It is the markers that are found on the DOM elements namely CSS, attributes, and elements. It can be used for building custom HTML tags which serve as the new custom widgets like AngularJS has built-in directives like ngModel, and ngBind.
Filters - This is used for choosing the subset of all the items from the array and it returns to as a new array.
Routing - It applies the concept of switching the views.
Templates - It is mainly rendered to view the information right from the model and controller. It can be used as a single file or multiple views on one specific page using the partials.
Deep Linking - Deep Linking permits you to encode the specific state of the application on the URL so it could be bookmarked easily. Also, the applications could be restored right from the URL to the previous state.
Model View Whatever - It is also called MVW. It is the design pattern that is used for separating the application into different parts and it is called Model, View, and Controller. Each one of them has unique responsibilities. Further, AngularJS will not implement the MVC in the traditional aspects, rather it is something that is similar to the MVVM. The Angular JS is the team that denotes the Model View Whatever.
Dependency Injection - The AngularJS has numerous built-in dependency injections and subsystems that aids the developers to build and understand the test and applications easier. The AngularJS Training in Chennai at FITA Academy renders a holistic training of the AngularJS concepts and their applications clearly to the students.
Angular Concepts
To become more familiar with Angular, you must have a clear idea of the AngularJS Basics. See-through the illustration that is given below, we will further discuss these topics elaborately in the later session of this AngularJS Tutorial for beginners.
Merits of AngularJS
The Benefits of using AngularJS are:
- It supports you in building Single Page Applications clearly and easily.
- It offers data binding capacity for HTML. Hence, it offers its users a responsive and opulent experience.
- The AngularJS codes are highly unit testable.
- AngularJS bestows its users with reusable components.
- AngularJS makes use of the dependency injections and it utilizes the separation of concerns also.
- With the support of AngularJS, the developers could easily reach more functionality with lesser code.
- With AngularJS, the views are simple HTML pages and the controllers are written using JavaScript for performing the business processing.
- Keeping all these things aside, AngularJS applications are capable of running on all the important browsers and operating platforms like Android and iOS, tablets, and desktops.
Demerits of AngularJS
Though there are many upsides there are some downsides that need concern and it is:
Not Degradable - When a user of your application disables the JavaScript, then you can not see anything, except for the basic page.
Angular MVC Architecture
Model View Controller is commonly called MVC. It is the software design pattern that is used in building web applications. It is highly popular because it can separate the application logic from a UI layer and further lends its support in the concerns of the separation as well.
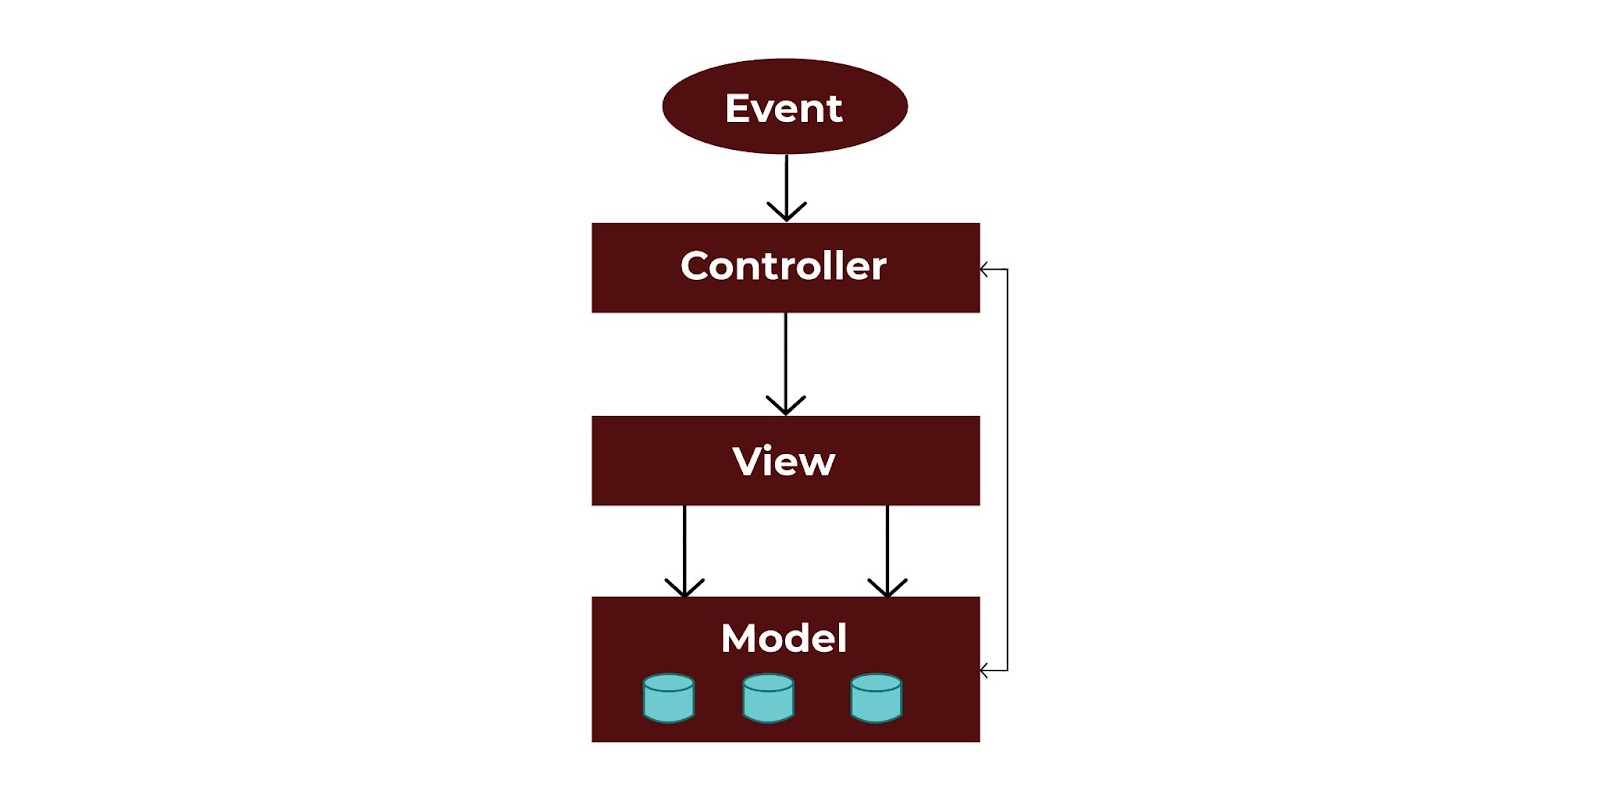
The above is the structure of the MVC, and it is made of three different parts, and they are:
Model: It is important to handle the application data. It can respond to the requests right from the view till it receives the instruction from a controller for updating itself.
View: It is more important for showcasing all the data or only a specific part of data to its users. Also, it specifies all the data is in a specific format that could be triggered by a controller's decision for presenting all the data. It is a script-based template system, and they are PHP, ASP, JSP, and these could be integrated easily with AJAX technology.
Controller: It is more important for controlling the relation between the views and models. It easily responds to the user input and executes the interactions on data model objects. Also, the controller receives the input, validates them, and performs all the operations of a business that alters the state of a data model.
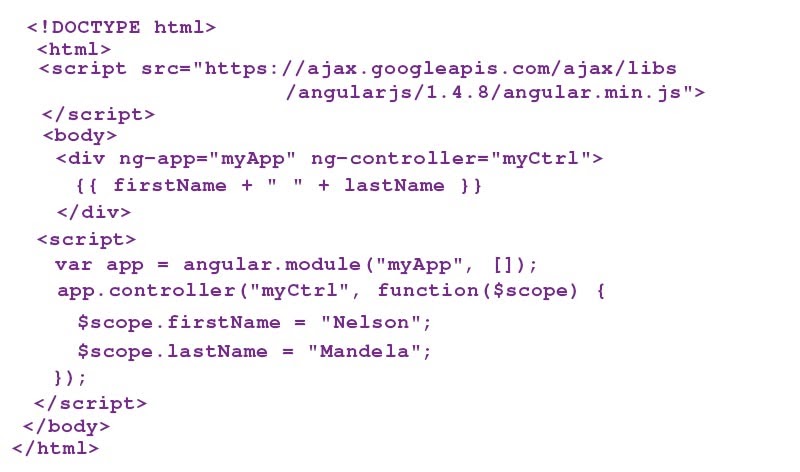
AngularJS First Application
Here in this AngularJS tutorial, we are going to see the basic format which is essential for becoming acquainted with the fundamentals.
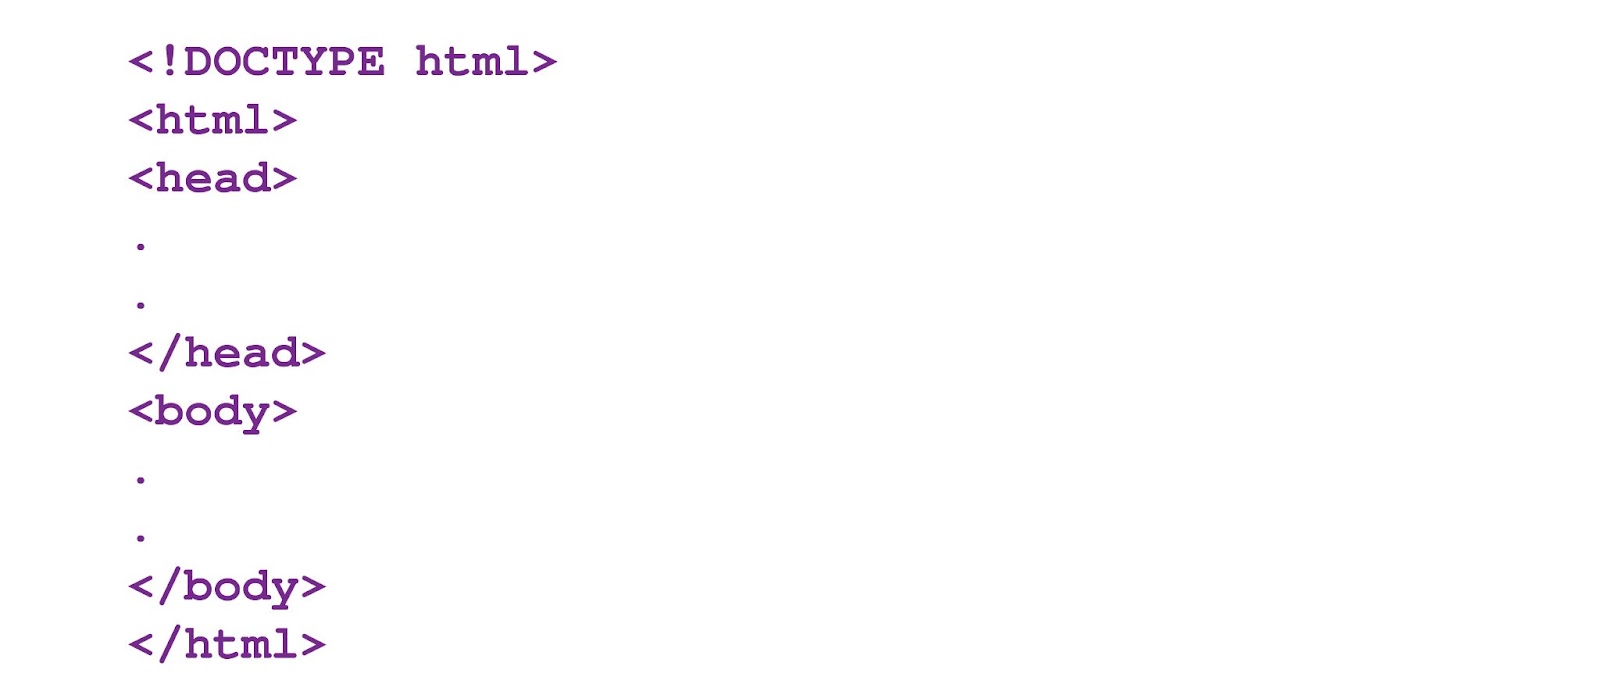
We all know the AngularJS applications are a blend of HTML and JavaScript. Firstly, all that you need for an HTML page is:
Secondly, you should incorporate the AngularJS JavaScript file to the HTML page so you can use the AngularJS:
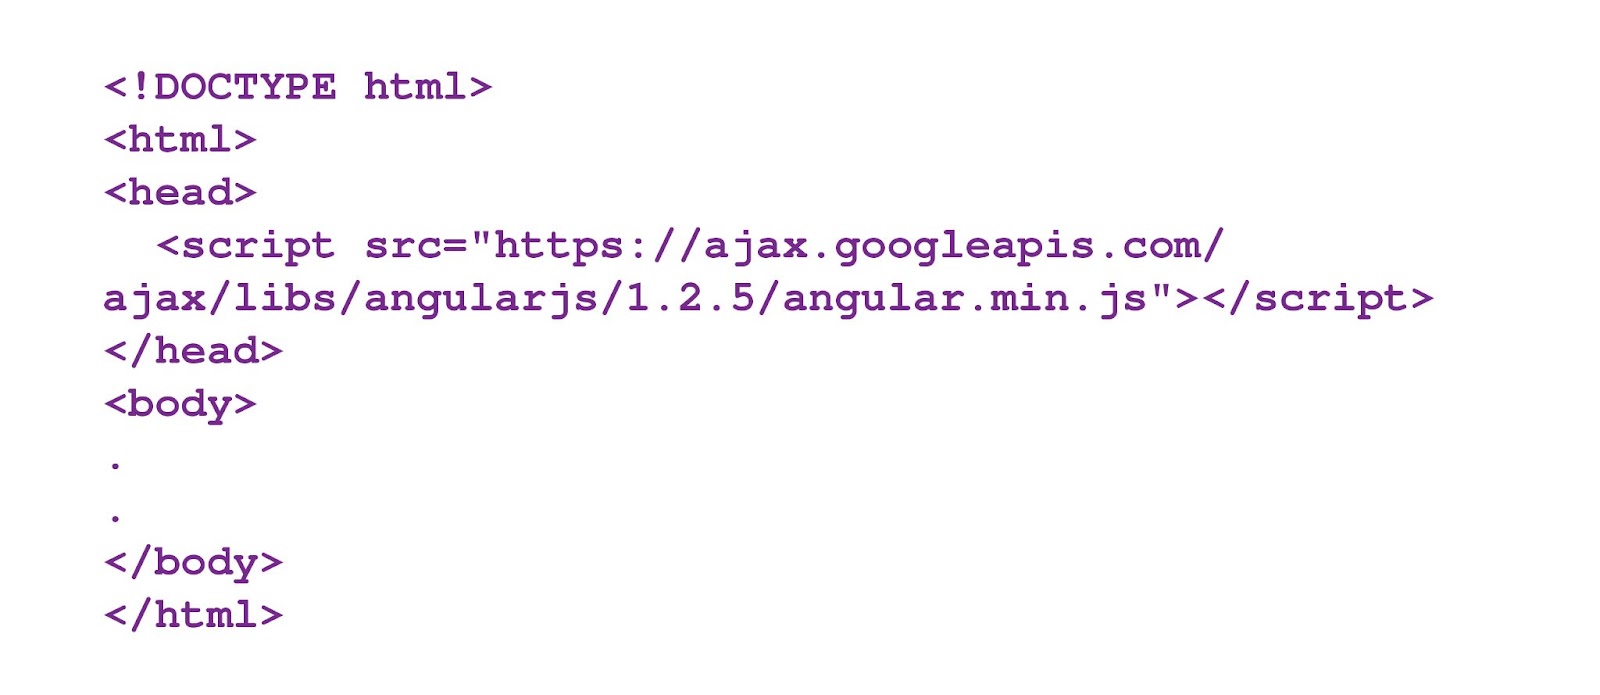
Angular Notes: It is recommended that you can make use of the recent version of AngularJS. Also, you don't need to use the same version that is used in the above illustration.
AngularJS First Example
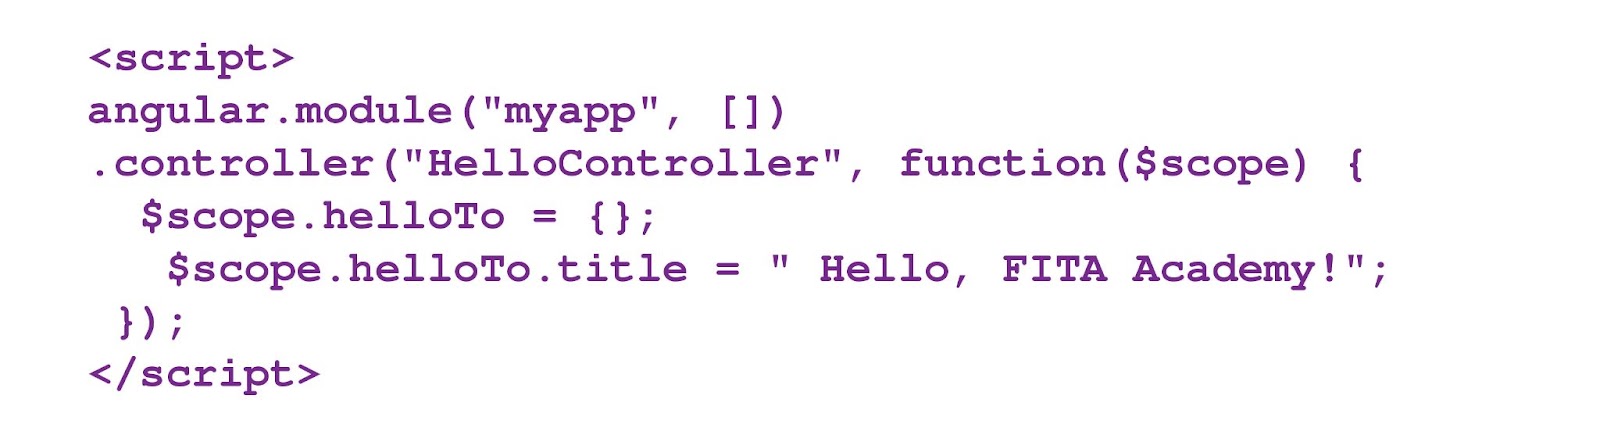
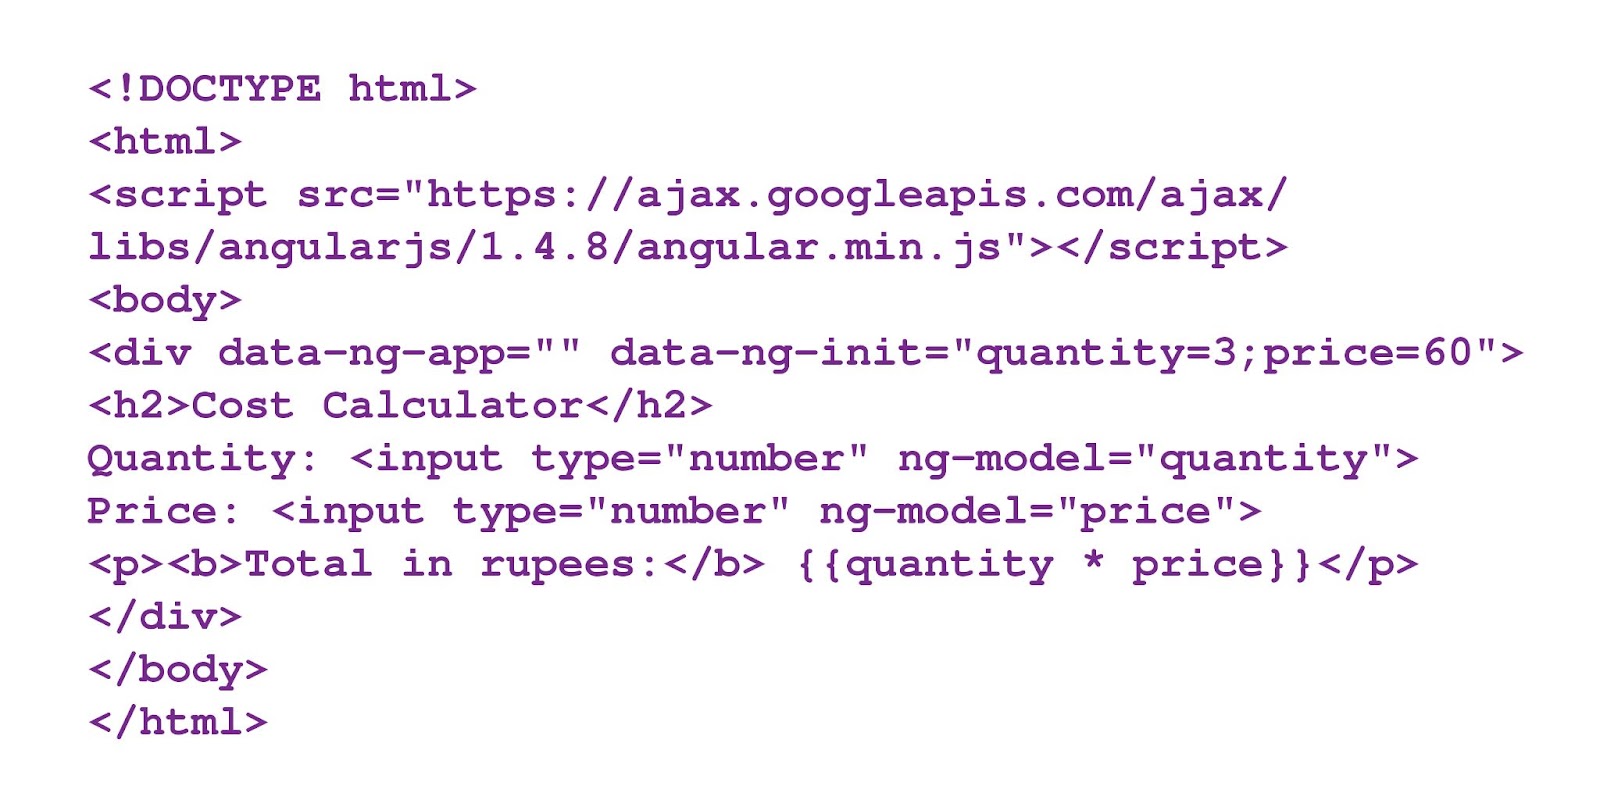
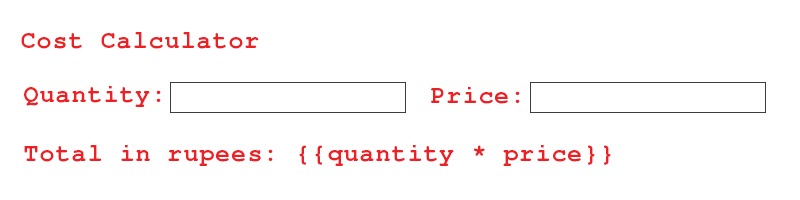
Given below is the simple example "Hello FITA Academy" made using AngularJS. It defines the Model, View, and Controller part of the AngularJS app.
Input
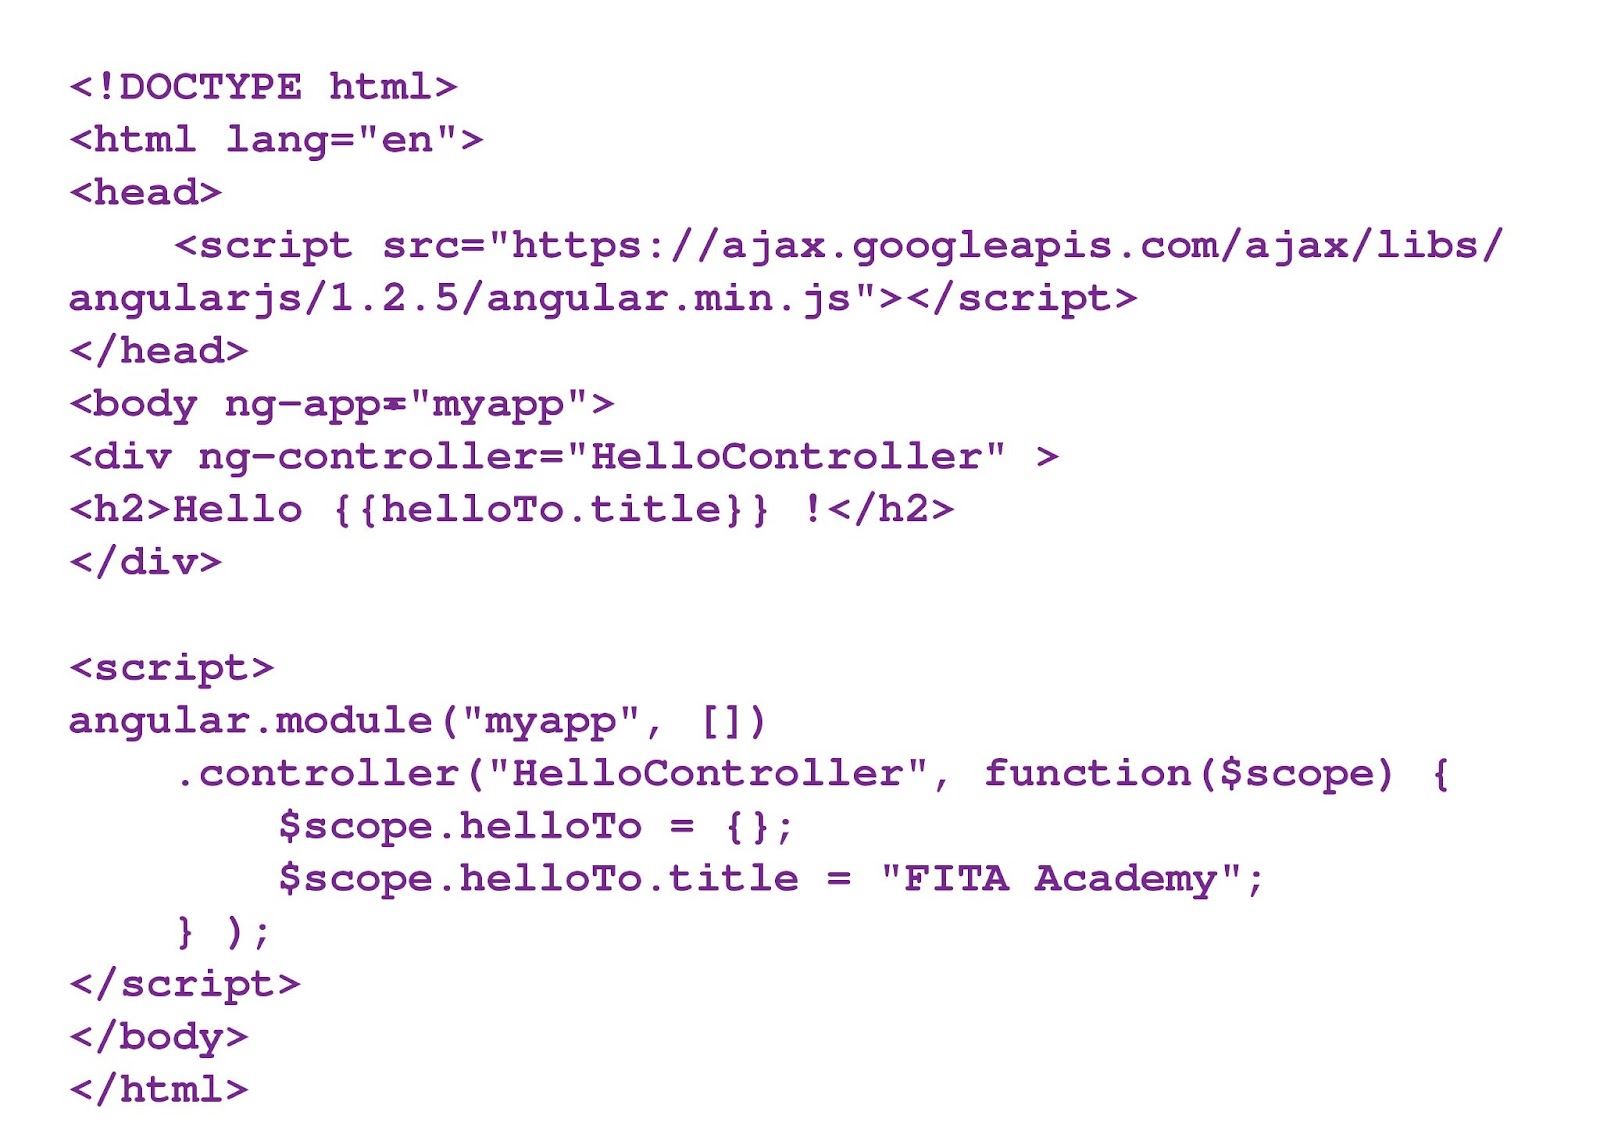
Output

View Part

Controller Part
AngularJS Data Binding
Data Binding is the most robust and useful feature that is found mainly in Software development technologies. It functions as the bridge for the business logic and view of an application. AngularJS follows the method of Two-way data binding method and here in this Angular tutorial we are going to see about them in brief.
One-Way Data Binding
A one-way data binding is a method where the value is taken right from the data model and they are placed into the HTML element. There are no other methods for updating the model from the view.
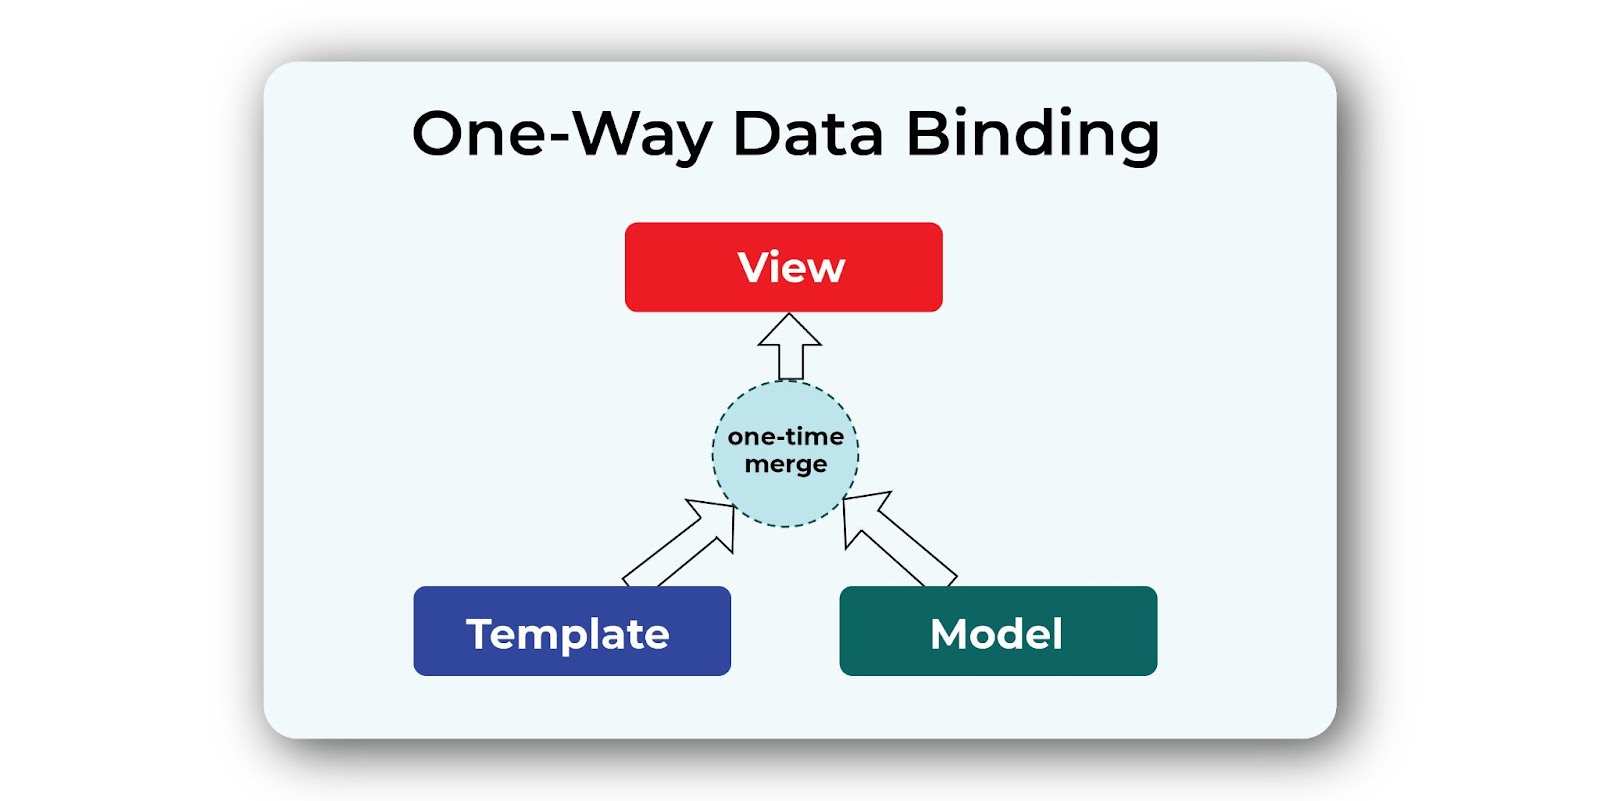
It is primarily utilized in Classical template systems. This system binds the data only in one specific direction.
Two-Way Data Binding
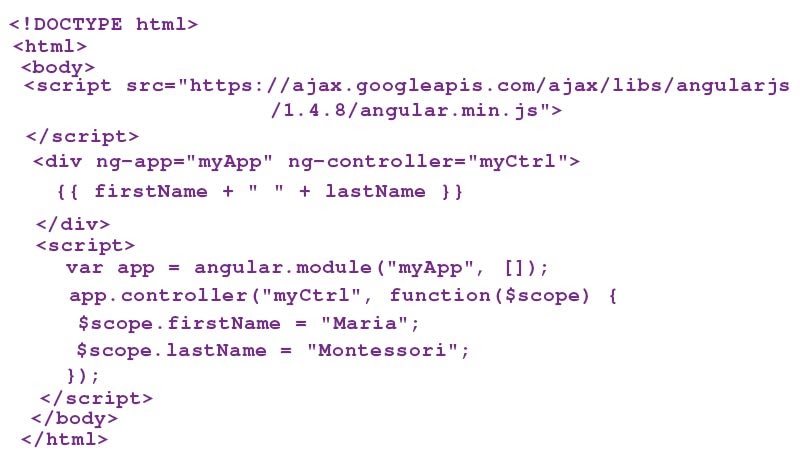
The Data-binding in the Angular App is the robust synchronization of data between the view and model components.
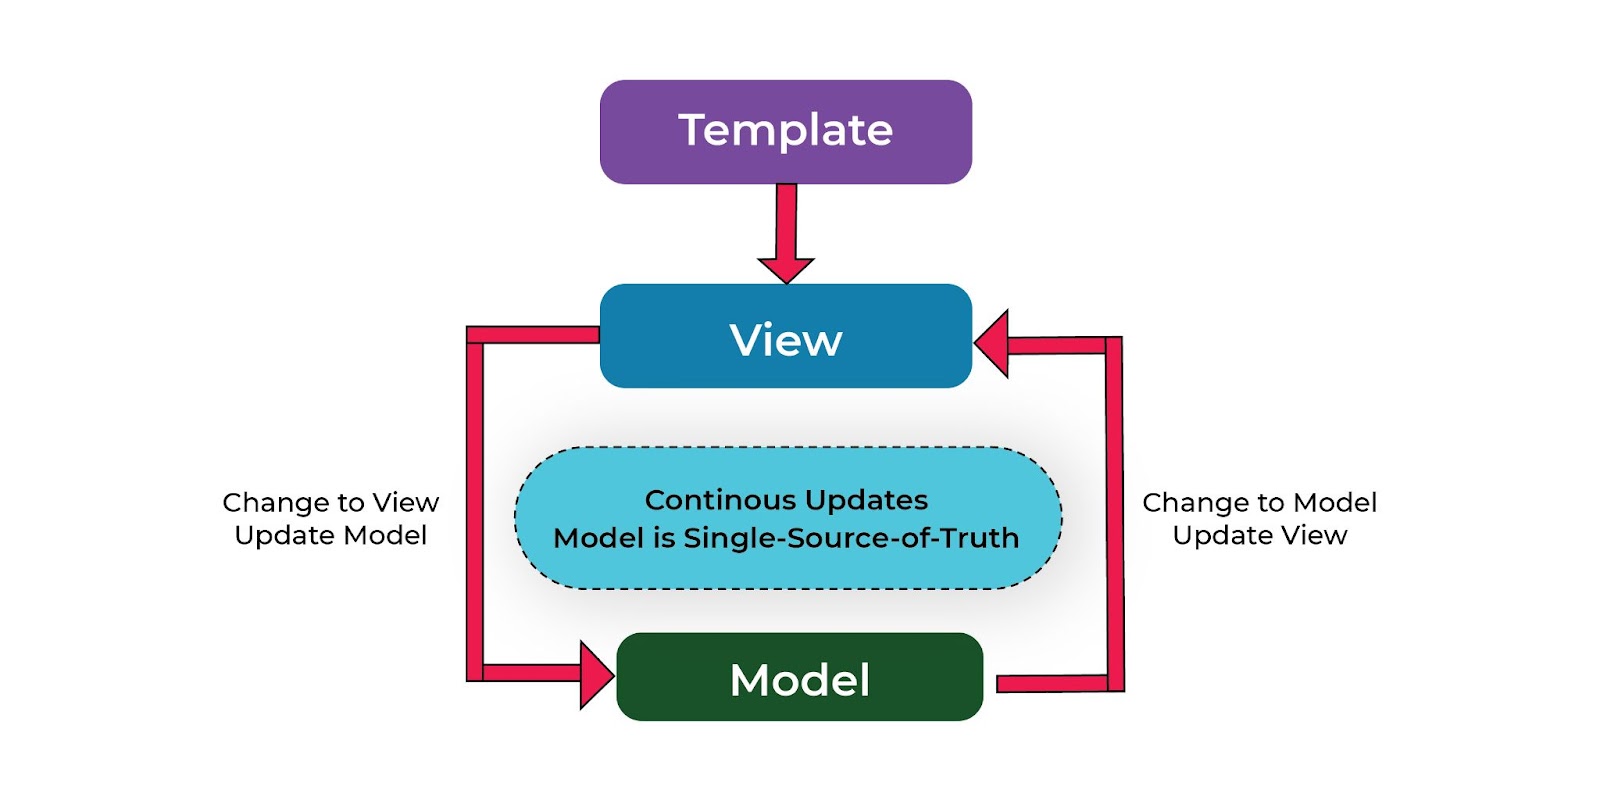
The Data Binding permits you to consider the model as a single source of truth to your application. It helps in viewing the projection of the model every time. When a model is altered, the view shall immediately reflect the change the other way around.
For instance,
Input
Output
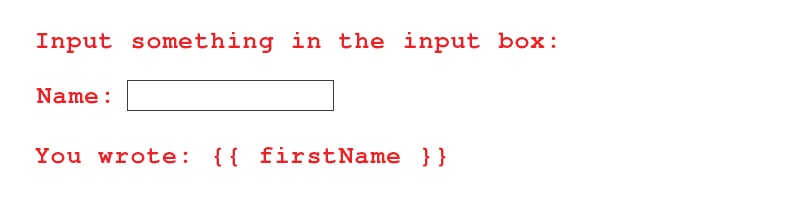
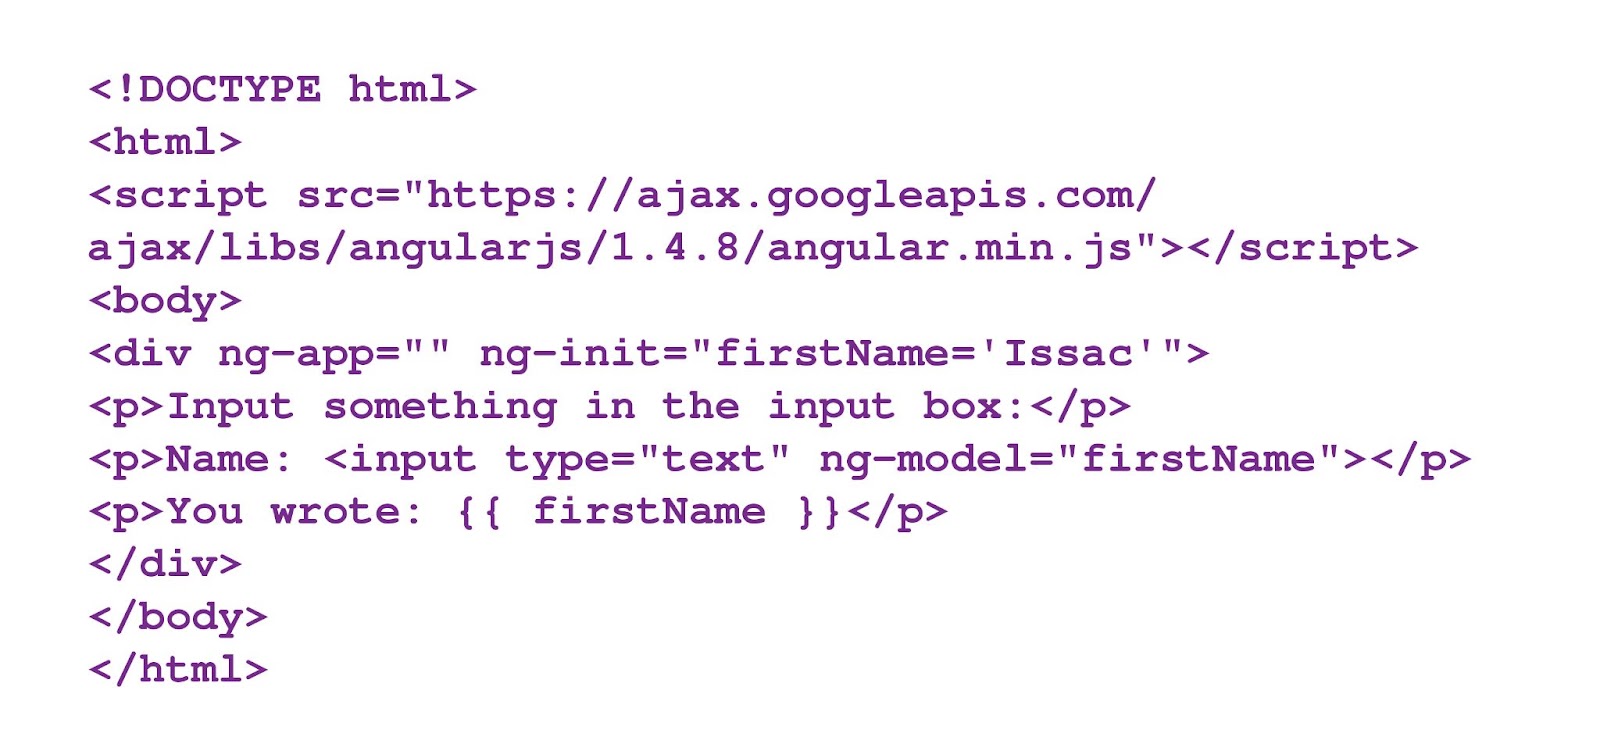
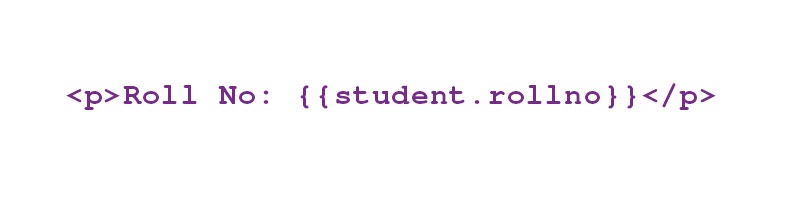
In the above instance, the {{ first name }} expression is regarded as the AngularJS data binding expression. The Data Binding in the AngularJS helps in binding the AngularJS Expressions with data.
{{firstName}} is leaped with the ng-model = "firstName".
Having seen about the one-way data binding, let see the example of two-way binding is done:
Input
Output
Angular Expressions
Here in this AngularJS tutorial, you will be covered with the popular Angular Expressions.
The Expressions are used for binding the application data into HTML. The Expressions are primarily written inside the double curly braces like {{expression}}. The Expression acts similar to the ng-bind directives. The AngularJS expressions are simply the JavaScript expression and the output of the data and where they are being used.
Using Numbers

Using Strings
Using Object
Using Array
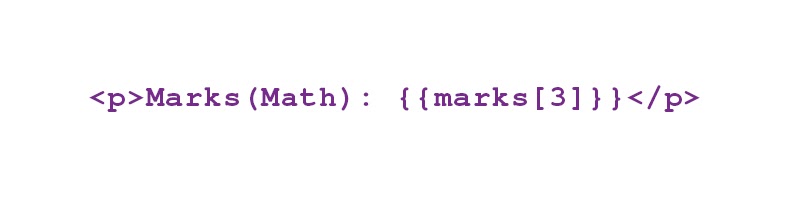
For Example:
The example which is given below is the mix of above all the mentioned expressions
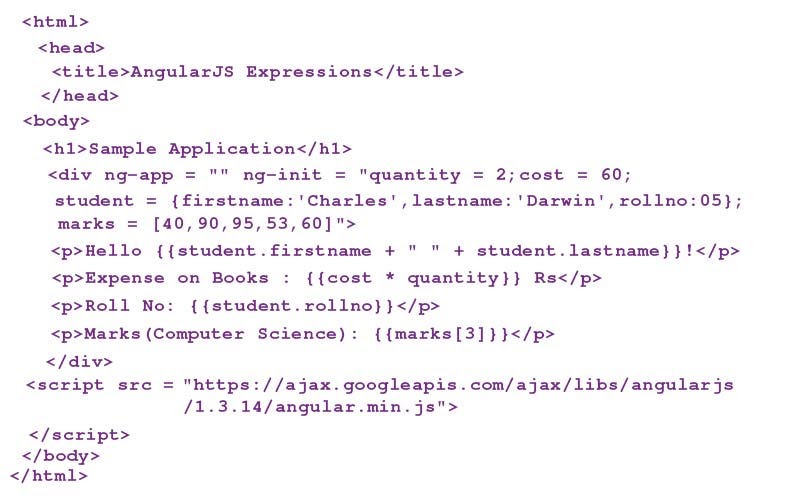
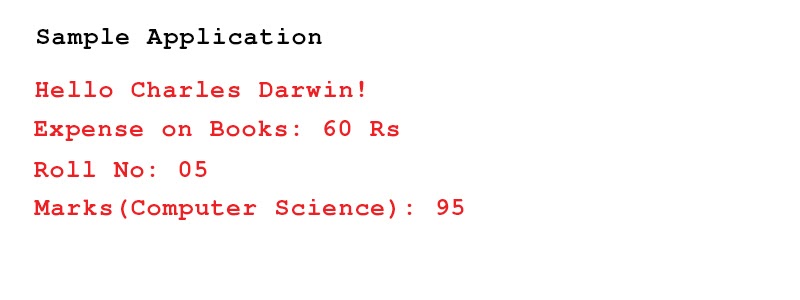
While opening the file testAngularJS.htm, in the web browser, you will see the result as:
Output:
Angular Directives
The AngularJS directives are mainly used for extending the HTML. It has unique attributes along with ng-prefix. In this Angular tutorial let us see some of the popular directives:
ng-app - It is the directive that is used for starting the AngularJS Application.
ng-init - It is the directive that is used in initializing the data application.
ng-model - It is the directive that helps in defining the mode that is found variable and is used in the AngularJS.
ng-repeat - It is a directive that is used for repeating the HTML elements for all the items that are found in the collection.
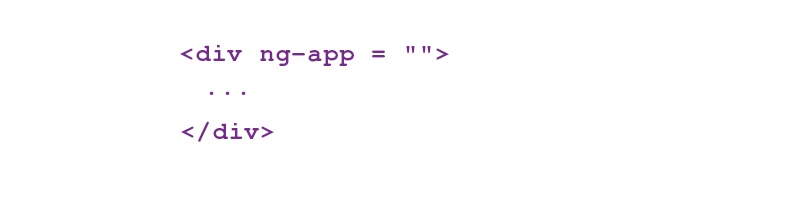
ng-app directive
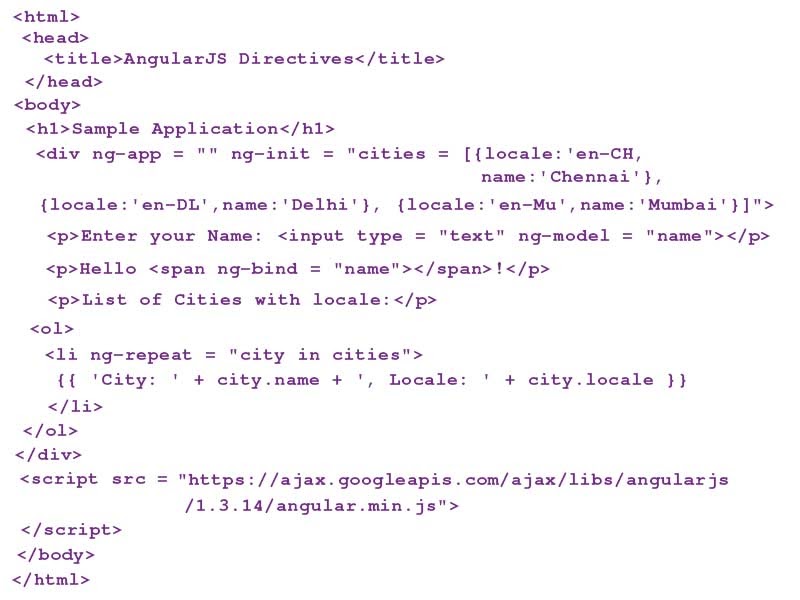
An ng-app directive begins with AngularJS Application. It is used for defining the core element. It immediately bootstraps or initializes the application when a web page consists of the AngularJS application that is loaded. It is used for loading different AngularJS modules that are found on the AngularJS Application. From the example that is given below, it is easy to define the default AngularJS application by using the ng-app attribute of the <div> element.
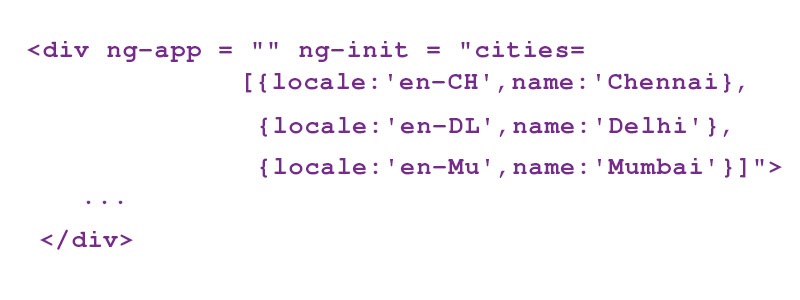
ng-init directive
An ng-init directive is mainly used for initializing the AngularJS Application data. It is used for assigning the values for the variables. From the example that is given below, you can initialize the array of cities. Over here, we have used the JSON syntax for defining the array of colors.
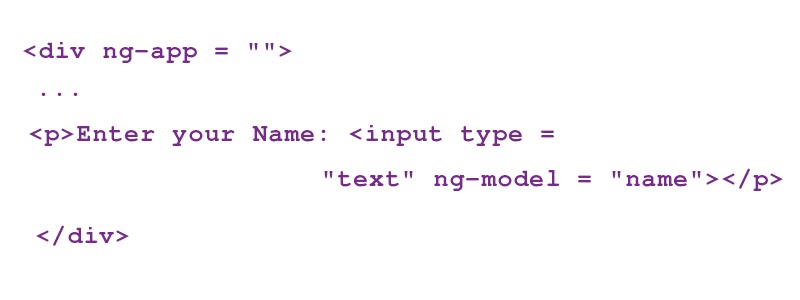
ng-model directive
An ng-model directive explains the variable/model that should be used in the AngularJS application. From the example that is given below, you can define the model name as:
The ng-model directive defines the model/variable to be used in AngularJS Application. In the following example, we define a model named name.
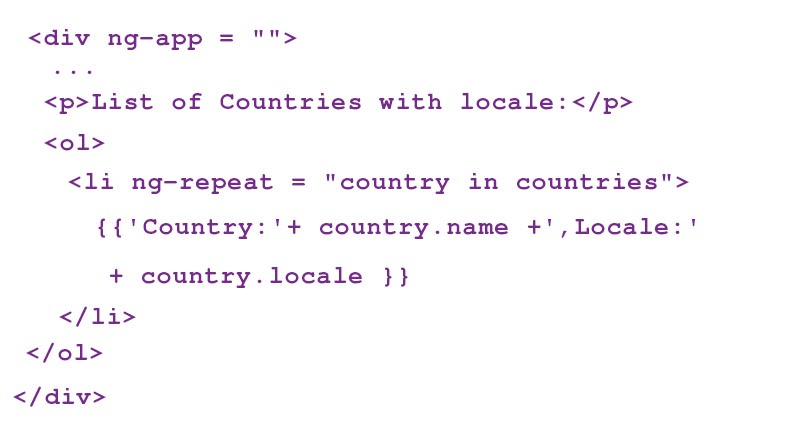
ng-repeat directive
An ng-repeat directive helps in repeating the HTML elements for all the items that are found in the collection. We have iterated over the array of color in the example that is given below:
For instance:
Here in this example, we have incorporated all the above directives
Output:
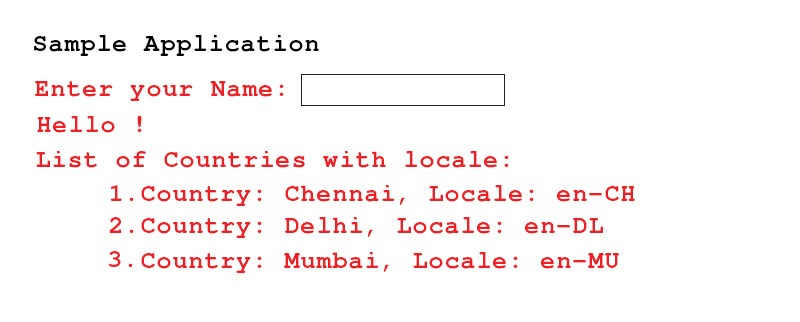
While you open the file testAngularJS.htm in the Web browser. You can enter the name and see the results. The AngularJS Online Training at FITA Academy is a meticulously crafted course that upskills the knowledge of the students with the required technical competence.
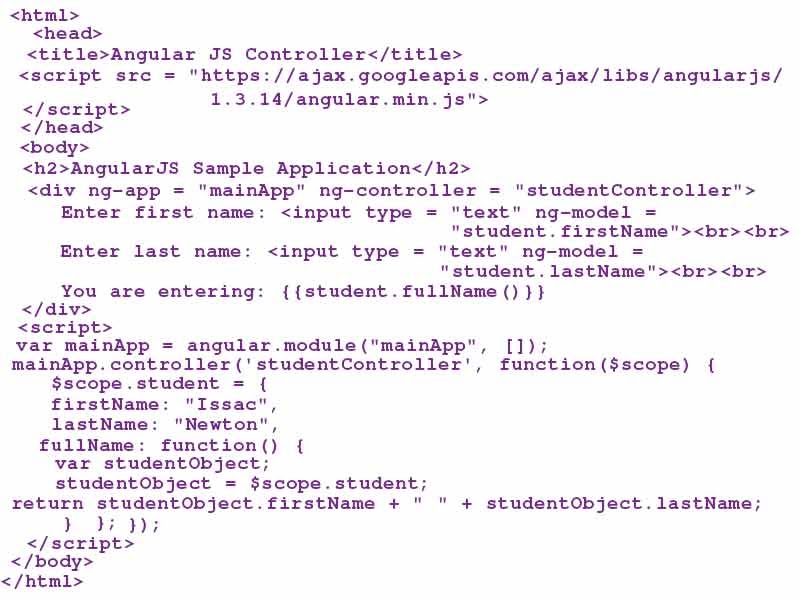
AngularJS Controller
AngularJS is an application that is highly dependent on the controllers for controlling the flow of a data application. The controller is used for defining the ng-controller directive. The controller is the Javascript object that consists of the properties and attributes and functions. All the controller accepts the $scope as the basic parameter and it refers to the module/application that a controller would need to manage. Here in this AngularJS tutorial, we are going to see about the Controllers in-depth.

Over here, you can declare the controller named StudentController by using the ng-controller directive. You can define them as:
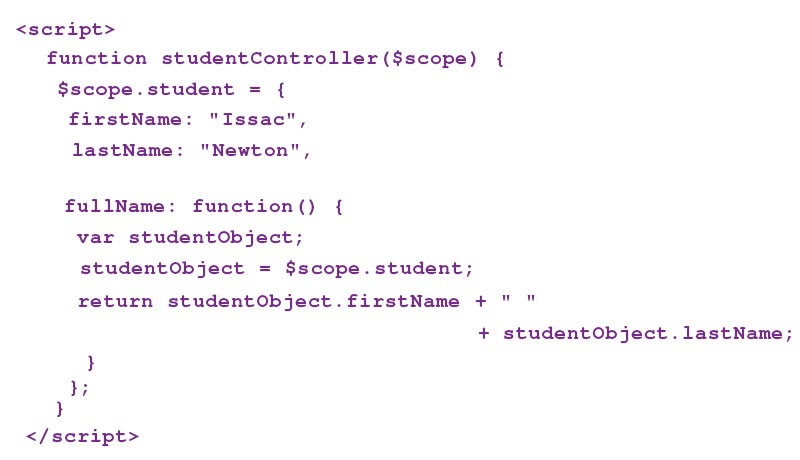
- The StudentController is described as the JavaScript Object with $scope of an argument.
- A $Scope indicates the application and uses the studentController object.
- The $scope.student is the property of a studentController object.
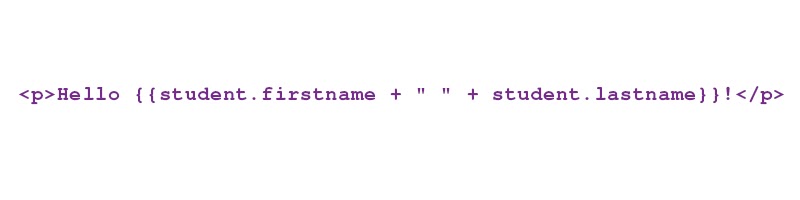
- The firstName and the lastName are the two different properties of $scope.student object. You can pass the default values to it.
- A property fullName is the kind of function of$scope. student object that helps in sending back the combined data.
- Also, for the sake of a note, you can describe the controller object in the separate JS file and it refers to the file that is found on the HTML page.
You can now use the studentController's student property by using the ng-model or by using the expression that is mentioned below:
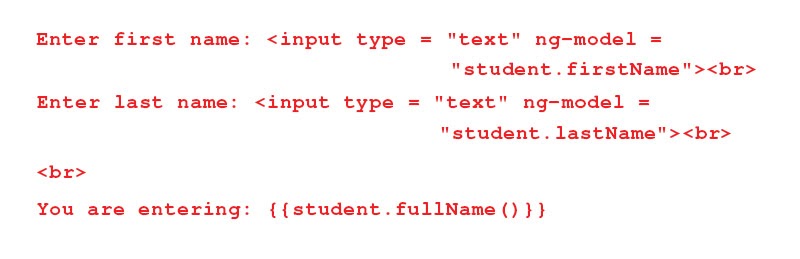
- Now, you can bound student.firstName and student.lastname to the two of the input boxes
- You can bind student.fullName() to the HTML.
- Whenever you type, you can find the first and last name in the input boxes. You can see the complete name that is being updated immediately.
For instance,
See through the example that is given below on how to use the controller:
Output:
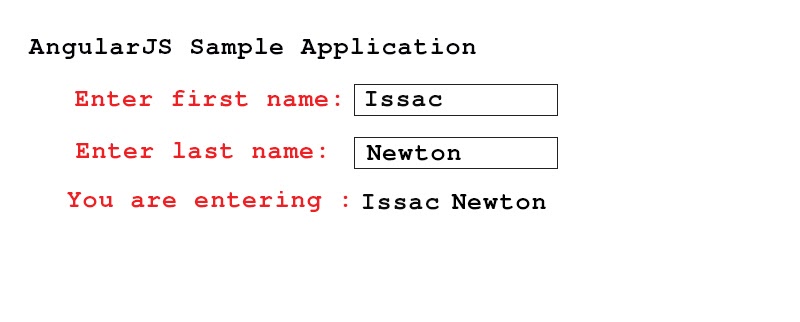
When you open the file testAngularJS.htm in the Web browser, you will see the result as:
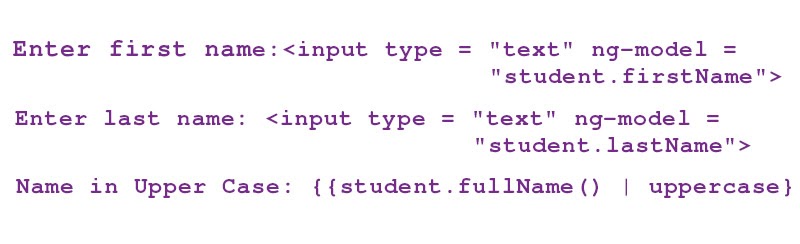
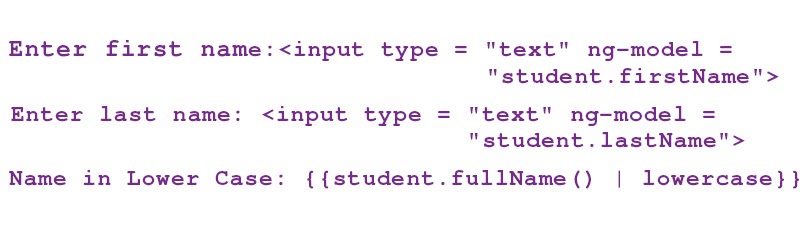
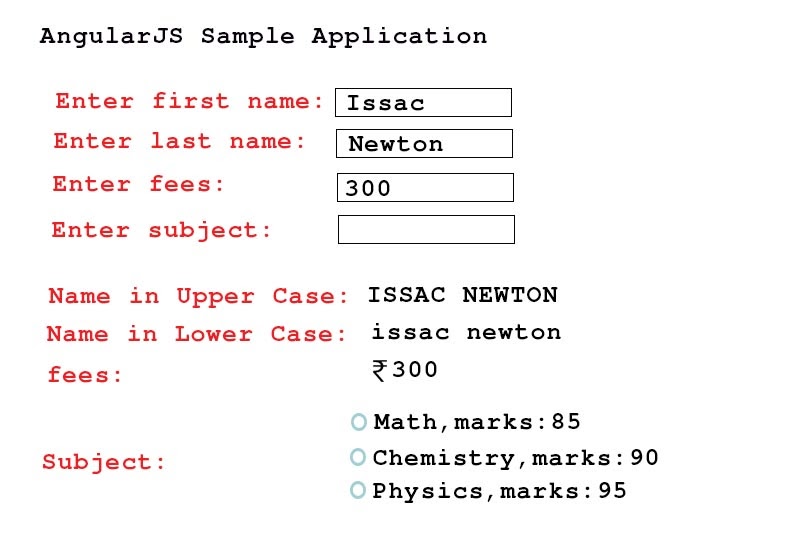
AngularJS Filters
The purpose of using filters in AngularJS is for modifying the data. It can be clubbed to the directives or expressions using the pipe (|) character. Below we have enlisted the most commonly used filters.
Uppercase - It helps in converting the text to upper case text.
Lowercase - This is used for converting the text to a lower case format.
Filter - A filter is an array that is the subset that is based on the offered criteria.
Currency - This supports you in formatting the text to currency format.
Order by - The Orders are the arrays that are based on offering criteria.
In this Angularjs tutorial for beginners, let us see about these filters and their syntax clearly:
Uppercase Filter:
You can add the uppercase filter to the expression by using the pipe character. Over here we have added the uppercase filters for printing the pupil name in capital letters.
Lowercase Filter:
You can add the lowercase filters to the expression by using the pipe character. Here you can add the lowercase filter for printing the name of the pupil in lowercase letters.
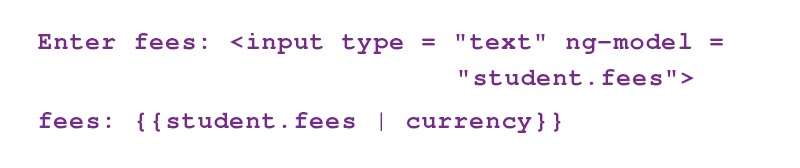
Currency Filter:
We can add the Currency Filter to the expression to return the number by using a pipe character. Right here, we added the currency filter to print the fees by using the currency format.
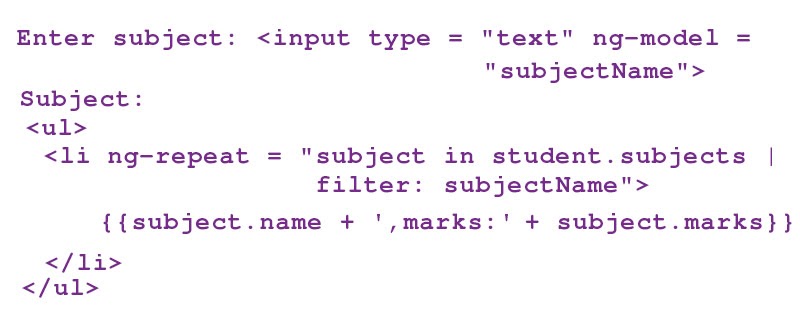
Filter:
It is mainly used for displaying the mentioned subjects, by using the subject name as the filter:
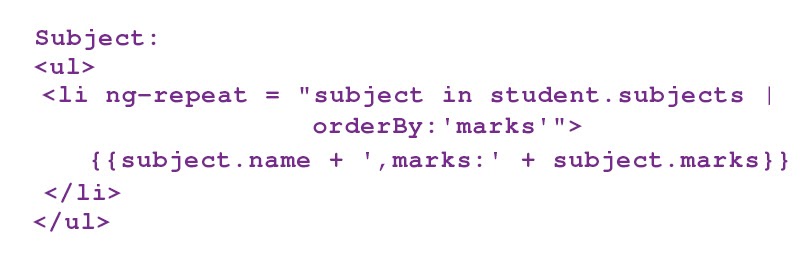
OrderBy Filter
To segregate the subjects by marks, you can make use of the orderBy marks.
For instance,
Here in this example, we have incorporated all the filters that is mentioned above:
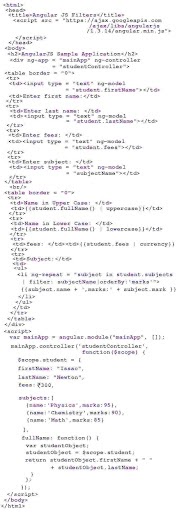
Output:
While you open the file testAngular.htm on the web browser, it will be displayed as given below:
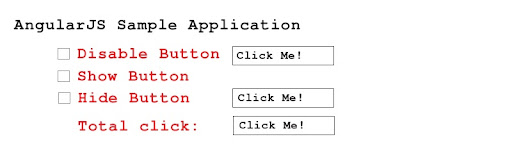
AngularJS HTML DOM
Listed below are the directives that are used in binding the application of the data for the attributes of HTML DOM Elements -
ng-disabled - It helps in disabling the given control.
ng-hide - It helps you to hide the control that is given.
ng-show - It helps in displaying the given control.
ng-click - It interprets the average number of AngularJS Click events.
Now, in this Angular Tutorial let us see the important directives of the applications.
ng-disabled Directive
An Add ng-disabled attribute of the HTML button also passes to the model. You can use the bind for modeling the checkbox and you can see through the variation.

ng-click Directive
\With add ng-click attribute you can use the HTML button and update the model. With the aid of the model for the HTML, you can see through the variation.

ng-hide Directive
By using the Add ng-hide attribute to the HTML button you can easily pass them to the model. Now, you can bind the model to the checkbox and see through the variation.

For instance,
In the below example we have incorporated all the above-mentioned directives:
Input:
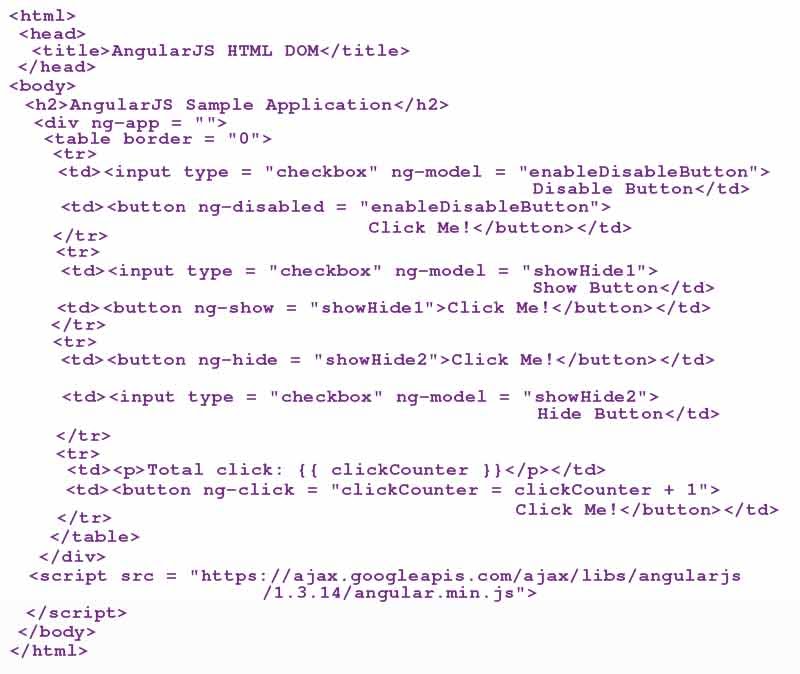
Output:
While you open the file 'testAngularJS.htm on the web browser, you can see the result as:
AngularJS Modules
Generally, in AngularJS, a module is mainly used for defining the application. It is the container for various parts of the application like filters, services, controllers, and directives.
A module is mainly used as the Main() method. A Controller usually belongs to the module.
Methods to Create Module:
In general, the Angular object's module() method is used to build a module. They are also called AngularJS functions and angular. module.

Over here, "myApp" defines the HTML element on which the application primarily runs.
You can now slowly add the directives, filters, controllers, and much more to the AngularJS application.
Methods to add the Controller to a Module
When you need to add the controller to the application you can refer to this controller with an ng-controller directive.
Input:
Output:

Methods to add a directive to the Module
Here in this AngularJS tutorial, we will take through different methods with which you can add the directives to the module.
Generally, the AngularJS directives are used for adding functionality to your application. Listed below are the set of AngularJS directives:
|
Directive |
Description |
|
ng-bind |
It helps you to bind the content of the HTML element to the respective application data. |
|
ng-app |
It helps in defining the root element of the application. |
|
ng-bind-template |
It aids you in mentioning the text content that has to be replaced with a template. |
|
ng-bind-html |
It supports in binding the inner Html of the Html element of the application data and also it discard the dangerous code from an Html string. |
|
ng-change |
It describes the expression for evaluating the content that has to be modified by a user. |
|
ng-bluer |
It explains the behavior of the blur events. |
|
ng-class |
It explains the CSS classes of the Html elements. |
|
ng-checked |
It describes whether the element is verified or not. |
|
ng-cloak |
It supports you in preventing flickering while the application is loaded. |
|
ng-class-odd |
This is similar to the ng-class, however, it will only take the effect of the odd rows. |
|
ng-class-even |
It is similar to the ng-class, however, it takes only a few effects on the even rows. |
|
ng-click |
It helps in describing the expression for evaluating the element that is being selected. |
|
ng-cut |
It helps in describing the behavior of the cut events. |
|
ng-csp |
It helps in modifying the content based on the security policy. |
|
ng-copy |
It explains the behavior of the copy events. |
|
ng-controller |
It explains the controller object of an application. |
|
ng-form |
It helps in describing the Html form for inheriting the control. |
|
ng-dbclick |
It explains the behavior of the double-click events. |
|
ng-focus |
It mentions the behavior of the focus events. |
|
ng-disabled |
It explains whether the element is disabled or not. |
|
ng-include |
It is inclusive of the Html in the application. |
|
ng-hide |
It shows or hides the Html elements. |
|
ng-if |
It helps in removing the Html element when if a condition is false. |
|
ng-href |
It helps to describe the URL for <a> element. |
|
ng-keypress |
It explains the behavior of the keypress events. |
|
ng-jq |
It helps in describing an application that should be used as a library just like jQuery. |
|
ng-init |
It explains the initial values of an application. |
|
ng-key down |
It explains the behavior of all the key-down events. |
|
ng-model-options |
It helps explain how the updates are performed in the model. |
|
ng-model |
It helps you to bind the value right from the Html controls to the respective application data. |
|
ng-keyup |
It explains the behavior of all the key-up events. |
|
ng-list |
It helps in converting the text into a specific list (array). |
|
ng-mosuedown |
It describes the behavior of the mouse down events. |
|
ng-mousemove |
It explains the behavior of all the mosuemove events |
|
ng-mouseneter |
It explains the behavior of all the mouseneter events. |
|
ng-mouseleave |
It defines the attribute of the mouseleave events. |
|
ng-mouseover |
It helps in specifying the behavior of all mouseover events. |
|
ng-open |
It helps in mentioning all the open attributes of all the elements. |
|
ng-non-bindable |
It helps in describing that no data binding can take place in this element or in its children. |
|
ng-mouseup |
It helps in specifying the behavior of the mouseup events. |
|
ng-paste |
It helps in describing the behavior of all the paste events. |
|
ng-option |
It mentions <options> in the <select> list. |
|
ng-pluralize |
It describes the message for displaying based on the en-us localization rules. |
|
ng-show |
It helps you to hide or show all the HTML elements. |
|
ng-readonly |
It defines the read-only characteristics of an element. |
|
ng-selected |
It aids you to mention the selected characteristics of the element. |
|
ng-repeat |
It enumerates the template for all the data in the collection. |
|
ng-required |
It supports you in defining the needed attribute of the element. |
|
ng-show |
It helps to hide or show all the Html elements. |
|
ng-srcset |
It helps in mentioning the srcset character for all the <img> elements. |
|
ng-style |
It helps in defining the style and characteristics of a specific element. |
|
ng-src |
It helps to define all the src characteristics of the <img> element. |
|
ng-submit |
It helps you to enumerate the expressions for running the on-submit events. |
|
ng-transclude |
It aids you to specify the point for inserting all the transcluded elements. |
|
ng-switch |
It allows some conditions that should be used while hiding/showing the child elements. |
|
ng-value |
It defines the value of all the input elements. |
Methods to Add Directives
Input
Output:

Modules and Controllers in the file
Here in this AngularJS tutorial, we will help you on how to place modules and also controllers inside the JavaScript files.
In the below example, "myApp.js" consists of the application module definition, and "myCtrl.js" consists of the controller:
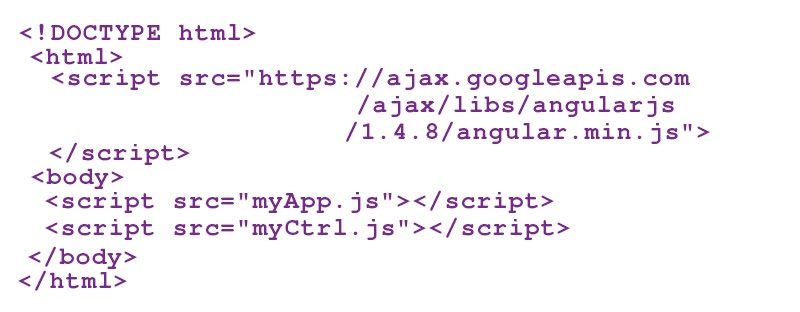
Over here, "myApp.js" contains:

Over here "myCtrl.j" consists of:

Input:
Output:

Angular Forms
The Forms in the AngularJS offers validation and data-binding input controls.
The Input Controls is the method in which the user shall enter data. The form is the compilation of control for grouping all the related controls together. Listed below are the input controls that are used in the AngularJS forms:
- select elements
- input elements
- textarea elements
- button elements
Data Binding
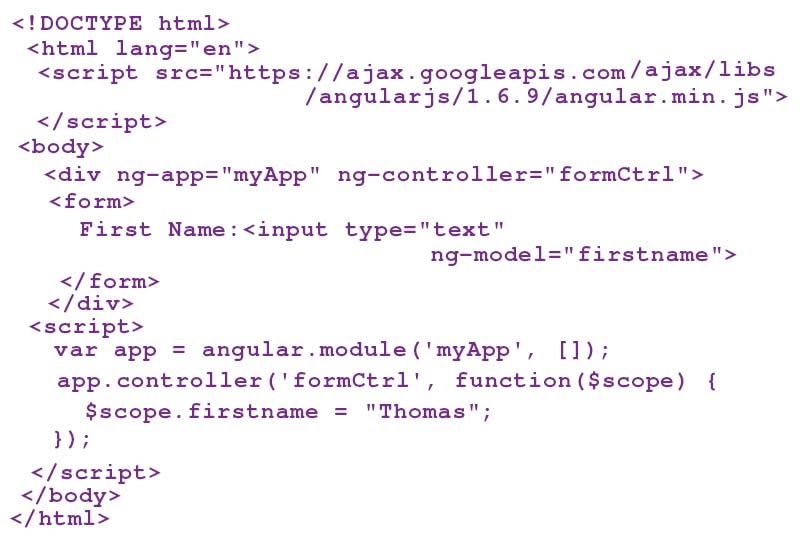
An Input Control offers the data-binding using an ng-model directive.
<input type="text" ng-model="firstname">
The application now has a property that is named as the first name.
An ng-model directive helps in binding the input controller for the rest of the application.
A property firstname is mentioned in the controller:
For instance,
Output:

Checkbox:
The checkbox consists of the value such as false or true. On applying the ng-directive model for the checkbox and using their value in your application.
Input:
Output:

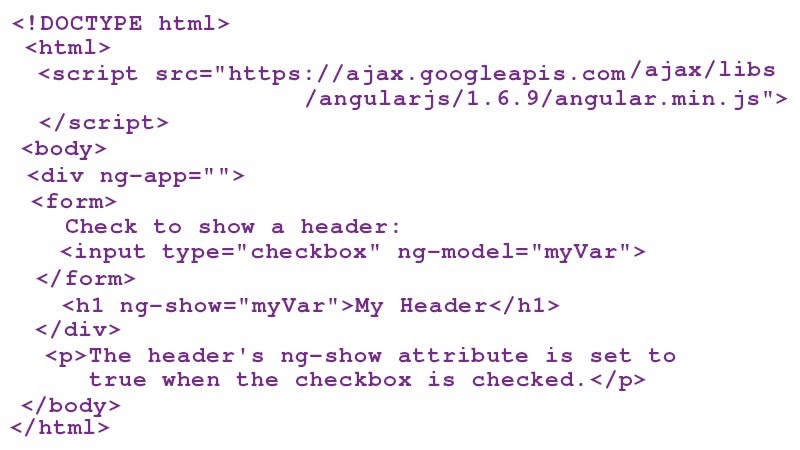
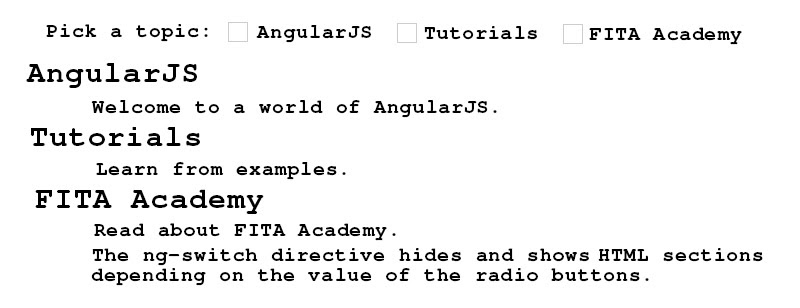
Radio buttons
The Bind Radio button of your application along with an ng-model directive. Also, the Radio buttons with similar ng-model could have various values, however only a selected few will be used.
For instance,
You can display a few texts based on the value of all the selected radio buttons:
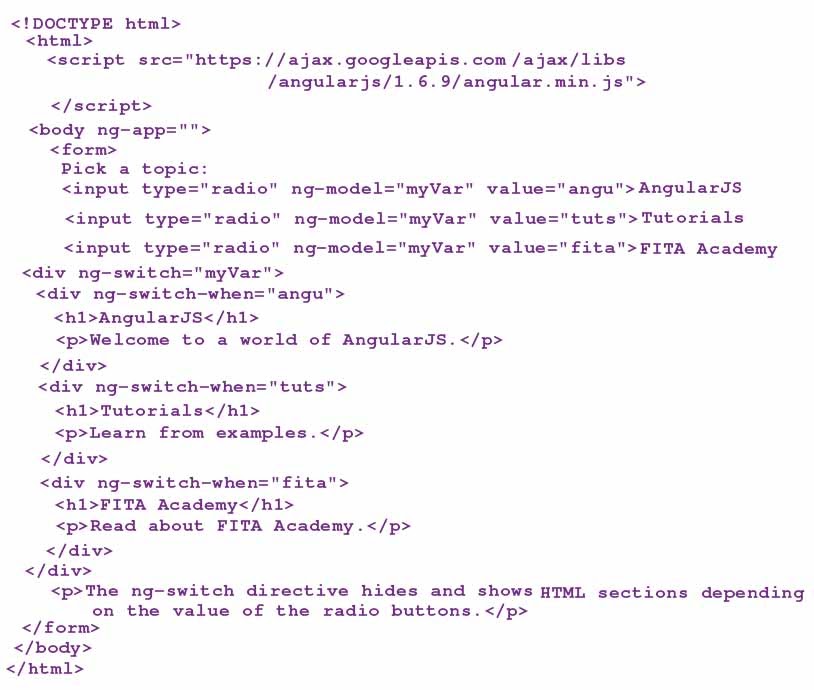
Output:
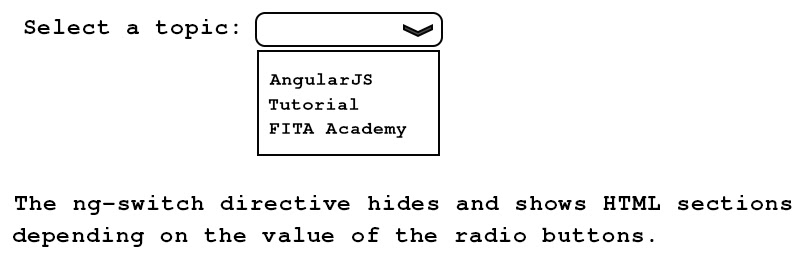
Select box:
A Bind Select boxes your application along with the ng-model directive. A property is defined in an ng-model attribute and it has the value of only a few chosen options in the select box.
For instance,
You can display few texts, based on the value of chosen options:
Input:
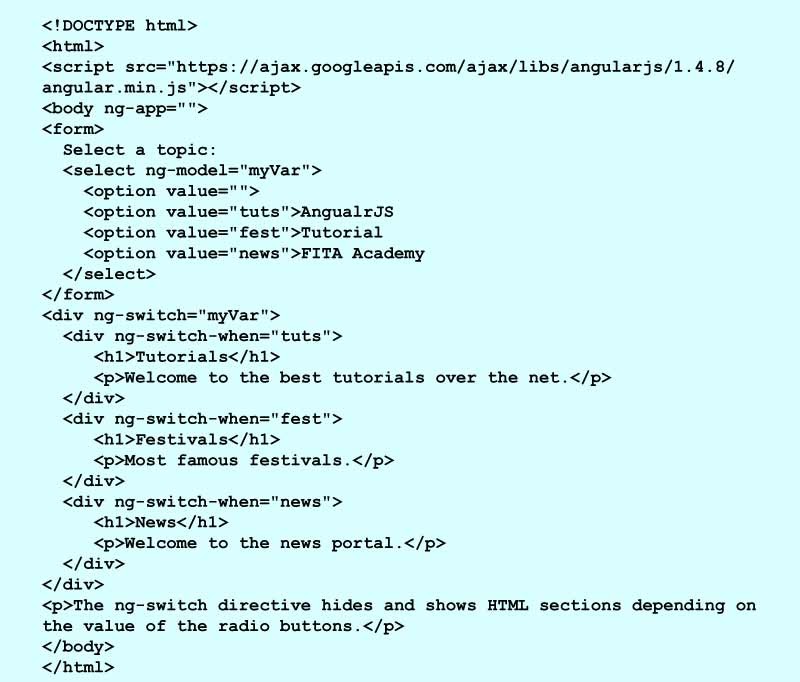
Output:
The AngularJS Training in Coimbatore at FITA Academy bestows the students proficient training of the front-end development skills and knowledge.
AngularJS Form Validations
- AngularJS provides a client-side validation form.
- AngularJS checks the state of a form and the input fields (select, input,textarea) and it permits you to check the user of the present state.
- AngularJS also consists of details whether you have been modified, touched, or not.
- You can make use of the basic HTML5 characteristics for validating the input and you can make use of your validation functions.
- A Client-side validation alone is not capable of securing the user input. You also need Server-side validation.
Required
You can make use of the HTML5 attribute that is needed for specifying the input field and they must be filled as:
Input:
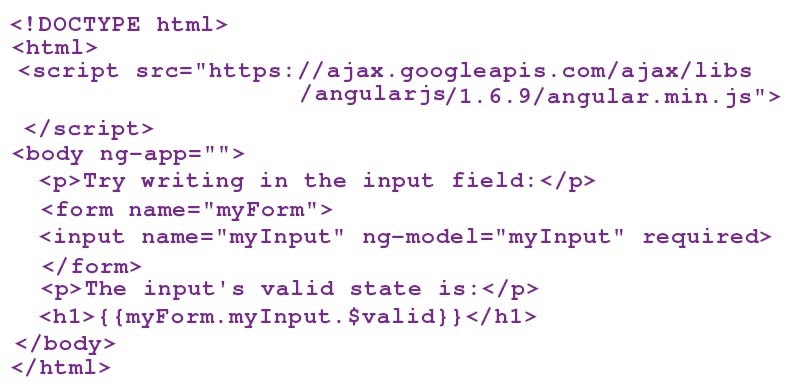
Output:

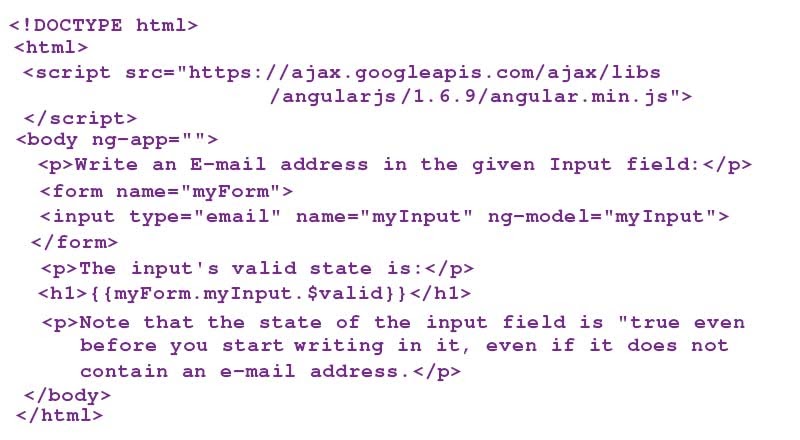
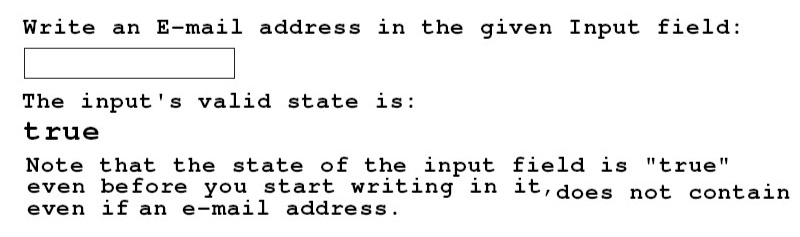
You can make use of the HTML5 kind of email for explaining the value and it has to email:
Input:
Output:
Form State and Input State
AngularJS is persistently updating the state of both the input and form fields.
An Input field consists of the below states:
$touched - It is the field that has to be touched.
$untouched - It is the field which has not yet been touched.
$dirty - It is the field that has to be modified.
$pristine - It is the field that is yet to be modified.
$valid - The field content of this is valid.
$invalid - The field content of this is not valid.
They are the different properties of the input field and they are either true or false.
The forms consist of the below states:
$valid - It is the form content that is valid.
$invalid - It is the form content that is not valid.
$pristine - It is the field that is yet to be modified.
$submitted - It is the form that is already submitted.
$dirty - It has one or above and it is modified.
It is the properties of all the forms and they are either true or false. You can make use of these states for showcasing useful texts for the user. For, instance, when the field is needed and when a user leaves it empty, you must give them the required user warning:
Input:
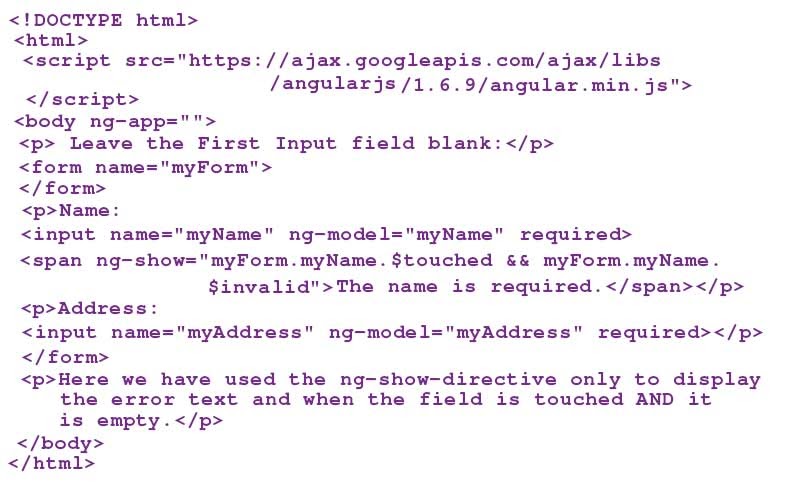
Output:
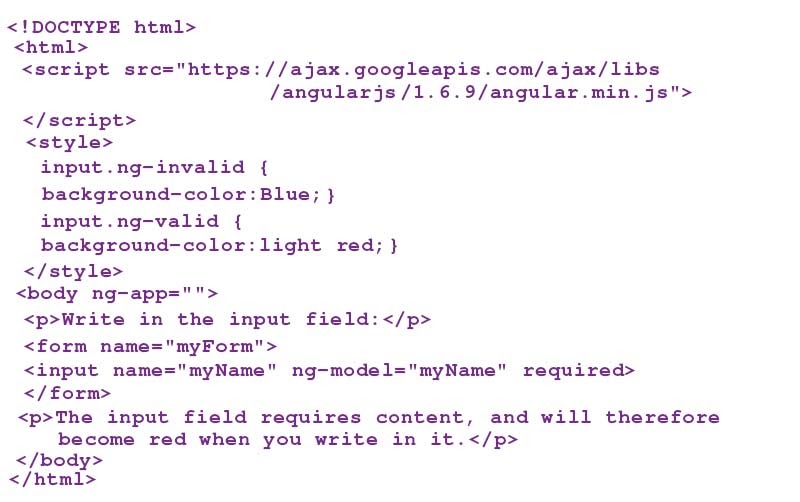
CSS Classes
AngularJS helps in adding the CSS classes to the input and forms fields based on their states.
The below are the classes are used for adding or removing from the respective input fields:
- ng-touched: It is the field that is yet to be touched.
- ng-untouched: It is the field that is not yet touched.
- ng-dirty: It is the field that is modified.
- ng-pristine: It is the field that is yet to be modified.
- ng-valid: It is the field where the content is valid.
- ng-valid-key: It is one key for all validation. For instance: ng-valid-required, and it is useful when you have above one thing that should be validated.
- ng-valid: It is the field where the content is valid.
- ng-invalid-key: For instance - ng-invalid-required
- ng-invalid: It is the field content that is not valid.
Given below are the classes is added to or removed from, the forms:
ng-dirty: There is more than one field that has to be modified.
ng-pristine: It has no fields which are not yet modified.
ng-valid: It is the form content that is valid.
ng-valid-key: It is the one key for all the validations. Ex: ng-valid-required and it is useful where you have the above thing which has to be validated.
ng-invalid-key: For instance: ng-invalid-required.
The classes are discarded when the value represented is false. The Add styles for all these classes provide your application a better and dynamic User interface.
For instance:
Input:
The App style using the standard CSS are:
Output:

Custom Validation
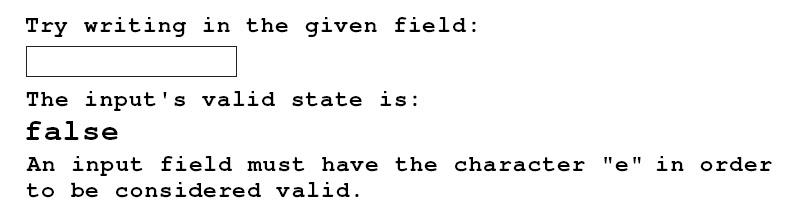
Building your validation function is a little tricky. All you have to do is add a new directive for all the applications and deal with the validations that are found inside the function with particular arguments.
For instance:
To create your directives it consists of a custom validation function and it denotes them by using my-directive. A field shall be valid only when the value consists of all the characters "e":
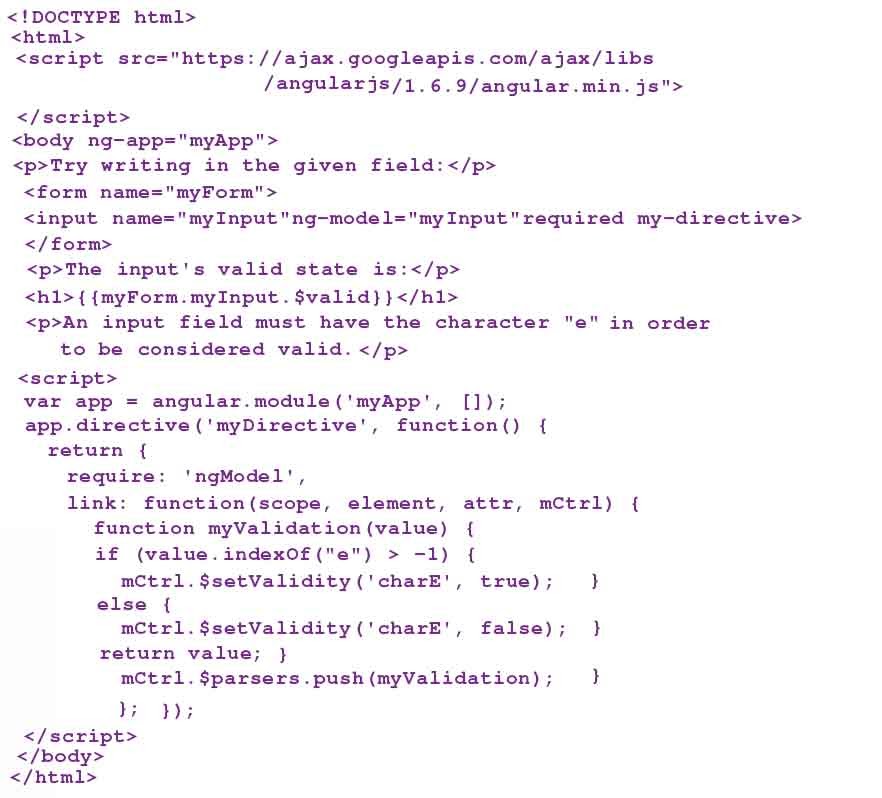
Output:
Angular API
Here in this AngularJS Tutorial, you will be covered with the Angular API and its functions.
The term API stands for Application Programming Interface.
AngularJS Global API
The AngularJS Global API is all set for the global JavaScript functions that is used for executing the general tasks namely:
- Iterating Objects
- Comparing Objects
- Converting Data
A Global API function is accessed using all the Angular Object. Listed below are the set of common API functions:
API Description
angular.lowercase() - It helps in converting all the strings to lowercase.
angular.uppercase() - It supports converting the strings to uppercase.
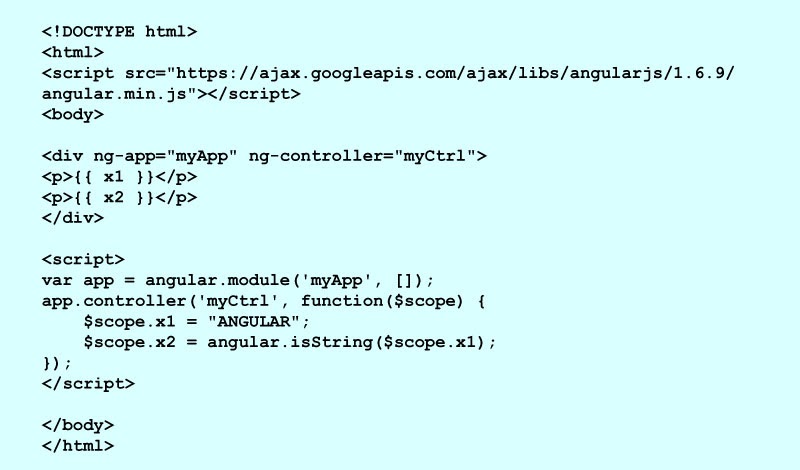
angular.isNumber() - It supports returning when the reference number is true.
angular.isString() - It helps in returning to true when the reference value is just a string.
angular.lowercase ()
For instance:
Output:

Input:
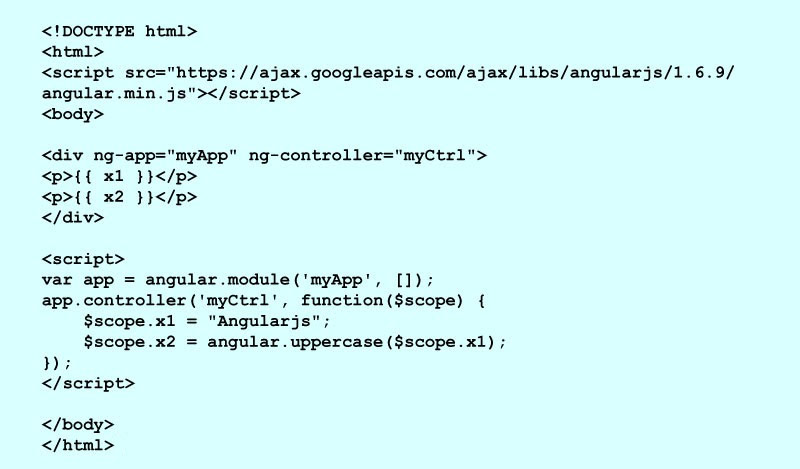
Output:

Input:
Output:

Input:

AngularJS Animations
Animation is where the transformation of the HTML elements provides you with the interpretation of motion.
For instance,
Output:
AngularJS Note: All the applications need not be filled with animations, however, some of the animations could make the applications easier to comprehend.
Things you must need To enable your applications ready for animations you should include all the AngularJS Animate Library:
<script src="https://ajax.googleapis.com/ajax/libs/angularjs/1.6.9/angular-animate.js"></script>
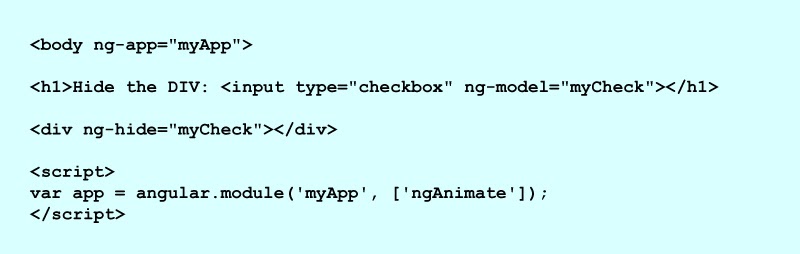
Also, you must refer to the ngAnimate module on your application:
<body ng-app="ngAnimate">
When your application consists of the name, you should add ngAnimate as the dependency on your application module.
For instance:
Functions of ngAnimate
A ngAnimate module allows you to add and remove classes.
A ngAnimate module need not animate all your HTML elements however, the ngAnimate takes care of few events like show or hide of the HTML element. Also, the elements receive some of the predefined classes and it could be used for making animations.
All the directives in the AngularJS add/remove the classes:
- ng-show
- ng-hide
- ng-class
- ng-view
- Ng-include
- ng-repeat
- ng-if
- ng-switch
An ng-show and ng-hide directives help in adding or removing all the ng-hide class values.
Rest other directives add the ng-enter class value when they step in the DOM and the ng-leave characteristics are discarded from DOM.
The ng-repeat directive permits you to add the ng-move class value where the HTML element helps in changing the position.
Further, at the time of animation, the HTML elements consist of a set of class values that are removed while the animation is not accomplished. For example, an ng-hide directive helps you to add all of these class values.
- ng-animate
- ng-hide-animate
- ng-hide-remove (when the element is showcased)
- ng-hide-add (when the element is hidden)
- ng-hide-add-active (when the elements are hidden)
- ng-hide-remove-active ( when the element is displayed)
Animations with CSS
You can use the CSS transitions or the CSS animations for animating the HTML elements. Here in this Angular tutorial, we will show you how:
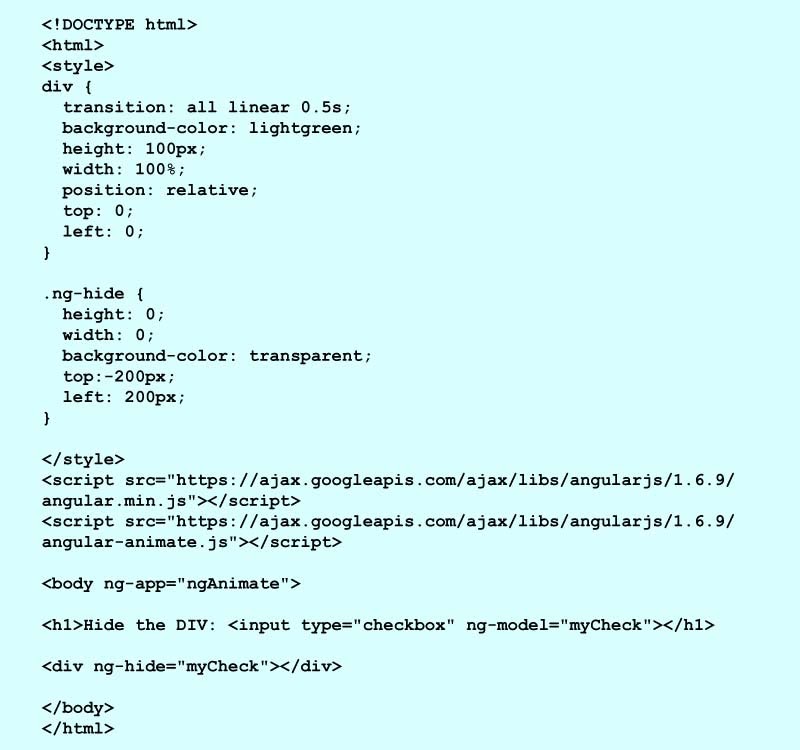
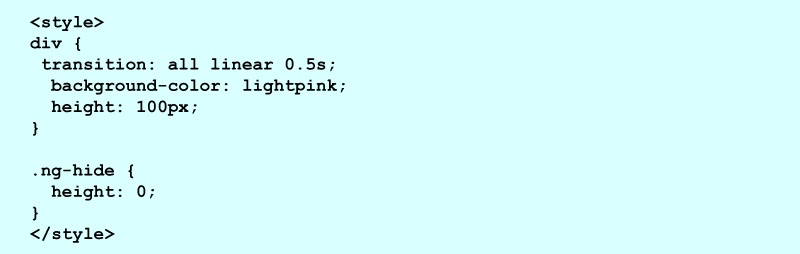
CSS Transitions
The CSS Transitions permit you to modify the change and CSS property values much smoothly from one value to the next within a given span.
For instance,
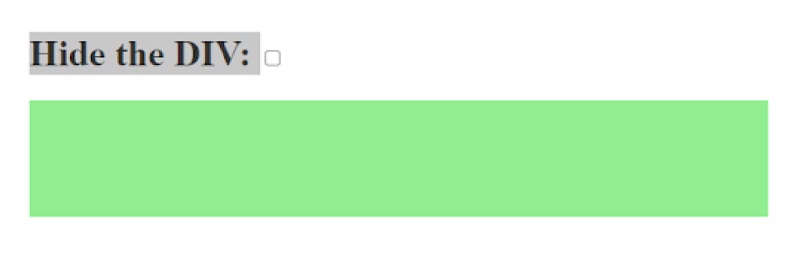
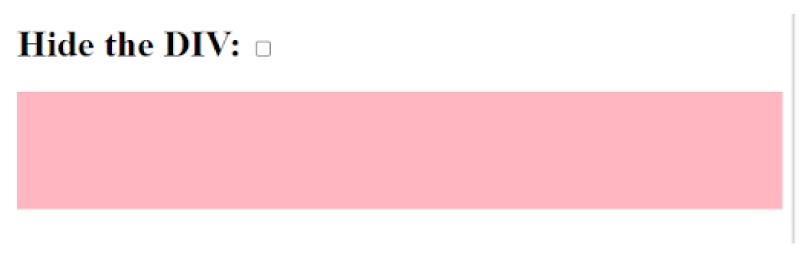
When a DIV element receives .ng-hide class, the transition may take at least 0.5 seconds and the height shall change gradually from 100px to 0:
Input:
Output
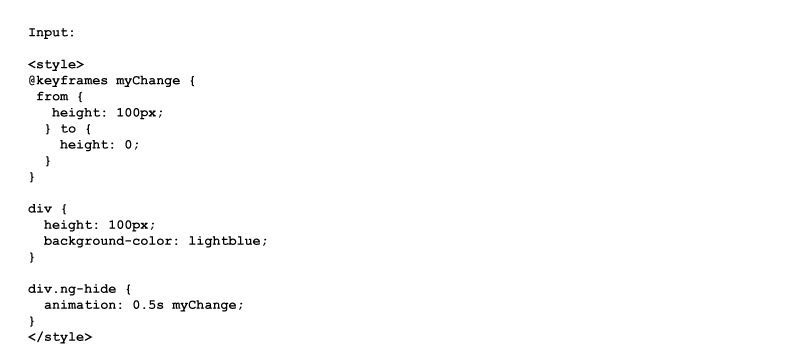
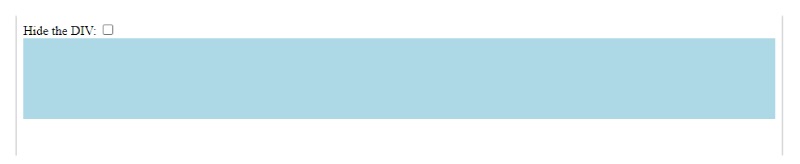
CSS Animations
The CSS Animations permits you to modify all the CSS property values easily right from one value to the next within a specified period:
Output:
The AngularJS Training in Bangalore at FITA Academy extends the students of the training program with in-depth training practices and methods of the recent Angular versions 8&9.
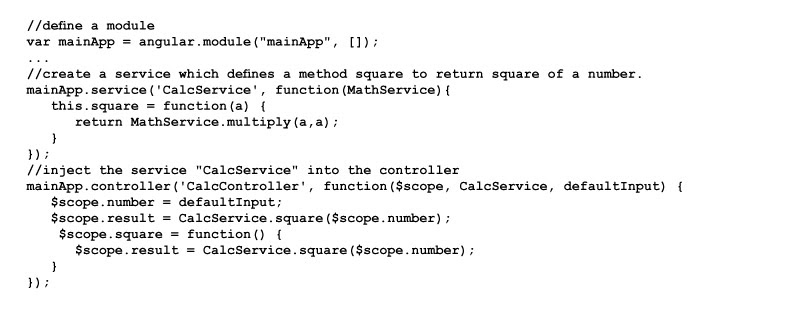
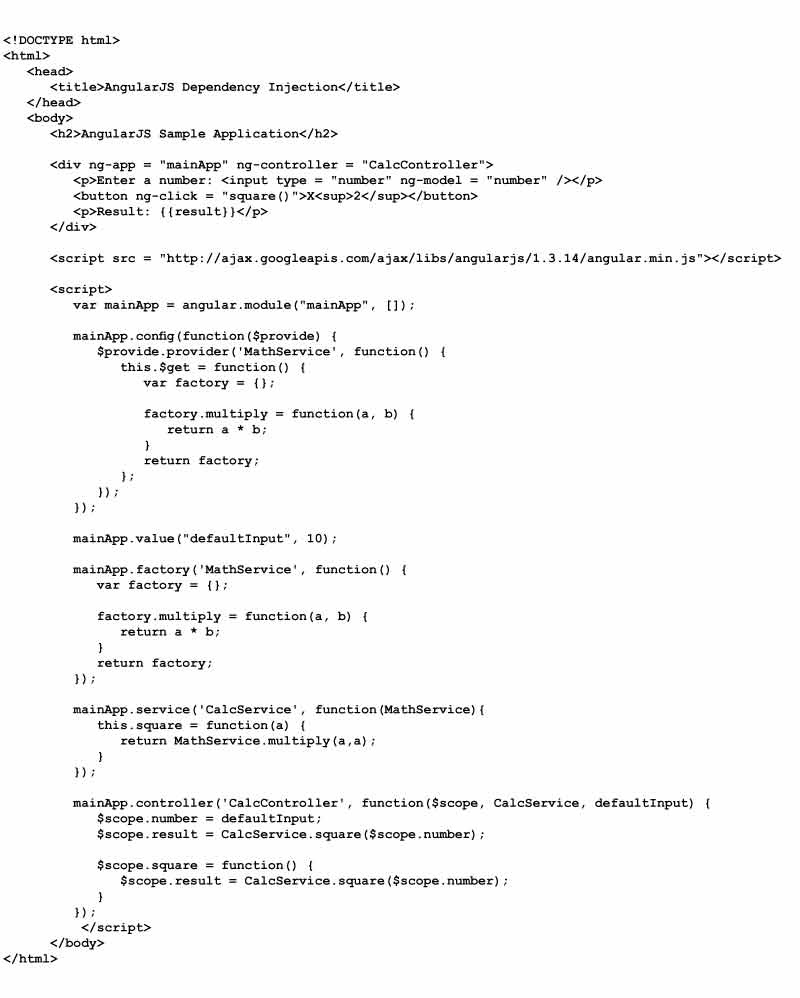
AngularJS Dependency Injection
Generally, AngularJS comes with numerous built-in and dependency injection mechanisms. It allows you to partition your application into different kinds of components and it could be easily injected into all the other dependencies. A Dependency Injection is a kind of software design pattern that mentions how the components have held on to their respective dependencies. Here, in this method, the components are offered the dependencies rather than coding them with a component.
Modularizing your application, it is easier for us to configure, reuse, and test all the components that are found in your application. Listed below are important types of components and objects:
- value
- factory
- service
- provider
- constant
These are the components and objects that can be injected into others by using an AngularJS Dependency Injection.
Value
Here in AngularJS, the value is a kind of simple object. It could be a string, number, or JavaScript object. It is mainly used for passing all the values that are found in the services, controllers, and factories at the time of the config and run phase.

Over here, the values are defined using the value() function that is found on the module. It is the first parameter that explains the name value and its second parameter is the kind of value of itself. The Services, Factories, and Controllers could now use these reference values using their name.
Injecting a value
For injecting the value into the AngularJS Controllers function, you can add one parameter within the same only when the value is defined.

Factory
A Factory is a function that is utilized for returning the value. If the controller or service requires a value that has to be injected right from a factory. You can create all the value based on the demand. Generally, it makes use of the factory function for calculating and returning all the values.
Now, you can consider the example where it defines the factory on the module and the controller receives the factory for which the created value is injected:

Injecting the values into the factory
For injecting the value into the AngularJS Controller function, you can add the parameter in the same and when a value is defined.

AngularJS Notes: It is not a factory function that has been injected but it is the value that is produced by a factory function.
Service
In AngularJS, the service is the JavaScript object that consists of a group of functions for executing a few tasks. The services are developed using a service() function that is found on the module and is later injected into the controllers.
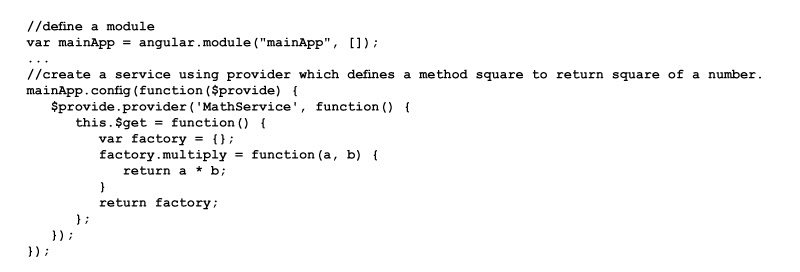
Provider
The Provider in AngularJS is mainly used for building factories and services at the time of the config phase. This is the flexible method of a factory that you can build. A Provider is the special set of the factory method that comes along with the get() function and it is mainly used for returning the value/service/factory.
Consonants
It is not possible to inject values into the module.config() function. However, the constants can be used for passing the values right at the config phase.

Now, let's incorporate the above all directives
Angular 7 Tutorial
The Angular 7 tutorial offers you basic to advanced concepts of Angular 7. This Angular tutorial is devised for both beginners and professionals.
Angular is the JavaScript framework that allows you to build robust Single Page Applications. It is the leading front-end development framework that is updated regularly by the Angular team of Google.
Angular 7 is entirely developed based on few components. It comprises numerous components like forming a tree structure just with parent and child components.
Here in this Angular 7, the JavaScript framework allows you to build reactive SPAs - Single Page Applications. The Angular 7 is entirely based on components. It encompasses numerous components. Also, it has numerous components that form the tree structure with the child and parent components. The Angular version is beyond 2+and it is known as Angular. The first version of Angular 1.0 is also known as AngularJS.
Angular is nothing but the complete rewrite of the AngularJS of the same team that is built using the AngularJS.
Single Page Applications (SPAs)
A single-page application is a website or web application that renders its users with a reactive, fluid, and robust experience that resembles desktop applications. It consists of buttons, menus, and blocks on the Single Page and where the user can click select on any of the below: it profoundly allows you to rewrite the present page instead of loading the complete new page right from the server. It is the reason behind the reactive and fast speed.
The distinction between AngularJS & Angular
|
AngularJS |
Angular |
|
It is the most popular and common name of the pioneer versions of Angular 1.0. |
Angular is the popular and familiar name of Angular's version that is beyond 2+ |
|
AngularJS is JavaScript-based and open-source and it is a popular front-end Web framework. |
Angular is open-source and TypeScript-based and it is the complete stack web application framework. |
|
AngularJS incorporates the approach of the controller or scope. |
Rather than Scope and Controller, Angular makes use of the hierarchy of components and it is the fundamental architectural attribute. |
|
AngularJS uses simple syntax and it is used on all the HTML pages with source location. |
Angular makes use of the different expression syntax. It uses this "[]" for property binding and event binding "()". |
|
AngularJS will not support any of the dynamic loading pages. |
The Angular bestows its support for all the dynamic loading of a page. |
|
AngularJS is the basic JavaScript file that is used along with all the HTML pages. Further, it will not need any supported feature for the server-side programming language. |
Angular makes use of Microsoft's Typescript language and it offers Class-based and OOPS, Generics, and Static Typing. These are the characteristics of the Server-side programming language. |
Features of Angular
Listed below are the important features of Angular:
Angular Extends its Support to Multiple Platforms
Angular is regarded as a cross-platform language. It supports different platforms. With this, you can build various kinds of apps with the aid of Angular.
Desktop Applications: Angular allows you to build desktop installed apps on various kinds of OS like Mac, Windows, and Linux using similar Angular methods and with which you can build the native and web apps.
Progressive Web Applications: A Progressive Web Application is the common apps that are built along with Angular. Angular offers modern Web platform abilities for delivering offline, step-free installation apps, and high-performance.
Native Applications: You can build the native apps using Angular with strategies that are derived from Ionic, Cordova, and NativeScript.
Robust Speed and Performance
Angular in general is fast and it offers performance based on the following reasons:
Universal Support: Angular is used mainly as the front-end web development tool for most languages like PHP, Java Struts, Spring, Node.js, and .Net. Also, it has the feature to serve as the near-instant rendering along with HTML and CSS. It can optimize every website to perform better SEO.
Code Splitting: All the Angular apps function and load robustly with the new Component Router and it provides automatic code-splitting so that the users can load in all the required code for viewing the requests.
Code generation: Angular allows you to use the templates that are highly optimized code for present JavaScript Virtual machines that offers the advantage of all the hand-written code.
Productivity
Angular offers the best productivity features owing to its simple and robust template syntax. Apart from this, it has the best editors and command-line tools, and IDEs.
Powerful Template: Angular offers simple and robust template syntax for creating the UI view fastly.
IDEs: Angular offers smart code completion, feedback on popular IDEs & Editors, and instant errors.
Angular CLI: Generally, the Angular CLI offers command-line tools that allow you to test, add components, develop faster, and instant deploy.
FullStack Development
Angular is a bundle-pack framework of JavaScript. It offers Animation, Testing, and Accessibility features. It offers FullStack Development with Express.js, Node.js, and MongoDB.
Testing: Angular offers Jasmine and Karma for performing unit testing. On using it, you can monitor and break all the things you need to save. Whereas Karma is the JavaScript test runner tool that is developed by the Angular team. Jasmine is the testing framework that helps in unit testing in most of the Angular apps, also Karma offers other helpful tools that enable you to call all your Jasmine tests easily while writing the code.
Accessibility: In Angular, you can develop accessible applications with the ARIA-enabled components and the developers allow you to guide, also you can access the built-in a11 and test infrastructure.
Animation Support: Angular provides features to build high-performance and complex designs and animation timelines with less code via Angular's intuitive API. The AngularJS Training in Hyderabad at FITA Academy assists the learners of the Angular Course with in-depth training of the Angular framework and its applications efficiently.
History of Angular versions
The initial version of Angular was called Angular 1.0 it is also known as the AngularJS. It was later re-launched in the year 2010. However, here we are going to see about Angular so here in this Angular tutorial session let's go through the various versions of Angular.
Angular 2
Angular 2.0 was first launched in October 2014. It is a completely rewritten version of Angular and it has numerous changes in this 2.0 version that also developed squabble among the developers. On April 30, 2015, they released Angular 2 which introduced itself as Alpha to Developers Preview, and later Beta version was launched in 2015 December. Its initial version was launched in the year 2016 and its latest version was launched on September 14, 2016.
Angular 4
This version was released on 13th December of 2016. The developers shall leap through version 3 because of some turbulence. The updated version was released on March 23, 2017.
This version was released as HttpClient, which is easy to use, the small, and robust library that allows you to make all the HTTP Requests.
It offers you new router and lifecycle events for Resolvers and Guards.
Four new events: GuardsCheckEnd, GuardsCheckStart, ResolveEnd join, and ResolveStart for joining the existing set of cycle events namely NavigationStart.
It offers support for conditionally and disabled animations.
Angular 5
This version was launched on November 1, 2017. It offers certain enhancements for supporting all the progressive web apps and offers supplements associated with Material Design.
Angular 6
It is the version that was introduced on May 4, 2018. The major release that offers features namely: ng add, ng update, Angular Material Starter Components, Angular Elements, Tree Shakable Providers, Angular Material CDK components, Library Support, CLI Workspaces.
RxJSv6, and Animations Performance Improvements.
Angular 7
The recent version of Angular is Angular 7. It was launched on October 18, 2018. It has more extensive features like:
- Virtual Scrolling
- Angular Material & CDK
- Enhanced Accessibility of the Selects
- Updates that are associated to Application performance
- Dependency Updates that are associated with TypeScript 3.1, Node 10, and RxJS 6.3.
- It supports Content Projection utilizing the Web standard of custom elements.
Installation of Angular 7
Here in this Angular Tutorial for beginners, we are going to see how to install all the requisites that are needed for running the first Angular 7 app.
Firstly, you must have an IDE like Visual Studio Coke IDE or the JetBrains Webstorm for running your Angular 7 app
VS Code is generally easy and light to set up. It consists of more built-in code formatting, editing, and refactoring features. You can use them freely. It offers a wide number of extensions that shall help you in boosting your productivity.
We can download the VS code from: http://code.visualstudio.com
A JetBrain Webstorm is one of the best IDE for developing Angular 7 apps. It is attractive, fast, and easier to use the software. However, we can not use them for free. You can get it later and it provides you the option of a free 30 day trial period.
We can also download the VS Code from here:
https://www.jetbrains.com/webstorm/downloas/#section- windows
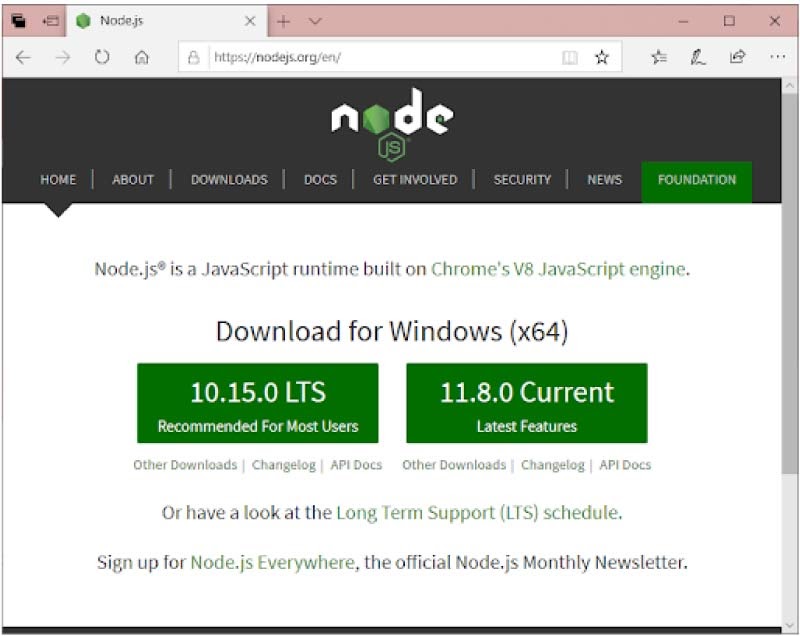
Installation of Node.js
We can install node.js for running our Angular 7 app. It handles the npm dependencies support and some of the browsers while loading specific pages. It offers the needed libraries for running the Angular projects. Further, Node.js supports you with a run-time environment as the local host.
Methods to install Node.js
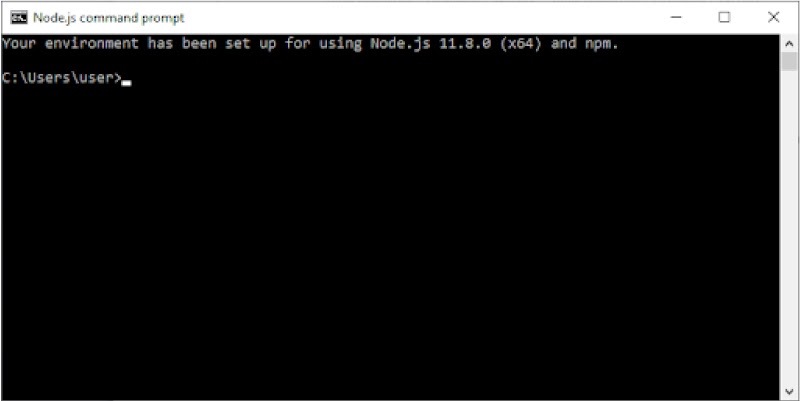
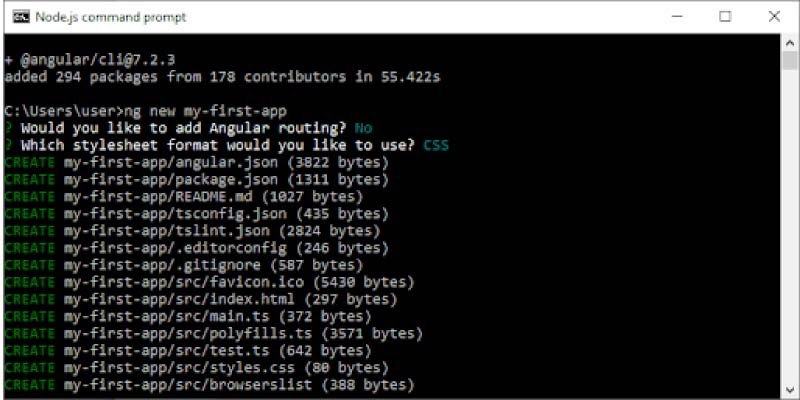
Download and install the recent version of the node.js.
Once the installation is completed, you will receive a command prompt like the one that is given below:
Make use of npm for installing Angular CLI
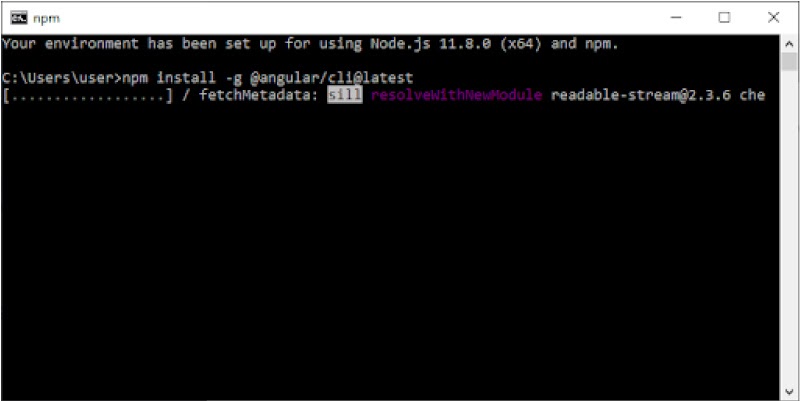
You can Run the Angular CLI command for installing the Angular CLI
npm install-g @ngular/cli
or
We can see the complete CLI command for building the Angular app. You must run the first command for installing Angular CLI. Also, the steps are similar for both Windows and Mac.


The Setting up of Angular Environment is complete now.
Angular 7 App Files Explanation
We can see the complete picture of the Angular 7 app on the WebStorm IDE. For the enhancement of Angular 7, you can make use of the WebStorm IDE or Visual Studio Code IDE. Both are better options. However, it is preferable to use the JetBrains Webstorm IDE.
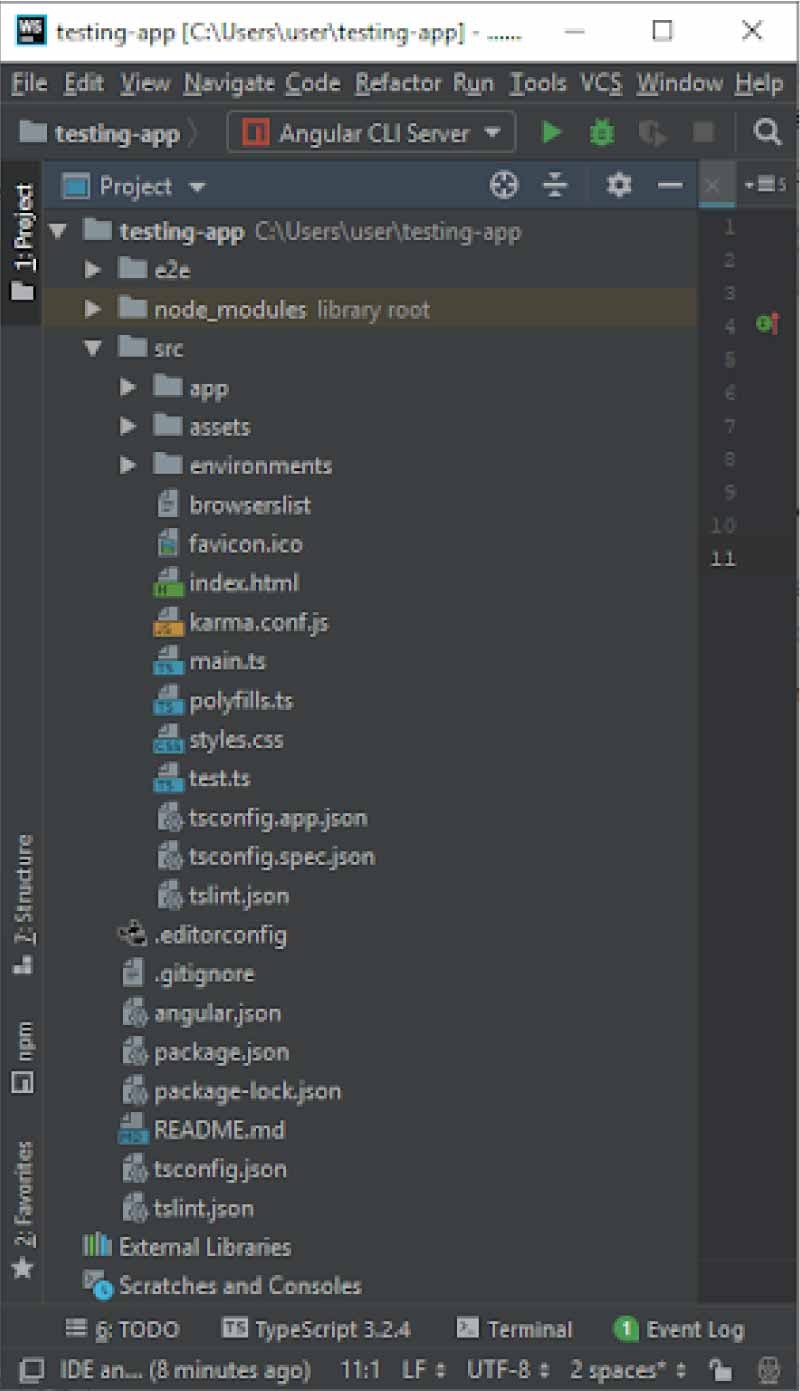
Here in this Angular Tutorial let's see some of the important files that are used in the Angular 7 App Folder.
Important Files used in the Angular 7 App Folder
src folder: It is the folder that consists of main code files that are associated with the angular application.
app.components.css: It is the kind of field that consists of the CSS for all your app components.
app folder: An app folder consists of the files that you have developed for all the app components.
app.component.html: It is the file that comprises the Html file that is associated with the app component. It is the type of template file that is utilized by Angular for performing the data binding.
app.component.ts: It is the most essential typescript file that consists of view logic that is behind a component.
app. modules.ts: It is the type of typescript file that allows every dependency that is required for a website. It is the file that is used for explaining all the modules that are needed to be imported. Also, the components must be declared and the other important components have to be bootstrapped.
app.component.spec.ts: It is a unit testing file that is associated with the app component. It is the file that is used perfectly well with the other unit tests. It is a run from Angular CLI using a command ng test.
Other Important Files
package.json: It is an npm configuration file. It consists of information of your website's package dependencies and information of your website that is a package by itself.
package-lock.json: It is a modified and auto-generated file that is updated when the npm performs an operation that is associated with the package.json or node_modules
gitignore: It is the file that is related to the source control git.
angular.json: It is the most important configuration file that is associated with your Angular application. It helps in explaining the structure of your app and it consists of a setting that is related to your applications. We can mention all environments of the file ( production, development). It is the Angular file where you can add the Bootstrap file for working with Angular 7.
assets folder: It is the folder that is a placeholder for the resource files that are used with the application like locales, images, and translations.
.editorconfig: It is the simple file that is used for maintaining the consistency on the code editors for organizing certain functions like whitespaces and indentation.
environments folders: The environment folder is used for holding the environment configuration constants that aids you to build an angular application. Generally, the constants are defined in 2 different.ts files (environment.prod.ts and environment.ts) and where these constants are used within the angular.json file using the Angular CLI.
browserlist: It is the file that is utilized by autoprefixer that helps in customizing the CSS for supporting the set of defined browsers.
index.html: It is the entry file that holds a high-level container of all the angular applications.
favicon.ico: It is the file that defines the small icon which is found next to a browser tab of the website.
karma.config.js: It is the file that is used for mentioning the config file of the Karma Test Runner. Karma is developed by the AngularJS team and it can run the tests of both Angular 2+ and AngularJS.
main.ts: It is the primary ts file that runs first, as stated in the angular.json file.It is the file bootstraps that start an AppModule right from the app.module.ts and it could be used to explain the global configurations.
polyfills.ts: It is the file that is a set of code that is used for offering compatibility support for the browsers that are old. Angular 7 code could be written mainly using the ES6+ language specification that is used for getting adaptable front-end development and not all the browsers can support the complete ED6+ features and polyfills could be used for covering the features that are missing from the given browser.
style.css:/ It is the global CSS file that is mainly used by angular applications.
tests.ts: It is the main test file that an Angular CLI command ng test uses for traversing all the unit tests that are found within an application to run them.
tsconfig.json: It is the typescript compiler and configuration file.
tsconfig.app.json: It is used for overriding a tsconfig.json file with an app-specific configuration.
tsconfig.spec.json: It helps in overriding a tsconfig.json file with an app-specific and unit test configuration
Setting up of Angular 7 Project
Given below are the Angular CLI commands that are used for building the first Angular app.
We can run the command for building our first Angular app.

Now, move to your first app.
- cd my-first-app
Set your Server to run your app.
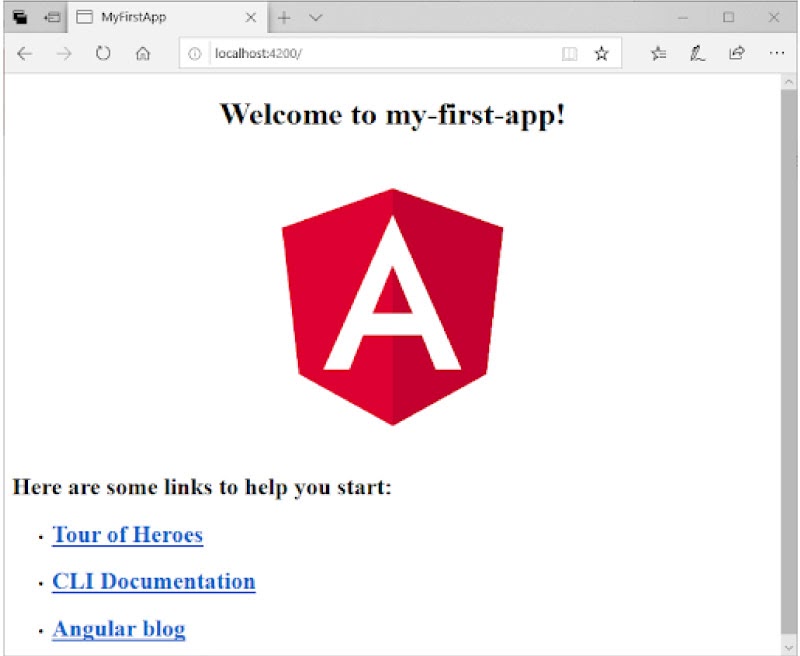
- ng serve
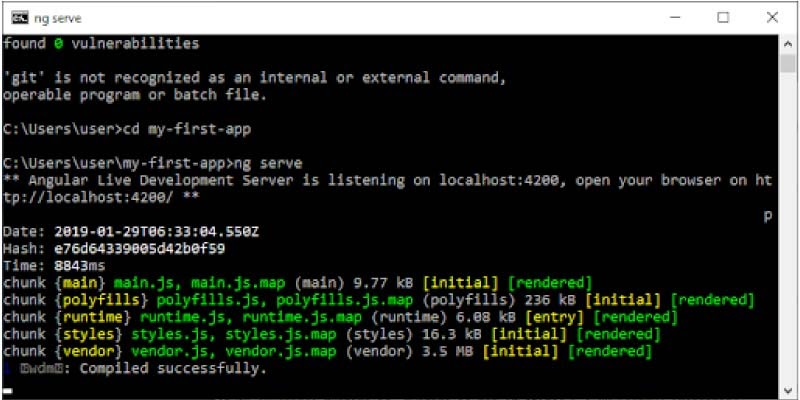
Now, your Server is running on the localhost: 4200. Move to your browser and now you can open them.
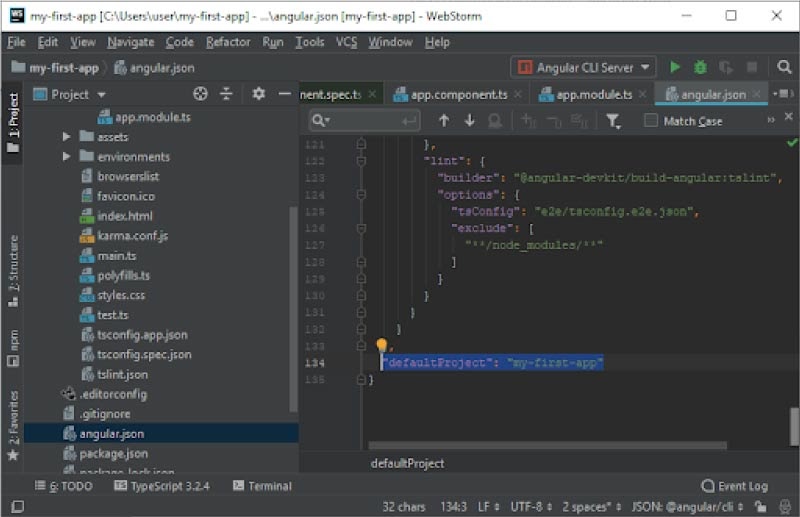
Here, we need the IDE for running and editing all your app's code. We can also make use of the WebStorm. We can open the webStrom and Open all your apps "my-first-app" on the IDE.

Go to the src folder, you will see a set of app folders over there. We can expand all the app folders.
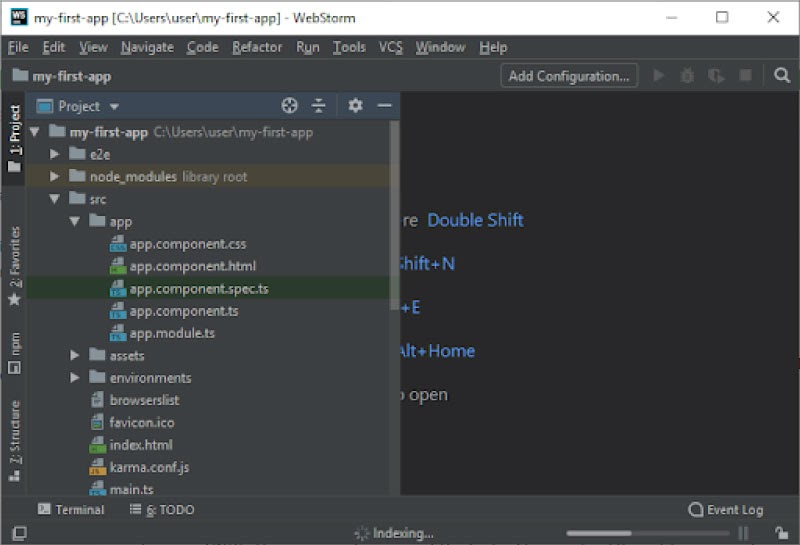
Now you can see five components there and they are:
- app.component.html
- app.component.css
- app.component.spec.ts
- app.module.ts
- app. component.ts
We can see the code that is within various components for comprehending what is happening and which part is taking part in the outlook of an app.
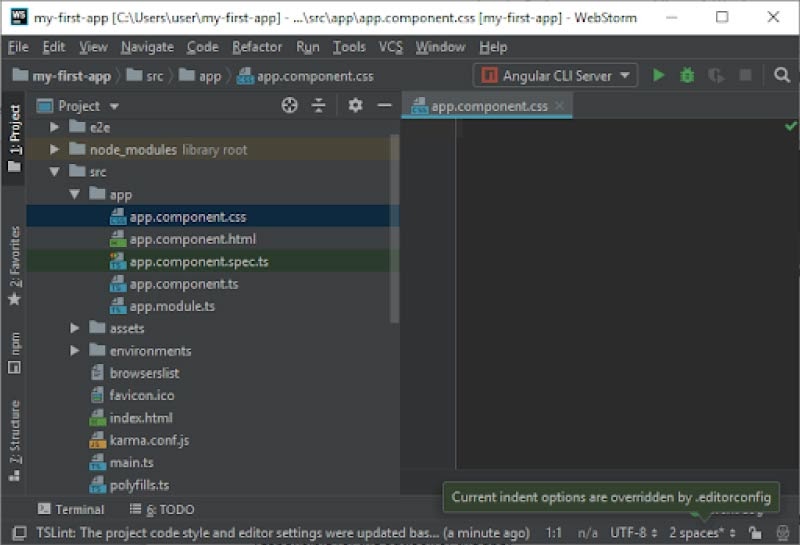
app.component.css
It is the part that is empty as it will not mention any CSS here.
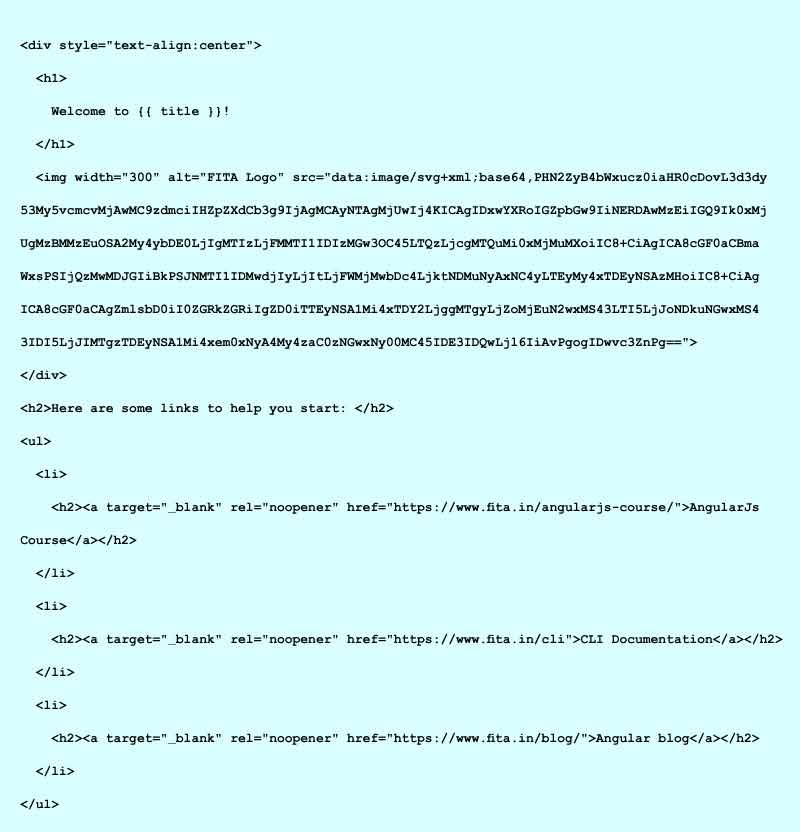
app.component.html
It is the most essential component of your front page of the app. Here, we can modify all the greetings that were previously used on your app's name. We can also modify the content which is on the front page and the corresponding links.
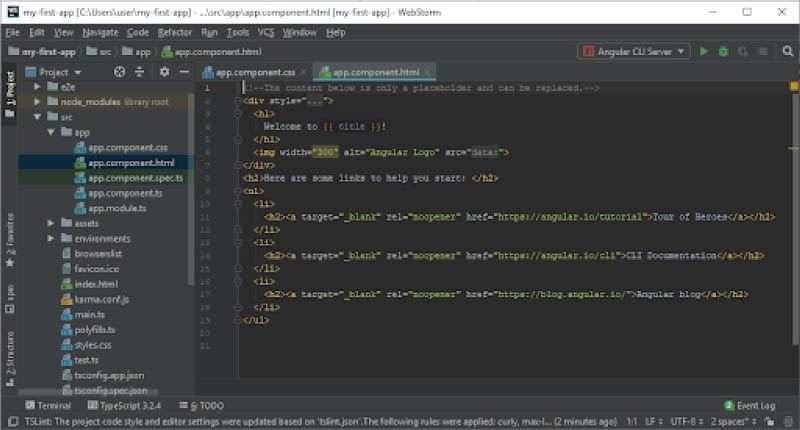
Code:
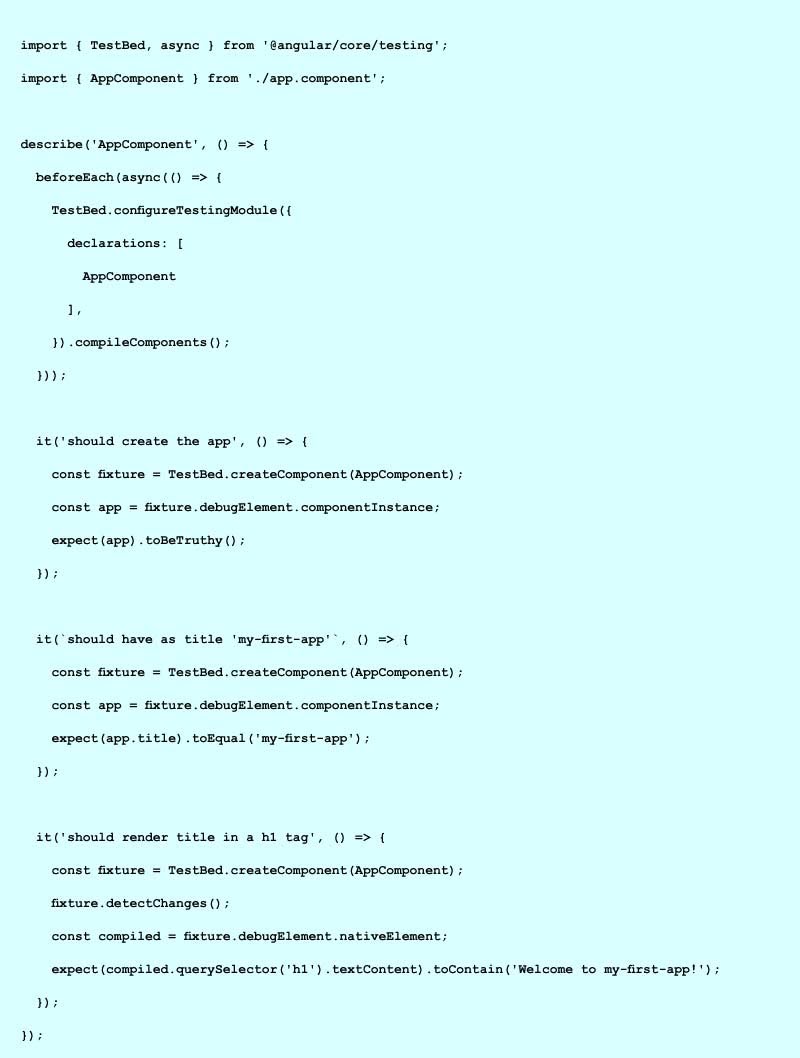
app.component.spec.ts
It is the file that is mainly used for testing needs only.
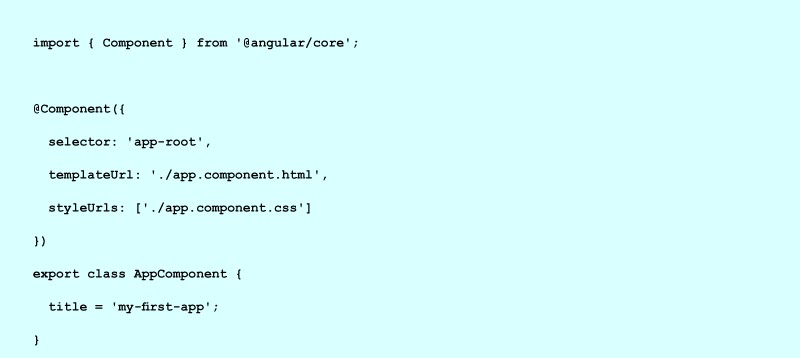
app.component.ts
We can modify the name on your app. We can just modify the title.
The Angular Training in Gurgaon at FITA Academy efficiently trains the students of the important features included in this Front-end framework with real-time practices.
Angular CLI Commands
Here in this AngularJS tutorial, we will see through the important Angular CLI Commands:
Angular CLI is the Command Line Interface tool that is mainly used for developing, initializing, maintaining, and scaffolding Angular applications. You can make use of these commands indirectly or promptly with the aid of an interactive UI. For example - Angular Console.
|
Command |
Alias |
Description |
|
add |
- |
This is used for adding support for the external library of your project. |
|
build |
b |
It allows you to arrange the output directory that is named dist/at a specific output path. It can be executed right within a workspace directory. |
|
config |
- |
It sets Angular configuration or restores the values right from the angular.json file of the workspace. |
|
doc |
d |
It allows you to open all the official Angular documentation in the browser and allows you to search for the given keyword. |
|
e2e |
e |
It develops and serves as the Angular app, then it runs on end-to-end tests with the help of a protractor. |
|
generate |
g |
It allows you to modify and generate the files on a schematic basis. |
|
help |
- |
It offers a set of commands that are readily available and they have short descriptions. |
|
lint |
l |
They are used to run the lint tools right from the Angular app code for a specific folder. |
|
new |
n |
It allows you to build a new workspace and the initial Angular app. |
|
run |
- |
It permits you to run the Architect target with an optional custom builder configuration which is explained in your project. |
|
Serve |
s |
It serves and develops your app for rebuilding the file changes. |
|
test |
t |
It runs the unit test on a project. |
|
update |
- |
It allows you to update all your applications and their dependencies. |
|
version |
v |
It outputs all the Angular CLI versions. |
|
xi18n |
- |
It permits extracts in the i18n messages right from the source code |
ng add command
An ng add command is used for adding support for the external library of your project. It permits you to add the npm package for the published library of your workspace and it allows you to make this the default app project for using that library in whichever way it is mentioned by a library's schematic.
For instance, when you add @angular/pwa, then you can configure all your projects with the PWA support.
It is the default app project and this is the value of default Porject in the angular.json.
Syntax:

Parameter Explanation
<collection>: It helps you to describe the package which you need to add.
Options:
--help= true|false|json|JSON: It is used for displaying the help message on the console. Default:false.
--defaults=true|false: If true, it shall discard all the interactive input prompts for all the options with a default.
--interactive=true|false: If false, it shall discard all the interactive input prompts.
ng build commands:
An ng build command is mainly used for collating the Angular app into a complete output directory which is called dist/at for a given output. It should be executed directly from a workspace directory.
Syntax:

Parameter Explanation:
<project>: It helps in defining the name of the project for the building. It could be used either as a library or app.
Options:
--aot=true|false: It allows you to develop everything before the gestation period. Default: false
--buildEventlog=buildEventLog: It is the Output file path for all the Build Event Protocol events.
--baseHref=baseHref: It helps in defining the base URL for all the applications that are being built.
--commonChunk=true|false: It makes use of other bundles that consist of the code which is used over various bundles. Default:true
--buildOptimizer=true|false: It allows '@angular-devkit/build-optimizer' and optimizations while using the 'aot' option. Default:false
--deleteOutputPath=true|false: This is used for discarding the output path right before building them. Default:true
--configuration=configuration: It is the named build target, that is mentioned in the "configuration" part of the angular.json. All the named targets are accompanied by the configuration option of the default for all the targets. Aliases:-c
--deployURL=deployUrl: It is the URL where all the files are deployed.
--es5BrowserSupport=true|false: It allows conditionally loaded ES2015polyfills. Default: false
--extractCss= true|false: This is mainly used for extracting css right from the global styles in the css files rather than js. Default:false
--extractLicense = true|false: This is used for extracting all the licenses on a separate file. Default: false
--help=true|false|json|JSON: This is used for displaying a help text for all the commands that are in the console. Default: false
--forkTypeChecker = True|false: This is used for running all the TypeScript kinds of checkers on the forked process. Default: true
--i18nFile=18nFile: It is the localization that is used for i18n.
--i18nFormat=i18nFormat: It is the Format of a localization file that is mentioned along with --i18n-file.
--i18nLocale=i18nLocale: It is the Locale that is used for all the i18n.
--i18nMissingTranslation=i18NMissing Translation: It helps in explaining how to handle all the missed translations for the i18n.
--index=index: It is the name of the index HTML file.
--lazyModules: It is the set of additional NgModules files that are lazily loaded. A lazy router module is identified immediately.
--main=main: It is the complete path for all the main entry points of an app that is associated with the present workspace.
--namedChunks=true|false: It utilizes the file name for all the lazy-loaded chunks. Default: true.
--ngswConfigPath=ngswConfigPath: It is the pathway for ngsw-config.json.
--optimization=true|false: It allows you to optimize all the build output.
--outputHashing=none|all|media|bundles: It allows you to Define all the output filename cache-busting hashing modes. Default: none
--outputPath=outputPath: It is the complete path for the entire output directory and it has a relatively current workspace. By default, it writes the output to the folder labeled dist in the present project.
--poll: It allows and defines all the files while watching a poll period within a few seconds.
--polyfills=polyfills: It is the complete path for a polyfills file and also it is relative to the present workspace.
--preservesSymlinks=true|false: It will not use the exact path while resolving modules. Default: false
--prod=true|false: When true, the sets build configuration a production target. All the build uses limited and bundling tree-shaking. A Production build shall also run defined dead code elimination.
--profile=true|false: It is the Output profile events for all the Chrome profilers. Default=false
--progress=true|false: Log progress to a console at the time of building.
--resourceOutputPath= resourceOutputPath: It is the path where all the style resources are placed along with relative outputPath.
--serviceWorker=true|false: It helps in developing the service worker config for all the production builds. Default:false
--sourceMap=true|false: This is used for displaying the Output source maps. Default: true
--showCircularDependencies=true|false: It displays circular dependency warnings on the builds. Default: true
--statsJson=true|false: It helps in building a 'stats.json' file that could be analyzed with the tools like: https://webpack.github.io/analyze or 'webpack-bundle-analyzer'
Default: false
--subresourceIntegrity=true|false: It allows the use of all the subresource integrity validation. Default: false
--tsConfig=tsConfig: It is the complete path of a TypeScript configuration file and the associated present workspace.
--VendorChunk=true|false: It utilized a unique bundle that consists only of vendor libraries. Default: true
--verbose=true|false: It allows you to add more info to the output logging. Default:false
--watch=true|false: It permits to run and build when the files are modified. Default: false
ng Config Command
An ng config command is mainly used for restoring or setting the Angular configuration values that are found in the angular.json file of a workspace.
Syntax:

Parameter Explanation
<jsonPath>: It is the configuration key that is used for setting or query on the JSON path format. For instance: "a[3].foo.bar[2]". When no value is offered it returns to the present value of that key.
<value> When provided, a new value for the specific configuration key.
Options
--global=true|false: If true, it can access the global configuration that is found in a caller's home directory. Default: false
Aliases: -g
--help=true|false|json|JSON: This is used for displaying a help text for this specific command that is found on the console. Default: false
ng doc Command
An ng doc command is mainly used for opening the official Angular documents that are found in the browser and it searches the selected keyword.
Syntax:

Parameter Explanation:
<keyword>: This is used for mentioning the keyword for searching for, as given on the search bar in the angular.io.
Options
--help=true|false\json|JSON: It is used for displaying the help text for this specific command on the console. Default: false
--search=true|false: When it is true, it then searches all the angular.io. Or else it searches only the API reference documentation. Default: false
Aliases: -s
ng e2e Command
This is used for serving and building the Angular app, and then it runs complete end-to-end tests using the Protractor.
Syntax:

This must be used for executing within the workspace directory. When you miss mentioning a project name, then it shall execute them for projects.
Parameter Explanation:
<project>: It is used for describing the name of a project that you need to develop. It can either be a library or an app.
Options
--baseUrl=baseUrl: It helps you to explain the base URL for a protractor to connect with.
--configuration=configuratin: It is mainly used for defining the name build target as they are mentioned in the "configurations" part of the angular.json. All the name target is combined with a configuration option and defaults to that specific target.
Aliases: -c
--devServerTarget=devServerTarget: It defines the dev server target for running the tests against.
--elementExplorer=true|false: It begins with Protractor's Element Explorer to debug. Default: false
--help=true|false|json|JSON: It displays the help text for a command in a console. Default: false
--host=host: It is the host to listen on. Default: localhost
--port: It explains the port for serving the applications.
--prod=true|false: If true, it shall set the build configuration for the production target. All the builds use bundling and it is limited to tree-shaking. Also, the Production build limits dead code for elimination.
--protractorCongif=protractorConfig: It explains the name of a Protractor configuration file.
--specs: It helps to revoke specs on the protractor config.
--suite=suite: It helps in revoking the complete suite of the protractor config.
--webdriverUpdate=true|false: This is used for updating the Webdriver. Default: true
ng Generate Command
An ng generate command is primarily used for modifying or generating the file which is based on schemes.
Syntax:

Parameter Explanation
<schematic>: It explains the collection or schemes: schematic that you need to generate. We can take any of the below sub-commands.
- application
- appShell
- class
- directive
- Components
- enum
- interface
- guard
- module
- library
- service
- pipe
- universal
- Service worker
application: This is used for building a new fundamental app definition on the "projects" subfolder of a workspace.
Syntax:

appShell: This is used for building the app shell to run the server-side version of the app.
Syntax:

class: This is used for building a new generic class definition for the given or default project.
Syntax:

directive: This is used for developing the new generic directive definition for the default project or for the ones that are provided.
Syntax:

Components: This is used for building the new generic component definition for the specific or default project.
Syntax:

enum: This is used for building the new and generic enum meaning for the specific or the default project.
Syntax:

interface: This is used for building a new generic interface and meaning for the specific or the default project.
Syntax:

guard: This is used for developing generic, new, and route guard meaning for the default or for a particular project.
Syntax:

module: This is used for building new generic NgModules meaning in the particular or default project.
Syntax:

Library: This is used for building a new generic library project in the present workspace.
Syntax:

service: This is used for building generic and new service meaning for the specified or default project.
Syntax:

pipe: This is used for building the new generic pipe definition for the default or specific project.
Syntax:

universal: It is the command that is applied for passing the scheme for the "run" command and for setting up the server-side for the app.
Syntax:

serviceworker: It is used in passing the scheme for the "run" command to build the service worker.
Syntax:

Options
--defaults=true|false: When it is true, it will discard the communicative input prompts for options with the default.
--dryRun=true|false: When it is true, it can run via the reports activity without writing the results.
Default: false
Aliases: -d
--force=true|false: When it is true, it pushes the overwriting of the existing files. Default: false
Aliases: -f
--help=true|false|json|JSON: This is used for showing the help text on the console. Default: false
--interactive=true|false: When it is false, it shall discard the interactive input prompts.
The Angular Training in Pune at FITA Academy equips the learners of the Angular Course with important Angular CLI commands and how they are used in the Web Development process.
Angular Libraries
Angular Libraries are developed as a solution for all the general problems like presenting data, presenting unified UI, and permitting data entry. The Developers can build general solutions for a specific domain that is adaptable and can be utilized in various apps. These solutions could be developed as Angular libraries and all these libraries could be shared and published as npm packages.
Generally, an Angular Library is considered as an angular project however, it differs from an Angular app in few terms, and that it is not capable of running on its own. It is commonly used and imported into the app.
Applications of Angular Libraries
An Angular Library is an extended Angular's base functionality. For instance, when you need to add all the reactive forms to the app, you can add all those library packages by using the ng add @angular/forms, and then you can import all the ReactiveFormsModule right from the @angular/forms and library on your application code.
All the Angular Material is an example of a general-purpose, large library that offers reusable, adaptable, and sophisticated components.
Installation of Libraries
The Libraries are usually published as npm integrated and npm packages with Angular CLI. For integrating all the reusable library code into the application, you must install the package and import them for offering functionality where you can use them.
Syntax:

An ng -add command mainly uses the npm package manager for installing a library package and calls schematics that are found in the package with other scaffolding and the things within a project code like adding fonts, themes, and import statements.
Library Typing
All Library packages consist of typing in.d.ts files. When your Library package is not included in the typing then the IDE shows the error, that you have installed all the library's related @types/package. For instance, when you have a library named d1:

All the types are defined in the @types/packages of a library installed on the workspace and immediately added to the TypeScript configuration of a project that makes use of that library. A TypeScript generally searches for types that are found on the node_module@typed folder by default. Also, it is not required to add all kinds of packages individually. When a library doesn't consist of typing at @types/ , we can still make use of it manually and add the typings for it.
We can do them by following:
Develop a typings.d.ts file on your src/folder. It is the file that is included immediately as the global kind definition.
You can add the below code in the src/typing.d.ts.
We can add the below code into the file or components that utilize the library:

Updating Libraries
We can update the libraries using the ng update command. And it is capable of updating all the individual library versions. An Angular CLI monitors the recently published releases of the library and it finds the recent version that is new and downloads and updates all your package.json for matching the recent version.
Syntax:

Methods to add a library for runtime global space
The Legacy JavaScript library is not imported on the app and it can be added on all the runtime global space and they are loaded when it is on the script tag. All you have to do is configure the CLI for doing this at the build time and by using the styles and scripts options for building the targets on the CLI configuration file and angular.json.
For instance, you can use the Bootstrap 4 library, when it is installed, the library and dependencies make use of the npm package manager:

You can add the Bootstrap to the CSS file for the "style" array:

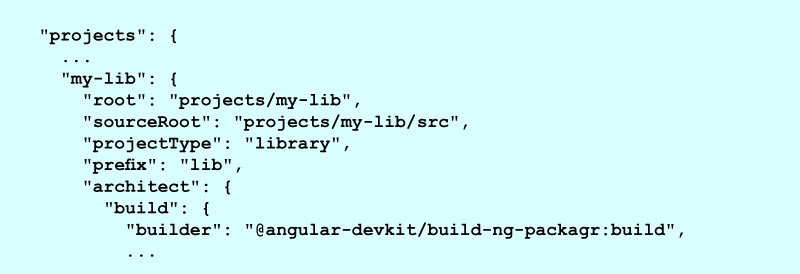
Building New Libraries
We can publish and build your own new libraries for extending the Angular functionalities. Generally, they are used when you must solve a similar problem for a single app and you must have the candidate for the library.
For instance: You can develop the button that is used for sending the users to your company website and it can be included on all your apps that the company builds.
You can now open the Angular CLI and make use of the below syntax for developing a new library:
Syntax:

It helps in building the project/my-lib folder on your workspace and it consists of the service and component that is inside the NgModule. A angular.json file and Workspace configuration file are updated along with a project of kind 'library'.
We can now test and built and lint all our projects using the commands that are given below:

The Architecture of Angular 7
In this Angularjs tutorial for beginners let see the important architecture of the Angular 7 version:
Angular 7 is a framework and platform that is used for building client-side applications on Typescript and HTML. Angular 7 is written in TypeScript.
Generally, Angular 7 deploys the optional and core functionality as the set of TypeScript libraries that allows you to import all your app.
NgModules are the fundamental building blocks of the Angular 7 application. It offers the complete context for all the components. An Angular 7 app is defined by a collection of NgModules, which are grouped and coded into functional sets.
Angular 7 app usually consists of a root module and it allows bootstrapping and also includes many feature modules in it.
The Components describe the views that are a group of screen elements that are selected and modified based on the program data and logic by Angular 7.
Components utilize services that offer certain functionality not straightly associated with views. It is possible to infuse the Service Providers into the components as dependencies and thus enable your code to be reusable, modular, and efficient.
Components
Both the components and services are just classes with decorators that label their kind and offer metadata that assists Angular to perform activities.
All Angular Applications have one component which is called the root component and it helps in connecting the page hierarchy along with the page DOM. All the components describe the class that consists of application logic and data which are related to the HTML template and it defines the view for displaying the target environment.
Metadata of the Component Class:
Metadata for the component class relates to the template that explains the view. A template helps in merging the usual HTML to the Angular directives and helps in binding the markup that permits the Angular for customizing the HTML before submitting it for display.
Metadata for the service class offers the details that Angular requires for making it accessible for the components via Dependency Injection.
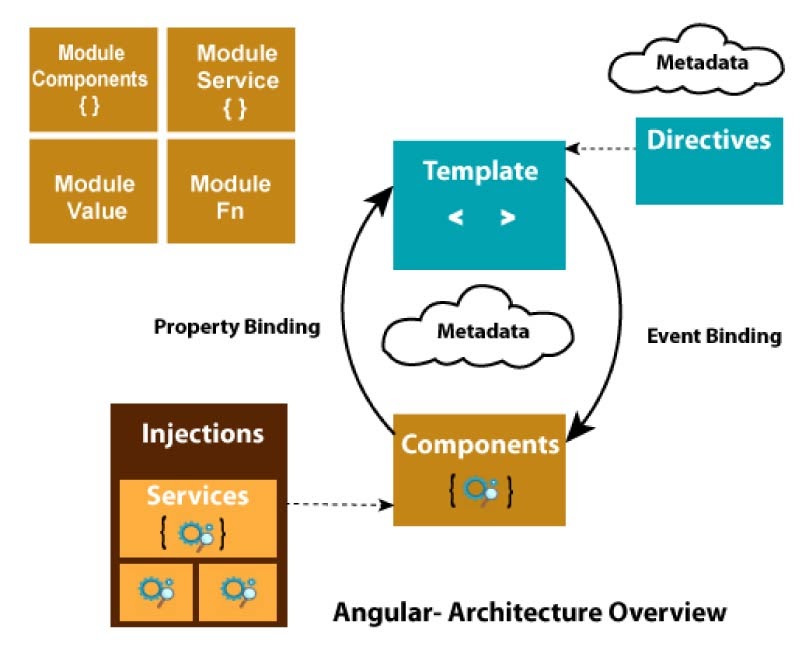
Modules
Angular 7 NgModules contradicts the other JavaScript modules. All the Angular 7 apps consist of the root module that is called the AppModule. It offers a bootstrap mechanism that helps you to download the application. Usually, all the Angular 7 app consists of numerous functional modules:
Angular 7Ng Modules aids in importing the functionalities from the other NgModules which are similar to JavaScript modules.
NgModules permit its functionality that has to be used and exported by the other NgModules. For instance, when you need to make use of the router service on your app, you can download the Router NgModule.
Directives, Template, and Data Binding
Here in Angular 7, a template is primarily used for merging HTML along with Angular Markup and for adjusting the HTML elements before presenting them. Template directives offer binding markup that helps in connecting your application data and DOM and Program logic.
There are two kinds of Data binding:
Event Binding: An Event Binding is used for binding all the events on your app and reacts to the user input on the target environment upon updating all your application data.
Property Binding: Property Binding is mainly used for passing data right from the component class and promotes you for annexing the values that are computed right from the application data to the HTML.
Service & Dependency Injection
In Angular 7, the developers can build a service class for logic or data that are not related to the specific view and they must share over components.
A Dependency Injection is used for making all your component classes efficient and lean. A DI can't obtain the data right from the server and validate user input or log them straight to a console; it can only just do tasks to services.
Routing
Angular 7, Router is the NgModule that offers the service that allows the developers to describe the navigation path over different application views and state hierarchies in the app.
It functions similarly to the way that a browser's navigation function:
Firstly, Enter the URL on the browser and address for hovering through the respective page.
You click the link that is found on the browser or page and it will help you to navigate through the new page.
You can click on the browser's forward or backward options and the browsers allow you to navigate front and back based on page history that you have visited.
Functioning Of Router
A Router maps URL-like maps you to views rather than pages. On any occasion, a user executes the action like clicking the link which would help to load a new page on the router, browser and it deflects a browser's behavior and hides or displays the view hierarchies.
When the Router identifies the present application that states it needs a certain module and functionality that describes whether it has been loaded and the router is capable of doing a lazy-load module on demand.
A Router interprets the link URL based on the app's view, data state, and navigation rules. It is possible to hover through newer views when a user clicks the button or selects it from a dropbox in response to another stimulus from another source. A Router logs activity on browser history, so the forward and backward option functions well.
For defining the Navigation rules, you can relate the navigation paths with all your components. A path makes use of the URL-like syntax that combines all your program data in a similar method that template syntax merges your views with the program data. You can also apply the program logic for opting which view is to be hidden or displayed for responding to the user input and for your access rules.
The Angular Training in Mumbai at FITA Academy assists the learners of the Angular Course with in-depth training of the Angular framework and its applications efficiently.
Angular 7 Directives
Here in this Angularjs tutorial, we will get you covered with the Angular 7 Directives and the methods to develop custom directives.
Directives are the guidelines that are found in DOM. It helps you to mention how to place the business logic and components in Angular. The Directives are js class and they are stated as @directive. There are three kinds of directives that are found in Angular and they are:
- Component Directives
- Structural Directives
- Attribute Directives
Component Directives: The Component Directives are utilized in the main class. It contains information on how components must be instantiated, processed, and utilized at the runtime.
Structural Directives: A Structural directive begins with a*sign. These are the directives that are utilized for changing and manipulating the design of the DOM elements. For instance: *ngIf and *ngFor.
Attribute Directives: The Attribute Directives are used for modifying the behavior and look of all the DOM elements. For instance: ngClass, ngStyle.
The distinction between Structural Directives and Attribute Directives
|
Structural Directives |
Attribute Directives |
|
Generally, a Structural Directive begins with the *symbol, and it looks distinct. |
An attribute directive views like the normal HTML attribute and it is mainly used on the event and data binding. |
|
A Structural Directive shall easily affect the complete area of the DOM. |
The Attribute Directives impacts only the elements where they are added with. |
Methods to build Custom Directives
You can build your custom directives and you can use them in the Angular components.
Developing a Fundamental Attribute Directive
So far we have seen the ngClass and ngStyle on the attribute directive. It is time for building your attribute directives.
Let's develop a folder. We can name them as "simple-style". We can create the file that is within a folder that is labeled as
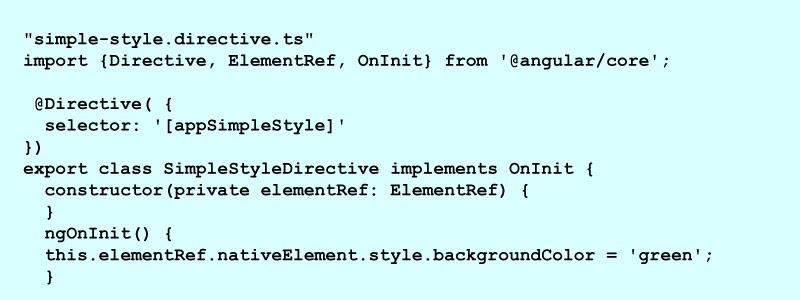
You must inform Angular that you have received a directive. You can add the SimpleStyleDirective to app.module.ts and they can also import them.
import { BrowserModule } from '@angular/platform-browser';
import { NgModule } from '@angular/core';
import { AppComponent } from './app.component';
import {SimpleStyleDirective} from './simple-style/simple-style.directive';
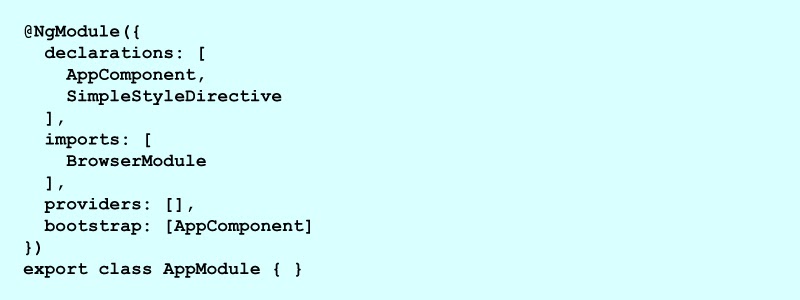
All your directive is developed now. Let's verify it. Open app. component.html and build your created SimpleStyleDirective
<p appSimpleStyle> Style me for your developed SimpleStyleDirective</p>.
Angular 7 Databinding
Databinding is the most robust feature of Angular. Generally, Angular Data Binding is mainly used for interaction. This is used for interacting between other components and TypeScript code which is mainly displayed to the users. Ex: HTML layout.
Databinding is mainly used where you can write the code on the TypeScript and this is used for arranging the JavaScript and all the results are displayed in the HTML layout. It helps in displaying spontaneous and accurate results for the user.
Note: It is more essential to have correct communication. Hence, this is the reason why Data Binding is used in Angular.
There are two kinds of Data Binding
One-way Data Binding: It is the one-way data binding that is simple and it is the one-way communication where the HTML template is changed and they can make the changes in the respective TypeScript code.
Or
This is one-way data binding, it is the value of a Model that is used for Viewing all the HTML pages and you can't update those Models from a View. Angular Interpolation, Event Binding, String Interpolation, are the key examples of data binding which is performed one way.
Two-way Databinding
In the two-way Data Binding, the immediate synchronization of data takes place between View and Model. The differences are usually emulated on both components. When you make changes to the Model, it shall reflect the View, and we can make the changes in the View, and later it will be reflected on the Model. It takes place immediately and it assures that the HTML template and all the TypeScript codes are updated immediately then and there.

Angular 7 String Interpolation
Here in this Angular tutorial, a String interpolation is mainly used showcasing the dynamic data on the HTML template. It permits you to make the required changes to the component.ts file and to get the data where the HTML template (component.html file).
For instance,
component.ts file:
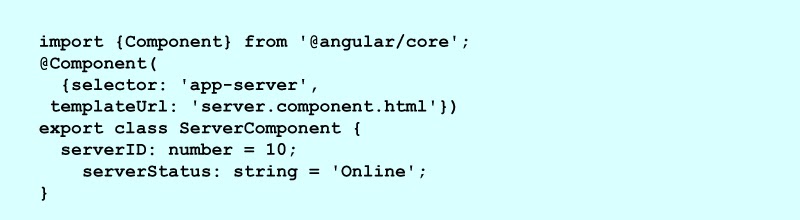
Now, we have mentioned the serverStatus and serverID with some values. We can see this "component.html" file.
component.html file

Output
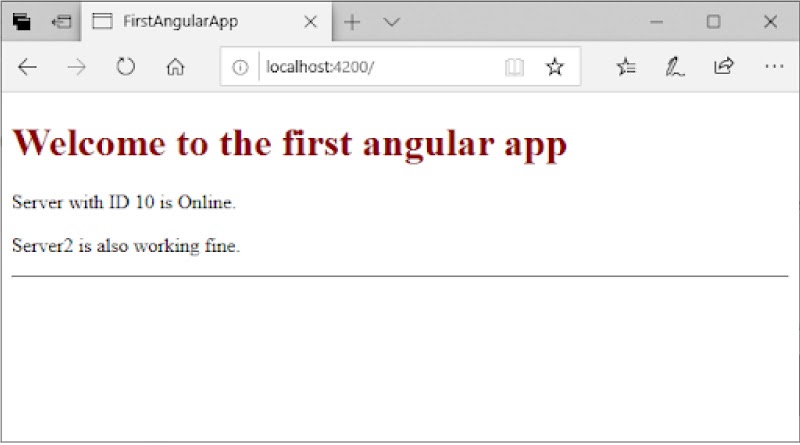
Property Binding vs String Interpolation
A String Interpolation and Property Binding are utilized for the same intent and this is known as one-way data binding. However, the issue is to find which is the best application for you. We can compare both on the basis of Differences, Security, Similarities, and it is the output you receive.
Correlation between Property Binding and String Interpolation
Property Binding and String Interpolation both are one-way data binding. Both of them flow in the value in one particular direction right from the components of the HTML elements.
String Interpolation
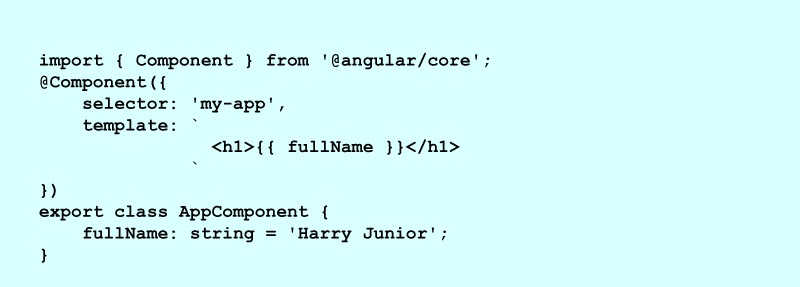
In the above example, Angular takes the value of fullName property right from a component and it inserts them between the opening and closing <h1> element for using the curly braces that are used for specifying the interpolation.
Property Binding
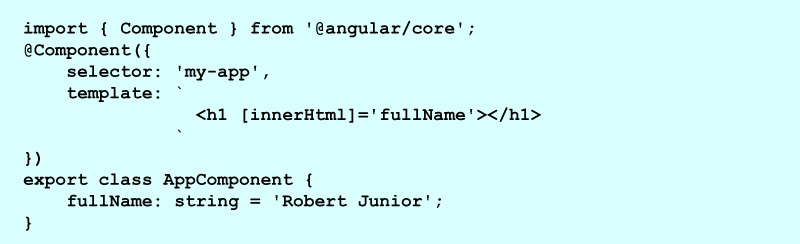
Here in the Property Binding, we can see how Angular helps you to pull the value right from the fullName and property right from the inserts and components and this is used as the Html property within the inner Html of <h1> element.
Both the examples of property binding and string interpolation shall give a similar result.
The distinction between String Interpolation and Property Binding
String Interpolation is the special syntax that is used for converting the property binding by Angular. It is the most favorable and alternative for property binding.
Where you must concatenate string and you should make use of the interpolation rather than property binding.
For example:
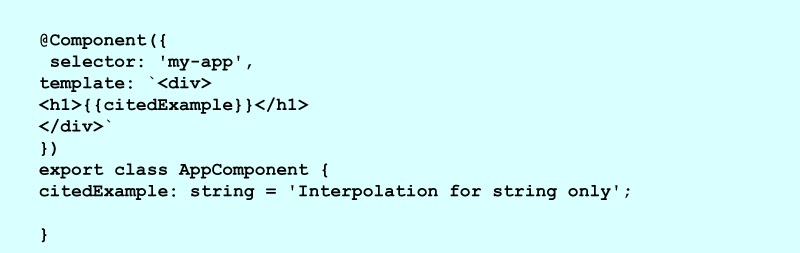
A Property binding is used where you must set the element property for the non-string data value.
For instance,
Given below is the example where you can disable the option by binding a Boolean property is disabled
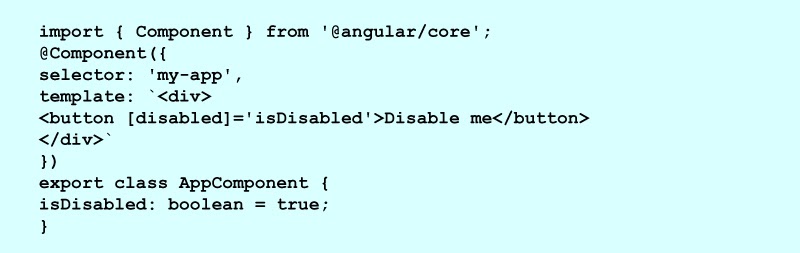
When you use the interpolation rather than property binding, then the button is discarded irrespective of isDisabled class property value false or true.
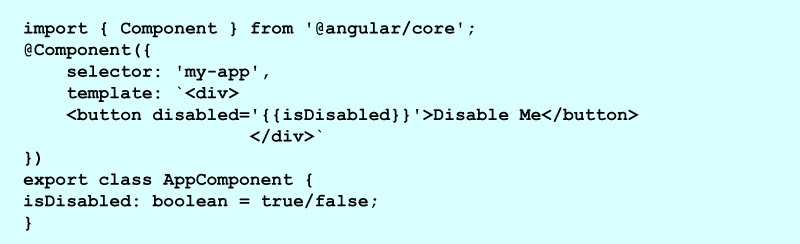
Angular 7 Event Building
Here in this Angular js tutorial let see Angular 7 DataBinding
Angular allows you to bind the event only with the methods. This is the process which is also known as event binding. An Event binding is used along with parenthesis().
For example:

component.html.file
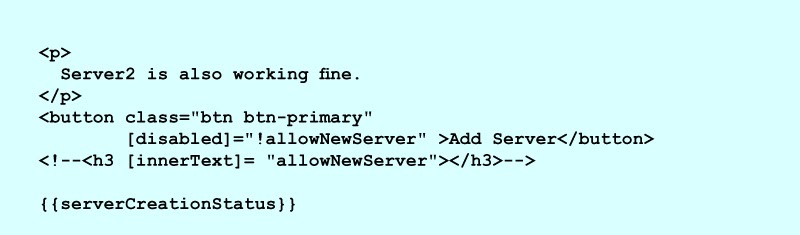
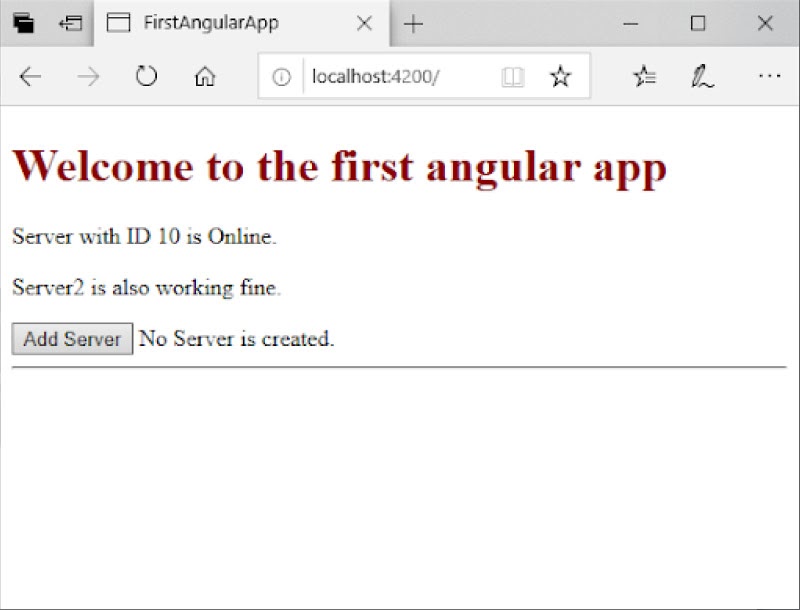
The output will be given as “No Server is developed”
Here are going to bind the event with a button. Then, you can add the other method onCreateServer() incomponent.ts file and you can signal the event.
component.html file:
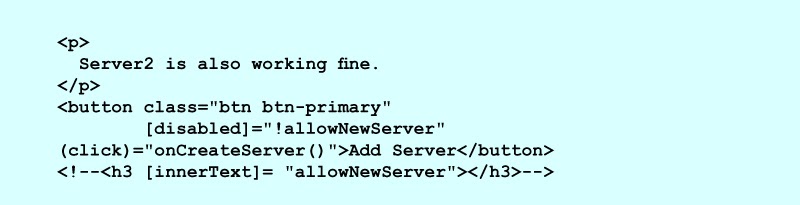
Output:
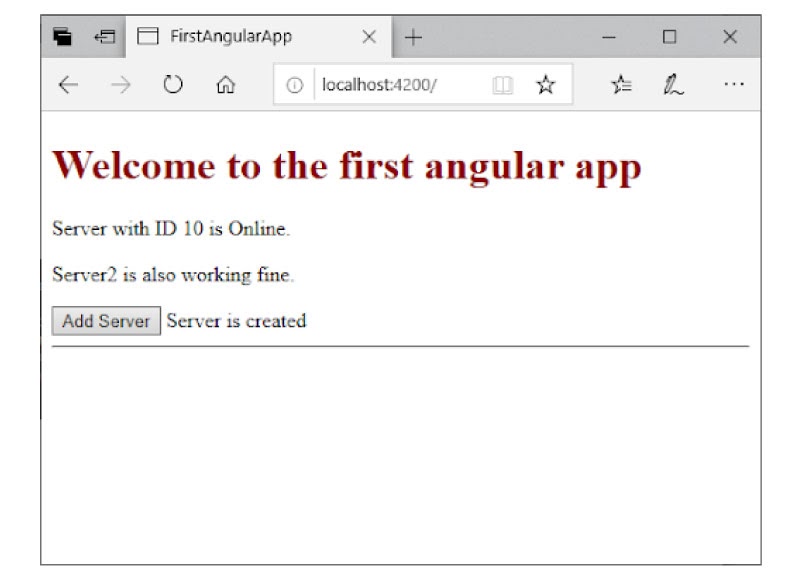
Here, after clicking the button, you can see what is displayed on the server that is developed. Below is the illustration of event binding.
Methods to use Data with Event Binding
We can understand them by example. Where you can build the method named "onUpdatedServerName" and you can add those events to them.
component.html file:

component.ts file:
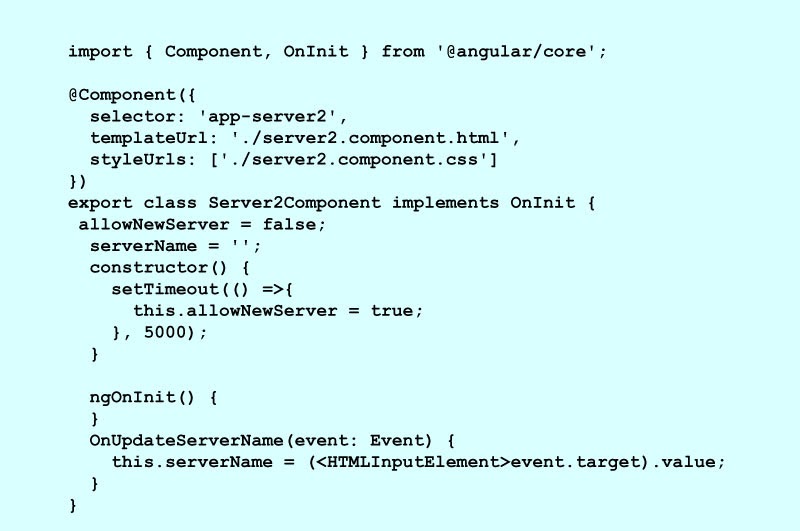
Output
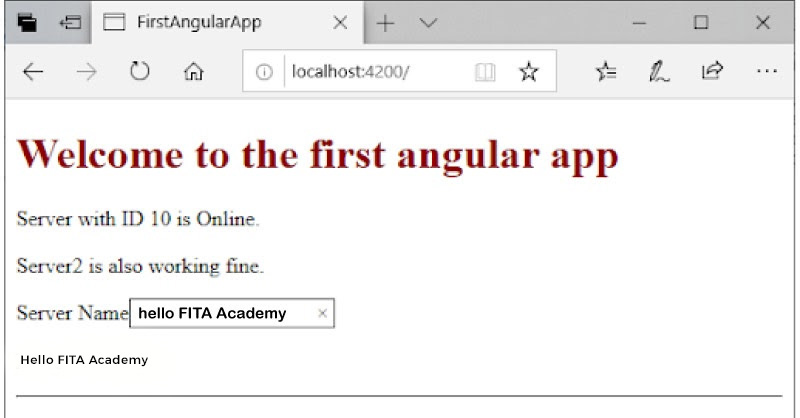
Where you can see where you can type anything on the block and it robustly updates them from the below input. It is how we can use the $event for fetching the event's data.
Angular 7 Property Binding
Here in Angular 7, the property binding is mainly used for passing the data from a component class and setting values for the specific element from the user-end.
Property Binding is the example of one-way data binding where the data is moved from one component to a class.
The major advantage of property binding is that it allows you to control all the element's property.
For example:
Where you can add the button to the "component.html" page.

component.ts file:

Output:
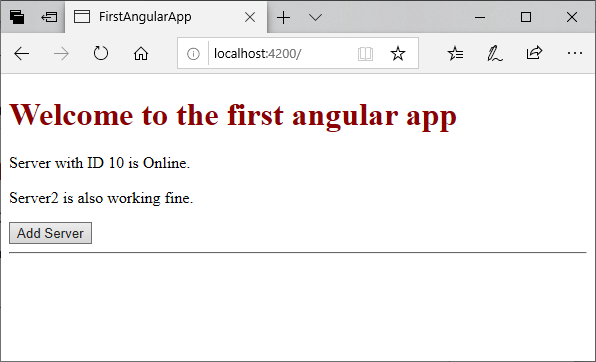
Let's see how property binding functions

Initially, where you are going to discard the option using the disabled attribute.
Now, the button is discarded.
You can add the new property "allowNewServer" in the "component.ts" file which discards the option automatically right after a certain time.
component.ts file:
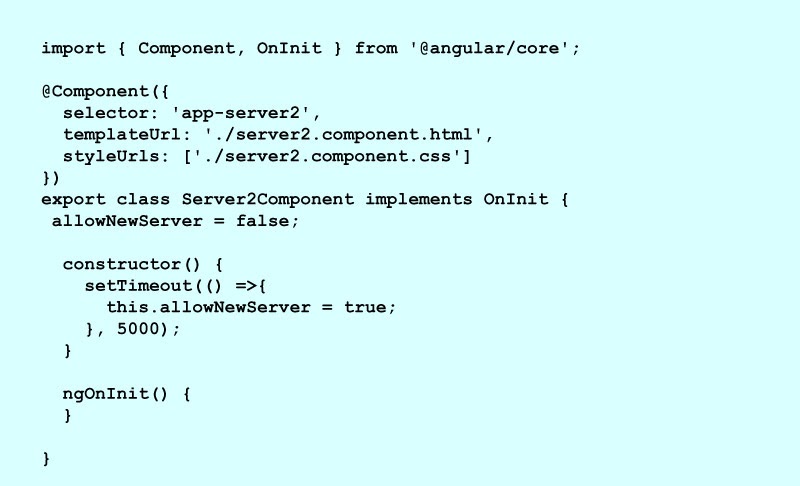
component.html file:

We can also set the time at 3000 milliseconds or 3 seconds. After every 3 seconds, an option will be discarded immediately. This is the best example for property binding where the property is dynamically bounded.
Output:
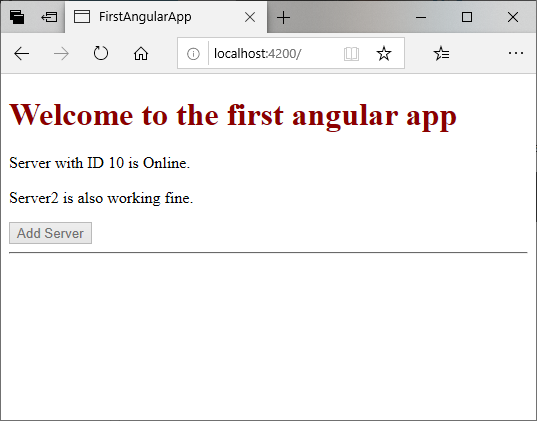

On using the code that is mentioned above, you can discard the button immediately after three seconds automatically.
String Interpolation vs Property Binding
You can use the property binding where the string interpolates for the data binding cases. For example, you can add the string interpolation on the above example.

The <h3>{{allowNewServer}}</h3> explains the string interpolation.
Output:
You can do the same task using the property binding.
For instance,
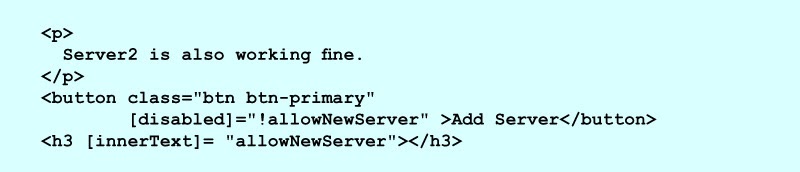
Output:
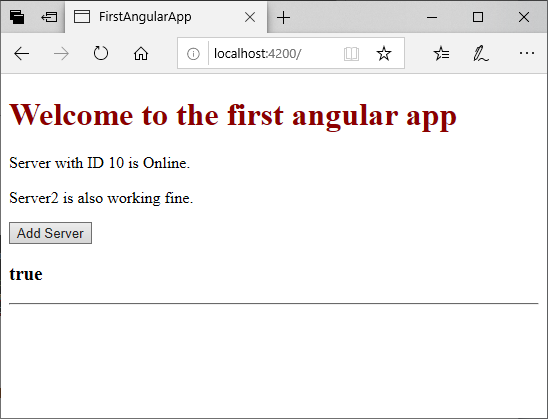
It will offer the required result:
Where string interpolates and has some limitations. We can learn where you can use the string for interpolating and here it is the property binding.
Angular 7 Forms
Generally, the Angular forms are used for managing the user's input. You can make use of the Angular form in the Application to allow the users for updating profiles, logging in, performing data-entry tasks, and entering information. In Angular 7, we can apply two methods for handling the user's input via forms:
- Reactive forms
- Template-driven forms
The above two approaches are used for getting the user input events from a view for validating user input and for developing the data model and form model for updating and offering ways to track all the changes. Here in this AngularJS tutorial let see about those two forms comprehensively.
Reactive Form vs Template-driven form
The Template-driven forms and Reactive forms are used for handling and processing the data individually. All of these offer various benefits.
Reactive Forms
- A Reactive form is robust.
- The Reactive forms are highly reusable, testable, and scalable.
- They are highly preferred for using the if forms and they are an important part of the application. Here is where the application is developed already, and it makes use of the reactive patterns. In both scenarios, the reactive forms are the best option for use.
Template-Driven Forms
- A Template-driven form is highly suitable when you need to affix a simple form to your application. For instance: the email lists the signing-up form.
- Template-driven forms are easier for use in the application however they are not scalable when compared with Reactive forms.
- The Template-driven forms are majorly used when your applications need the basic logic or form. It could be handled easily in the template.
The distinction of Reactive and Template-driven forms
|
Similarity Index |
Reactive Forms |
Template-driven forms |
|
Predictability |
Synchronous |
Asynchronous |
|
Data Model |
Structured |
Unstructured |
|
Setting-up |
These forms are highly explicit. They are used for building the component class. |
These are template-driven forms are not that explicit. It is used for developing directives. |
|
Form Validation |
Functions |
Directives |
|
Mutuality |
Immutable |
Mutable |
Correlation between Template-Driven and Reactive forms
Certain developing blocks can be shared by the two template-driven and reactive forms:
FormGroup: This is used for tracking similar values and status for a set of collections of the forms controls.
FormControl: This is used for controlling the validation and value status from an individual form control.
ControlValueAccessor: This is used for developing the bridge between the native DOM elements and Angular FormControl instances.
FormArray: This is used for tracking the similar status and values of the arrays of form controls.
Form Model Setup
The Form model setup is used for monitoring the value changes that take place between the form input and Angular form elements. See the example that is given below for the form model and how they are developed and defined.
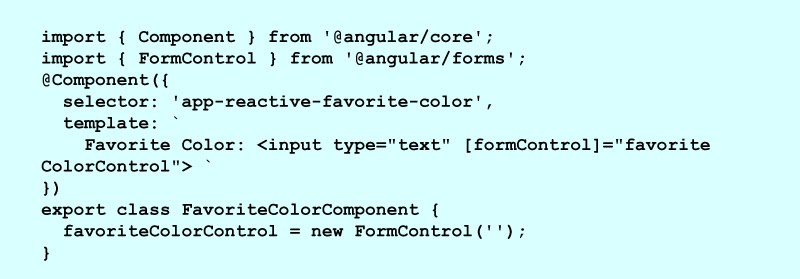
Form Model Setting Up in Reactive Forms
You can see the component below with the input field of the single control that is implemented by applying the reactive forms.
Here in the Reactive forms, a form model is the base of truth. The Source of truth gives the status and value of a form element that is offered at a specific time.
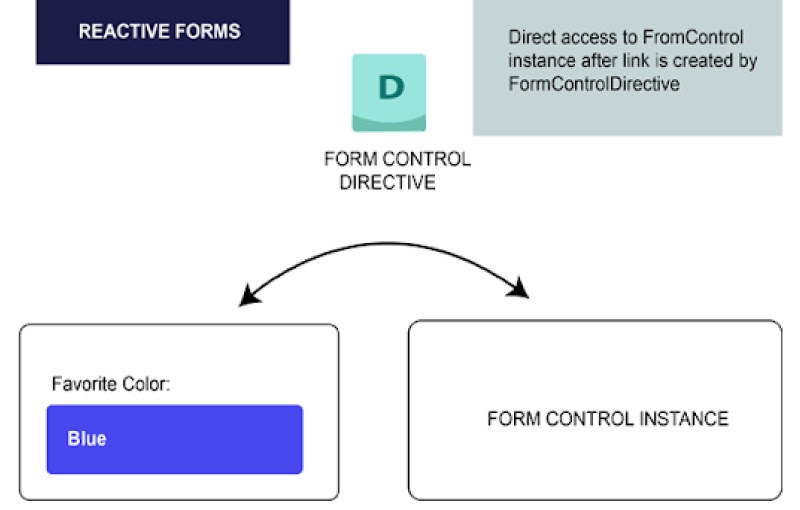
From the above example, a form model is the type of FormControl instance.
Generally, in the reactive forms, a form model is plainly described in the component class. Once they are completed the reactive form directive (FormControlDirective) links to present FormControl instance for a particular form element on the view with value accessor (ControlValueAccessor instance).
Form model setting-up the Template-driven Forms
From the above component of the input field for a specific control is implemented with the aid of template-driven forms.
Syntax:
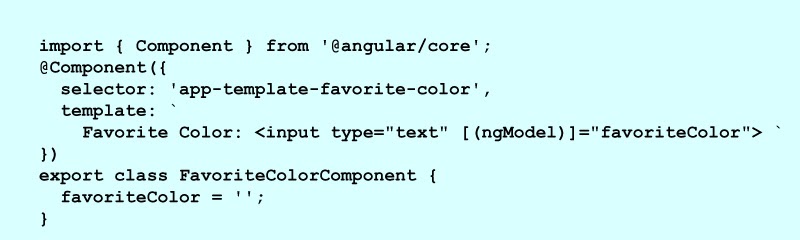
In the template-driven forms, the source of origin is itself the template.
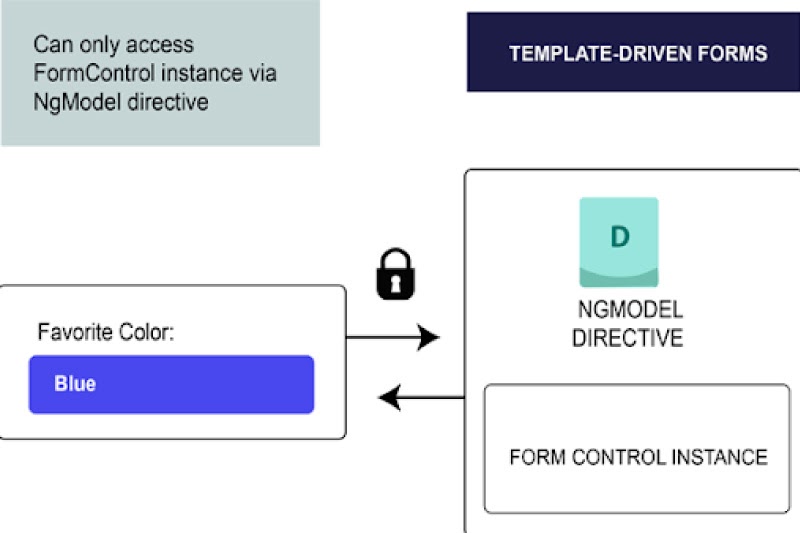
A form model abstraction is used for enhancing accessibility right over the structure. A template-driven and form directive NgModel is used for handling and developing a FormControl instance that is offered a specific form element. Also, it is less explicit and helps in removing the direct control over a form model. The Angular Training in Delhi at FITA Academy renders the comprehensive training of important Angular concepts and how to develop a dynamic Front end Web application under the mentorship of Expert Developers.
Data Flow in the Angular Forms
When you build Angular forms, it is mandatory to understand that how the frameworks manage the data flow. There are two kinds of forms in Angular, and they are template-driven and reactive that provide different structures for handling the user's input.
Data Flow in the Reactive Forms
In the Reactive form, all elements on the view are straightly linked to a form model. Any of the updates from the view to model and model to view are generally synchronous and they are not highly dependent on UI. Let's first learn them with interpretation. The Interpretation shows how the data flows while you change the input field's value from a view and form model.
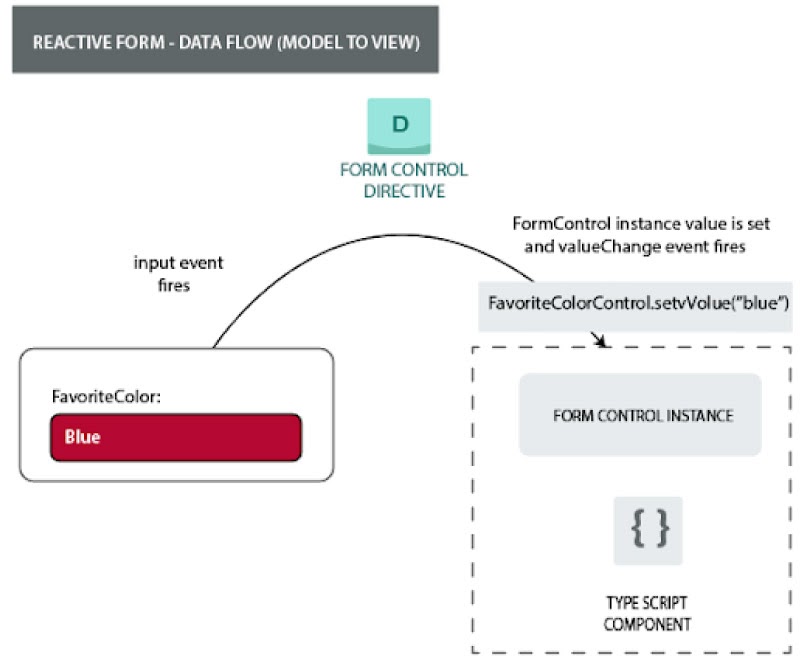
Methods of Data Flow from view to the model in the Reactive forms:
- Initially, the user enters the value into an input element. Here in this instance, an input element is a Favorite color and the entered value is Green.
- Later, a form input element is used for emitting the "input" event that is with the lastly entered value.
- Later a Control value accessor automatically depends on the new value of FormControl instance. (They listen for all events in a form input element.
- Once the value is received theFormControl instance gives off the new value via valueChanges observables.
- All the Subscribers for the valueChanges and observables that receive the new value.
Data Flow from the Model to View
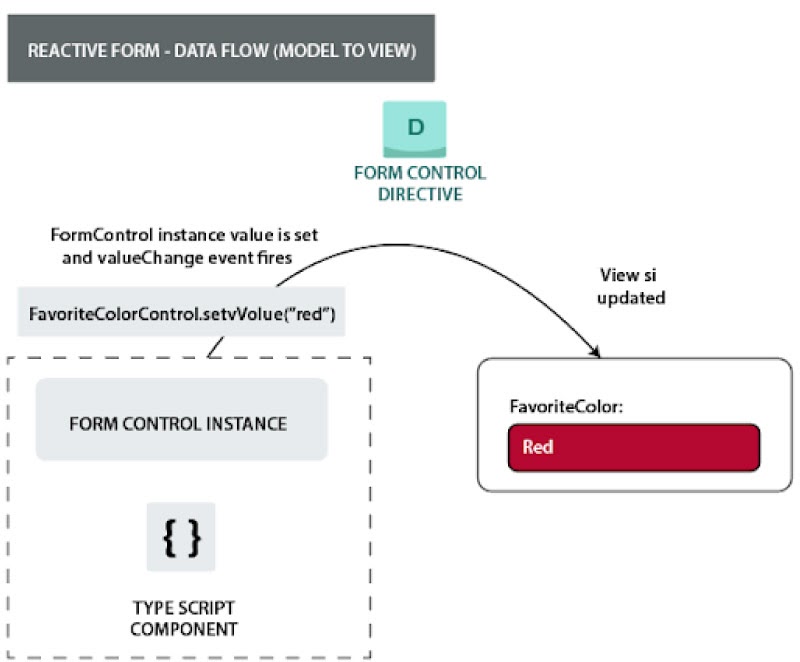
Steps are involved in the Data flow right from a model for viewing the reactive forms:
- Initially, the users calls for favoriteColorControl.setValue() method. It is the method commonly applied for updating the FormControl value.
- Secondly, the FormControl instances transmit the new values via the valueChanges observable.
- Thirdly, the subscribers for the valueChanges observables accept the new value.
- Finally, the Control value accessor in the form input element helps in updating an element with a new value.
Data Flow on the Template-driven forms
All the elements of template-driven forms are linked with the directive for handling the form model that is present internally. The image which is given below is one example to comprehend the data flow on the template-driven angular forms. When the input field's value is modified from viewing and then to a from a model.
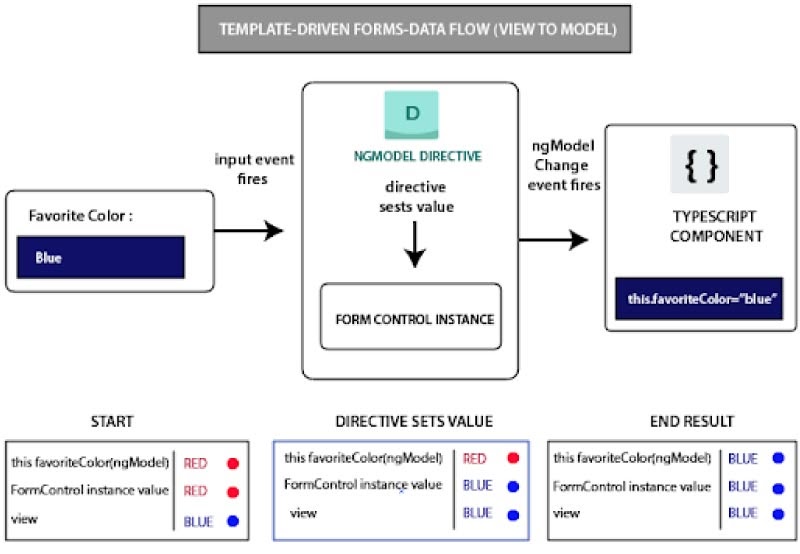
The procedure of Data flow fromview to the model on the reactive forms:
- Right here, the users can modify the input value red to green.
- Initially, the users enter Green in the input element.
- Later, the input element transmits the "input" event having the value as Green.
- Now, a control value accessor is affixed along with the input triggers to a setValue() method on a FormControl instance.
- When the setValue() method, a FormControl instance transmits a new value via the valueChanges observable.
- A Subscriber to valueChanges observables accept new value.
- Right after that, a control value accessor shall call for the NgModel.viewToModelUpdate() method that gives of the ngModelChange event.
- Over here the component template make use of two-way data binding for favoriteColor property, a favoriteColor property on the component is updated for the value that is given off by ngModelChange event (Green).
Data flow right from Model to View:
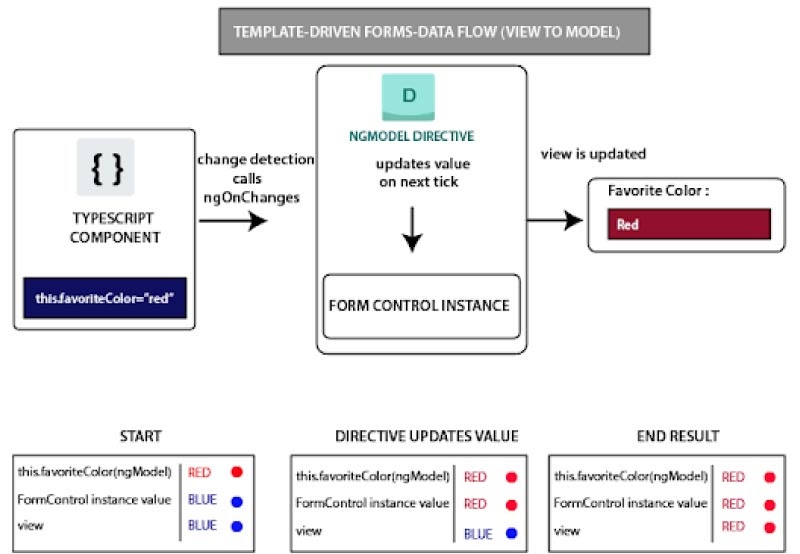
Procedures for Data Flow form model to viewing the reactive forms:
- A Data flow form model is used for viewing the below steps when the favoriteColor element is modified from red to Green.
- Initially, a favoriteColor is updated to the new value in the component.
- Now, the change detection begins
- At the time of the change detection, the ngOnChanges cycle hook are called NgModel directive instance as the value of one of their input is been modified.
- An ngOnChanges() method helps in queueing up all the async task for setting the value to the internal FormControl instance.
- The Change detection would be completed by now.
- Now, the tasks are set in the FormControl instance value are executed.
- A FormControl instance can transmit the recent value via the valueChanges observable.
- All the subscribers for the valueChanges and the observables shall get the new value.
- A Control value accessor is used for updates of form input element from the view to the recent favorite color value.
Angular Reactive Forms
The Angular Reactive forms pursue the method of model-driven format for handling the form input when those values are modified over time. It is also called the model-driven form. Generally, in Reactive forms, we can update and develop a simple form control that makes use of different controls in the group, implement more advanced forms, and validates the form values.
The Reactive forms make use of the immutable and explicit approach for handling a form at a specific time. You can modify the form state and it comes back to the new state that handled the principles of all the models between changes. In the reactive forms, you can build your interpretation of the form in a component class.
In general, the Reactive forms are easier to test as they ensure persistent and predictable data when asked. Here in this Angular tutorial, we will be focusing on how to add the Single form Control.
Methods to Add Single Form Control
In this AngularJS Tutorial, you will get an in-depth explanation of how to add the single form control. Right here, the users are required to enter their name onto the input field, interpret the present value of a form control element, and form captures that input value.
Go through the guidelines that are given below:
1) Register your Reactive Form module: Initially, you must import the ReactiveFormModule from @angular/forms package. Then you must add them to your NgModule's imports array for using reactive forms.
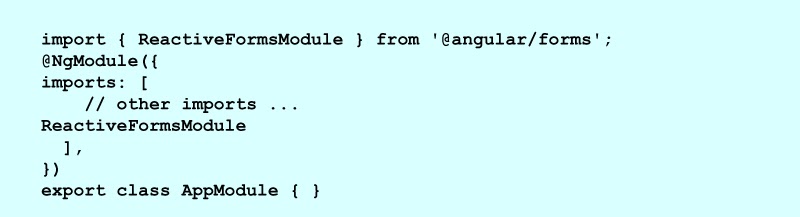
2) Import and Generate a new form of control
Initially, you must generate the component for control using the below syntax:

For registering the single form control, you should import a FormControl class on your component, and you must develop the new instance of a form control for saving the class property. A FormControl Class is the fundamental building block that is mainly used in reactive forms.
You can now write the below code on the name editor.component.ts.file:
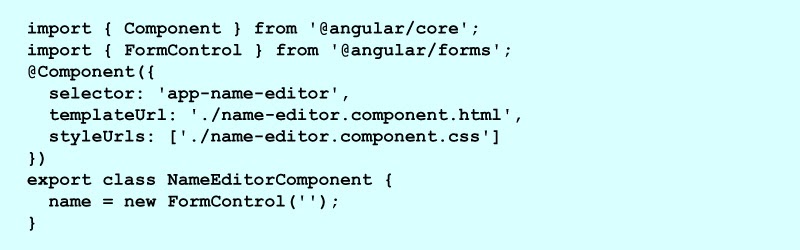
3) Register the Control in a template: Once, when you create the control on the component class, you must add them to the form control element in a template. To use a formControl binding that is offered by the FormControlDirective for updating a template with a form control.

You must have them registered to a form control of the name input element in a template. The DOM element and form control will interact with one other for viewing and reflecting the changes on the model and these model impacts the changes in a view.
4) Component Display: You can add a form control component to a template for displaying a form. We can add the below code to the app.component.html.
Syntax:

Output:

Template-driven Forms
Generally, the Template-driven forms are applied in most applications. For instance - log in, placing an order, data entry, and submitting a request.
You can now create a form by following the steps that are given below:
Develop a Project
Initially, you can develop a new project titled angular-forms with the aid of the command that is given below:

Go to the respective project folder with the help of the command that is given below.

You can apply the Angular CLI command ng generate class here to build a new class labeled Hero:

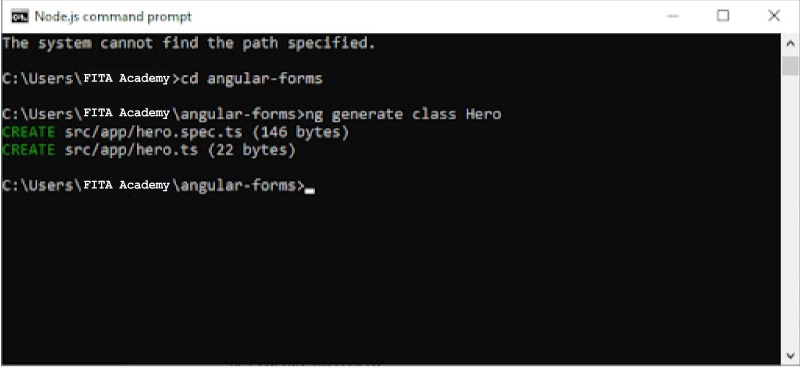
Hover to your project file angular forms and open the hero.ts file which is under the app module. You use the following code:
Syntax:
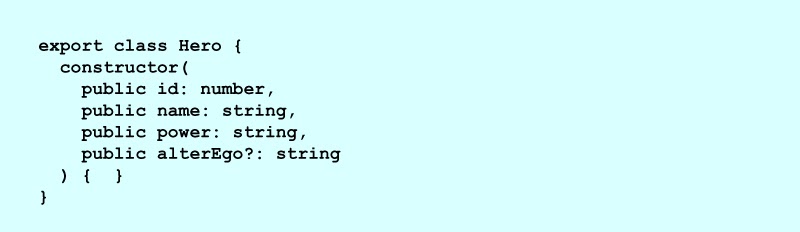
A TypeScript compiler is used for developing a public field for all the public constructor parameters and where you can build new heroes. It immediately designates the parameter's value to that particular field. Right here, alterEgo is the constructor and optional thing that can be omitted.
Developing a Form Component
An Angular form incorporates the two main things:
- HTML based template
- A component class for managing users and data
We can now generate the new component which is called HeroForm using the command:

You can write down the below code in the hero-form. component.ts
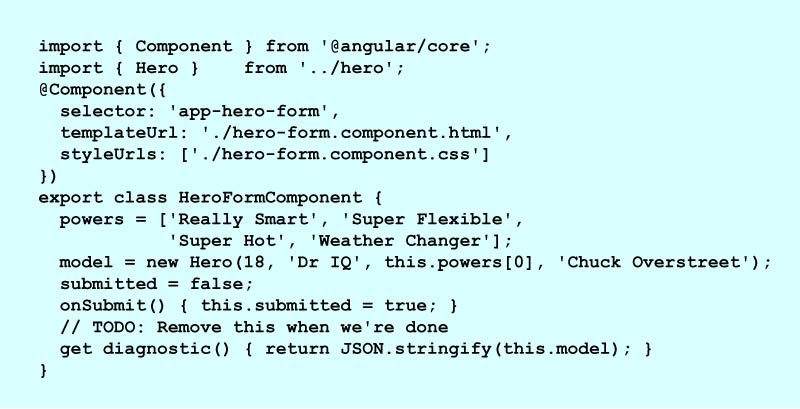
Revise app.module.ts file
An app. module.ts file is mainly used for explaining the root of an application module. A template-driven form is usually found in its module. You must just add a FormsModule to the array of imports of an application module prior to using the forms.
We can use the code that is given below and inside the app. module.ts file:
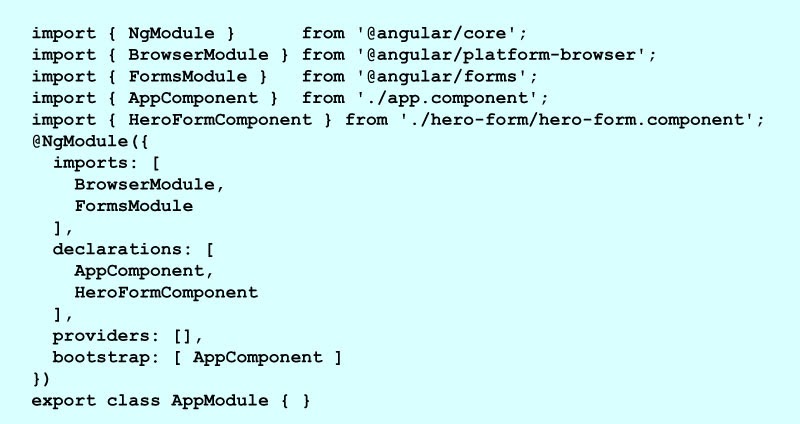
You can now import the FormsModule and the other FormsModule to the set of imports that are mentioned in @NgModule decorator. It is used for accessing the complete application for all the template-driven forms features inclusive of ngModel.
Revising an app.component.html.file
An app.component.html is mainly used for hosting a new HeroFormComponent. This is the root application component. You can write the code in the app. component.html

Developing an initial HTML form template
We can make use of the code: hero-form.component.html
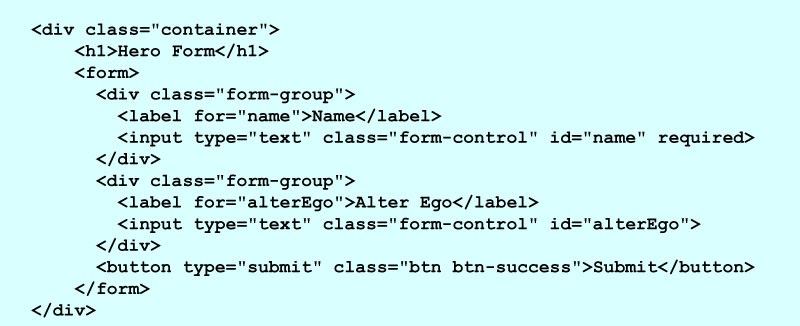
Styling of Form: You can open an style.css and utilize the below code for importing a bootstrap file.

Add the Power list utilizing *ngFor
A hero form is a highly preferred power list from the fixed set of agency authenticated powers. We can use the below HTML code alternative below and the Alter Ego group in the hero-form.component.html.

Given below is the fundamental template-driven form which is completed now. We can make use of the ng-serve command for running a project.
Output:

We can check here the Hero's power.
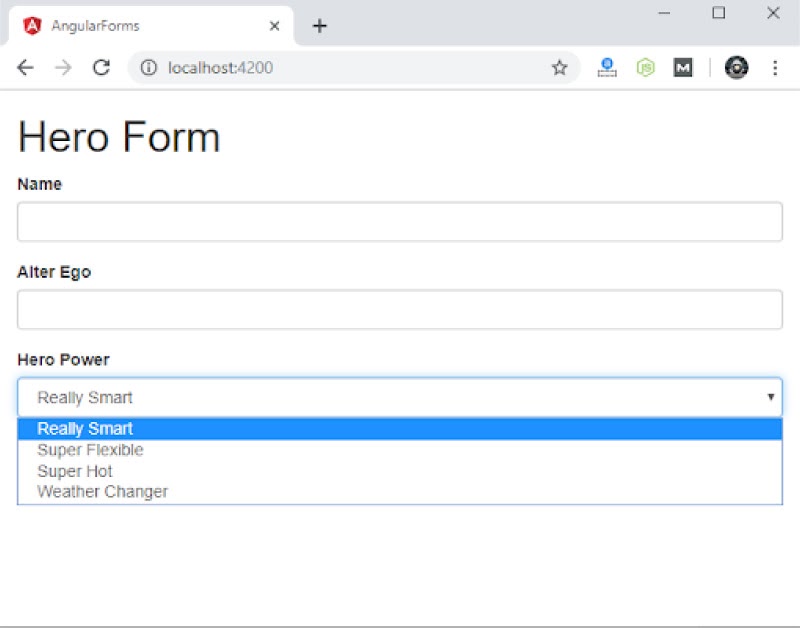
Angular 8
First, in this AngularJS tutorial for beginners let us become familiar with Angular 8 and its features.
Angular 8: Usually, Angular 8 is the client-side and TypeScript based framework that is mainly used for developing dynamic web applications. It is similar to the earlier versions excluding some of the extensive features.
Angular Notes: A dynamic web application is simply called a dynamic website. For example www.gmail.com. It tends to modify the information/data in correspondence to three other parameters.
- Time-to-time (News updates)
- User-to-User ( Facebook, Gmail)
- Location-to-Location (Weather updates)
Features of Angular 8
The Angular community released the Angular 8 version with an attractive set of improvements and changes that includes the most awaited Ivy compiler as the opt-in feature.
The most essential features of Angular 8
- It supports TypeScript 3.4
- It extends its support to Web Workers
- A new compiler of Angular 8 is the Ivy Rendering Engine
- The Angular 8 offers dynamic imports for all the lazy-loaded modules.
- It helps in the enhancement of the ngUpgrade
TypeScript 3.4
Angular 8 primarily supports Typescript 3.4 and it only needs to run the Angular 8 project. You can now upgrade to the TypeScript Version of 3.4.
Web Workers Class
JavaScript is single-threaded and it is used for critical tasks namely data calls that take place asynchronously. A Web Worker allows you to run the entire CPU-intensive computations in the background thread and easing the main thread for updating the complete user interface. A Web Worker is also useful when the application is unresponsive at the time of processing the data.
When you want to outsource the calculations to the background then you can develop a web worker with the support of Angular CLI.

Getting to know about Bazel and Ivy
Bazel is the build system and Ivy is the rendering engine. Both of these were created to use with Angular 8. Ivy is the latest runtime/compiler of the Angular and the Angular 8 recent release for providing the switch for opt-in the Ivy officially.
An Ivy is the default rendering engine on Angular version 9. A Bazel offers the latest feature of Angular 8 and you build all the CLI applications rapidly.
Benefits of using Bazel
- It offers the chance to allow your frontends and backends to function with the same set of tools.
- It is the incremental tests and builds.
- It has cache and remote builds on a build farm.
Dynamic method of importing lazy-loaded modules
Angular 8 permits you to make use of the standard and dynamic import of syntax rather than the custom string of lazy-loaded modules.
A lazy-loaded import looks like this:

or
It can also be like this:

Enhanced Angular CLI Workflow
The Angular CLI persistently works in enhancement. Now, an ng test, ng run, and ng build are usually equipped with the aid of third-party tools and libraries. For instance, AngularFire is all set to make use of these new abilities for deploying a command.
Angular 8 Installation
Before setting up the environment for the Angular developments with the aid of the Angular CLI tool. Initially, you should install Node.js to your system and position the development background and the npm package manager.
Installation of Node.js
- Generally, Angular needs Node.js version 10.9.0 or the version that is next to them. We can download them from https://nodejs.org/en/
- Once, when you are done with downloading, you should configure it on your system.
- Now, open the node.js command prompt.
- Check your version, run node-v on the console/terminal window.
- Make use of the npm for Installing the Angular CLI
- Follow the command that is used for installing Angular CLI.
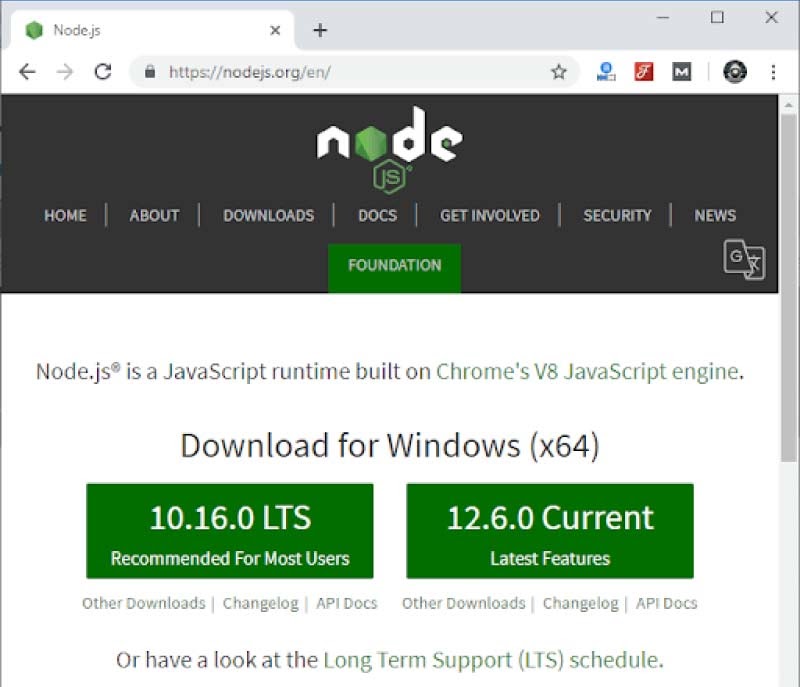

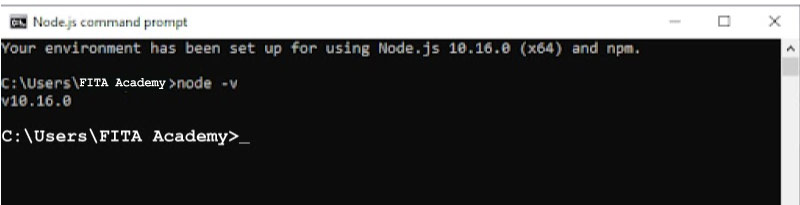

or

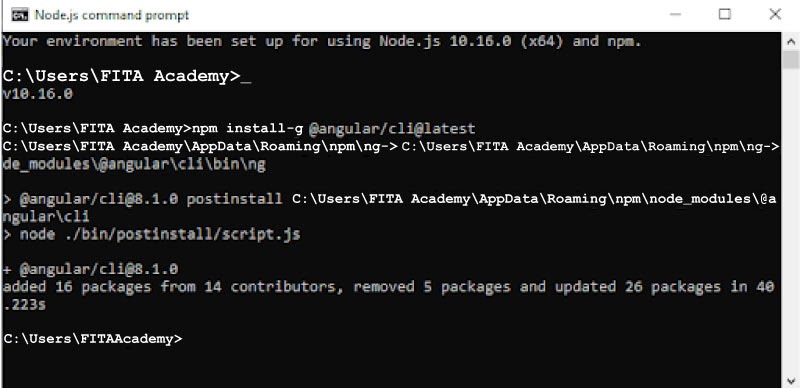
Or
You can just move to the official website of Angular CLI: https://cli.angular.io/
Now, you will see the complete CLI command for developing the Angular app. You must run the very first command for installing the Angular CLI. The steps are the same for both Mac & Windows operating systems.
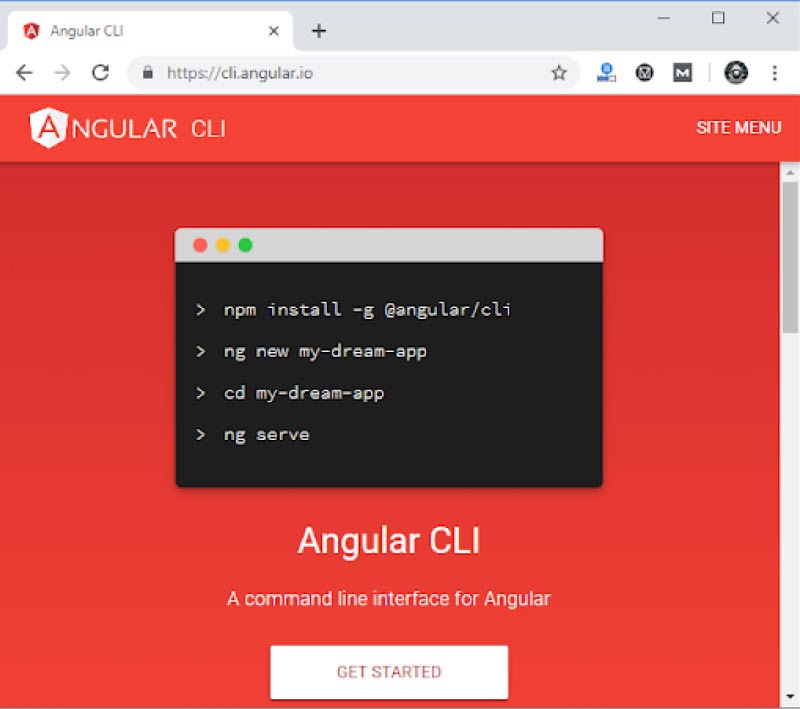
You can verify your installed versions using the ng --version command.
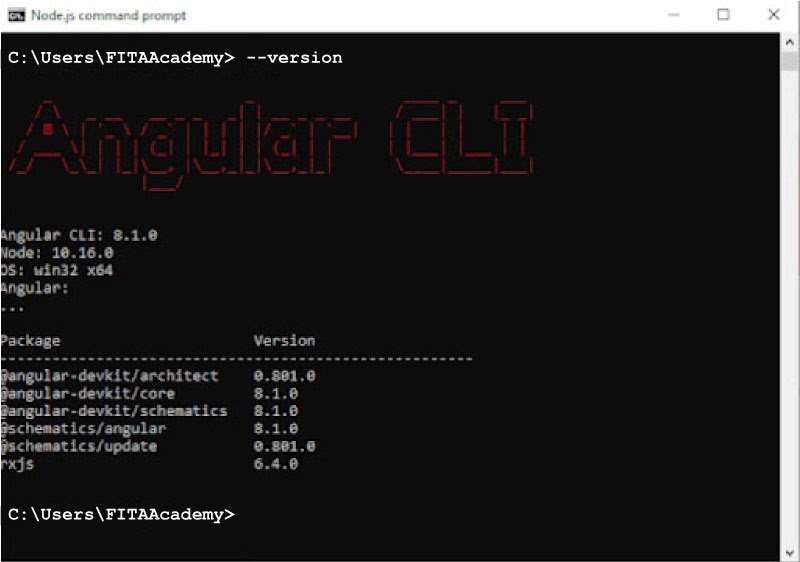
Finally, Angular 8 is installed on your systems. The Angular Training in Kochi at FITA Academy incorporates all the skills that are required for a Front-end developer in the Web development industry under the guidance of Real-time professionals.
Angular 8 Architecture
Here in this AngularJS tutorial, we will see the Angular 8 framework and platform that is used for developing the client-side applications on TypeScript and HTML.
In general, Angular 8 is developed using TypeScript. This is used for deploying the optional core functionality which is the set of Typescript libraries that you can use for importing them on the apps.
The fundamental building block of the Angular applications is called NgModules and it offers compilation context for all the components. The NgModules helps in collecting the code that is associated with the functional sets: the angular app is defined by a group of NgModules. The app consists of root modules that allow bootstrapping and it usually has more feature modules.
A Component defines the views, and they are the group of screen elements from which the Angular could pick and change based on the program data and logic.
The Components make use of services that offer particular functionality which is never directly associated with the views. The Service providers are injected into the components as dependencies to make your code reusable, efficient, and modular.
Essential parts of Angular 8 Architecture
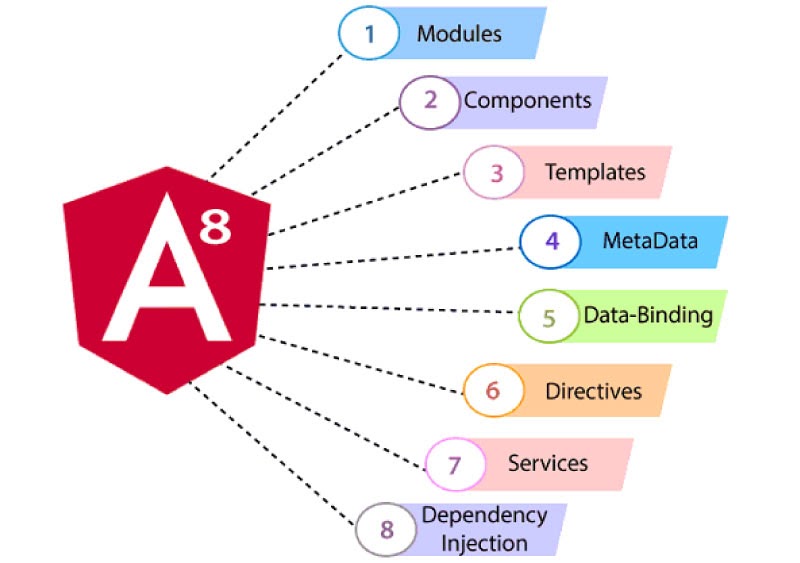
Important Components of Angular 8
In Angular 8, the services and components are just classes with decorators that mark its type and offer metadata for assisting Angular to perform few things.
All the Angular applications have above 1+ components which are also called the root component and it bridges the page hierarchy directly with the page DOM. All the components explain the class that consists of application logic and data that are related to the HTML template for defining the view that has to be interpreted in the target environment.
Metadata of the Component Class
The metadata of the component class is related to the template that explains the view. The template helps in merging the basic HTML with all the Angular binding and directives for markup and it permits the Angular to change the HTML right before offering them for display.
Metadata of the service class offers the details which Angular would require for making them available for all the components via dependency injection.
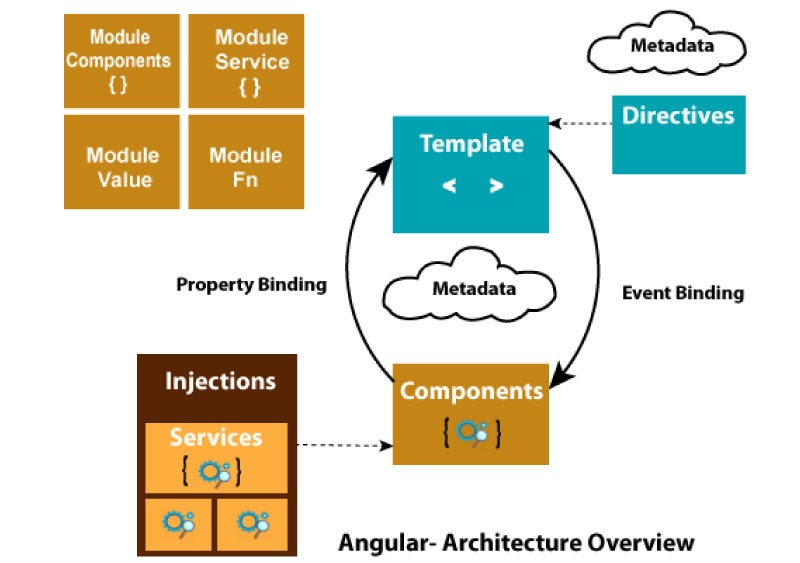
Modules
The Angular 8NgModules vary from the rest of the other JavaScript modules. All the Angular 8 apps have the root module which is called AppModule. It offers the bootstrap mechanism and it is used for installing the applications. Usually, all the Angular 8 apps consist of many functional modules.
The key features of Angular 8 Modules are:
- The Angular 8 NgModules are used for importing the functionalities right from the other NgModules like the other JavaScript modules.
- All the NgModules permit functionality that has to be exported and it can be used by the other NgModules. For instance, when you need to use the router service on your app, we can import them to the Router NgModule.
Directives, Template, and Data Binding
Here in Angular 8, the template is mainly used for merging the HTML with Angular Markup and to change the HTML elements prior to display. A Template directive offers binding markup and program logic that connects all your application data and DOM.
There are two kinds of data-binding:
Event Binding: An event binding is mainly used for binding the events of your app and they respond to all the users with input on the target environment by updating all of your application data.
Property Binding: A Property binding is mainly used for passing the data right from the component class and it allows you to interpolate all the values which are computed on your application data on the HTML.
Service & Dependency Injection
On Angular 8, the developers are used for developing the service class for logic or data that are not related to the particular view and they need to share all the components.
Dependency Injection (DI): This is used for making all your component classes look efficient and clean. The DI usually will not get data from a server, log in directly to a console, validate the user input and it renders tasks to all the services.
Routing 3
Here in Angular 8, the Router is the NgModule that offers the service which allows the developers for defining the hovering path and other different application views and state hierarchies in its app.
It functions in a similar way as the Browser navigation functions:
- Now type the URL on the address bar. Now the browser will move you to the respective page.
- You can click on the link on the page and the browser can hover to the new page.
- Click on the browser's forward or backward options and now the browser shall move forward and backward based on the history pages.
Angular 8 Directives
The Angular 8 directives are used for manipulating them. With Angular Directive, we can modify all the changes and the appearances with the layout and behavior of the DOM element. This also aids you in extending the HTML.
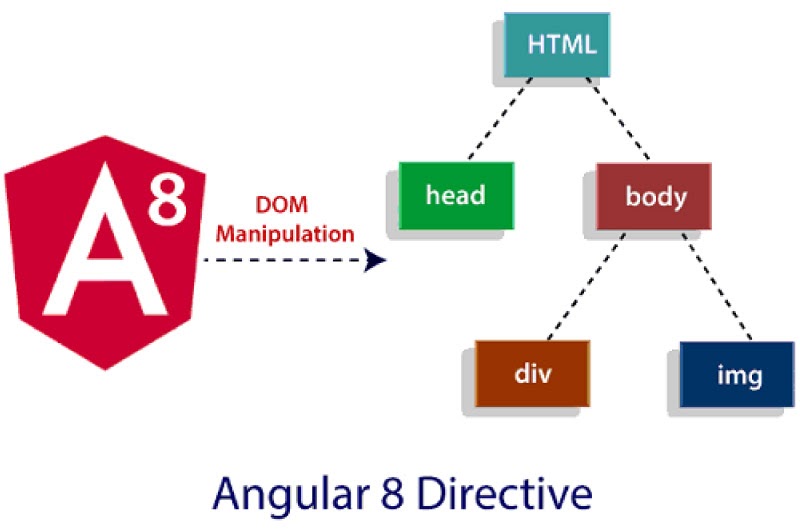
Angular 8 directives could be differentiated into three categories on the basics of how they behave:
- Component Directives
- Structural Directives
- Attribute Directives
Component Directives: The component directives are primarily used in the main. It consists of detail on how all the components must be instantiated, processed, and utilized at the runtime.
Structural Directives: A Structural directive begins with a*sign. These are the directives used for changing and manipulating the structure of DOM elements. For example: *ngIf directive, *ngFor directive, and *ngSwitch directive.
ngFor Directive: A *ngFor directive that is used for repeating the set of HTML templates as per all items from the iterable list.
*ngSwitch Directive: It is the *ngSwitch permits you to Add/Remove all the DOM elements. It resembles all the switch statements of C#
ngIfDirective: A ngIf permits you to add/ remove DOM elements.
Attribute Directive: It is primarily used for modifying the behavior and outlook of all the DOM elements. For instance: ngStyle and ngClass Directive.
ngClass Directive: It is a ngClass directive that is used for adding or removing the CSS classes to the HTML element.
ngStyle Directive: A ngStyle directive allows you to change the style of the HTML element with the help of expression. We can also make use of the ngStyle directive for dynamically changing the style of the HTML element.
Angular 8 ngIf Directive
Here in this Angularjs tutorial let us see about ngIfDirectives and how this is used for adding and removing the HTML elements based on the expression. An expression should return the Boolean value. An expression is false when the element is discarded otherwise the element is added to it. It resembles more the AngularJS: ng-if directive.
ngIf Syntax

*ngIf directive form with the "else" block

A ngIf usually will not hide all the DOM elements. It helps in discarding the complete element that is found along with the subtree of the DOM. It further supports getting rid of the parallel and state freeing up of the resources that are related to an element.
A *ngIf directive is commonly used for displaying the inline template. Go through the example that is given below:
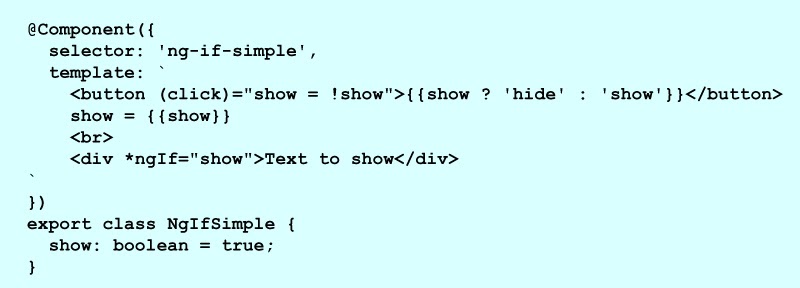
Same template example with else block
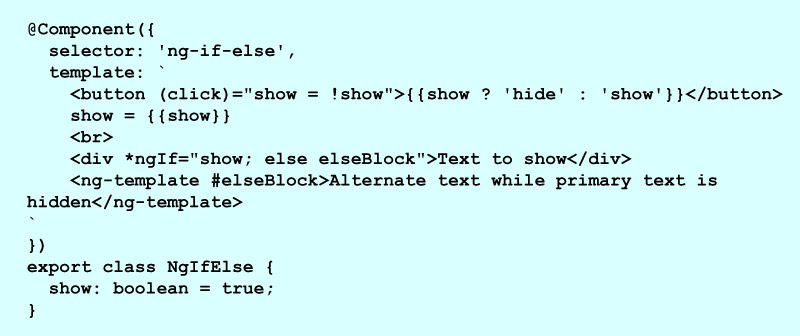
Angular 8 *ngFor Directive
A *ngFor Directive is utilized for repeating the set of HTML templates for every item from the iterable list. The ngFor is also the Angular structural directive which resembles the ngRepeat in the AngularJS. The local variables are the First, Last, Index, Even, and odd is exported by the *ngFor directive.
Syntax of ngFor
You can see the most simple syntax of the ngFor directive:

Methods to use ngFor Directive
We can use the ngFor Directive when you need to build the block of all the HTML elements that are displayed on a single item of the items compilation. Once, when you are done with it, we can use the ngFor Directive to explain the angular to repeat those blocks of the HTML elements of all the items in the file.
Example of *ngFor Directive
Initially, you have to build the Angular application. Then you must open all app.component.ts and total the below code:
The code which is given below consists of the set of Top 3 movies which is given in the movies array. Let's develop the template for interpreting all these movies in tabular form.
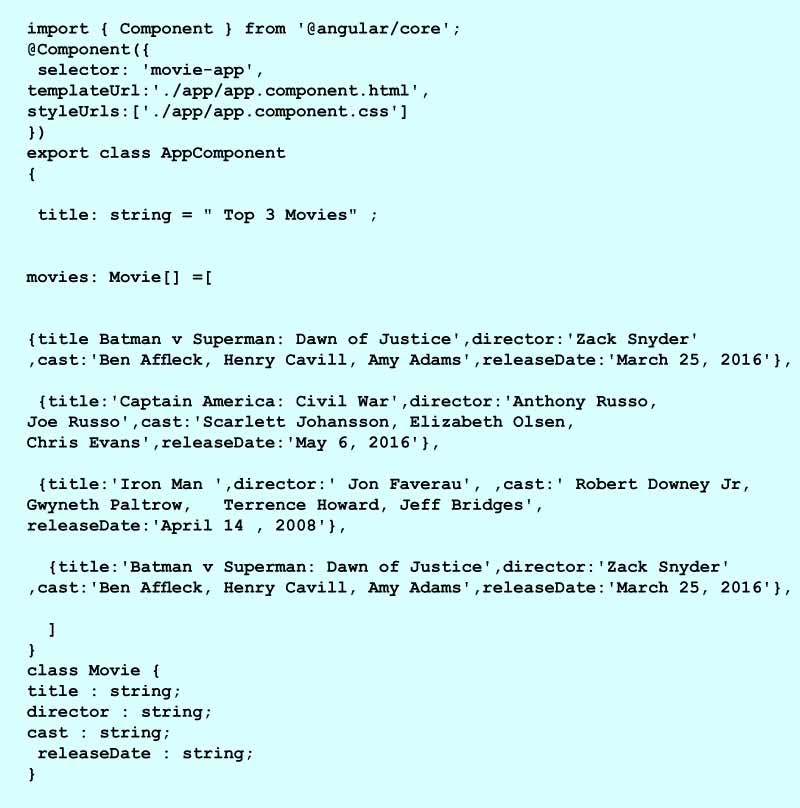
Now, open the app.component.html, add on the following code:
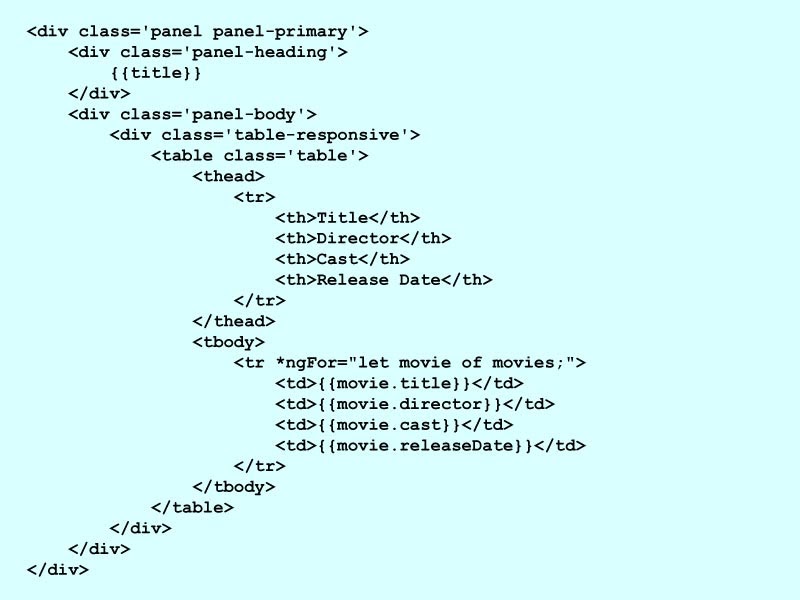
Now, run the application, it will present the movies in tabular form.
Angular 8 ngSwitch Directive
Here in this Angular js tutorial for beginners, ngSwitch is the architectural directive that is used for Add/Remove the DOM element. It resembles more the switch statement of the C#. A ngSwitch Directive is mainly applied to the container elements along with the switch expression.
Syntax of ngSwitch

ngSwitch Case
Here in the Angular ngSwitchCase directive, all the inner elements are placed right inside the container element. A ngSwitchCase directive is tested to all the inner elements along with match expression. At any time, the value of a match expression should match the value of a switch expression with respect to the inner elements that are attached to the DOM. All the other inner elements are usually discarded from the DOM. If there is a single match, the DOM is updated with all the matching items.
ngSwitch Default
We can apply the ngSwitchDefault directive on Angular 8. An element with ngSwitchDefault is advertised only when the match is identified. An inner element along with ngSwitchDefault could be placed anywhere right inside a container element and it need not be at the bottom. When you add the above one ngSwitchDefault directive, everything is displayed.
All the elements are situated on the container element, however, on the outer side, the ngSwitchDefault or ngSwitchcase is interpreted as they are.
ngSwitch Directive
We can use the below code on the app. component.ts file of the application:
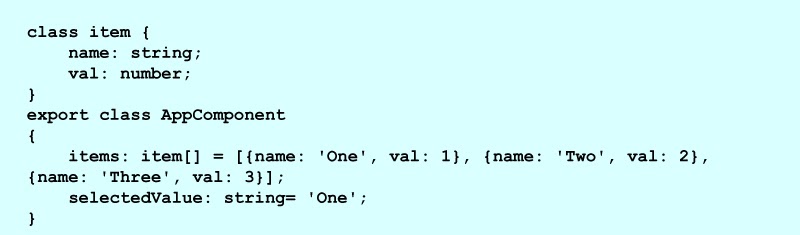
We can use the below code on the app.component.html.file of the file application:
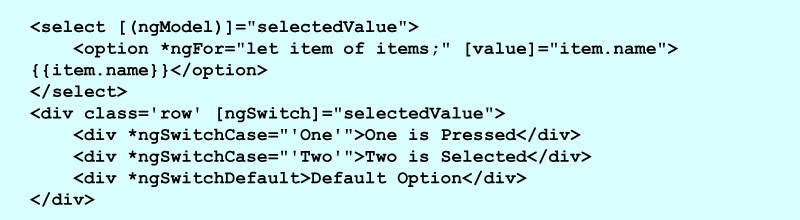
Angular 8 Data Binding
In this Angular tutorial, you will be covered with the Angular 8 Data binding concepts in a precise manner.
Data binding is the essential concept of Angular 8 and this is primarily used for defining the interaction between the DOM and component. This is the commonly used technique for linking the data along with the view layer. In a nutshell, we can tell that data binding is the interaction between the typescript code of the component and your template which the users can view. It makes it simple for defining the communicative application without having to think about the pushing and pulling of data.
Data binding is of two types and they are:
- One-way binding
- Two-way binding
One-way binding: One-way data binding is the simplest method of interaction where the template is modified when you change the typescript code.
or
Generally, in one-way data binding, a value is the Model which is primarily used for Viewing the HTML page however we can't update those Models from a View. One-way data binding is demonstrated via String Interpolation/Angular Interpolation, Event Binding, and Property Binding.
Two-way Data Binding
In the two-way data binding, the automatic synchronization of data takes place between the Model and View. Over here, the changes are impacted on both the components. When you make some changes to the Model, it shall reflect the View and when you make certain changes on the view it shall impact the Model.
It takes place eventually to make sure the HTML template and also the typescript code are updated constantly.

Angular offers four various types of data binding and they are -
- Property Binding
- String Interpolation
- Event Binding
- Two-way binding
String Interpolation
This is a process of one-way binding technique that is mainly used in processing the output data from a typescript code to the HTML template view. It utilizes template expressions that are in the double curly braces for presenting the data right from a component to a view.
For instance,
{{ data }}
A String Interpolation is used for adding a value to a property right from a component:
Syntax:

Property binding: It is also one of the popular one-way data binding methods. Generally, in the property binding, you can bind the property of the DOM element to the field which is actually a defined property on our component TypeScript code.
For instance:
<img [src]="imgUrl"/>
Syntax:

Event Binding: In Angular 8, this is used for managing the events that are lifted from a DOM-like button namely mouse move and click. When a DOM event takes place (keyup, change, click) it signals the particular method that is found in the component. The method which is given below is cookBacon() method from which a component is called when the option is clicked:
For instance:

Two-way Data binding:
Having seen that any changes made in the template of one-way data binding had no effect on component Typescript code. You can solve this issue with Angular two-way data binding. In the two-way data binding, there are many features for updating the data from a component to a view and inversely.
Usually, in the two-way data binding method, a In two-way data binding, property binding and event binding are merged together.
Syntax:

Angular Notes: To perform two-way data binding, you must allow the ngModel directive. It mainly relies on the FormsModule on the angular/forms load and you can addFormsModule on the imports[] array on AppModule.
The AngularJS Training in Ahemdabad at FITA Academy extensively trains on the important concepts of commands, binding, forms, and directives with real-time examples and case studies.
Angular 8 Property Binding
Property binding in general or otherwise is called the one-way data-binding method. Generally, on property binding, we can bind all the properties of the DOM element to the field where the defined property is your component TypeScript code. Further, by default, Angular helps in modifying all the string interpolation to the property binding method.
For example:
<img [src]="imgUrl" />
A Property binding is mostly chosen over the other string interpolation as it has only clean and shorter code. String interpolation is mainly used when you must just present certain dynamic data from the component to view among the headings namely - h1 and h2.
Angular Notes: Property Binding and String Interpolation are one-way bindings. It means when the field value of the component is modified, then the Angular can immediately update DOM. However, any changes made on the DOM may not reverse back on the component.
Example of Property Binding
Firstly, open the app.componnt.ts file and then affix the code that is given below:

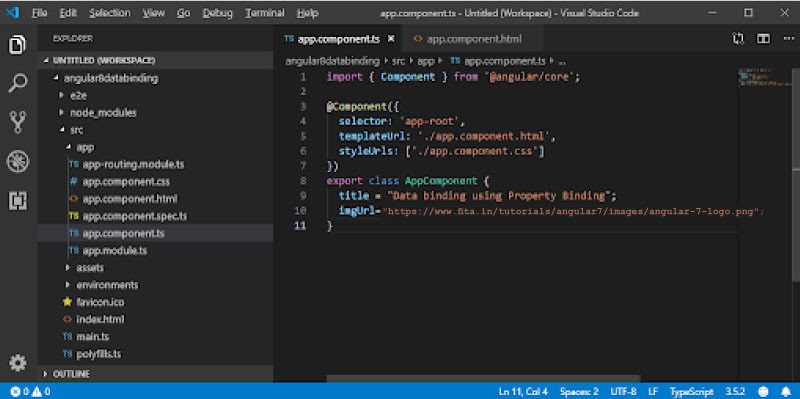
Secondly, open the app. component.html and make use of the code that is provided below for property binding:

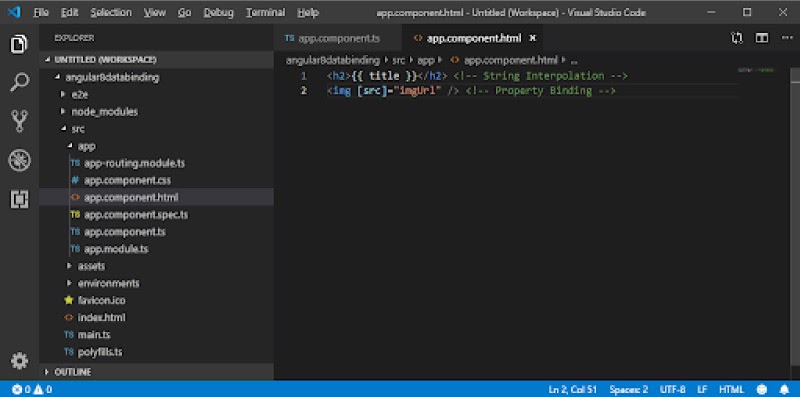
Now, you must run the ng serve command and then access the localhost to view the result.
Output:
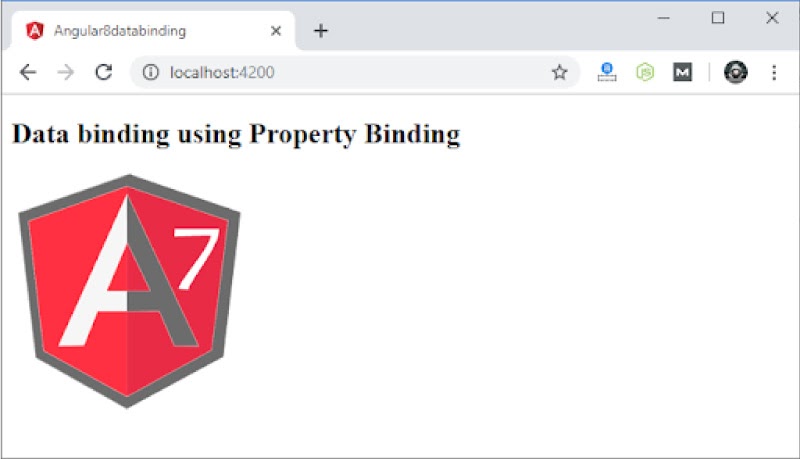
Angular 8 String Interpolation
Here in this AngularJS Tutorial, you will be covered with Angular 8 String Interpolation concepts.
A String Interpolation is the one-way data binding method that is used for output data from the TypeScript code of the HTML template. You can make use of the template expression that is found in the double curly braces for presenting the data from a component for view. A String Interpolation helps in adding value to a particular property from a component.
For example:
{{ data }}
Earlier we have developed the Angular Project using the Angular CLI.
Over here we can use the same example.
First, open the app. component.ts file and apply the code that is within the file:
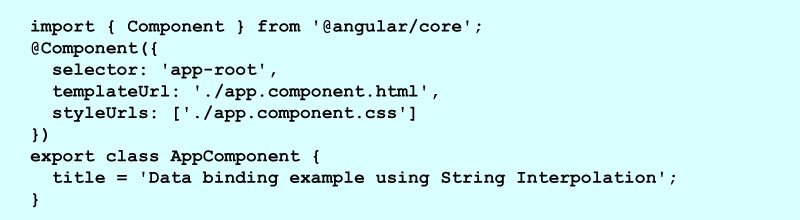
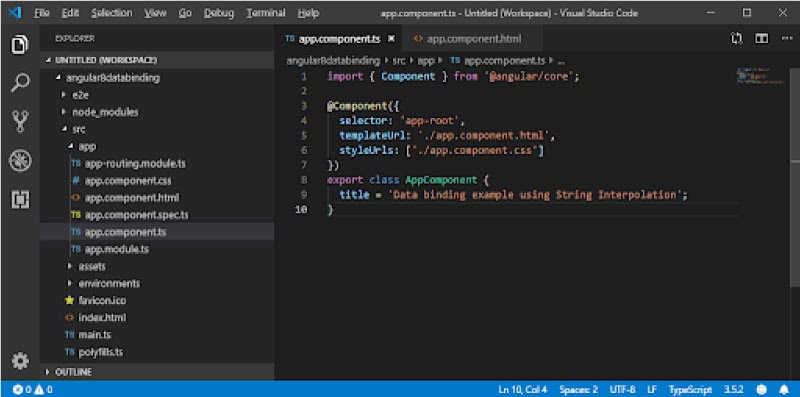
Next, open the app.component.html and apply the code to seeing what string interpolation is:

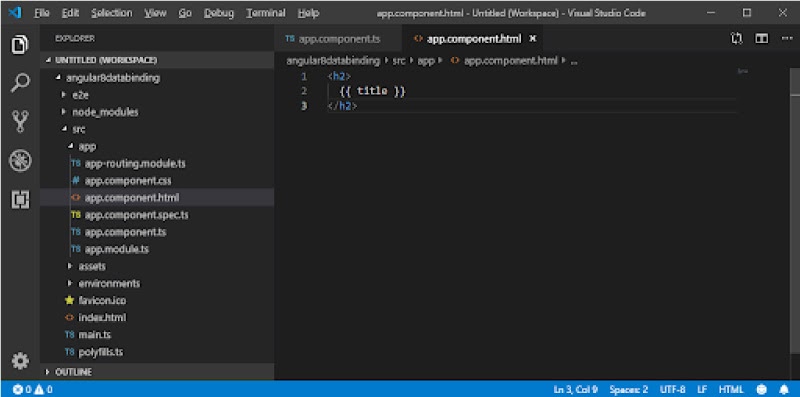
After that, open the Node.js command prompt and you can run all the ng server command for viewing the result.
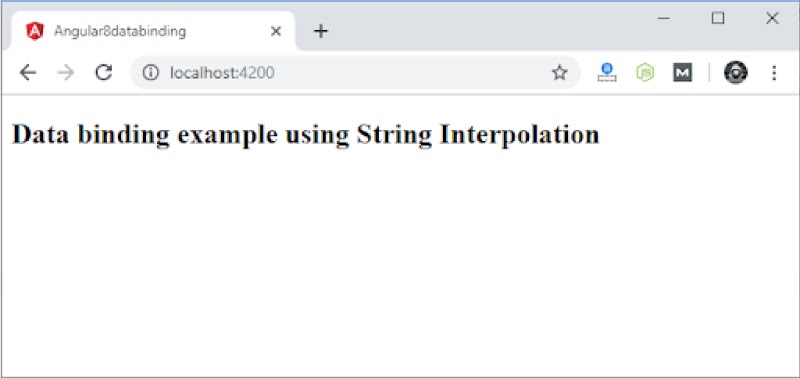
A String Interpolation could be used for solving the other expressions as well. See the illustration that is given below:
For instance:
Firstly, you must update app.comoponent.ts file which is with the code:
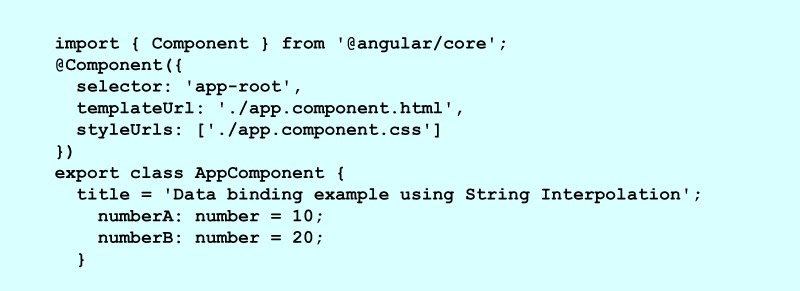
app.comoponent.html

Output:
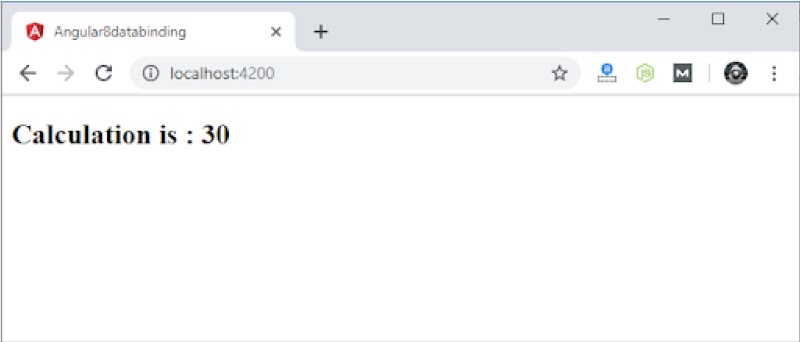
The other way to use the same application is:
You can use the same application in another way:
App.component.ts:
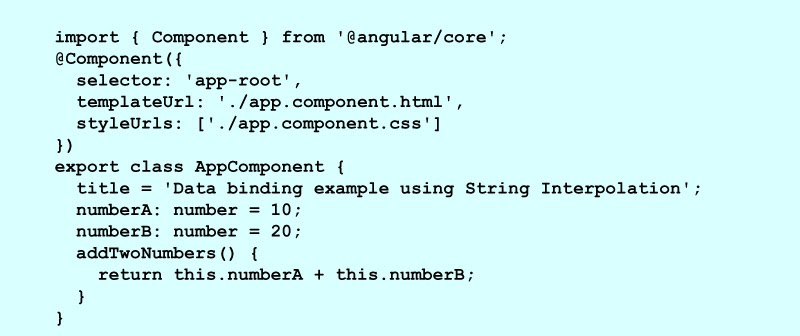
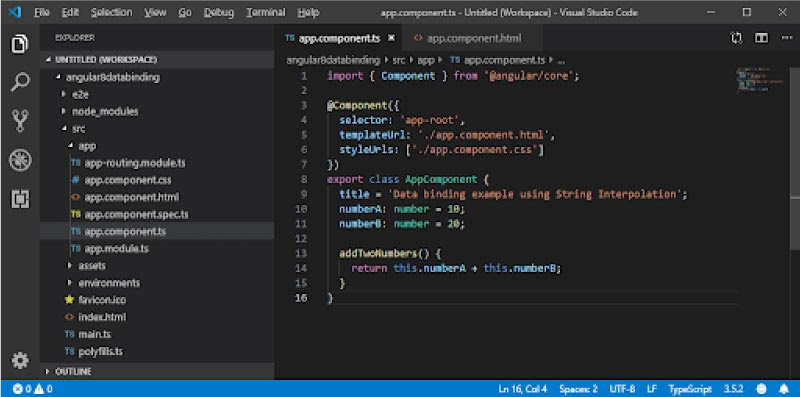
App.component.html:

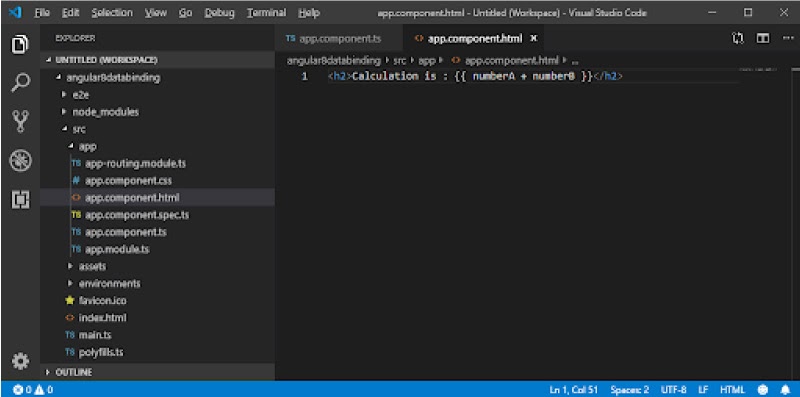
Output
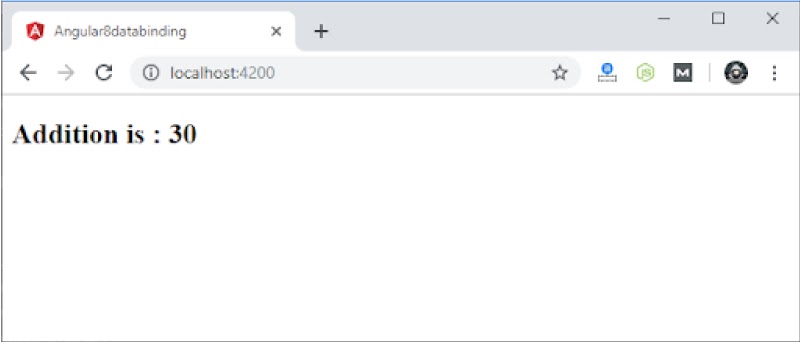
Angular 8 Event Binding
Here in this Angularjs tutorial, you will be seeing about Angular 8 Event Binding concepts in-depth.
Event Binding in Angular 8 is mainly used for managing the events that are constructed from the DOM option - mouse move and click. When a DOM event takes place (change, keyup, and click) and this calls for the particular method on the components. From the example that is given below cookBacon() method, from a component is initiated only when the option is clicked:
For example:

Example of Event Binding
Now, take the button in the HTML template and operate the click event of that button. For implementing the event binding, you can bind the click event of the button that is along with the method of a component.
You can open the app.component.ts file and apply the following code:
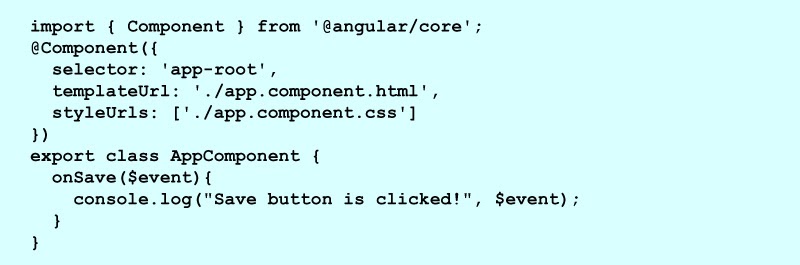
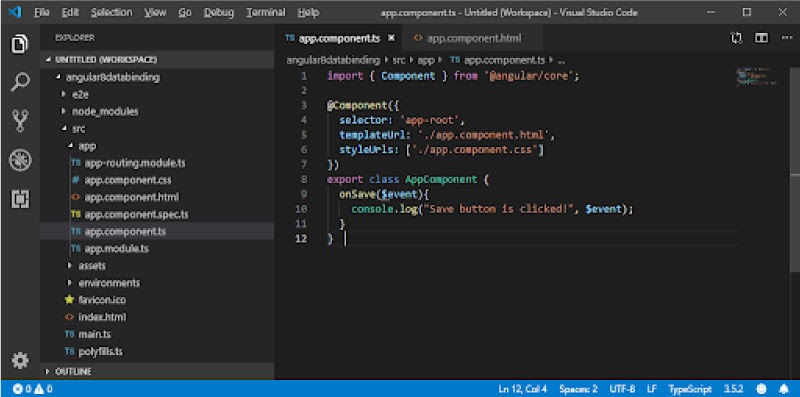
app.component.html:

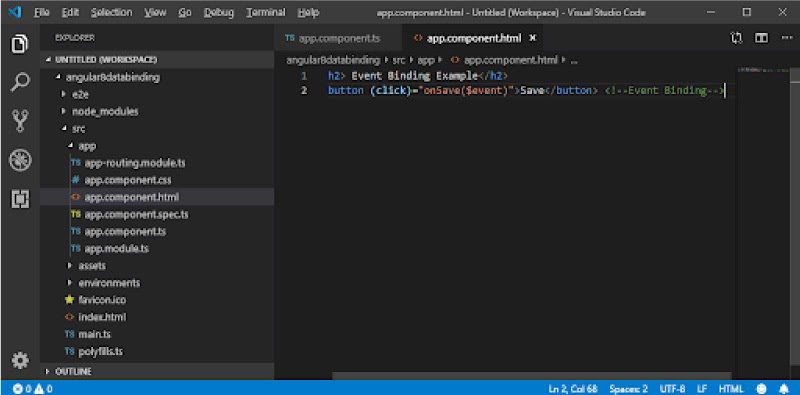
Output:
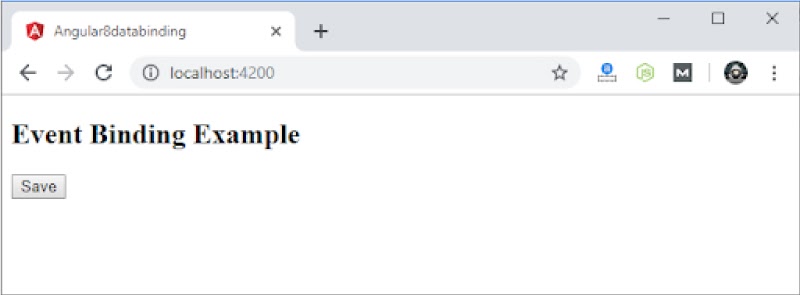
Now, click on the "Save" option, next open the console for viewing the result.
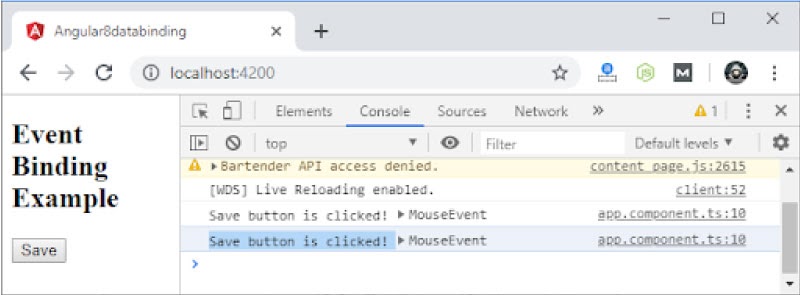
As you can see in the above picture the Save button is being clicked
Event Bubbling
An Event Bubbling is mainly used for indicating the order in which the event handlers are being initiated. When one of the elements is located inside the second element and both the elements are certified to the listener of the same event (example: click)
Now, let's see through the above button example. Here, we have used the div wrapper over the button on the component HTML and div also has a click event handler. It displays the text only if the div option is clicked.
Use the below code app.component.ts file:
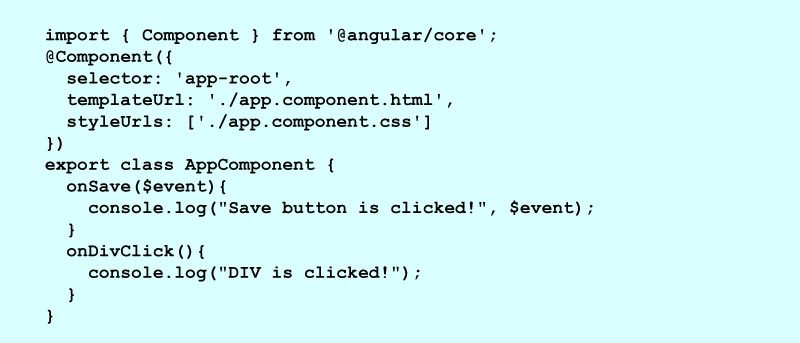
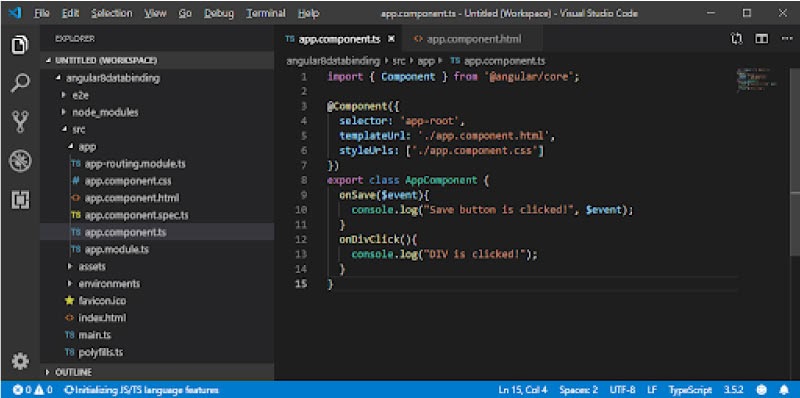
app.component.html:


Output:
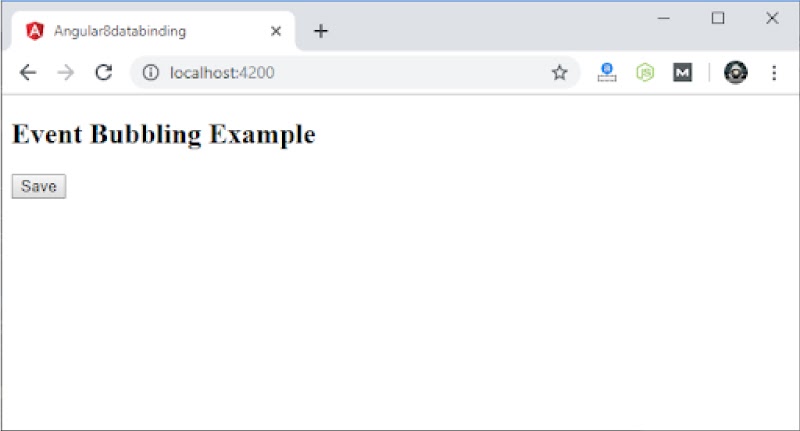
You can click the "Save" option and then open the console to look at the result.
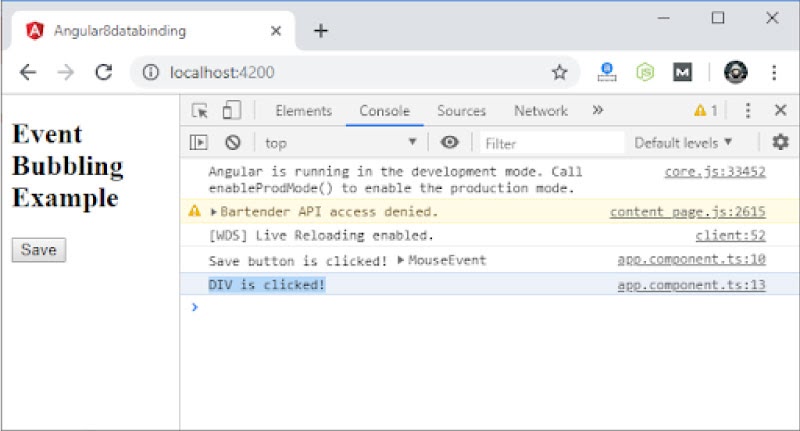
Over here, you see that the div text has taken place. It is due to the event bubbling where you are needed to have the particular onDivClick button.
Angular 8: Two-way Data binding
Having seen one-way data binding, here in this Angular js tutorial let see what the two-way data binding has to offer. For solving this issue, Angular offers two-way data binding. A two-way data binding consists of the attribute like update data from a component for view and inversely.
Generally, in two-way data binding, the immediate synchronization of data takes place between the Model and View. Over here, the changes are impacted on both the components. When you make the required changes on the Model, then it can reflect on the view and you can make the required changes on the view. It is usually impacted on the Model. It takes place immediately and it allows the HTML template and all the typescript code are renewed immediately. Mostly in the two-way method of binding - event binding and property binding all are merged together.
Syntax:

Angular Notes: In most of the two-way data binding, you must allow the ngModel directive. It mainly relies on the FormsModule on the angular/forms parcel. We can bind more FormsModule on the imports[] array of the App Module.

You can consider the illustration that is given below to understand them better.
Open the project's app.module.ts file and utilize the code which is given below:
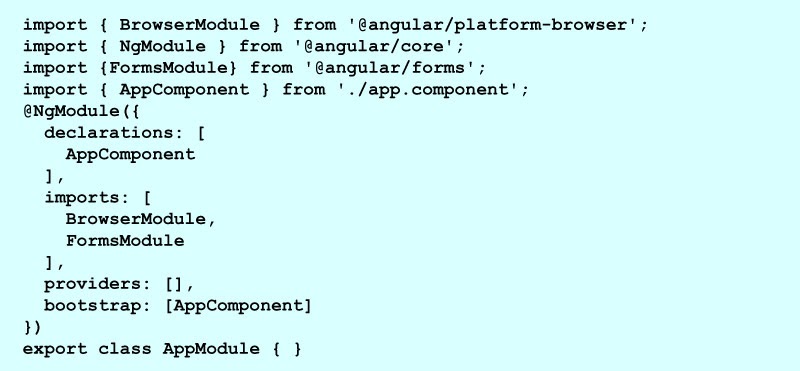
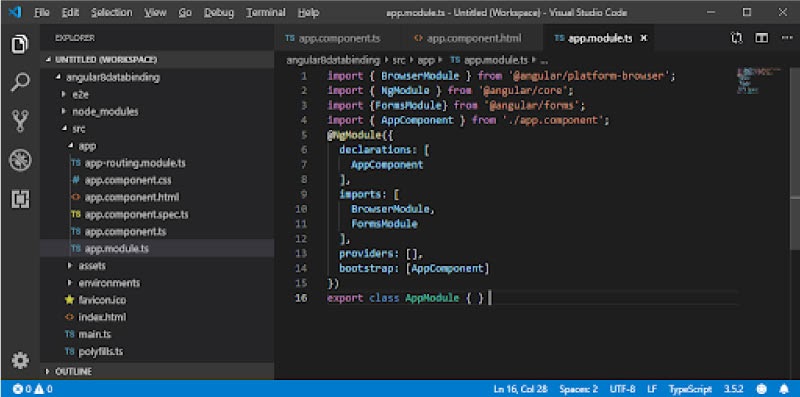
app.component.ts file:
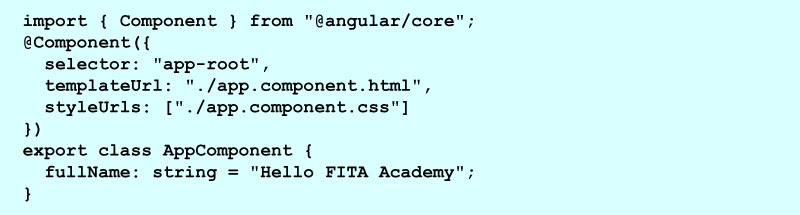
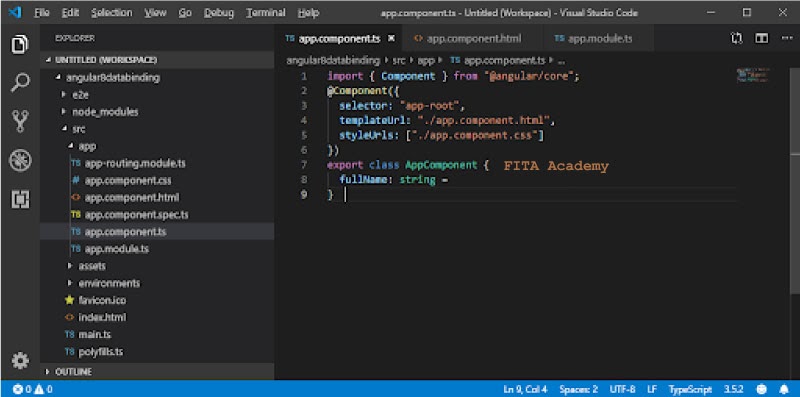
app.component.html file:

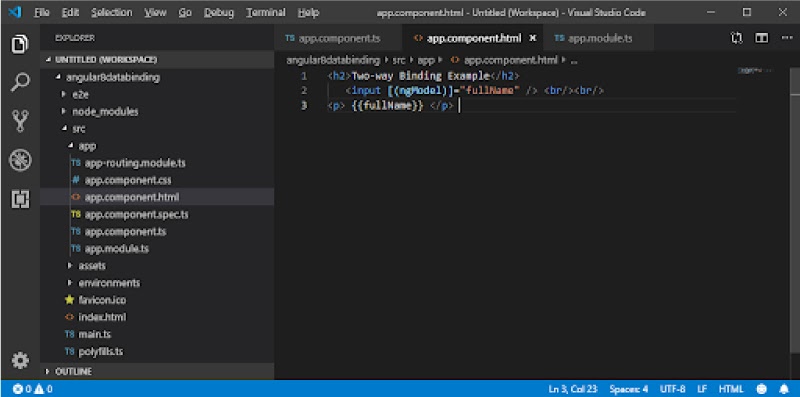
You can now start the server and open all the local host browsers for viewing the end result.
Output:
We can check them by modifying the textbox value and this is used for updating the component likewise.
For example:
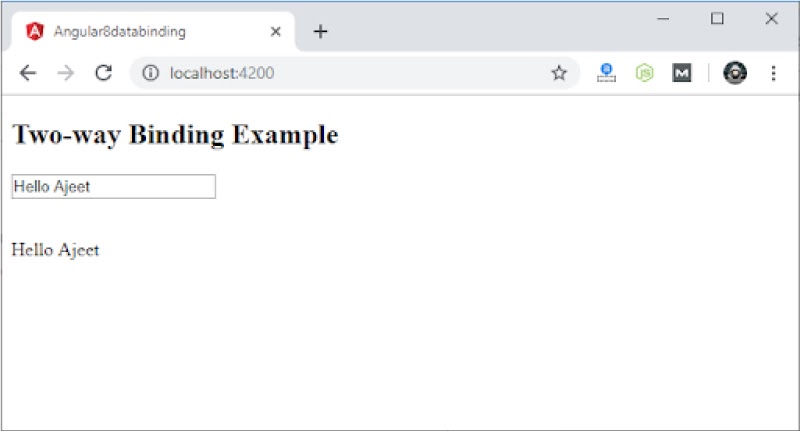
Angular 8 Forms
In this Angularjs tutorial for beginners let's see about forms and their types.
The Angular forms are mainly used to manage the user's input. It is possible to use the Angular form in the application and permit the users to log in, type information, and update the profile to execute the other data-entry tasks. The two main methods that are used for handling user's input via forms:
- Reactive Forms
- Template-driven forms
Both these approaches are mainly used for getting the user input events from a view. They are used for validating user input and for developing the form and data model for updating and offering the different methods to monitor the changes.
Reactive Form: These Reactive dynamic forms are reusable, testable, and scalable. It is highly preferred for using the if forms when there are important parts of the application or when the application is being developed using the reactive methods. However, in both cases, a reactive form is the best option for use.
Template-driven Forms: A template-driven form is highly suitable when you must add a simple form to all your applications. These forms are easy to use on the application however, they don't have any scalable Reactive forms. A Template-driven form is primarily used when the application needs the fundamental logic and form. This is easier for handling the template.
Example of Angular 8 Forms
We can now comprehend the Angular 8 forms to create the form example. When you use the Angular Reactive form, we must follow the procedures that are mentioned below:
First, develop the Angular form app labeling angular8form and you can run all the servers using the below commands.

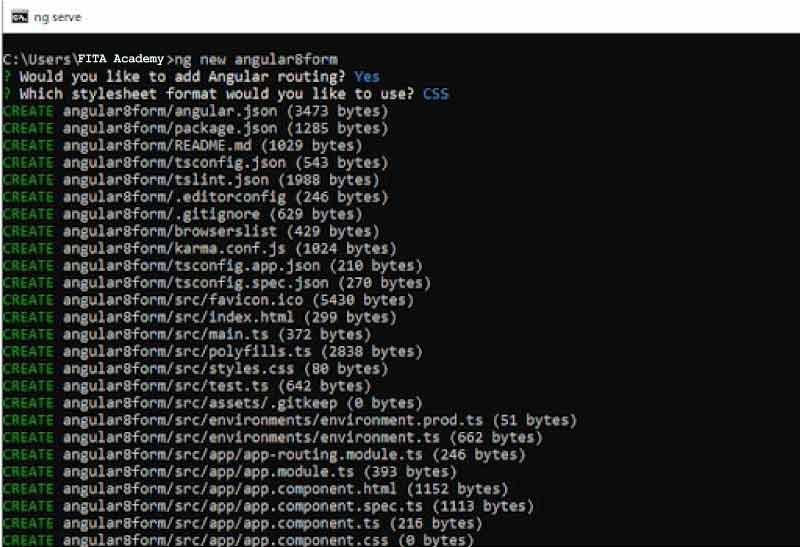
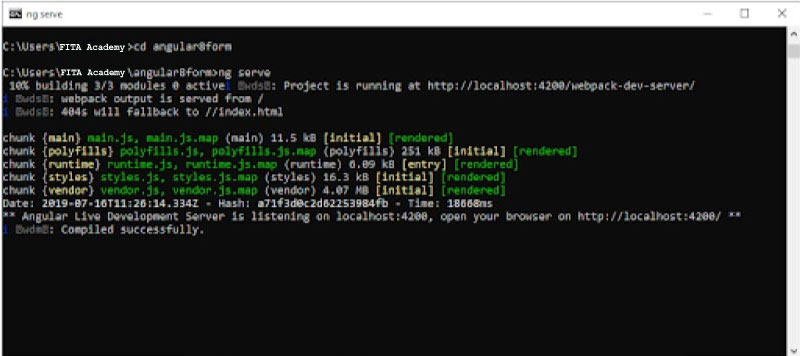
Now, launch Bootstrap 4 with the help of the command that is provided below:

We can also include the bootstrap 4 in the angular.json and the file that is found inside a style array.

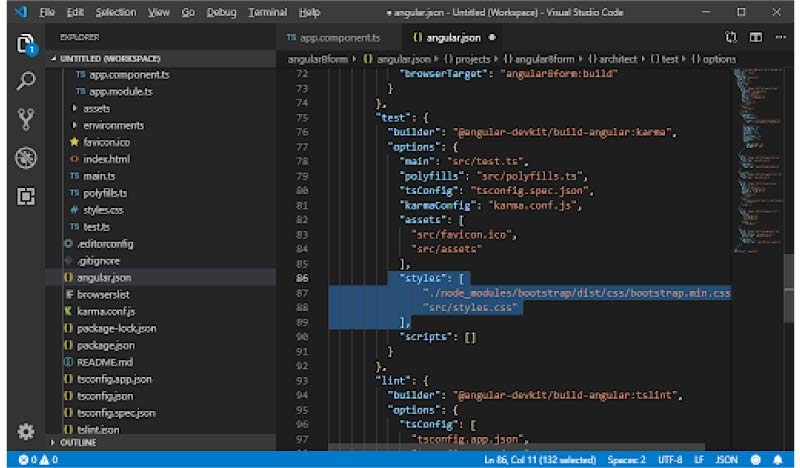
Book all the Reactive Form Module We can make use of the Reactive forms to import all the ReactiveFormsModule from @angular/forms container and then you can add them to the app. module.ts file's array import.
Now, use the code that is found right inside the app.module.ts file.
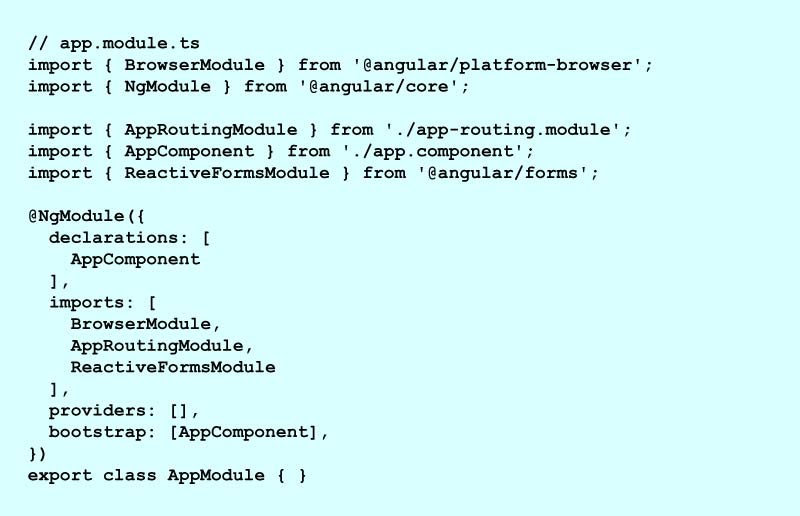

You can Add FormControl class register control on a template and we can update a FormControl value.
A FormControl class is a basic building block that is used along with the reactive forms. So when you need to register one form control you must import a FormControl class to your component. You can build new instances of the FormControl class to your component and develop new instances of the form control for saving the class property.
We can change the app.component.ts file.
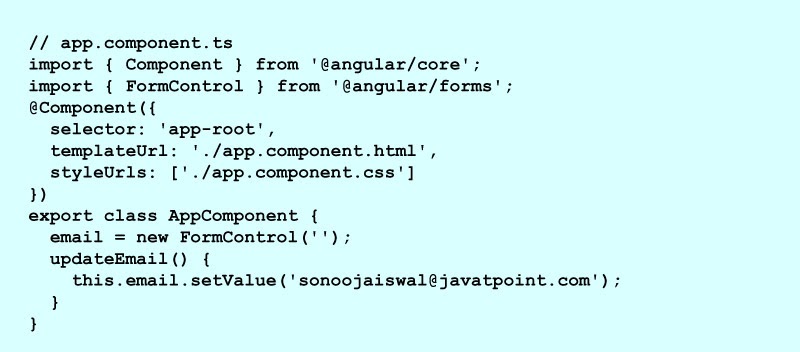
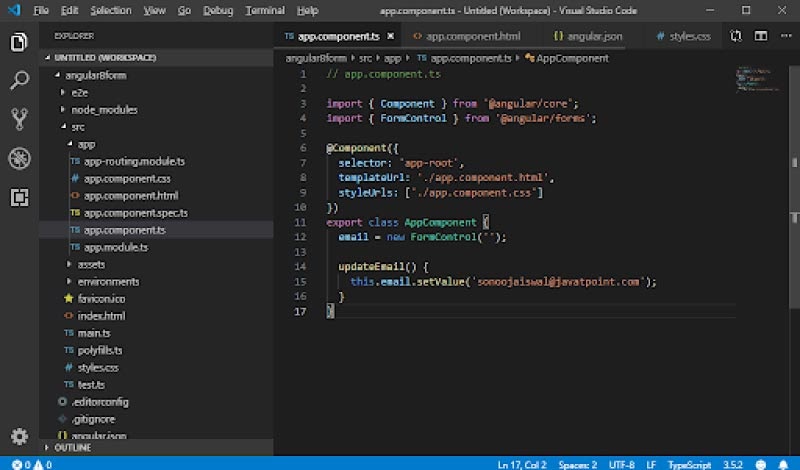
We can now update the view.app.component.html file.
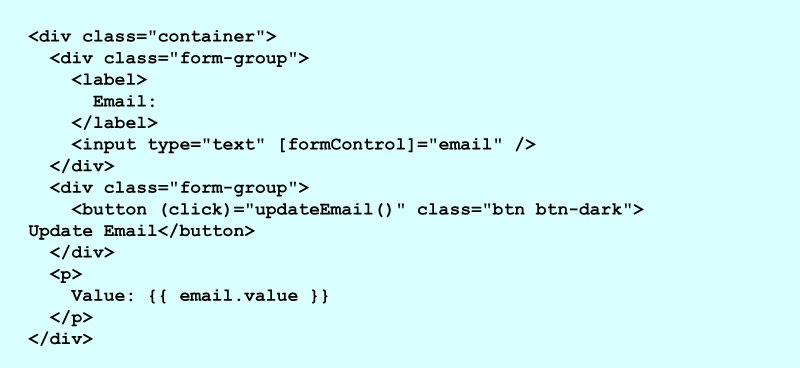
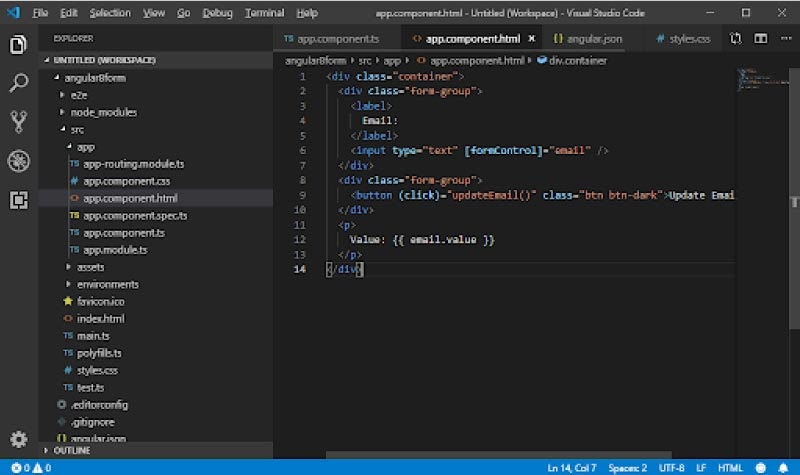
Save your code and begin with the new server.
Output:
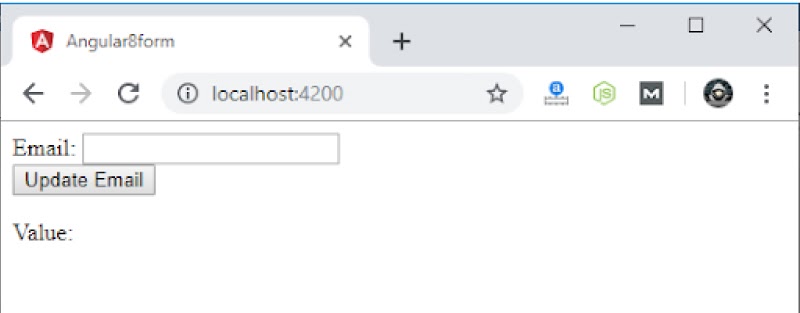
Type your email id and you can see the result on the value.
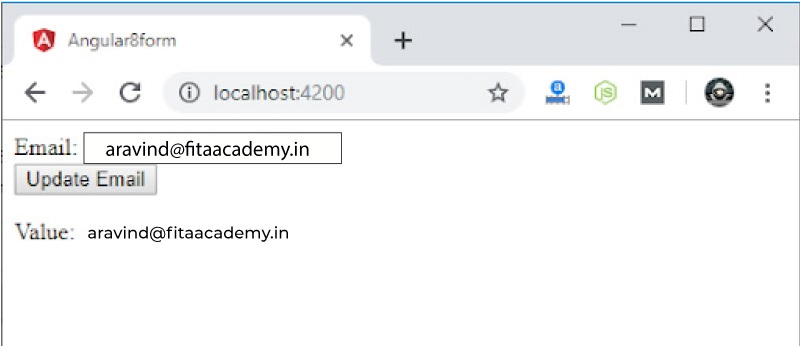
When you click on the "Update Email" button, it will update the email id as we saved in the template file

Angular 9
Angular 9 is one of the import releases of all the versions. This version was launched on 6th February 2020. The release of this version had a major impact on the complete platform inclusive of Angular Material, Components, Frameworks, and CLI. Also, Angular 9 is way more different from all its earlier versions in numerous aspects. Here in this version, all the applications are used on the runtime by default, and the Ivy compiler opens in numerous other methods for testing the components. The Angular version 9 has the updated feature for supporting and working with all the TypeScript 3.6 & 3.7 versions.
Methods for updating Angular 9 from its previous Angular versions
It is always preferable to utilize the recent version of Angular. So here in this Angular tutorial, we will explain how to upgrade to recent versions and the features that Angular 9 provides to its users.
Go through the steps for updating to its recent version
Step 1: Firstly, we can monitor the present version of the Angular CLI using the command given below:

Step 2: Now, update the local Angular CLI to the version of 8. x and 8.3.17 using the below command and earlier version of Angular.

Step 3: Once, when you update the Angular CLI to version 8 and above, make use of the command that is provided below for updating the Angular version 9.

Step 4: We can use the command when you need to install the Angular 9 version.

The other method for updating the Angular CLI to its recent Angular version
Initially, verify the present version of the Angular CLI using the ng--serve.

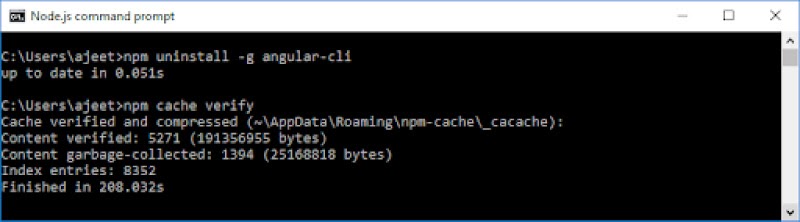
Run the command which is given below for uninstalling the earlier versions of Angular.

Check and clean the cache using the command that is given below:

Install the recent Angular CLI version using the command which is given below:

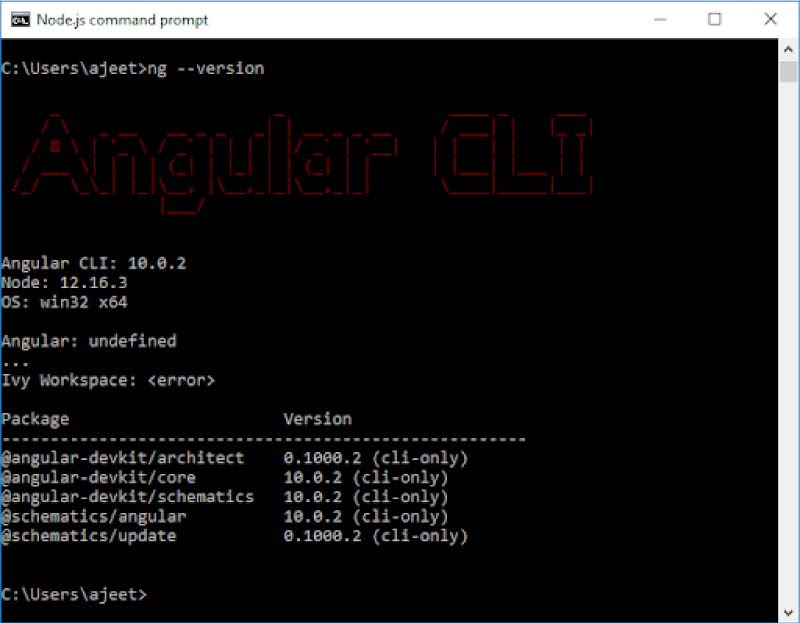
Benefits of using Angular 9
The Angular 9 helps in moving all your applications for using runtime by default and Ivy compiler. An Ivy compiler helps in solving many bug fixes and issues. Further, with these bug fixes, runtime and Ivy compiler offer more benefits. Go through these set of benefits that you enjoy while using Runtime and Ivy compiler:
- Testing is performed Rapidly
- The bundle size is small
- Efficiently fixes the bug and helps in debugging
- Helps in adding enhanced type checking
- Supports in enhancing build errors
- Aids you in adding the enhanced CSS class and also performing the style binding
- Allows you to add build-time by allowing AOT by default
- Supports improved Internalization.
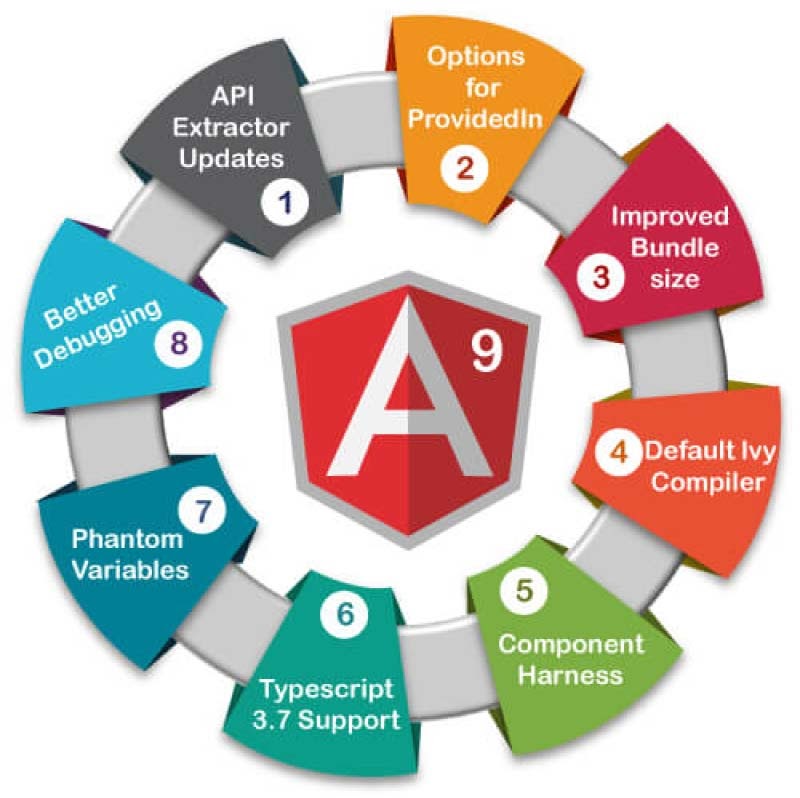
Testing is performed Rapidly: Here in Angular 9, the Ivy has much potential as it has by default implemented a new and enhanced structure, appearance, and form of TestBed.
In its earlier version, a TestBed helps in compiling all the components once again among every test that is running and it will not think of the changes that were made earlier to all the components.
Usually, in the Ivy, a Testbed is not needed for compiling all the components that are found between the tests till you hand-operate and override the component. And this is the reason why mostly there are no recompilation issues among tests.
Once this change takes place, then tests will be faster, and about 40-50%
Efficiently fixes the bug and helps in debugging
It is tedious to build an entirely bug-free program and it is crucial that your codebase has to be equipped with techniques and tools for checking bugs by itself. We can solve this issue and Ivy offers different tools for debugging the applications and fixing them. Here, the Ivy offers a new ng object to debug and you must run all the applications on the Dev Mode along with Ivy runtime.
The Ivy on the Angular 9 allows you to access the instances of all your directives and components.
Here, we can initiate all methods and update their state manually.
We can trigger its change detection along with the applyChanges and you are required to view the end result of the change detection.
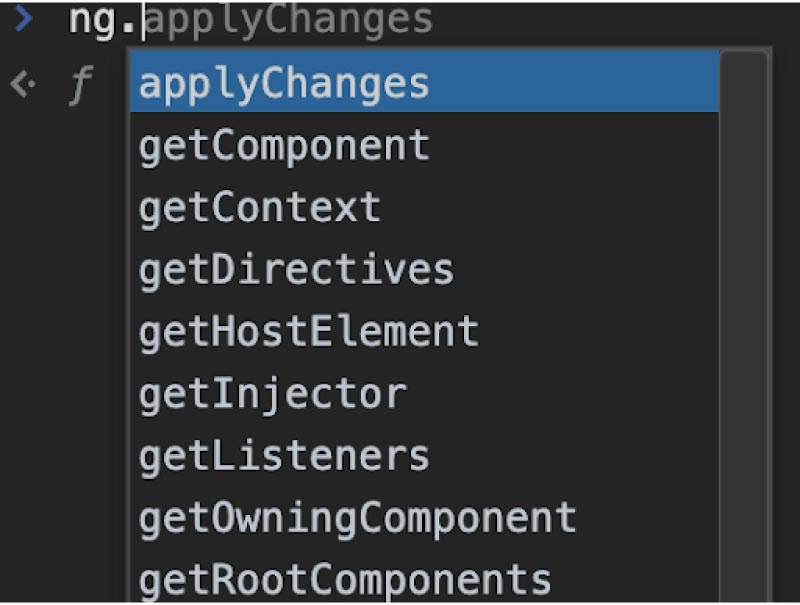
The bundle size is small: The updated and enhanced Ivy Compiler is curated for discarding the new parts of the Angular through tree-shaking and developing lesser code for all Angular components. On using these enhancements, the small and large apps are being benefited immensely.
Generally, all the small size apps need not use more Angular features for receiving large gains from tree-shaking.
A medium-sized app can help you to reduce its size and it will turn slightly small. Hence, we get lesser benefits from a tree-shaking as it will not have more components for pulling smaller factories completely.
The large apps use many Angular components for receiving the size of all these apps to be reduced.
Helps in adding enhanced type checking: An Ivy Compiler in the Angular 9 offers you many features for monitoring many kinds of applications and it has many stringent rules. All the Ivy features aid you and your team in catching bugs and setting them right during the development process. Here this Angular 9, offers three different modes for reaching its facility. Besides, a default flag, all the other flags which thee angular supports are:
strictTemplates: It is the flag that is initiated while the compiler must apply stringent Type System rules to monitor the checking.
fullTemplateTypeCheck: It is the flag that is initiated when a compiler must verify everything that is within the template (ngFor, ng-template, and ngIf)
Supports in enhancing build errors: A new compiler Ivy is deployed in Angular 9 and this is much faster, stronger, and provides type safety. An Ivy compiler boots the build time enormously and it offers limited time for a build to get completed. Also, it makes all the messages be viewed and read easily. In its earlier version, it is possible to see a typical compiler error and it would be like this as they are given below:
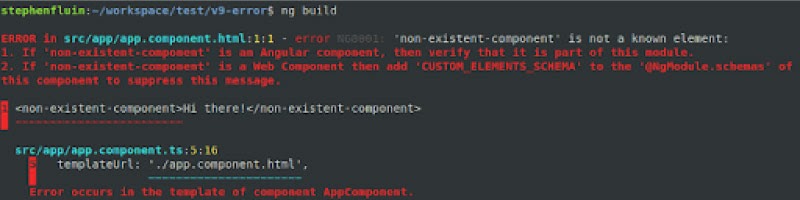
Aids you in adding the enhanced CSS class and also performing the style binding: The Runtime and Ivy compiler is inbuilt with certain features which are easily anticipated for monitoring the CSS style and class. In its earlier versions, when the application consists of competing definitions for a style, then these styles are destructively replaced with one another. With Ivy Compiler's launch in Angular 9, we can easily handle the styles with a persistent and clear order of precedence and this does not rely mainly on the timing.

In the above code, the binding was calculated lastly and it mainly relies on the time of change to all these expressions. When both myOtherColor and myColor are blank, the static 'red' style is normally ignored.
When you have the Ivy compiler in the Angular version 9, we can easily handle the styles with a persistent and clear order of precedence without having to rely on its timing. In most cases, the most important styles take precedence. A bound to [style] is an example.
For instance:

Allows you to add build-time by allowing AOT by default: In Angular 9, an Ivy compiler's new layout has more important enhancements for boosting the performance of the compiler. The overhead of the top plain TypeScript and compilation of the programme are used to evaluate the performance of a computer.
In most cases, using an Ivy compiler reduces overhead by only 40%.This indicates that your app is developed with Ivy compiler and it is notably faster.
As it speedups, we can make use of the AOT for all the dev-mode builds. It indicates that we shall no longer need ng serve and entryComponents. It will also get merits from a similar compile-time for monitoring the production builds and it enhances the developer's experience of Angular. Over here, all these components are compiled and identified by their application.
Supports improved Internalization: The Internalization (i18n) has more important features of Angular, where we can build the application based on per locale and accept the highly localized and optimized applications.
Further, Angular 9 has introduced more new solutions which balance all the drawbacks which we encountered in our earlier versions without having to miss the performance.
Angular 9 also makes it faster for moving all the build-time i18n substitution and its later build process. All these changes allow you to boost the process ten times faster.
Angular 10
Here in this Angular Tutorial, we have covered you with the outlook of the Angular 10 version and its features.
The recent version of the Angular framework 10 was launched on June 24, 2020. The Angular 10 is an important release and this is used for modifying the recently introduced and it impacts on the complete platform that includes Angular Material, CLI, and Framework. In fact, the Angular 10 version is much smaller when compared to its earlier releases. Also, this version was released immediately right after the release of Angular 9.
It is mentioned that Google aims to release two of its important versions every year for keeping Angular in sync with the other JavaScript ecosystem and it has an anticipated schedule so it is convinced that Angular 10 is the recent release.
Important changes introduced in the Angular 10 version
We can see what Angular 10 has to offer for its users and the changes made in this version:
- New Date Range Picker
- Alternative Stricter Settings
- New Default & Browser Configuration
- Warnings of CommonJS imports
- Removals and Deprecations
- Update your Ecosystem
- Solving Issues and Bugs
New Date Range Picker: Angular 10 has introduced the new date and range picker. When you need to use the new date range picker, then we can easily do that by using mat-date-range-picker and mat-date-range-input components.
For Example:
Output
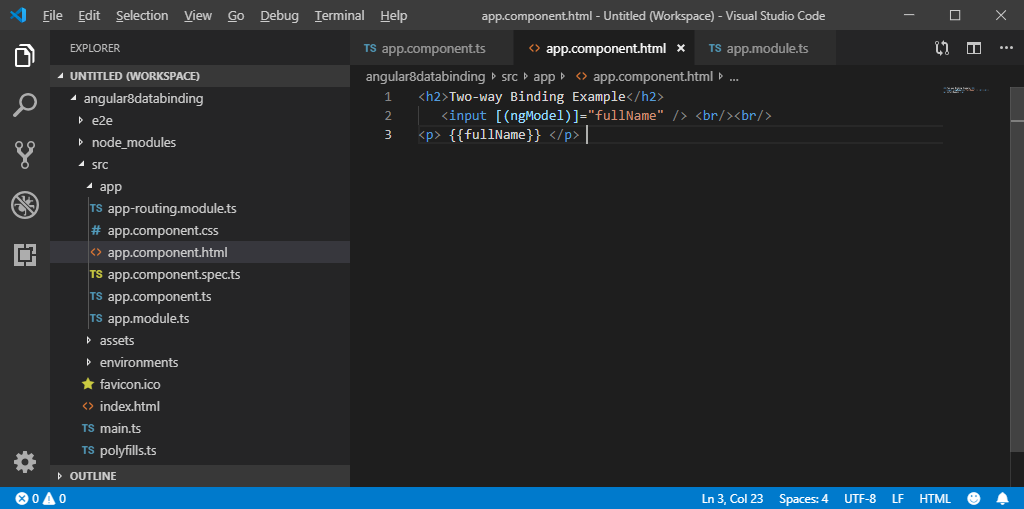
Alternative Stricter Settings: Angular 10 offers a stringent project setup where we can build a new workspace on Angular 10 by applying the ng new command.
We can use the below command for allowing stringent features.

Once you have enabled this feature, your present project allows you to initialize certain settings that enhance the overall features like identifying bugs ahead of time, permitting the CLI to execute advanced optimizations for your app and Maintenance.
Given below are a set of actions which a strict flag performs specifically:
- When you permit a strict flag on your app, it allows you to configure all the app as defect-free and to assure advanced and tree-shaking.
- It helps in turning the template kind of checking to strict mode.
- It allows the strict mode of TypeScript.
- By allowing a strict flag, a default bundle budget is reduced up to 75%
- It permits you to configure all the linting rules and prevent you from any kind of declarations.
New Default & Browser Configuration: Angular 10 has updated browser configuration for all of its new projects. Here in this updated version, the old and less utilized browsers are excluded. We can see the differences by default and the supporting browsers are cleared by comparing Angular versions 9 and 10.
Name of Default browsers in version 9
- and_ff 68
- and_uc 12.12
- and_chr 81
- android 81
- and_qq 10.4
- baidu 7.12
- chrome 80
- chrome 81
- chrome 83
- edge 18
- edge 81
- edge 83
- firefox 68
- firefox 76
- firefox 77
- firefox 78
- ie 11
- ios_saf 13.3
- ios_saf 13.4-13.5
- ios_saf 12.2-12.4
- op_mini all
- kaios 2.5
- op_mob 46
- opera 69
- safari 13.1
- opera 68
- safari 13
- samsung 11.1-11.2
- samsung 12.0
We can check them using the npx browser list command.
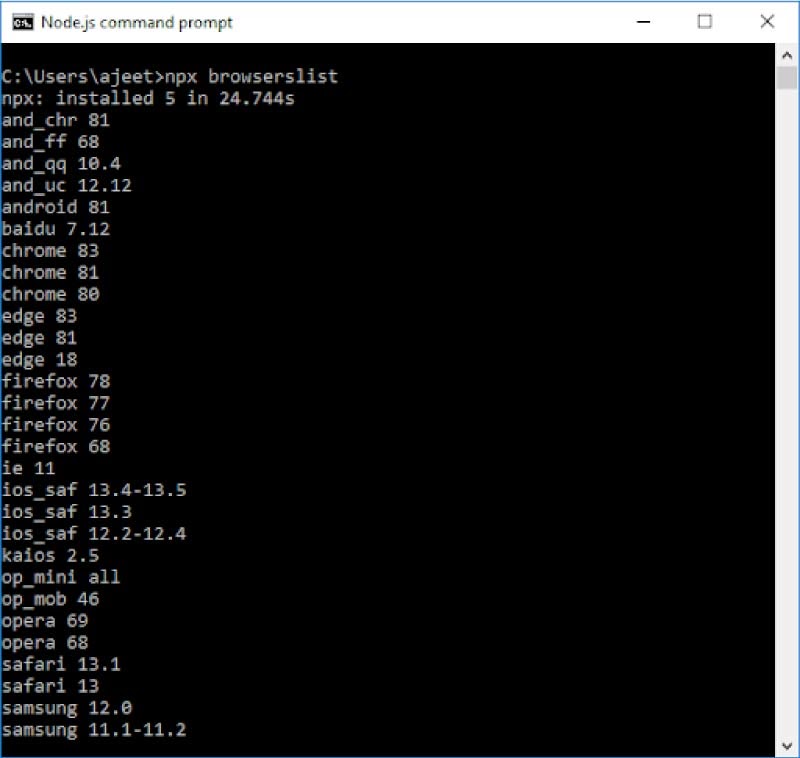
Name of default browsers in version 10
- edge 18
- edge 83
- edge 81
- firefox 68
- firefox 76
- ios_saf 13.3
- ios_saf 13.4-13.5
- ios_saf 13.0-13.1
- ios_saf 13.2
- ios_saf 12.0-12.1
- ios_saf 12.2-12.4
- safari 13
- safari 13.1
- safari 12
- safari 12.1
We can see that by default, the supporting browsers are excluded in its recent version. It is because of discarding the ES5 builds by default for newer projects. When you need to allow differential loading for browsers and ES5 builds, we can easily add the needed browsers and we need to support all the .browserlistrc files.
Warnings of CommonJS imports: In the earlier Angular versions, when we use the dependency which is packed with CommonJS, we may need to get a result in the method of slower and larger applications. With the launch of Angular 10, you can use any of these packages and it shall give you warning text. When you receive any of these warning texts for your dependencies, then we must prefer the ECMAScript module bundle for our project.
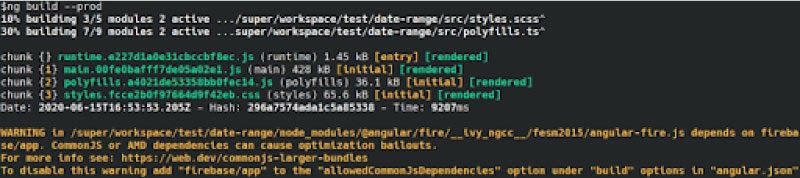
Removals and Deprecations: The Angular 10 has made more changes on which the new version has performed different removals and deprecations.
In the latest Angular 10 version, an Angular package format no longer consists of ESM5 or FESM5 bundles, so Angular 10 is deprecated and includes FESM5 or ESM5 bundles.
It allows the new version which is light and it permits you to save at least 119 MB of its download and this permits you to install the time when you must run the yarn or the npm install for all the Angular libraries and packages.
Update your Ecosystem: It keeps your system updated and it introduces the Angular 10 dependencies for keeping them updated and staying in sync with the JavaScript ecosystem.
Solving Issues and Bugs: The updates of the New Angular 10 version have helped to solve many bugs and to fix those bugs from their earlier versions. More bugs are fixed in the Angular 10 version. Given below are some of the bugs, and it can resolve the issues:
Core: When you have undecorated-classes-with-decorated-fields migration, then it will not decorate its derived classes.
Router: In Angular 10 - the UrlMatcher is not permitted to return to null.
Modules: In Angular 10, we can easily find the modules which are impacted by all its overrides on the TestBed.
Compiler: If you import the nonexistent symbol, then the compiler would avert the undefined expressions on the holey array and its core evades the migration error.
Service Workers: It prevents you from SW registration strategies that impact the stabilization of the apps.
Procedure to update Angular 10 version
It is preferable to make use of the best practice or a recently updated version of any software. Here in this Angular tutorial, we will explain the procedure on how to update the recent version of the Angular.
Firstly, verify your present version of Angular CLI with the help of ng --serve

Now, use the command that is given below for uninstalling your old version.

Check and clear its cache using the commands that are given below:

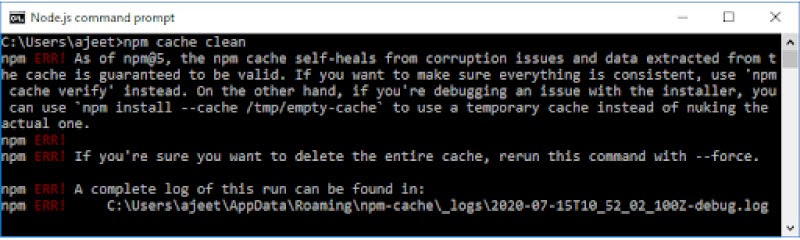
Once when you have cleared the cache, install the recent version of the Angular CLI using the command that is given below:

Angular Lifecycle
Angular is the powerful and widely explained client-side platform that has covered the attention of millions of developers. Right from its inception, the Angular platform is developing applications that are better than their previous versions. Angular is broadly used in data visualizations and is used for developing applications for both desktop and mobile. Its endless potential for leveraging data has made angular different in its class. As new features are being added year by year, Angular has captured its marketing trends and thus the lifecycle of Angular persists to evolve.
Dating back in 2009, Google introduced angular and it had a restricted life cycle features and dependencies and it was firstly the initiative that has to be served to the JavaScript and HTML.
But, in its last version, TypeScript has retrieved the former JavaScript and popular scripting languages. On other aspects, Angular has given the privilege for the developers to create applications that can run mobile, desktop, and mobile with lesser footprints. Here in this Angular Tutorial, let's see some of the important aspects of the Angular lifecycle.
Angular Lifecycle
In Angular, all the components are rooted through eight different stages in its cycle. To be even more clear, it is the first, and the root is developed and later confronted with all its components. This is always verified when a component is loaded at the time of building an application. Also, they are all updated gradually. When a component is not used, then it is going to approach the death phase and thus it expels and decimates it from a DOM.
Further, the interesting thing is that Angular can look after the cycle of all its directives and components easily to comprehend the results of its previous data and allow the application to integrate smoothly. Accordingly, all components allow the primary developing blocks of Directives and Versions for rooting its version with the build.
The next interesting thing about Angular Lifecycle is that all the components have a life cycle at all the stages and the lifecycle changes itself from development to destruction. The steps are explained below:
On initializing the Angular lifecycle component it develops and presents its roots to components that are developed to offer beneficiaries.
The next stage includes components that are being loaded at the time of application development and the data binding techniques are updated progressively.
The next stage includes the unused components which are not used and which approach to the death stage and it moves out the DOM.
Outline of Lifecycle with Hooks
Every event that takes place in the component's life is called "lifecycle hooks" in the Angular. The Hooks are nothing but just simple functions which a developer can call upon at any time in Angular applications. We can think of the hooks that are the callback options that initiate positive events which happen in the cycle of a component. Now, in this AngularJS tutorial, let us see through the different stages:
Constructor vs Online
If you are a programmer then it is important to develop your components and launch them. We must always consider two options and they are either to use the OnInt life cycle method or to use the constructor. When a component is used, then the OnInitlifecycle method is immediately triggered.
Though both the OnInt methods and Constructor are used for a similar purpose, a developer chooses to use the ngOnInit for initialization or declaration and to avoid using the constructor maximum.
Interface
The interface is the most essential asset of the hook in a lifecycle method as it is the component class and the application should be enabled in the virtual interface. Based on the recommendation, a method triggers implementation, which is AfterViewInit and it is highly preferable for ngAfterViewInit.
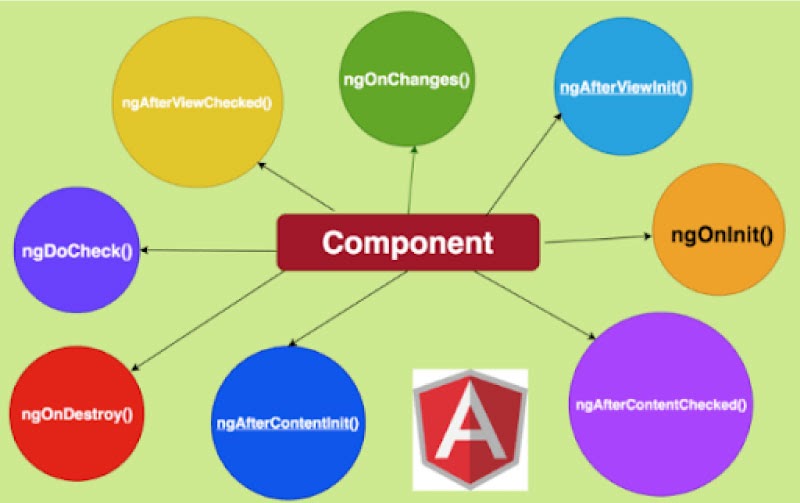
ngOnChanges
It is the callback function that is used for leaping the data property variation which takes place on a component. In a nutshell, we can think of it as the event that is being executed and when the input controls are revived inside a component. The modified data is rooted and the Angular receives it and the present and previous data are wrapped into simple change. Hence, by using these cycle hooks, the Parent component could easily interact with their child components and it offers decorators that are exposed to @InputDecorator of all the child.
Even when the Parent component is moved off the line, then the input property of this hook is immediately notified to its child component. This in turn aids the developers to think less about the procedure of implementation. The properties which it includes uses all the components which have input and invokes them when the input is modified. And this gets a first call which is lifted before ngOnInit. The properties of this phase have practical use of all the input components and it is initiated when a value is requested and changed initial calls before ngOnInit.
ngOnInit
Once the Angular is done with building and introducing the callbacks, it shall display and initialize certain data-bound properties. This occurs only after ngOnChanges constructor and event calling. With a hook, a component's logic is loaded and every property of the ngOnInit could be used. Any child which belongs to these properties will not be used when a hook is being triggered.
Initialization of component hooks is one of this phase's features.When the input is being set, then the hook receives its call and this is added with the default Angular CLI for all its components. This is more essential to note that each of these activities takes place only once.
ngDoCheck
Once the hooks are being sorted, it stays as an essential part for reviewing the properties and inputs that are grouped with the corresponding directives and components. We can easily monitor your logic here. To be even more clear, we can place the custom checks for viewing the test cases and later implementing them to a component. These hooks are handy once the ngOnInit and the important function of the hook are executed evenly when there are no changes on a component's property. It is the hook that comes into view for any instance. The Angular slips to find any changes on the input properties. This hook has properties that include automatic function calls and updates.
ngAfterContentinit
When ngDoCheck is highlighted as complete, this phase is lifted. In the beginning, all of the components in ngAfterContentInit are introduced and verified. Generally, this method is deployed immediately as Angular has the component view and content project. It is the method which is called while the properties are curbed as ContentChildren or ContentChild. It ensures all of these are called. External child components, on the other hand, are included through a process involving placement and tags. As a result, these hooks are only invoked once per lifecycle component.Hence, for every lifecycle component, these hooks are called only once. There are many properties in this phase and it includes not only initializing a content it also occurs right after the ngDoCheck.
ngAfterContentChecked
It is a hook method that is devised to inspect the modification in the contents and utilizing the Angular shift detection apparatus. It executes all tasks even when no changes are made, assuring that all the things are on a check and if they are on point. A hook accepts its call only when ngAfterContentInit is immediately executed after the execution of ngDoCheck. It occupies a major position in the child component for initialization. The main properties of this method are waiting for ngContentInit and this has to be ensured and executed when all the things are accomplished after the ngDoCheck.
ngAfterViewInit
This stage is where ngAfterContentChecked and utilized only the important components. It is the method that resembles ngAfterContentInit and this initiates immediately after the child view and component. It is the method that is called immediately when the initialization of the view and takes place only for one time.
ngAfterViewChecked
It is the method that triggers when a consequential check-in of the child view and component check takes place. It is the approach that is initiated after ngAfterViewInit and for a check, a method is used while ngAfterContentChecked. Just like the other lifecycle methods which are mentioned above, this kind is applied only for the components and effortlessly while a child component awaits its execution.
After the checking and initialization, the property of this type is only called once. Also, immediately after the ngAfterContentCheck method begins to execute.
ngOnDestroy: It is the method that calls when Angular crushes all its components or directives. It is the best place for clearing up all your constructed logic and it easily unsubscribes them from its observable. It discards all the event handlers and this is performed uniquely to discard its memory leakage and buffer-oriented issues.
The important property or function of this hook is to initiate a call immediately after the components are discarded from DOM.
To conclude, components in Angular occupy an important role in the process of application development. Right from its launch, Angular had many dependencies and it was tedious to implement its hooks.
Even now, because of massive advancements that are occurring these days, the lifecycle method of Angular is split into different phases as you saw above. Here, you have learned the different methods of the Angular lifecycle with its hook which drives all these types concurrently and easily. Also, the component is termed to be the important building block of application in Angular and this is the most essential part to comprehend the processing methods which are easily deployed on the applications. The AngularJS Training in Trivandrum at FITA Academy upskills the knowledge of the students with the complete wheel of the Angular with real-time training practices.
Angular 11
Google released its recent version Angular 11. And it is available in the marketplace from the 14th of November. This version mainly concentrates on enhancing the developer's experience by fixing the bug issues which are frequently raised in the community. This release has offered numerous enhancements that intend to simplify the development process and make the work process simpler for Angular.
Here in this AngularJS Tutorial, we are going to see about the recent updates that have taken place in the Angular 11 version.
Feature & Update of Angular 11
The key feature of this version is an automatic alignment of fonts, router operation improvements, and stricter types. With the aid of Router performance that apps are functioning faster. It is used for compiling inline fonts and time downloads that are utilized and connected with an application. The default Automatic font inlining of the Angular 11 is permitted for the applications which are being updated. More features are included in Angular 11 and let us see them in detail in this session.
Updated Hot Module Replacement (Support)
The Hot Module Replacement is the kind of mechanism that permits the modules to be restored without a complete browser refresh. This is considered to be the age-old concept of Angular where the developers must have worked in HMR in their previous versions.
The exciting thing in Angular 11 is that it provides support for all the HMR with required code and configuration and this makes them less ideal and to incorporate them into the Angular. It was not available in its previous version. Angular 11 permits the CLI to facilitate HMR and thus while beginning the application with the ng serve. You can run the command given below, to begin with:
A console is used for illustrating a text after the local servers begin with HMR confirming and that it is active. Generally, in the development stage, the recent alteration of styles, templates, and components are immediately updated to the application that is running presently without the need to refresh the complete page. The data are entered on the forms and they give a boost to the productivity of a developer. It is one of the key features of the Angular 11 new updates.

Updates in Operations Byelog
Angular Roadmap is one of the important things in Operation Byelog where the Angular team concentrates on lending major engineering efforts on training PRs and issues. Right before having a better understanding of the broader community requirements. We can now easily report them on the initial objectives that are accomplished. All of these issues are now triaged successfully in all the three mono repos and this will lead you to see the efforts as and when the issues are being reported.
It is also stated that this process has settled the popular concerns on the router forms. All these issues are now triaged that is within the two weeks of occurrence and it curtails the complete size of resolved issues and Angular backlog.
Inlining of Fonts Automatically
Angular 11 enables the automatic font inlining and this allows you to remodify your Google Icons and Fonts for inline on the index.html. It occurs whenever we set the flag below in your angular.json under a build option. The Angular CLI shall inline and download the fonts at the time of compilation that is being developed and linked to all the applications. These are the new set of features of Angular 11 and this is permitted by default in the production configuration.
The thing we should consider here is the benefits of optimization and ensuring that the internet connection is stable at the time of build and when the build runs on the CI. We need to update your application and to allow them by default in the apps which are developed with version 11.
OR
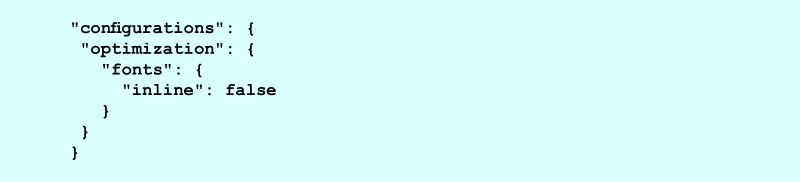
Component Test Harness
A Component of Test Harnesses is launched in Angular version 9. It gives the legible and robust API surface that aids to test Angular Material components. It paves the pathway for developers to communicate with Angular Material components that are developed using supported API at the time of testing. It's one of the Angular 11 features that allows developers to create strong test suites by harnessing all of the components. The thing which is new in the Angular 11, is new APIs, parallel function, and performance improvements.
A parallel function operates with other asynchronous actions in a test and by allowing the developers to operate multiple asynchronous communication components correspondingly. With the manualChangeDetection function, the developers could discard the automatic change espial in the unit test, and pervading the finer-grained and the control of change detection.
Updation in Language Service Preview
The Angular 11 has the feature of Angular Language Service that offers the most helpful tools to build productivity within the Angular Environment. The present form of the language service relies on the View Engine and it gives more power and concrete experience for its developers. In Angular 11, the model for all the language services aptly infers to the generic kinds in the templates similar to the function of the TypeScript compiler. It is the recent Angular 11 feature that is found in the development which offers accurate and powerful Ivy-based service language.
Rapid Builds
Angular 11 brought in rapid development and build cycle that allows up-gradation in certain key areas. The areas include:
- TypeScript v4.0
- Ngcc - Angular compiler
An Ngcc process update is 4x faster similar to the new changes in Angular 11. It implies that the users are not required to wait for more time for builds and rebuilds. The Angular contributor Joost at the time of profiling Angular compiler and had to make a typescript compiler rapid to improve the Ngcc. This alteration lands in the TypeScriipt 4.1 and when Angular lends its supports to typescript 4.1, in its later version, this will permit you to build faster.
Experimental Webpack Version 5 Support
Angular 11 improvements include a team that can opt-in for webpack v5. A Webpack is used for bringing together countless documents into one record or bundle. Webpack version 5 is the recent release. However, it still needs time to stabilize its functions. Now we can test them with the module federation. The webpack v5 in the upcoming days helps you in clearing your path:
- Disk caching and Faster builds
- Smaller bundles which are found with cjs tree-shaking
We can add the sections which are mentioned below to your package.json file to try out the Webpack 5:

Angular 11 is used for yarning to test and it is because the npm may not support every resolutions property.
Move to ESLint
The earlier versions of Angular was been shipping the default implementation to lint (TSLint). This was purposefully one of the popular linting tools which have been in user for a long time. Angular version 11 is derogated using the Codelyzer and TSLint as the essential part of the Angular material changelog. Also, it is mentioned that after this, the next version may not have any default implementation to lint the Angular projects.
It is the important changes that took place in Angular 11. The TSLint is derogated by developers who suggest transfer to ESLint. It is an open-source community that is developed by the third-party solution and it plans the flight through angular-eslint, typescript-eslint, and tslint-to-eslint-config. To assure effortless transitions, then the Angular developers must integrate well with the supportive linting stack.
Router
The important difference between Angular 10 and 11 is that its previous version uses #shouldResuseRoute method and RouteResuseStrategy which concerns the future and the next routes that are being bartered for its child routes. It is an issue that is set alright in the Angular version 11, yet you need to alter your code when you use them in your code previously.
Here, in this version, the recent parameter kinds permit the variable of kind NavigationExtras which has to be passed. However, it will not allow the object literals as it may only list some types and properties which do not consist of the properties in common along with the ones in a pick. To set right this issue, the user can mention properties from NavigationExtras which make use of the type assertion on variable or object as the NavigationExtras.
Forms
Important amendments have been made in Angular 11 to enhance the typing for asyncValidator and validators which were earlier unavailable. These arguments are properly entered into your code depending on the directive constructor's kinds as it would need certain updates to enhance its type safety. Type of AnbstractFormControl.parent in the Angular 11 includes nothing and it incorporates its type of .parent.
Recently, Angular changelogs added a non-null assertion operator when needed. A FormControl, FormArray, and FormGroup class of the earlier version consisted of async validators that are explained at the time of initialization. In the recent version, the status event is exuded into status Change observables.
Breaking and Deprecations Changes
Typescript 4.0 Support
The angular team has abandoned TypeScript 3.9 support in version 11 and now supports TypeScript 4.0, allowing for faster build
RoadMap
A Roadmap is developed as one of the important features of Angular 11 and this is presently an in-progress project. This method mainly reflects the bigger efforts permitting the developers to offer early feedback which is to be included in the final release.
Pipes
The recent version of Angular has set right the number and data pipe which were previously used for taking any kind as input. Here the date pipe and date-time will turn off all its nearest millisecond parts. An async pipe may not turn to null further as the value of undefined input. It causes compilation error and this is the reason why still this is considered as the breaking change and this is used for uncovering all the invalid usages.
Angular Universal
In Angular 10, to use the absoluteUrl a team must be efficient while functioning with SSR. The Angular 11 stable requires to have a baseUrl parameter to utilize useAbsoluteUrl baseUrl that helps in revoking the protocol, port, and hostname.
Browser Cleaning/Support
Support for IE 9, 10, and IE mobile in Angular 11 are discarded. It was deprecated in the version 10 release, however, it was canceled here in this version. Angular 11 also discarded several functions and obsolete APIs that have been piled up to the deprecated list.
CollectionChangeRecord is Deprecated
The Users must use all the IterableChangeRecord in its earlier stage, and as CollectionChangeRecord is depreciated now
ViewEncapsulation
The Angular 11 changelog includes the elimination of ViewEncapsulation.Native. Rather, is the latest release, where could make use of the ViewEncapsulation.ShadowDom. An ng update is immediately updated to its current pages.
Unit Test
In its previous version a calling TestBed.overrideProvider once TestBed statement has zero impact. The Users now accept the exception when they bid to do that.
Backing the Lazy Load along with Named Outlets
The previous version was titled as an outlet that persistently supported a component. There were not many ways for lazy load and the module uses the outlet. We can use them now with Angular 11 along with the commands that are mentioned below:
Angular Flex-Layout
The Angular 11 update comprises the addition of a flex layout of the module of Angular. This release allows the beta version and it functions perfectly with production.
Feature of Extracting i18n tokens from a library
The recent release of Angular 11 permits you to extort all the i18n tokens from the Angular libraries which use the command that is given below along with the library.
Prompt for Stringent Mode
The Angular 10 has a flag --strict to set up the Angular applications. The Angular 11 along with all the strict checks options, permits users and this will now have the prompt for checking whether you can permit the image as they are given below. The additional package.json was developed right inside the app folder of its previous version and this shall no longer be developed for averting its previous version and this is mainly developed for bypassing the confusion within the community members.
Angular Flex-Layout
Angular 11 update permits the addition of a flex-layout module of Angular. This release supports the beta version and it functions pretty well in production.
- Angular CLI generators for the resolvers
- Angular CLI in Angular 11 shall now develop and resolve its guards.

Update for getting version 11
When you are all set to update the recent version 11, we can run the command that is given below:

To conclude
Angular generally releases two versions a year, at an interval of six months. Angular 11 is a big release with more interesting types and features. The safety enhancements for reactive forms and pipes. In its next version, it is anticipated that it shall bring in the important features namely angular 11 support for NrwlNX and Ivy-based language service which shall not take much of your time.
Features of Angular 12
The recent update of Google's and the leading TypeScript-based Web framework was released on the 12th of May and this is presently accessible for the production release. Among various upgrades, it depreciated inheritance View Engine assemblage and delivered the pipeline for the present Ivy technology. The Angular version 12 now can be accessed on GitHub, using the different beta releases and deliveries of candidates.
Angular 12 draws you near to the "Ivy all over" vision for designing. The Ivy is depicted as the cutting-edge collection and delivery of pipeline that renders quick AOT compilation. The Angular group largely notices the View Engine which is taken out for further delivery. Presently, the libraries that utilize the View Engine on any case functions with the Ivy applications. However, the library creators are cheered to start with progressing to the Ivy.
Ivy Everywhere: Angular v12
A View Engine at last been deplored in the Angular 12 version. A community is been functioning on all ongoing deliveries to the objectives of connecting the Angular ecosystem to the Ivy. This methodology is termed "Ivy Everywhere".
As the View Engine is deplored now, we can eliminate them easily on the upcoming releases too.
The present libraries used the View Engine and it functions default with the Ivy applications. Also, the library authors must start to transition to the Ivy.
Moving from Legacy i18n message IDS
So far many legacy message-id designs are used in the i18n framework. These legacy message-ids are gentle as the issues could rise based on the whitespace and regulating the formats also the ICU expressions. For managing this issue, the Angular team is dislocating them away. A new standard and message-is designs are remarkably natural and tough. This configuration helps in reducing the superfluous translation and invalidation that are associated with the retranslation cost on applications and where the translation need not counterpart owing to the whitespace changes of instance.
The Angular version 11 and new tasks were spontaneously devised for using the new message ids and it currently has the tool for moving the current venture with the current translations.
Protractor: The path for future
A team has been persistently working along with a community to conclude the possible end of Protractor. Currently, we are searching for the feedbacks that are shared on the RFC and to sort the best future of Protractor. It is one of the recent attributes of Angular 12. A team was selected to prevent from all its new tasks and all the things are regarded as an equipped substitute for all the 3rd party elucidations in the Angular CLI. A team is currently functioning with Cypress, TestCafe, and WebdriverIO for backing angularjs development company that is with accepting the elective solutions.
Nullish Coalescing
A nullish coalescing operator (??) is used for guiding the engineers in creating codes that are clean in the TypeScript classes for a certain period. The main intent of this feature is that we can get in the force of nullish coalescing for Angular templates on the v12!. Currently, their templates, engineers could be used for the new syntax structure for enhancing complex conditionals.
For example:

Enhancements in Styling
In the Angular v12, the components support the inline Sass that are found in a style field of @Component decorator. Previously, Sass was only accessible outside the resources owing to the Angular compiler. We can power this component to your present application just by totaling "inlineStyleLanguage": "scss" to the angular.json. Now, it is accessible for all the new tasks for using SCSS.
Angular Material and Angular CDK have embraced Sass's recent module framework that functions internally. When your application makes use of the Angular Material or CDK, we should ensure that we have modified the node-sass to the sass npm package. A node-sass package is usually not maintained for a longer time as it is attentive to new features which are annexation to the Sass language.
At the time of updating the application to angular's recent version, it shall subsequently modify itself to a new Sass API by invigorating to your application with a new ng update. This order would restructure any of the Sass @import expressions for Angular Material code and CDK right over the new @useAPI. As both the Angular Material and CDK is used for uncovering the other Sass API surface that aims for the use with new @use language architecture.
See the demonstration that explains both before and after.
Deprecating support for IE11
Angular is a legacy platform which implies that it shall easily cope up with the progressing web ecosystems. Discarding the support for the legacy browser allows you to concentrate on the modern solution much better and support both the clients and engineers.
A team must be combined for new deprecation and warning text as that of the other Angular 12 feature and removes the support for IE11 in the Angular v13.
Support from Community
The Angular team is been operating ardently to enhance the Angular experience right from its sixth version. It is persistently trying to increase the learning experience of the developers as well. The Angular 12 has new features and it has rolled out certain important modifications to its documentation. Also, it has an updated angular.io contributor's guide which aids the individuals to enhance the docs.
Strict by Default
A Strict mode of Angular is now allowed by default on the CLI as this is one of the best features of Angular 12.
A Strict mode allows maintainability and allows you to assist with tracking bugs from its previous process. Further, strict mode application is simple for statically examining and it aids the ng update command for restructuring code securely and precisely when you update them to its recent version of the Angular.
Follow the command that is given below for developing application and workspace:

Also, now run the following command when you need to develop a new app with the existing and non-strict workspace on the strict mode:

Production build by default
Till this point, running an ng build command helped the development build. In the Angular version 12, the ng build by default sends to the production build. Usually, it will guide to few groups that are with abstaining from tragically building and thus transferring the development builds into the production environments.
HTTP Improvements
Angular 12 features many upgrades over its HTTP support. Let's see through them:
Metadata for interceptors and requests
To begin with, a HttpClient can now allow you to use the store and thus restore custom metadata for its requests. It is mainly helpful for all the HTTP interceptors. It has the capacity that could be used via the new HttpContext.
Currently, peculiar HTTP strategies are given by HttpClient to include the other specific events: HttpContext or otherwise we can use them for passing the map.
appendAll on HttpParams
A HttpParams class are currently used for the other appendAll technique and this is used for seamlessly affixing the bunch of boundaries without any delay:

HttpStatusCode
Angular 12 features its lists of intelligible names for all the HTTP status codes, in method of const enum. As it is the new element, we can now use the HttpStatusCode rather than introducing them to the solution that has human-readable names.
For instance:

ng API improvements
An ng troubleshooting API is used while we can use them from a program dev tool for the enhanced feature of Angular 12. Certain functionalities are deployed to mention a few - getDirectiveMetadata and esetProfiler for debugging the APIs for designing the inspection of the applications. The getDirectiveMetadata is used for mending the data over its directives and parts. An esetProfiler is utilized for discerning template creation span, template updates, and the cycle of hooks processing. The API provides the information for working with the applications at runtime.
New Dev Tools
Before Angular 12, the Angular group reported its accessibility for Angular Dev Tools to Google Chrome. An embedded profiler is used for previewing and recording the changes on the detection event which are monitored for which components and cycle does it takes more time. Before Angular community had only semi-official Dev Tools that were not suitable with Ivy.
Angular Universal
The important enhancement of the Angular 12 includes the Inline critical CSS which is by default present in common/universal. The Angular universal now allows proxy configuration in the ssr-dev-server builder. It is used in updated schematics that use the default configuration. This version permits the support of the SSR engine and this is also called the Clover which is found with the new engine that seems promising. A new engine intends to ease things for developing applications that shells without any extra removal or build need for multiple builds of SSR/prerender. Also, it extends its support for the TLS of the dev-server.
TypeScript 4.2
It is the major update feature of Angular 12 and it supports Typescript 4.2. It has some breaking changes and exciting features in this version. Now, let's see the features of the typescript 4.2 and how it impacts the developers and Angular on the whole.
Modification in Tuple types
Tuples are highly useful in data type programming when the developers are required for sending back different outcomes from the function. These are the constant, tuples that are used as the main key for the dictionary-type word reference. The important highlight of the Typescript is that the tuples are optional, rest, discretionary components that are easy to read and tooling.
Abstract Construct Signatures
Abstraction is an important attribute of TypeScript 4.2. A TypeScript allows the designers to make use of the theoretical modifier for monitoring the class as abstract. For making the occasions to infuse the practices and properties of abstract classes, the engineers must follow, the important OOP concept that is used for broadening the abstract class using the startup and subclass objects. The Mixins is the leading-edge technique of TypeScript that is found additionally along with the same object. Firstly, while using the mixins along with the abstract classes it is possible to find certain bugs. However, version 4.2 developers make use of the abstract modifier on the constructor signatures.

Enhancements in Operators
There is a lapse in how to use the important variable on the right side of the in-operator and to give a complete protocol in programming. Anyway, till version 4.2, this is not considered as the TypeScript.
Yet, with the recent updates, a Typescript is used for exacting the rules. However, in-operator will not allow you to crude details kinds from the legitimate side.
“test var” in 31 // this spontaneously paves the way for error.
Enhanced Type Alias
In its past forms, a TypeScript was not able to solve the types. Primarily, a TypeScript is used for sending the right types but not prompting the absence of readability, substantial validity, and repetition of the same code over and over again. Presently, the re-aliasing of all these types certainly shows and receives its new type alias.
Webpack 5.37 Pack
The Angular 12 features are production-ready and experimental Webpack 5 which enables support when it was initially introduced in the Angular 11 version. A Webpack is an important piece of the Angular CLI puzzle and this has a major role in the bundle size and constructs execution. A Webpack 5 is the most important delivery which includes numerous breaking features and changes. A Webpack 5 aids in enhancing the build performance, compatibility with Web platform, long-term caching, and bundle packed with finer code generation.
Major changes in the Angular 12
Animation
In version 12, the DOM components are found precisely and discarded from its root view. When you use the SSR, it uses the applications of the HTML to deliver, and it will ask for the assurance which you need mainly for saving the HTML to the variable right before discarding an application.
Furthermore, the tests inadvertently rely on the old conduct and try to find the component that is taken out from its past test. But, when the situation fails to test, it is conditioned to be updated and as well guaranteed as they need correct setup code and it instates all the components on which it relies.
Common
The methods of a PlatformLocation class, mainly onPopState and onHashChange, are used for sending back the void. Currently, these techniques are used for sending back the work that could be used for calling and for eliminating its event handlers.
The main intent of Angular 12 enhancements is that these are the strategies of the HttpParams class that are presently accepted number| string| boolean instead of string value for a parameter. When you broaden this class on your application, you must update its signatures to your strategies to reflect the changes.
Compiler CLI
The interesting feature of Angular 10 is to use the new IVY extractor for running the ng xi18n in any of your applications. The new feature of Angular 12 is that it will not for a longer period develops the legacy i18n message-ids via linked libraries. To downstream your applications, you must give the translations for all these messages and localize-migrate the command-line tool that aids you to move its message ids.
Form:
Earlier 'min' and 'max' feature the characters on <input type = "number"> and it was neglected by all the Forms modules. Presently, with the existence of all these characteristics, it shall trigger the min/max validation logic and it is used for comparing the form control status and it will mirror it.
Core:
Angular will no longer support you in handling the Node of v10. Earlier, the ng.getDirectives work was tossed as an error in terms of the given DOM node and it had no Angular settings that are associated with it. And this conduct had conflicts with the other troubleshooting utilities that were found under the ng namespace and it looked after the current circumstance without having to raise any exemption. Since the important changes in Angular 12, is ng.getDirectives functions for DOM nodes and it will bring in all the empty arrays from its function.
The kind of APP_INITIALIZER token modified itself more literally to mirror types for sending the values that were taken care of by the Angular. Before it, all the initializer callback was compiled to send back any of the current Promise<unknown>|Observable <unknown>| void. In an unlikely event all you application uses the TestBed.inject API or Injector.get API for infusing the APP_INITIALIZER token and you may need to refresh all the codes to depict its strict type.
Compiler CLI
The fascinating feature of Angular 10 is to make use of the new IVY extractor for running the ng x i18n on any of your applications. Further, Angular no longer develops legacy i18n message-ids via the linked libraries. To downstream all your applications you must give translations for all these messages and you must localize-migrate and the command-line tool for moving the message ids.
Platform Browser
The XhrFactory is discarded from @angular/normal/http to @angular/normal.

Router:
A Strict invalid check is given to the account as a part of credibly being invalid. It is the type of RouterLinkActive.routerLinkActiveOptions input that was elongated to allow more adjusted control. This code is recently used for reading the property that may be used for presenting the updated new kind.
Other important Updates in the Angular 12
- It renders support for the compiler to change its component style resources.
- The Fonts are automatic inlining.
- The Angular 11 feature allows the HRML to initiate the application along with the ng serve --hmr where the Angular 12 version is enhanced to extend its support to Hot Module Replacement (HMR).
- It is used for improving the component tests to the harnesses and introduces them to the Angular 9 to test all the Angular Material components. It is the team that has added harnesses to all its components.
- The Ng_packages is not capable of developing minified UMDs further.
- It is used for enhancing the reporting and logging as the result of better CLI readability.
- The Experimental support of the Webpack 5 was launched as the new module federation feature.
- Angular 12 have updated its roadmap to keep their developers posted of the current priorities of Angular team.
- It has Updated TypeScript that extends its support for version 4.2.
- Migration by default is the Ivy-based language Service that is from an opt-in service.
- It introduces you to the Context option of the compiler-cli and it permits you to supply the arbitrary data in a type-safe way.
- The Addition is much of fine-tuned control in the routerLinkActiveOptions.
- It offers a reduction of framework overhead by discarding legacy.
- The Permission is granted for Custom Router Outlet and Implementations.
Methods to Upgrade to version 12
You can run the command that is given below to update to Angular 12
However, when you have Nx 12.3, you must note that it by default supports the Angular 12 version.
To conclude:
The Angular 12 came with a set of enhancements in compiler, performance, language service, and form validation. Deprecation of the View Engine along with the deployment of the Ivy ecosystem is one of the important enhancements that has to be taken into consideration in the Angular 12th version. Further, with this, the Angular 12 has seen some of the major improvements like Nullish Coalescing, Styling, and Shifting from the Legacy i18n Message IDs as other major features have made the release steady. Further, the Angular 12 features give different bug fixes that affect the router, core, compiler, and language service.
Angular Roadmap is used for projecting the focal points as "Zoneless Angular" and thus making Zone.js choices and finally it provides more control to its developers. The Angular community has introduced the beta version in its last two months and this came up with other important and breaking changes last May. Now, it is anticipated that the recent version has come with some of the stable changes. The AngularJS Training in Kolkata at FITA Academy supports the students with comprehensive training of the Angular 12 version and the recent changes that have taken place in the front-end framework.
Career Opportunities
Angular is the popular and modern JavaScript framework that is mainly used for developing interactive and web page applications. Ever since Angular came under the management and development of Google Inc, it has seen tremendous growth with a far reach. Further, the demand for Web Development is skyrocketing. The majority of IT graduates intend to begin their careers in the field of web development. Based on the reports submitted by Payscale.com it is mentioned that on average, the Entry-level Front End Developers are paid around the US $65,661 yearly.
Based on the market condition of India, on average, an AngularJS Web Developer is paid around Rs. 4,00,00 yearly. IBM, Google, Cisco, Intel, Deloitte, Accenture, and Microsoft systems are some of the most well-known organizations that hire these specialists. The general job titles that are offered to these professionals are - Front end Developer, Web Developer, Web App Developer, JavaScript Developer, UI Developer, and Front end Web Developer.
As Digital presence is becoming a basic norm in the present organizational set up the need for skilled Web Developers is pacing up significantly. This is the right time to begin your career in the Web Application Development domain.
Additional Resources
AngularJS Interview Questions and Answers
To Conclude
Web Development is one such domain where the demand for both Freshers and Experienced candidates is high. And now is the ideal time to start working in this industry. Hope this Angular Tutorial was helpful and that you got a complete view of the popular front-end language. Angular Training at FITA Academy supports the students with both Angular Course Online and Angular Course in Chennai in various locations. The Angular Course at FITA Academy is tailored by Expert Front-end Web developers from the industry. We offer training with placement support and help the students to step in their desired path.
Interview Questions
Interview Questions on Digital Marketing Java Interview Questions For Experienced Selenium Interview Questions and Answers For Experienced Hadoop Interview Questions and Answers For Experienced Python Interview Questions and Answers For AWS Interview Questions and Answers For Experienced DevOps Interview Questions and Answers Oracle Interview Questions PHP Interview Questions For Freshers AngularJs Interview Questions RPA Interview Questions Software Testing Interview Question and Answer Mobile Testing Interview Questions and Answers Salesforce Interview Questions Networking Interview Questions and Answers Pega Interview Questions NodeJS Interview Questions Ethical Hacking Interview Questions Data Science Interview Questions and Answers Javascript Interview Questions Blue Prism Interview Questions SEO Interview Questions Android Interview Questions MS Excel Interview Questions Cloud Computing Interview Questions Cyber Security Interview Questions Interview Question on Tableau Power BI Interview Questions and Answers Artificial Intelligence Interview Questions and Answers Azure Interview Questions and Answers SQL Interview Questions and Answers Full Stack Interview Questions and Answers Dot Net Interview QuestionsFull Stack Interview Questions and Answers UI UX Interview Questions and Answers ReactJs Interview Questions Full Stack Interview Questions and Answers Linux Interview Questions
Contact Us
For Business
Testimonials
Resources
Follow Us
TRENDING COURSES
JAVA Training In Chennai Core Java Training in Chennai Software Testing Training In Chennai Selenium Training In Chennai Python Training in Chennai Data Science Course In Chennai C / C++ Training In Chennai PHP Training In Chennai AngularJS Training in Chennai Dot Net Training In Chennai DevOps Training In Chennai German Classes In Chennai Spring Training in ChennaiStruts Training in Chennai Web Designing Course In Chennai Android Training In Chennai AWS Training in Chennai
iOS Training In Chennai SEO Training In Chennai Oracle Training In Chennai RPA Training In Chennai Cloud Computing Training In Chennai Big Data Hadoop Training In Chennai Digital Marketing Course In Chennai UNIX Training In Chennai Placement Training In Chennai Artificial Intelligence Course in ChennaiJavascript Training in ChennaiHibernate Training in ChennaiHTML5 Training in ChennaiPhotoshop Classes in ChennaiMobile Testing Training in ChennaiQTP Training in ChennaiLoadRunner Training in ChennaiDrupal Training in ChennaiManual Testing Training in ChennaiWordPress Training in ChennaiSAS Training in ChennaiClinical SAS Training in ChennaiBlue Prism Training in ChennaiMachine Learning course in ChennaiMicrosoft Azure Training in ChennaiSelenium with Python Training in ChennaiUiPath Training in ChennaiMicrosoft Dynamics CRM Training in ChennaiUI UX Design course in ChennaiSalesforce Training in ChennaiVMware Training in ChennaiR Training in ChennaiAutomation Anywhere Training in ChennaiTally course in ChennaiReactJS Training in ChennaiCCNA course in ChennaiEthical Hacking course in ChennaiGST Training in ChennaiIELTS Coaching in ChennaiSpoken English Classes in ChennaiSpanish Classes in ChennaiJapanese Classes in ChennaiTOEFL Coaching in ChennaiFrench Classes in ChennaiInformatica Training in ChennaiInformatica MDM Training in ChennaiData Analytics Courses in ChennaiFull Stack Developer Course in ChennaiHadoop Admin Training in ChennaiBlockchain Training in ChennaiIonic Training in ChennaiIoT Training in ChennaiXamarin Training In ChennaiNode JS Training In ChennaiContent Writing Course in ChennaiAdvanced Excel Training In ChennaiCorporate Training in ChennaiEmbedded Training In ChennaiLinux Training In ChennaiOracle DBA Training In ChennaiPEGA Training In ChennaiPrimavera Training In ChennaiTableau Training In ChennaiSpark Training In ChennaiGraphic Design Courses in ChennaiAppium Training In ChennaiSoft Skills Training In ChennaiJMeter Training In ChennaiPower BI Training In ChennaiSocial Media Marketing Courses In ChennaiTalend Training in ChennaiHR Courses in ChennaiGoogle Cloud Training in ChennaiSQL Training In Chennai CCNP Training in Chennai PMP Training in Chennai OET Coaching Centre in Chennai
Are You Located in Any of these Areas
Adambakkam, Adyar, Akkarai, Alandur, Alapakkam, Alwarpet, Alwarthirunagar, Ambattur, Ambattur Industrial Estate, Aminjikarai, Anakaputhur, Anna Nagar, Anna Salai, Arumbakkam, Ashok Nagar, Avadi, Ayanavaram, Besant Nagar, Bharathi Nagar, Camp Road, Cenotaph Road, Central, Chetpet, Chintadripet, Chitlapakkam, Chengalpattu, Choolaimedu, Chromepet, CIT Nagar, ECR, Eechankaranai, Egattur, Egmore, Ekkatuthangal, Gerugambakkam, Gopalapuram, Guduvanchery, Guindy, Injambakkam, Irumbuliyur, Iyyappanthangal, Jafferkhanpet, Jalladianpet, Kanathur, Kanchipuram, Kandhanchavadi, Kandigai, Karapakkam, Kasturbai Nagar, Kattankulathur, Kattupakkam, Kazhipattur, Keelkattalai, Kelambakkam, Kilpauk, KK Nagar, Kodambakkam, Kolapakkam, Kolathur, Kottivakkam, Kotturpuram, Kovalam, Kovilambakkam, Kovilanchery, Koyambedu, Kumananchavadi, Kundrathur, Little Mount, Madambakkam, Madhavaram, Madipakkam, Maduravoyal, Mahabalipuram, Mambakkam, Manapakkam, Mandaveli, Mangadu, Mannivakkam, Maraimalai Nagar, Medavakkam, Meenambakkam, Mogappair, Moolakadai, Moulivakkam, Mount Road, MRC Nagar, Mudichur, Mugalivakkam, Muttukadu, Mylapore, Nandambakkam, Nandanam, Nanganallur, Nanmangalam, Narayanapuram, Navalur, Neelankarai, Nesapakkam, Nolambur, Nungambakkam, OMR, Oragadam, Ottiyambakkam, Padappai, Padi, Padur, Palavakkam, Pallavan Salai, Pallavaram, Pallikaranai, Pammal, Parangimalai, Paruthipattu, Pazhavanthangal, Perambur, Perumbakkam, Perungudi, Polichalur, Pondy Bazaar, Ponmar, Poonamallee, Porur, Pudupakkam, Pudupet, Purasaiwakkam, Puzhuthivakkam, RA Puram, Rajakilpakkam, Ramapuram, Red Hills, Royapettah, Saidapet, Saidapet East, Saligramam, Sanatorium, Santhome, Santhosapuram, Selaiyur, Sembakkam, Semmanjeri, Shenoy Nagar, Sholinganallur, Singaperumal Koil, Siruseri, Sithalapakkam, Srinivasa Nagar, St Thomas Mount, T Nagar, Tambaram, Tambaram East, Taramani, Teynampet, Thalambur, Thirumangalam, Thirumazhisai, Thiruneermalai, Thiruvallur, Thiruvanmiyur, Thiruverkadu, Thiruvottiyur, Thoraipakkam, Thousand Light, Tidel Park, Tiruvallur, Triplicane, TTK Road, Ullagaram, Urapakkam, Uthandi, Vadapalani, Vadapalani East, Valasaravakkam, Vallalar Nagar, Valluvar Kottam, Vanagaram, Vandalur, Vasanta Nagar, Velachery, Vengaivasal, Vepery, Vettuvankeni, Vijaya Nagar, Villivakkam, Virugambakkam, West Mambalam, West Saidapet
FITA Velachery or T Nagar or Thoraipakkam OMR or Anna Nagar or Tambaram or Porur or Pallikaranai branch is just few kilometre away from your location. If you need the best training in Chennai, driving a couple of extra kilometres is worth it!
© 2024 FITA. All rights Reserved.