
ReactJs is a library of JavaScript code used to make user interfaces. In the past few years, ReactJs has become more and more popular, and for good reason: it is a powerful tool that makes making user interfaces fast and easy. ReactJs is based on React, a library for building platforms that were made by engineers at Facebook.
ReactJs Interview Questions and Answers from FITA Academy can give the best resources for ReactJs interview preparation. If you have completed your ReactJs Training In Chennai then you can get many job opportunities in front of you. We have given the top questions and answers which will help you to become a successful ReactJs Developer.
In this article, we’ll provide an introduction to ReactJS, including interview questions and answers that you might encounter when preparing for a job interview with ReactJs.
React is a declarative programming language for creating user interfaces. It lets programmers write code only once and use it on many different platforms. This facilitates application maintenance and updates.
React is a toolkit for building dynamic user interface components. Developers can build rich user experiences without worrying about browser inconsistencies.
- Better performance than other frameworks because it uses virtual DOM.
- Easier debugging because it is written in pure JavaScript.
- No need to worry about browser inconsistencies because it works across all browsers.
- Easy to learn because it takes away some complexity from developers.
- Easy to maintain because it doesn’t require any specific framework knowledge.
- Easy to extend and reuse because it comes with its own set of APIs.
- You don’t have to think about how your application will look like on various devices because it automatically adapts itself to them.
- It helps create reusable UI components.
- It is highly scalable because it supports both server side rendering and client side rendering.
- It is easy to test because it is unit tested and well documented.
- Virtual DOM – it allows developers to update their views without affecting the underlying HTML structure.
- JSX – It makes writing markup much simpler.
- State Management – It makes managing state a lot easier.
- Data Binding – It simplifies communication between view and model.
- Routing – It allows users to navigate through multiple pages easily.
- Lifecycle Methods – They help developers manage events such as component mount/unmount, rerendering, etc.
- Component Based Architecture – It encourages developers to organize their logic into smaller independent components.
- CSS Modules – It is modular so developers can import custom CSS modules.
- Support for Server Side Rendering – It renders pages on the server before sending the final page over to clients.
- Unit Testing – It makes testing easier because it isolates each piece of functionality.
JSX is basically XML syntax for building web applications. If we say “HTML” then we mean HTML tags, right? Well, JSX is similar to HTML but it adds support for functional programming constructs. Now what happens here is that we write an element called div which contains another element called head which contains another element called title and so on. So essentially, this gives us the ability to write complex logical expressions within our HTML documents.
Form the above reactjs interview questions and answers we have prepared for you. At FITA Acdemy we provide you the best React Js Online Course which is created by React Js experts who are expert in web development. This is the best way to learn any new technology from the experts through online courses. It will help you to learn all of the concepts
- Because JSX is not part of the ECMAScript standard yet.
- Browsers don’t understand how to parse JSX because they don’t know how to interpret it.
- It doesn’t have any syntax highlighting or indentation.
- You need to transpile it into regular JavaScript before you can run it.
ES6 lets you use new syntax and features to improve the readability and efficiency of your code. The most important change is arrow functions. Arrow functions make it much easier to abstract away closures and capture variables inside function bodies. You also get a few other nice syntactic sugar like default parameters, destructuring assignment, template strings, and let.
Redux is a toolkit for managing application state. It helps developers build apps where user actions update the state, and the UI updates automatically based on the current state. Redux is designed to work well with React Native.
GraphQL is a query language for APIs that is used to fetch data. In simpler terms, it allows developers to define queries instead of writing SQL statements every time they need to access data from their database. GraphQL was created by Facebook as part of its React Native framework.
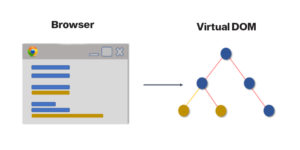
Virtual DOM works in three steps. Whenever any data changes in React app, the entire UI is rendered again in virtual DOM representation. This step is called diffing.
The second step is where the differences are calculated. In this step, we calculate the changes required in the current state of the DOM tree. For example, let us say there is a list of items in our application. When we add one item to the list, it needs to be added to the end of the list. So, we need to make sure that the position of the newly added element is updated in the DOM. This step is known as updating.
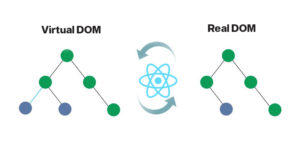
After calculating the changes, we update the DOM.
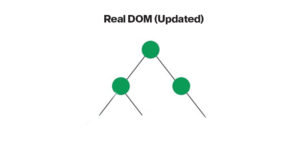
In simple words, the first step makes sure that the DOM gets refreshed whenever any change occurs. Second step calculates the changes and third step updates the DOM accordingly.
ES6 standard defines new syntaxes for defining classes, functions, modules, etc. ES5 standard has been around since 1997. ES6 is more powerful than ES5.
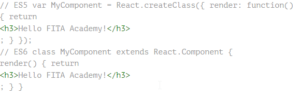
Components and Function- ES6 allows us to write reusable pieces of code called components. These components can be reused anywhere in our application by many different clients. For example
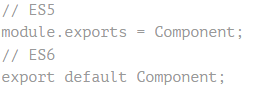
Exports vs Export
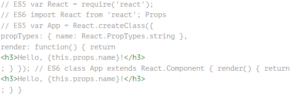
Require vs Import
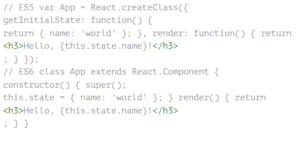
State
|
ReactJS is written in JavaScript |
React native is written in Java |
|
ReactJS uses HTML elements |
React Native uses native components like TextView, Imageview etc. |
|
ReactJS is based on MVC architecture |
React Native is based on MVVM architecture. |
|
ReactJS uses XMLHttpRequest |
React Native uses WebSocket. |
|
ReactJS is used for creating web applications |
React Native is used for mobile apps. |
|
ReactJS is used to create single page applications |
React Native is use to create multi-page applications. |
|
ReactJS is used when you want to build large scale applications |
React Native is useful for building small scale applications. |
|
ReactJS supports both server-side rendering and client-side rendering. |
React Native supports only client side rendering |
|
ReactJS can run on a single machine |
React Native requires at least two machines. |
|
ReactJS does not support animations |
React Native supports animation |
- In real DOM we have to manually update the state of each element whenever any change happens in the UI. Whereas virtual dom updates its internal representation automatically whenever there is any change in the data.
- The main advantage of real DOM is that it provides better performance as compared to virtual DOM.
- We need to explicitly set the style property of an element in real DOM but we don’t need to do so with virtual DOM.
- In real DOM we cannot directly manipulate the DOM tree structure whereas we can easily manipulate the virtual DOM tree structure.
- In real DOM we can add or remove child nodes whereas we can’t do this with virtual DOM.
- In real DOM we need to write code to handle events whereas we don’t need to write any event handling code in virtual DOM.
- In real DOM we don’t need to worry about browser compatibility issues whereas we need to be careful while using virtual DOM.
- In real DOM we should always use className instead of id attribute because if we use id then we will face problems while updating the DOM tree.
- In real DOM we must use refs to access the properties of the component whereas we don’t need them in virtual DOM.
- In real DOM we use inline styles whereas we don’t need these styles in virtual DOM.
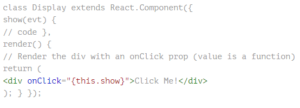
In React, everything is a Component. Every component is responsible for rendering the view. Each component takes care of updating itself based on the props passed to it.
In React, we use render() method to render components into DOM. We usually call render() method once during application initialization phase. In react there are 2 types of rendering methods – server side rendering and client side rendering. Server side rendering is generally used for large applications where data is fetched from backend API and rendered on frontend. Client side rendering is used for small scale apps.
Example: You need to show welcome screen on app launch. So, you can either render welcome screen on server side or on client side. For example, you can render welcome screen on client side like below.
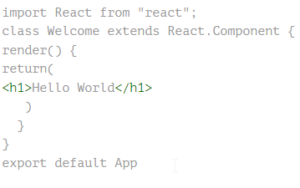
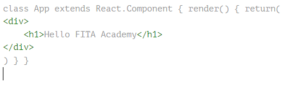
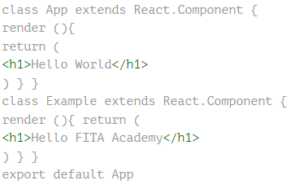
You can use multiple components inside another component. In this case, we are creating a simple Hello World app. We start off by importing React from’react’. Then we define a class called App. Inside the constructor function, we call super() and pass it our props. Next, we want to display “Hello World”. So we return a h1 tag.
import React from ‘react’
React components can receive data in two ways: props and context.
Props are data passed from the component’s immediate parent. They’re used to communicate information between different parts of a single application.
Context is a way to send data from one part of a JavaScript program to another. It works like a global variable—it’s accessible everywhere.
Data sent via context doesn’t come from anywhere else in the code; it’s just shared across everything inside a function.
With React Fragments, you can group child elements or components without creating nodes in the DOM. This makes it possible to add multiple elements in one place without having to create individual nodes.
In simple terms, sometimes we need a container to hold multiple components, but we don’t want to use a generic tag like a div.
An example would be displaying a list of items and styling each item differently based on the type of data it represents. But instead of nesting every item inside a div, we can use a fragment to achieve the same effect.
Fragment syntax is best described as an empty set of tags <></>or is made up of tags that are labeled React.Fragment.
As an alternative to HTML, it uses the JSX language.
The life cycle of ReactJS is very similar to other frameworks such as AngularJS.
Initialization- This is the first step when we initialize the application. Here we import all required modules and declare some variables.
Mounting- After initializing, we mount the components to the DOM. Mounting happens after the initialization process.
Updating- After mounting, we update the state of the component.
Unmounting- When we unmount the component, we remove it from the DOM. Unmounting happens before updating.
Deleting- We delete the component if there is no reference to it anymore. Deleting happens before unmounting.
Properties are one of the most important concepts in React. They are basically the props you pass to a component. It might be useful to display information about a person based on his name. In such cases, we use properties like `name` and `age`. We don’t directly set values to those properties; rather, we pass it to a function called `render()`, which returns a value. This value is what gets displayed.
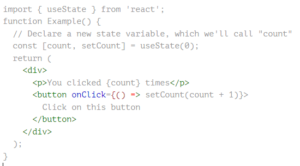
A property is just a variable that holds a reference to something else. For example, if I wanted to keep track of how many times someone has clicked on my button, I could do something like this:
“`jsx
const count 0;
function MyButton(props){
}
A state is an object that stores data for your application. It’s similar to a database or cache in other languages. The state can be changed by calling functions, but it will not change unless there is a reason to update it. Consider the example of a list of individuals with their names and ages. If you click on a person’s name, then the age should increase by 1. By storing the current age in the state and incrementing it when the user clicks the name of a person, you can achieve this.
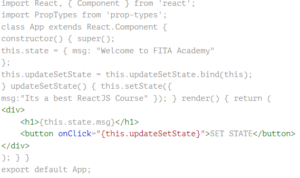
We update the state of our components with setState(). It is a primary method to update the UI in response to events like button clicks, form submissions, etc. In addition, it allows us to make asynchronous requests to the backend without worrying about updating the UI.
The setState() method takes three arguments:
- nextState – This argument represents the updated state object.
- updater – This function receives the current props and state values and returns the next props and state values.
- context – This optional argument provides access to the entire react context.
The difference between states and props is subtle. A state is something that you change frequently, like the current weather, whereas props are things that don’t change often, such as the number of likes on Facebook.
For example, if we want to store whether our app is running or not. We could use a Boolean variable called “running”. If it’s true, we’d set it to “true”, and vice versa. This is a state because it changes frequently.
However, what if we wanted to track how many times someone liked our app? We might do something like this:
let likes 0;
function updateLikes() {
likes++;
}
A stateless component doesn’t have any state of its own. Instead, it relies on props to determine what should be displayed.
For example, imagine a simple counter. The user starts at zero, and each time they click the increment button, the value increases by one.
This would require two separate components: a parent component that passes down the initial value, and an increment button. Each component would then need to update the state when clicked.
In contrast, a stateful component has its own internal state.The status is immediately updated when the user clicks the increment button.
An event is an action which happens as a result of a user action or system generated action like a mouse click, load of a webpage, pressing a key, resizing of a window, etc. In react, the event handling system works similarly to how it does in the DOM.
The event handling system is known to us as synthetic event, which is a cross browser wrapper of the browser’s natural event. This allows you to write code that works across browsers without worrying about browser specific quirks.
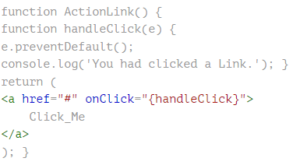
In React, we use functions to handle events. A function is called as event handler instead of passing strings. We call our event handlers with the syntax {eventName}.
Here’s a simple example of an event handler:
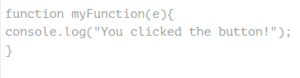
We can create an event as follow.
A synthetic event is an object that wraps up the browser’s native event and provides some additional functionality. For instance, it allows you to cancel the default action associated with the event. This makes synthetic events useful for creating custom controls or building reusable components.
Synthetic events are often used in conjunction with refs. When you’re working with refs, you’ll want to make sure that you don’t accidentally trigger a synthetic event. To do this, we recommend wrapping our refs in a synthetic event handler like so:
Controlled Components – An application component that is designed to perform a specific task without maintaining its internal state.
Uncontrolled Components – An application component whose behavior depends on its current internal state.
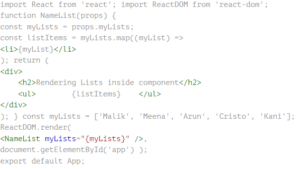
Lists are used to display data. They are very useful because you can navigate through the items of a List easily. You can add/remove items from the List and you can even sort the items.
Lists in React can be built in the same way that they are in JavaScript. Let us see how.
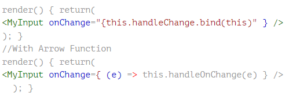
Arrow functions are one of the most exciting features of JavaScript recently introduced into ECMAScript 6. They enable us to write functional components without binding the context object to each method call. This lets us keep our code clean and easy to work with.
React developers love them because they allow them to write declarative component logic. We can easily define what we want our component to do. In addition, we don’t need to worry about creating closures, since every variable defined within the body of the function is scoped to the current execution context.
Here is how we can implement the same functionality using General methods:

Forms are used to ask users for information. Forms are usually used to gather information like name, email address, etc.
A form consists of two parts: input elements and submit buttons. The input elements are used to collect user input. The submit buttons are used to send that information to the server.
To make a form in React, we first render all the input fields and then add a submit button. When the user submits their information by clicking the button, it will trigger a callback function, which sends the data collected by the inputs to the server.
The following are the phases of a React component’s lifecycle:
Initial Phase: It is the birthplace phase of the React lifecycles when the component starts its way toward the DOM. This phase begins when you call ReactDOM.render() method.
In this phase, a component has no props nor state. All components have some default props and initial state. You can set up default props and initial state inside the constructor of a component like we did in our previous example.
Mounting Phase: In this stage, the instance of a react component is created and added to the DOM. This happens automatically when you render a react component.
Updating Phase: After mounting the component, it is possible to update the state or props of the component. This happens via setState(), setProps() methods.
React 16.0 introduces the concept of Pure Component. A pure component is a component that doesn’t mutate internal data structures. This helps you write less code and make better decisions about how to update your UI.
A pure component is similar to a class except that it does not extend from React.Component. Instead, it extends from React.PureComponent.
You can use the React.PureComponent to avoid unnecessary re-renders. For example, let’s say we want to render a list of items. We could do something like this:
This renders each item in our list, but every time one of those items change, the entire list gets re-rendered. If we used a regular component, this would cause the entire list to be rendered again.
Higher Order Component is an advanced pattern used in React JavaScript library. HOC is a type of function that takes a component as input and return a new component. If you want to understand what this mean, explained step by step.
In general, we use functions like map(), filter() and reduce(). These functions take one or many arguments and return a single value. For example, let’s say I’m building a web app where I need to display some data. Let’s say I want to show how much money each person makes. So I could write something like this:
This code works fine because we’re just adding up income values. But what happens when we have to do it again, but with different fields? We’d end up writing the same thing over and over again. This is where HOC comes into play.
HOC stands for Higher Order Component. A component is something that makes up part of the application. For example, a button is a component. Components can interact with each other. This is where HOC comes into play. With HOC, we can manipulate components. We can add props to it, change state, render it differently based on different conditions, etc.
- It allows us to reuse common logic across multiple components.
- It allows us to create reusable components.
- It allows us to encapsulate business logic within components.
- It allows us to compose complex components using simple ones.
- It allows us to easily test components without having to worry about rendering them.
- An element is a DOM node. You can think of elements as containers for content. Elements don’t have any behavior. They simply hold content.
- A component is a self-contained piece of functionality. Components contain both markup and behavior.
- The main difference between an element and a component is that a component has its own lifecycle.
- When you define a component, you give it a name. Then you pass it properties and methods that will help it behave.
In React, we can write single line comments as /* Single Line Comment */ with curly braces: {/* Single Line comment*/}. This is just like writing comments in JavaScript.
In React, it is necessary that you start the component name with a capital letter. This is because React does not recognize the lowercase version of components. So, it throws an error as an unrecognised tag.
If we start the component name in lower case, it will be treated as HTML tag.
This is because, in JSx, lower case tag names like div, p etc., are treated as HTML tags.
So, it is better to keep the naming convention consistent throughout the app.
In React 16.2 version, it was introduced. You could use Fragment inside another component. You don’t need to wrap every single child element into a div tag. Instead of creating one big parent container, you can break down your UI into smaller pieces called fragments. This way you can reuse those parts across different components.
For example, let say we want to display some text next to a button. We can write something like this:
render () {
return(
{/* Text */}
Fragments are fast. This makes them much faster to render and load than containers. A fragment is just a chunk of HTML code that you put inside another element. You can nest fragments inside each other, making it easy to build complex layouts without having to worry about breaking the structure.
You can think of a container as a box that holds something else. For example, a container could hold a sidebar, footer, or header. But you cannot nest containers within each other; you must always start over again. If you want to move a component out of a container, you must destroy the entire container and recreate it. With a fragment, however, you can simply drag the fragment around and reattach it to different containers.
React provides us a great way to validate our input fields and textareas. But we don’t want to write too much boilerplate code just to check whether the value is empty or not. Therefore, let’s have a look at how we may validate our inputs by utilising the built-in reactjs/prop-types package.
We will start with defining a simple form like this:

- Install Node.js on your computer.
- Open up the Command Prompt or Terminal window and navigate to the directory where you want to create your project.
- Type ‘npm init’ into the command prompt/terminal and hit Enter. This creates a file called ‘package.json’.
- In the file, type in the name of your project (‘hello world’) and press enter.
- Press Enter again to complete the process.
Create-react-app is a tool which helps you to quickly create new React applications. It uses webpack to bundle all the dependencies and then runs a script to generate everything needed for the initial development environment.
React is one of the most widely used JavaScript libraries. It makes building web applications easier than ever. In fact, it is being adopted by many companies around the world. React’s ability to reuse components is a defining characteristic.
This allows us to build complex applications very quickly. However, sometimes we need to update the values of our children components without having to pass down the entire data structure.
For example, let’s say we have a list of items where each item contains some information about itself. We might want to display the name of the item, but we don’t necessarily want to show the price of the item. But what happens if we want to edit the price later on? Now we need to go back into every single component and make sure we updated the price everywhere. And even worse, if we decide to delete the item, we need to remember to adjust the prices too. We need to use something called “refs” because of this. A ref is basically a pointer to a specific element within the parent component.
So, if we want to change the value of a child, we just set the child’s ref property to the same object as the parent’s ref property.
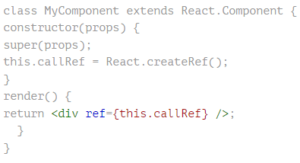
React provides several methods for creating references. If you’re looking for the most frequent technique, you can use the createRef method. This is typically done within the constructor function of a component.
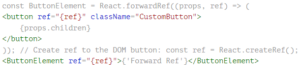
Forward Refs allow you to pass down a ref to a child component without having to manually set it up in every single one of those children. This makes sense because we don’t want to force our parent component to know about each individual child. Instead, we just tell it what type of ref to give out to each child. When we do this, we’re actually passing down a reference to the actual DOM element. So now we can access that element directly from anywhere else inside our app.
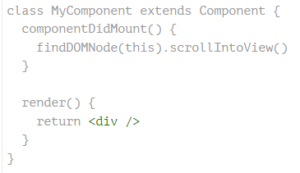
The preferred option is to use callbacks over findDOMNode(). This is because findDOMNode() gives you very little control over the lifecycle methods of the DOM node. For example, you cannot prevent the browser from reusing the same element instance across multiple components. With callback refs, however, it is possible to completely avoid such issues.
The ref attribute is used to return a JavaScript object reference to the component instance. This allows us to access properties and methods defined on the component class directly from our markup, without having to write any code. We can do this because the ref attribute returns a value that references the same underlying DOM node as the component.
Refs are useful for many things. For example, you could use it to manage focus, change styles, trigger imperative animations, or integrate with third-party libraries. You can even use it as a callback.
React Router is a standard routing system based on the React framework. It allows us to build dynamic web apps easily. In simple words, it makes our life easier while building the React application. We can use it to develop Single Page Web Applications.
We can use it to make different URLs in the same page. This technology is known as Routing. If we want to display some information about a particular product, we just need to specify the URL of that product. When the user visits that URL, he/she will see the desired products.
We need a Router to navigate our web application. A Router provides a way to define multiple routes within a single HTML document. We use it to render different components based on what route we are on. For example, you might want to show a list of items in one component, while showing a form in another.
The router does this by defining a set of paths that map to certain components. You can think of each path like a link that takes you to a different part of the app.
In most cases, you’ll just make a single path that maps to a root component. This component renders whatever is passed down to it as props.In certain circumstances, you may need to create a hierarchy of nested routes.
For example, imagine you’re building a blog post editor. The main component could contain all the fields for adding a new post. But if you wanted to allow editing individual parts of the post, you’d probably nest additional components under it.
You’d have a component called “PostEditor”, and inside PostEditor you’d have a component called Fields, which contains text input elements. And inside Fields you’d have another component called TextInput.
To support this type of structure, we need a way to tell the router where to go next. We call this process routing.
The commonly used framework for the development of single-page apps is called React Router. This framework helps you build rich internet apps (RIAs). With React Router, we can easily develop our web app without worrying about the state management.
Here are the major benefits of React Router. Let us start with the following points:
- Easier navigation
- Simple routing logic
- Reliable URL generation
- Easy to use
- Browser history support
In conventional routing, you have one main route and multiple sub routes. When you navigate to a URL like /about/contact/, it goes to the about component and renders the contact component inside of it. This works fine, but what happens if you want to add another feature inside of the contact component? You’d have to make a second copy of the contact component and put it inside of the about component. This gets messy very quickly.
React router solves this problem by having just one component called App. It takes care of rendering the correct components based on the current path. For example, if you’re on the root URL /, it’ll render the Home component. If you go to /about/, it’ll render the About component. And finally, if you go to /contact/, it’ll render the Contact component.
The cool thing about react router is that it doesn’t require you to write separate files for each component. Instead, it uses JavaScript classes to define components. Then, we use props to pass down data to our components. We don’t even need to worry about where those components come from because react router handles everything behind the scenes.
In fact, there are many reasons why one might wish to use the Switch component within a React application.
For example, let us say you wanted to render different components based upon whether the user is logged into your app. You could simply use the Route component and pass props down to each child component to determine what to render.
However, what happens if you want to add another feature to your application where you need to decide whether to redirect the user to a login screen? If you did not use the Switch component, you would end up rendering every possible route including those that lead to the login screen.
This is because the default behavior of the Route component is to render the next matching route. So even though you never intended to show the login screen to the user, the routing system would still attempt to load it. And since the LoginScreen component does not exist, it would fail. But now imagine how much simpler your code would look if you used the Switch component.

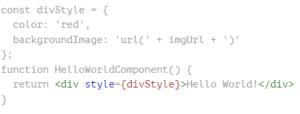
We can use the style attribute for styling in our React application. This allows us to add dynamic computed styles at runtime. In addition, it supports passing a JavaScript object containing key/value pairs. Let’s see how we can do that.
The style attribute accepts either a CSS string or a JavaScript object. If you pass a JavaScript object, it must contain keys in camelCase format. Each property value is assigned to the corresponding element’s style attribute.
We can style React component in mainly four ways, Which are given below:
- Inline styling- We can directly apply inline styling on any HTML tag using the style attribute.
- CSS stylesheets are used to apply custom styles to elements. They are written in CSS syntax and stored in separate files.
- CSS modules are similar to CSS stylesheets, except that it is compiled into one file. This helps us to reduce our bundle sizes.
- Styled components are very similar to styled components. But they are written in JavaScript language. So, you can write your code in JSX format.
CSS Modules is a new way to style components in React. Instead of creating separate files for each component, you import the styles into one file called.module.css. This allows you to reuse classes across multiple components.
In addition, you don’t need to use the “import { css } from ‘./myStylesheet’ syntax anymore. Just add “.module.css” to your stylesheets array in webpack config.
Styled components are a way to style React components using JavaScript and CSS. They use a technique called “enhancement,” where you write CSS inside JavaScript functions and pass those functions into another function that applies styles to elements. This allows you to write reusable code without having to worry about how it affects other parts of your app.
Hooks allow you to write reusable components that don’t require classes. You can think of it like mixins, except they’re built into the language itself. They provide a way to add logic to existing functional components. In other words, they let you do things that aren’t possible with just functions alone. Let’s see what exactly they are.
End Summary
To help your career as a ReactJS Developer. ReactJS Interview Questions and Answers are important as they will give you an idea of the type of questions that might be asked during an interview. This will help you prepare better for the interview. This information will equip you with the tools necessary for success in the ReactJS Developer Field. Use this information to solidify your understanding of ReactJs and boost your confidence when interviewing with ReactJs experts. So, if you’re ready to take your development skills to the next level, be sure to check out FITA Academy’s ReactJs course.
Supplementary resources
Java is a powerful programming language that can be used in combination with ReactJS to create sophisticated user interfaces. You can find the best Supplementary resources for learning ReactJS and working with Java, including Java Tutorials, tools, and code samples.
If you are new to ReactJS, we recommend starting with our Training program. Once you have some experience working with React, check out our tutorial on creating basic user interfaces with React and Java. Alternatively, if you want to learn more about the specific features of ReactJS, or salary packages, consider reading our blogs on Freshers Salary.
Finally, if you’re looking to build something more our Java interview questions and answers offers a variety of questions related to Java. React js can be used in the frontend and backend of a web application. The React library is an open-source JavaScript library for building user interfaces.
