
Overview
Selenium is a popular open-source automated testing tool for testing web applications across several browsers. Do you ever wonder what it was about Selenium that made it the top automated testing tool on the market? Don't worry, our Selenium Tutorial series has covered everything. Now, coming back to the question, years ago, in the Web development domain, endless time was spent on testing a web application to ensure that a newly created application is completely functional outside the development environment too. Back then, the test scenarios were entirely different where a group of Manual testers would conduct several test case scenarios to ensure that the developed Web Application is completely fault-tolerant and secure to use.

Getting a Web Application to that level not only incurred a huge amount of time but also manpower and capital resources. It affected ROI and overall delivery quality. This is where Selenium Testing came into play. With Selenium, enterprises were able to address major testing challenges such as functionality, compatibility, performance, security, and user interface experience.
In recent years, newer automation tools like Playwright have also emerged, offering faster execution and modern features for cross-browser testing. However, Selenium continues to remain a widely adopted framework in the automation testing domain.
Upon implementing the Selenium testing practices, the organizations were able to enormously reduce the time frames that are taken for testing an application. Further, they were able to ship bug-free and new releases frequently with immediate feedback and solutions. And this is one of the significant factors that made Selenium an integral part of the automation testing domain. A Selenium testing tool is capable of testing the Web applications over a myriad of Web browsers like Chrome, Safari Opera, Firefox, and much more. Apart from this, you can use any of the programming languages like Perl, Java, PHP, Python, or Ruby to test the codes. Further, it is a platform-independent tool and that means you can easily deploy Selenium on Linux, Windows, and Macintosh.
Having said that, here in this Selenium Tutorial session, we will help you to have an extensive understanding of the Selenium tool, its advantages, and its suite of tools that are used in various testing scenarios along with examples and explanations.
Intended Audiences: This Selenium Tutorial series is compiled in the aspect to aid both the Beginner and Testing professionals to have a clear understanding of the Selenium testing suite. This Selenium Tutorial series encompasses all the important topics which are mandatory for a Professional Selenium Tester.
Prerequisites: To comprehend the Selenium Testing tool at a faster pace, it is preferable to have a sound knowledge of any of the programming languages - Perl, Java, Python, PHP, and Ruby. However, it is not mandatory.
Getting Started with Manual Testing
In this Selenium Tutorial for beginners, before getting deep into Manual testing and the challenges involved in it. Let us have a clear perspective on what software testing is and then proceed with Manual testing and its use cases.
Software Testing: It is the method of evaluating the functions of a software application with the objective to find whether the software that is developed has met all the primary needs of a user. Also, to assure that the developed product is bug-free and defectless.
Manual Testing: It is the method of testing any software manually to identify the defects. Generally, a Tester should have the attribute of an End-user & make sure that every feature in the developed product functions by guidelines that are set in the requirement document. And here in this process, the testers execute the test cases manually and thus generate the test report without the support of any automation test tools. The different kinds of Manual Testing are:
- Black Box Testing
- White Box Testing
- System Testing
- Unit Testing
- Acceptance Testing
- Integration Testing
Places to apply the Manual Testing methods
Exploratory Testing: This kind of testing is primarily performed by domain experts. These testers just perform the testing function by examining the functionalities of an application without knowing its requirements.
Usability Testing: This type of testing is done to check whether the developed application is user-friendly or not. Also, it is done to test the user experience and check the comfortability level of a user while using the application. An example of a good application is one that has self-exploratory features without having to guide its users on its operations separately.
Ad-hoc Testing: It contradicts the formal method of testing. We can also state that it is an informal type of testing. In the Ad-hoc method of testing, the testers haphazardly test an application without following the testing design techniques and document guidelines. This kind of testing is mainly performed when the knowledge of testers about the application is comparatively high. And to do this, the tester just randomly tests the application without having to know about the test cases or other business requirements that are specified in the document.
Where can we apply the Manual Testing method?
- You can apply the Manual Testing method when the project is at its initial stage of development
- In case if you are required to perform the Adhoc and Exploratory testing is required to be performed
- When the project span is short and where the writing scripts would be time-consuming if you compare them with the Manual testing
- In case if the test cases are not automatable
Merits and Demerits of Manual Testing
Merits of Manual Testing
- It could be performed on all types of applications
- It is highly recommended for shorter life cycle products
- When the applications are required to be tested manually before automating them
- In the newly designed test cases and the cases that have to be only executed manually
- It is highly recommended in the projects where the requirements keep changing frequently and where the products of the GUI changes persistently
- When it is affordable in terms of initial investment while considering the Automation testing
- When it needs less expense and time to start a productive manual testing
- It permits the testers to execute the ad-hoc testing
- There is no requirement for the tester to know any automation testing tools
Demerits of Manual Testing
- Limited Scope
- Time-Consuming
- Chances of risk of error are higher
- Need the presence of a tester 24/7
- It needs Manual creation of logs
On considering all these drawbacks, there was an increasing need for automating the testing process. And here is how the Selenium came as the rescuer of the testers.
What is Selenium?
Selenium is a free, open-source tool for evaluating Web applications across several browsers. Selenium is capable of testing only web applications. A Selenium can not test the Mobile and Desktop applications. Selenium Training in Chennai at FITA Academy supports the students of the Selenium Course with comprehensive training of the Selenium suite and its applications in real-time practices.
The reason behind the growing popularity of Selenium
- The tests shall be coded in different programming languages like Python, PHP, Java, Perl, and Ruby.
- Selenium is easier to use as it is primarily developed using JavaScript.
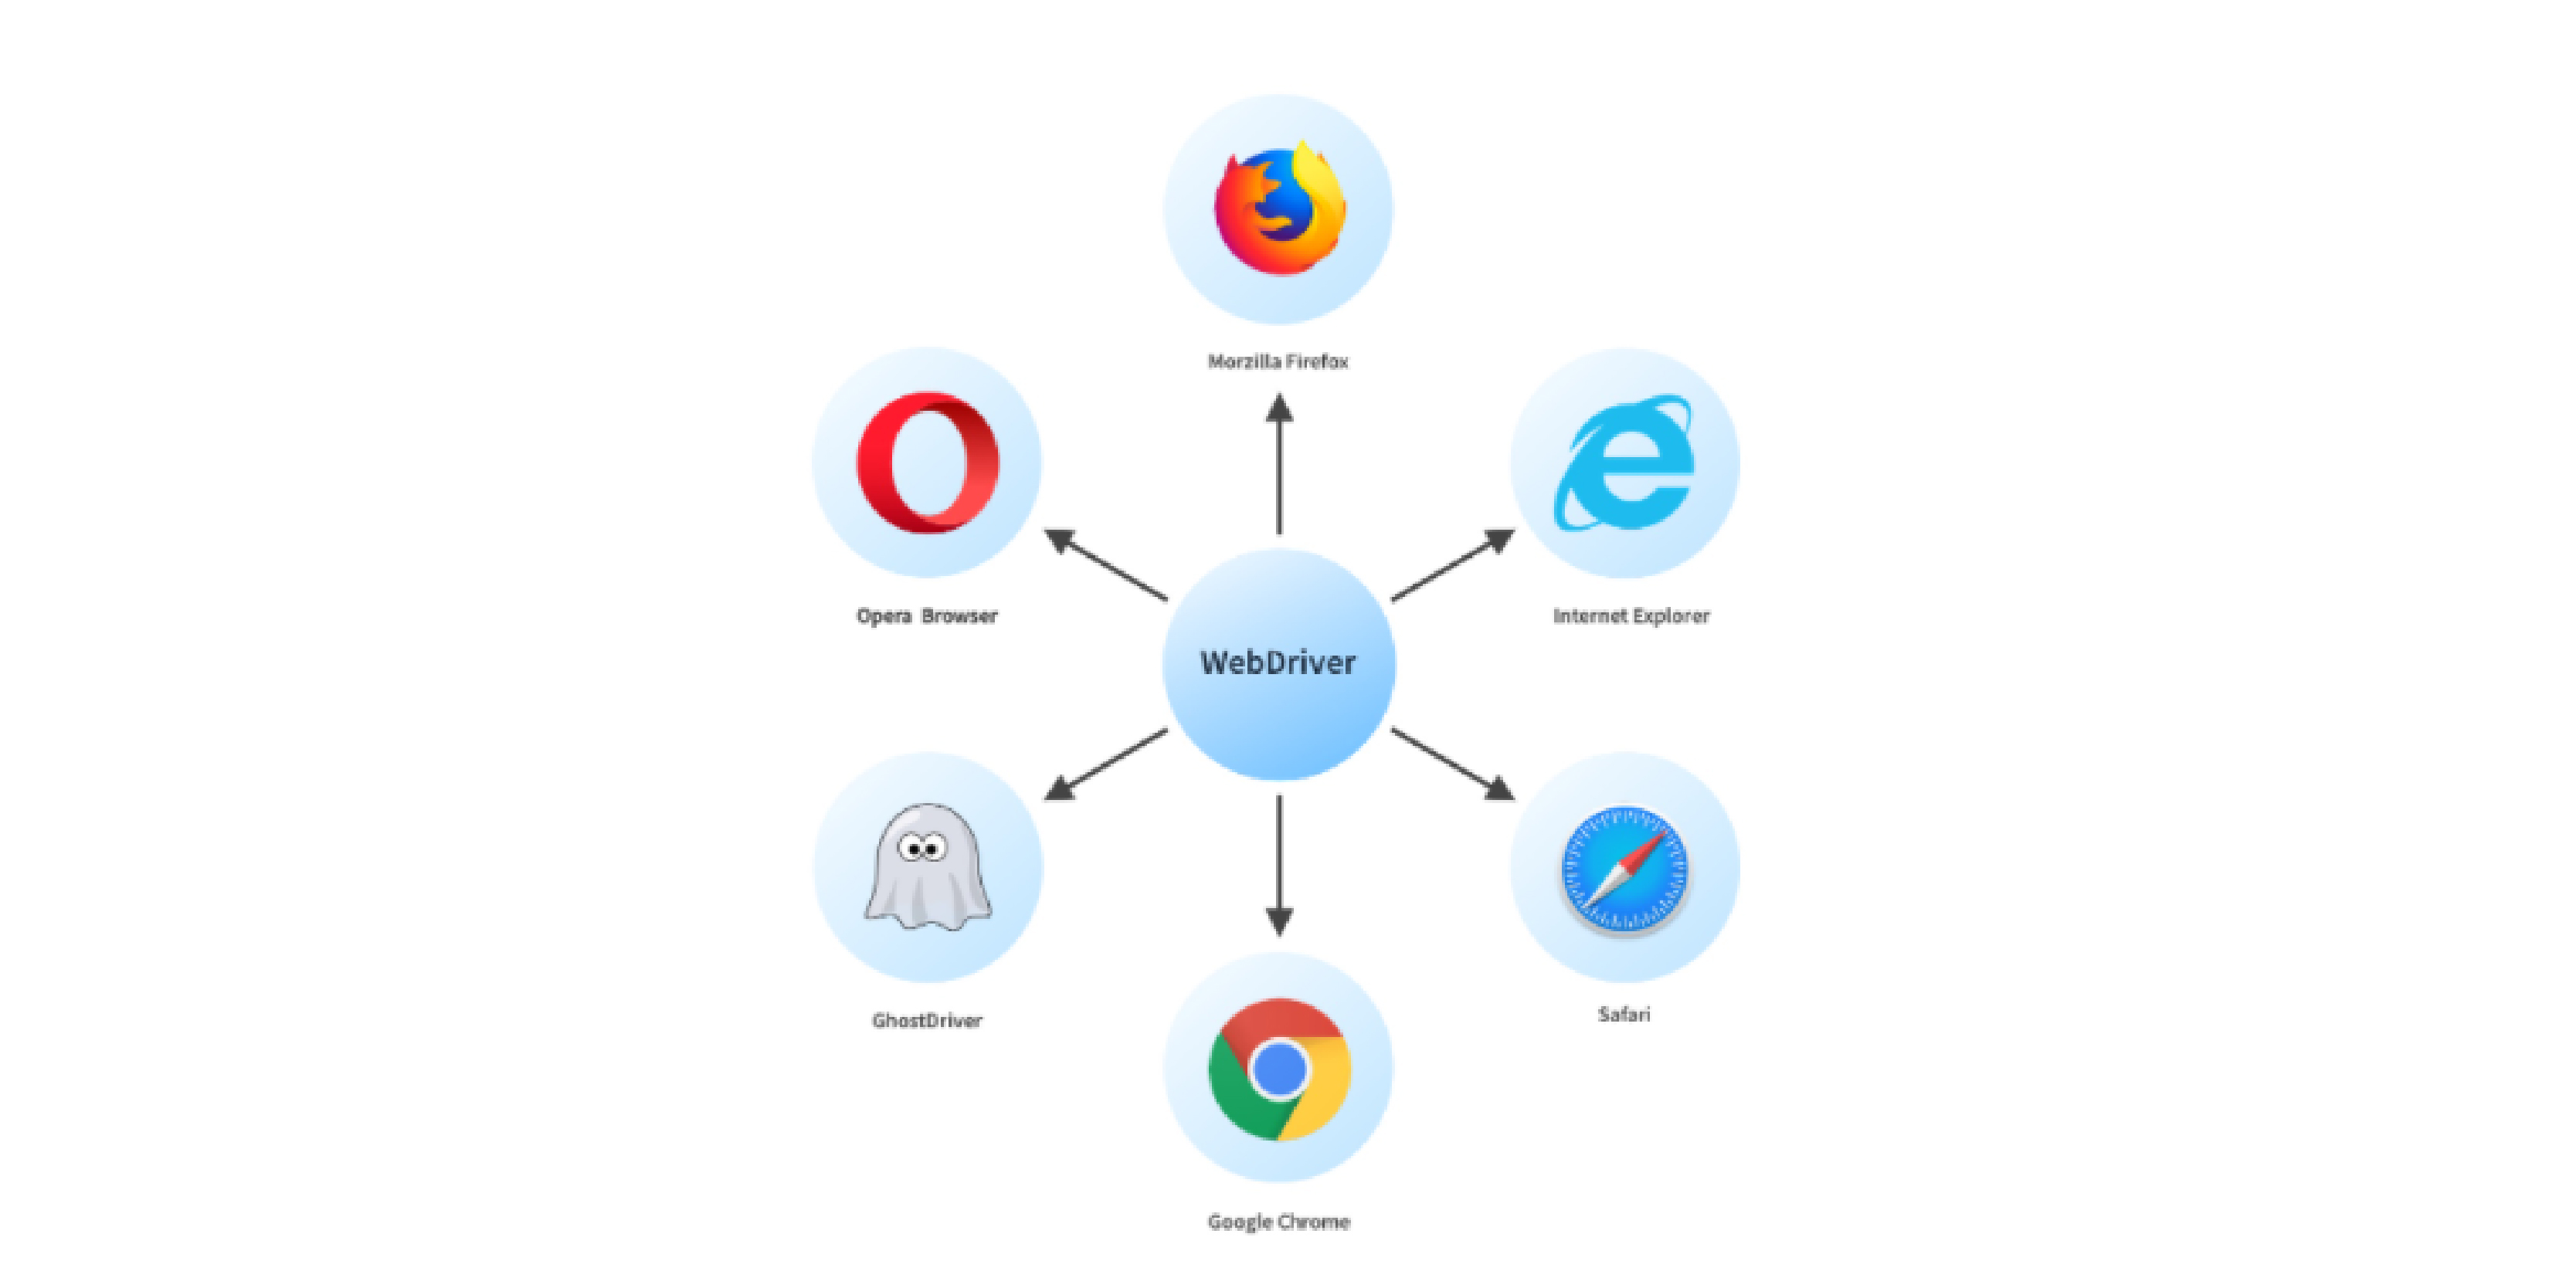
- Selenium shall test the Web applications over different Web browsers namely Chrome, Safari, Opera, Firefox, and Internet Explorer.
- It is a platform-independent tool and it could be deployed on different platforms namely Windows, Linux, and Macintosh.
- Selenium could be easily integrated with the tools namely TestNG and JUnit for test management.
Important Terminologies of Selenium
Here in this Selenium Tutorial before proceeding with Selenium Architecture and its Components. Firstly, let us become familiar with the important concepts that are associated with Automation testing.
Automation Testing: This kind of testing makes use of specialized tools. Automation testing is devised in the manner to test applications without the intervention of humans. The Automation testing tools shall access the test data and they can control the execution of the tests. Also, it is possible to compare the current result over the anticipated test result. Therefore, we can easily generate detailed test reports of the developed application under this test. Enrolling in a Selenium Training in Trichyhelps learners understand how these automation tools work in real-time testing environments and how to efficiently implement them in software projects.
Automation testing helps in covering both the functional and the performance tests of the application.
- Functional automation: The practice of automating functional test cases is referred to as "functional automation". For instance - Regression tests where it is repetitive and could be automated.
- Performance Automation: It is mainly used for automating non-functional performance test cases. For instance - Assessing the response time of an application under a certain load (100 users).
Automation Testing life cycle
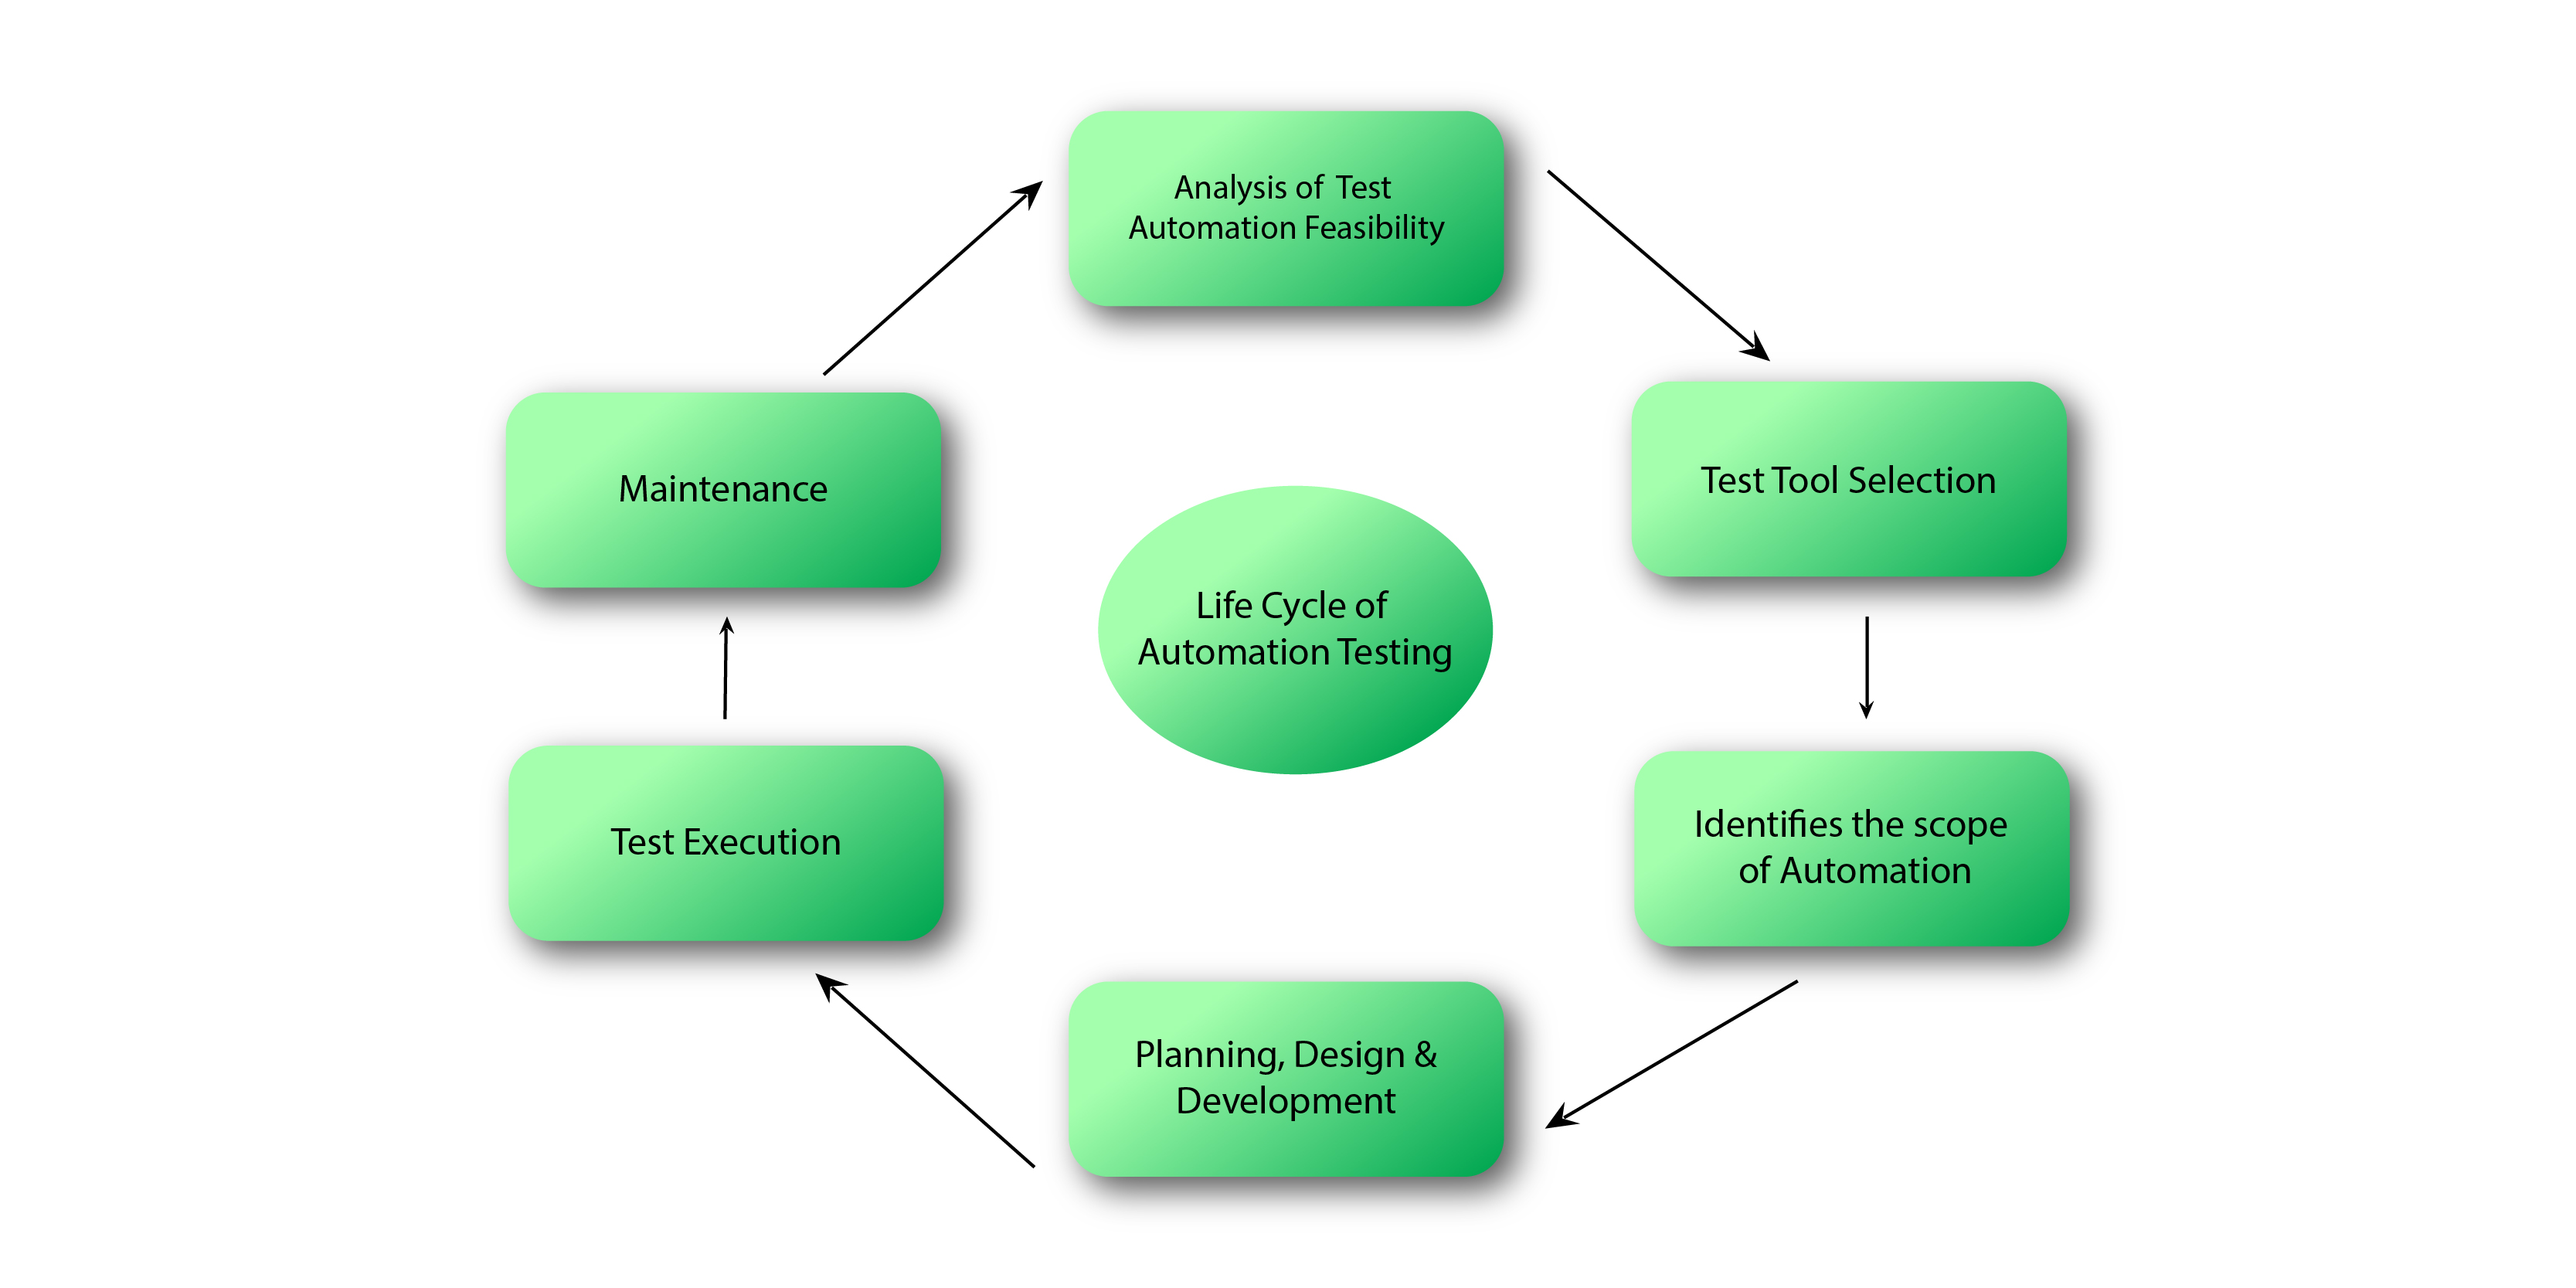
The above is the image of the Automation Testing life cycle. Now let us see in-depth that Why Automation testing is needed?
- Automated Testing is highly beneficial for large-scale enterprises. As it is often considered an expensive tool for the smaller organizations to implement.
- The key benefit of the Automated testing tools is that they can be easily programmed for building and executing testing scripts at a certain point in time without having to involve human intervention.
- With an automated testing method, you can easily start the testing overnight and then analyze the results of the automated test the very next day.
- The pre-defined and pre-recorded activities will be played back by the automated testing program.
- It also supports the feature of frequent regression testing.
- It offers rapid feedback and suggestions to the developers.
- It offers limitless iterations of test cases and execution.
- It supports its users with detailed and neat documentation of all the test cases.
- The Automated test helps in generating customized defect reports.
- It is less error-prone while considering manual testing.
Selenium Suite of tools
The Selenium has a dedicated suite of tools and it helps in easing the process of Web applications and they are
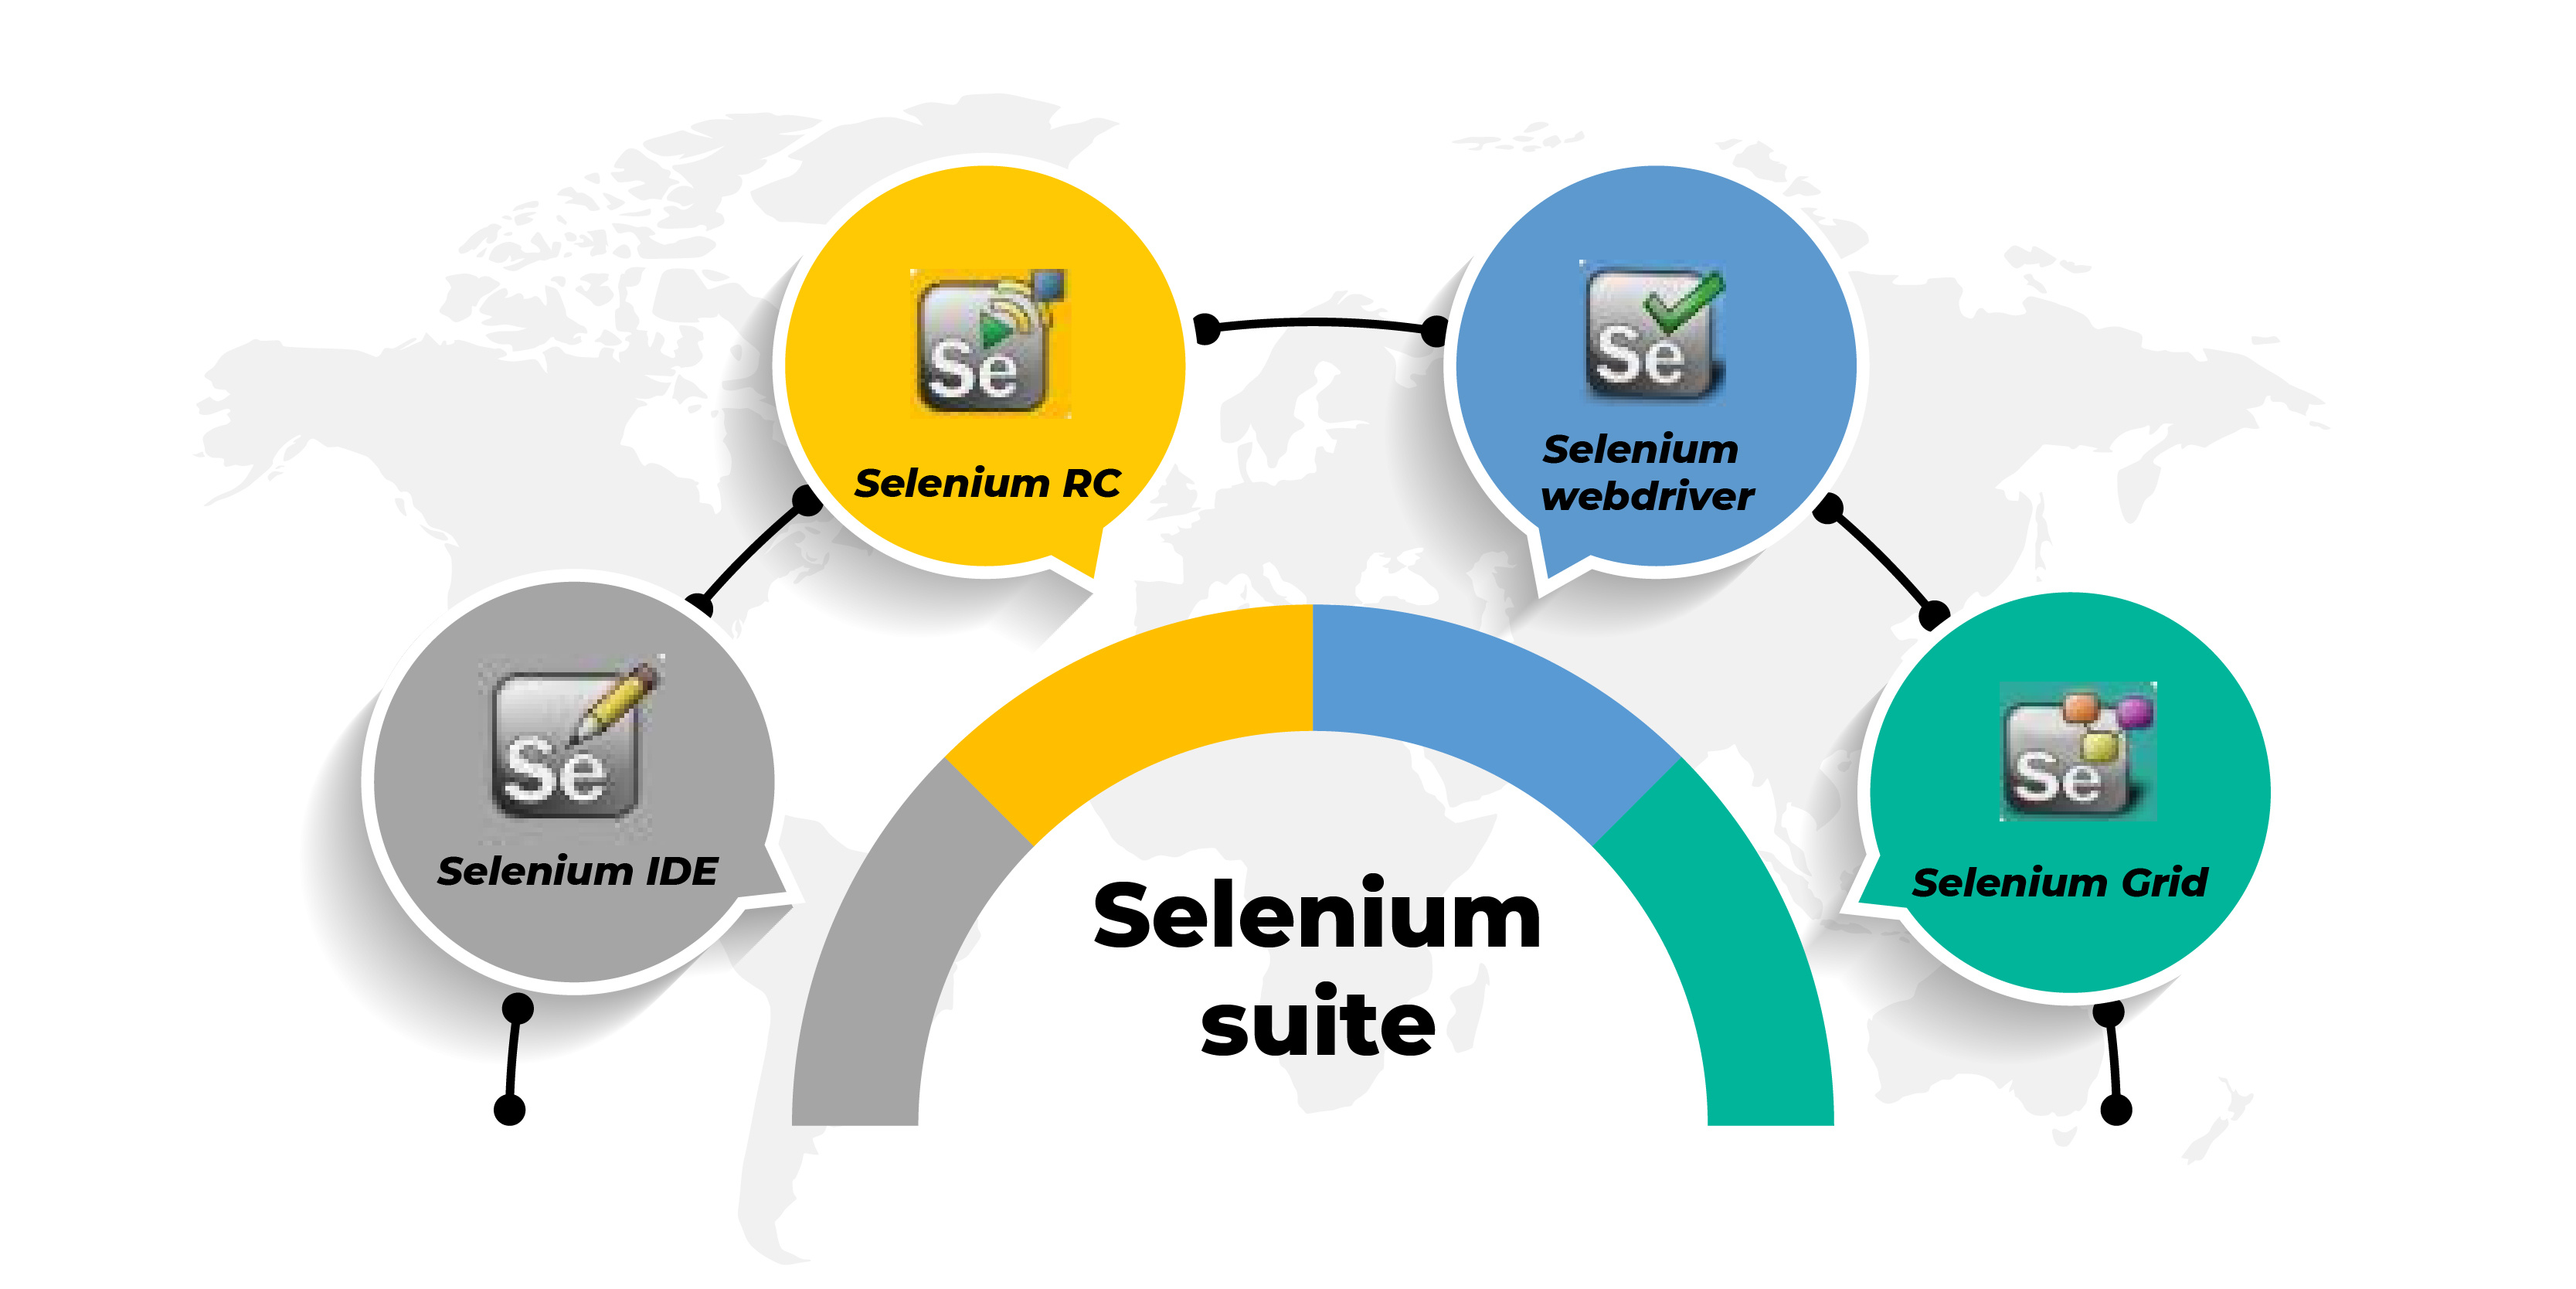
- Selenium IDE - Integrated Development Environment
- Selenium RC - Remote Control
- Selenium Web Driver
- Selenium Grid
Selenium IDE - Integrated Development Environment
It was developed by Shinya Kasatani in 2006. The Selenium IDE is the browser extension of Chrome or Firefox and it helps in automating the functionality. Generally, the IDE records the User Interaction on the Browser and it exports them as the reusable script.
The IDE was developed to boost the pace of the creation of the automation scripts.
It is one of the rapid prototyping tools which is used by Engineers who have no programming language.
Recently, the Applitools rewrote all the old Selenium IDE and released its latest version in the year 2019. The current version came with numerous advancements.
- It supports both Firefox and Chrome
- It enhances the locator functionality
- It supports in Parallel execution of tests by using the Selenium Command Line runner
- It supports its users with the feature of control flow statements
- It immediately waits for the pages to be loaded
- It supports the Embedded JavaScript code-runs
- The IDE has the debugger that permits adding breakpoints and step execution
- It also supports Code Exports
Selenium Remote Control
It was developed by Paul Hammant. Before knowing in-depth about the RC first let us know how RC first came into the play. Firstly, a tool called Selenium-Core was developed. The Selenium-Core was a compilation of JavaScript functions that executed and interpreted the Selenese commands by utilizing the JavaScript interpreter that was built-in the browsers. The Selenium-Core was later injected into a Web browser.
Now, just consider the JavaScript test.js that is used byGoogle.com. This program shall access pages like google.com/login or google.com/mail that are found within the google.com domain.

But, the program could not access the elements of the other domains namely Yahoo.com and Internet Explorer. The Local copies of the Web browser and Selenium-Core should be installed so that it ascertains to the same domain. It is called the "Same Origin Policy" and to address this limitation the Selenium RC was introduced. The Server acts as the Client configured HTTP proxy and "tricks" a browser to trust that the Web Application and Selenium Core are being tested and that it belongs to the same origin.
Thus, Selenium RC is the Server that is written in Java to provide its users for writing the application tests in the different programming languages namely PHP, Perl, Python, C#, and Java. The RC Server also accepts the command that is received from the User program and it shall pass on them to the browser as the Selenium-Core JavaScript commands
Selenium WebDriver
Selenium Web Driver was developed in 2006 and it was founded by Simon Stewart. It's the first cross-platform testing framework that can set up and manage browsers at multiple levels of OS. It is used as the programming interface that is used for creating and running the test cases.
In contradiction to the Selenium RC, the WebDriver will not need any core engine namely RC, and it interacts intrinsically with the browser applications. The WebDriver also supports different programming languages namely Python, PHP, Ruby, Perl, and they could be easily integrated with various frameworks namely JUnit and TestNG for test management.
The Architecture of the Selenium WebDriver is easy and simple to comprehend:
Selenium Test Script: It is the test code that could be written in any of the programming languages like Python, Perl, PHP, or Java and it could be easily understood by a driver.
JSON Wire Protocol: The JSON Wire Protocol offers the transport mechanism to share the data among a server and client. The JSON Wire Protocol serves as the industry norm for different Web services
Browser Drivers: Selenium generally uses the drivers that are distinct to all the browsers for constituting the secure connection within browsers.
Browsers: The Selenium WebDriver enables different web browsers for running and testing the application.
Selenium Grid
Patrick Lightbody created the Selenium Grid. The Selenium Grid was developed with the aim to reduce the complete execution time. It was promoted by distributing the test commands on different machines at a time. A Selenium Grid permits the function of parallel execution of tests on various Operating systems and browsers. The Grid is especially extensible and it blends easily with the other suite of components to process simultaneous execution.
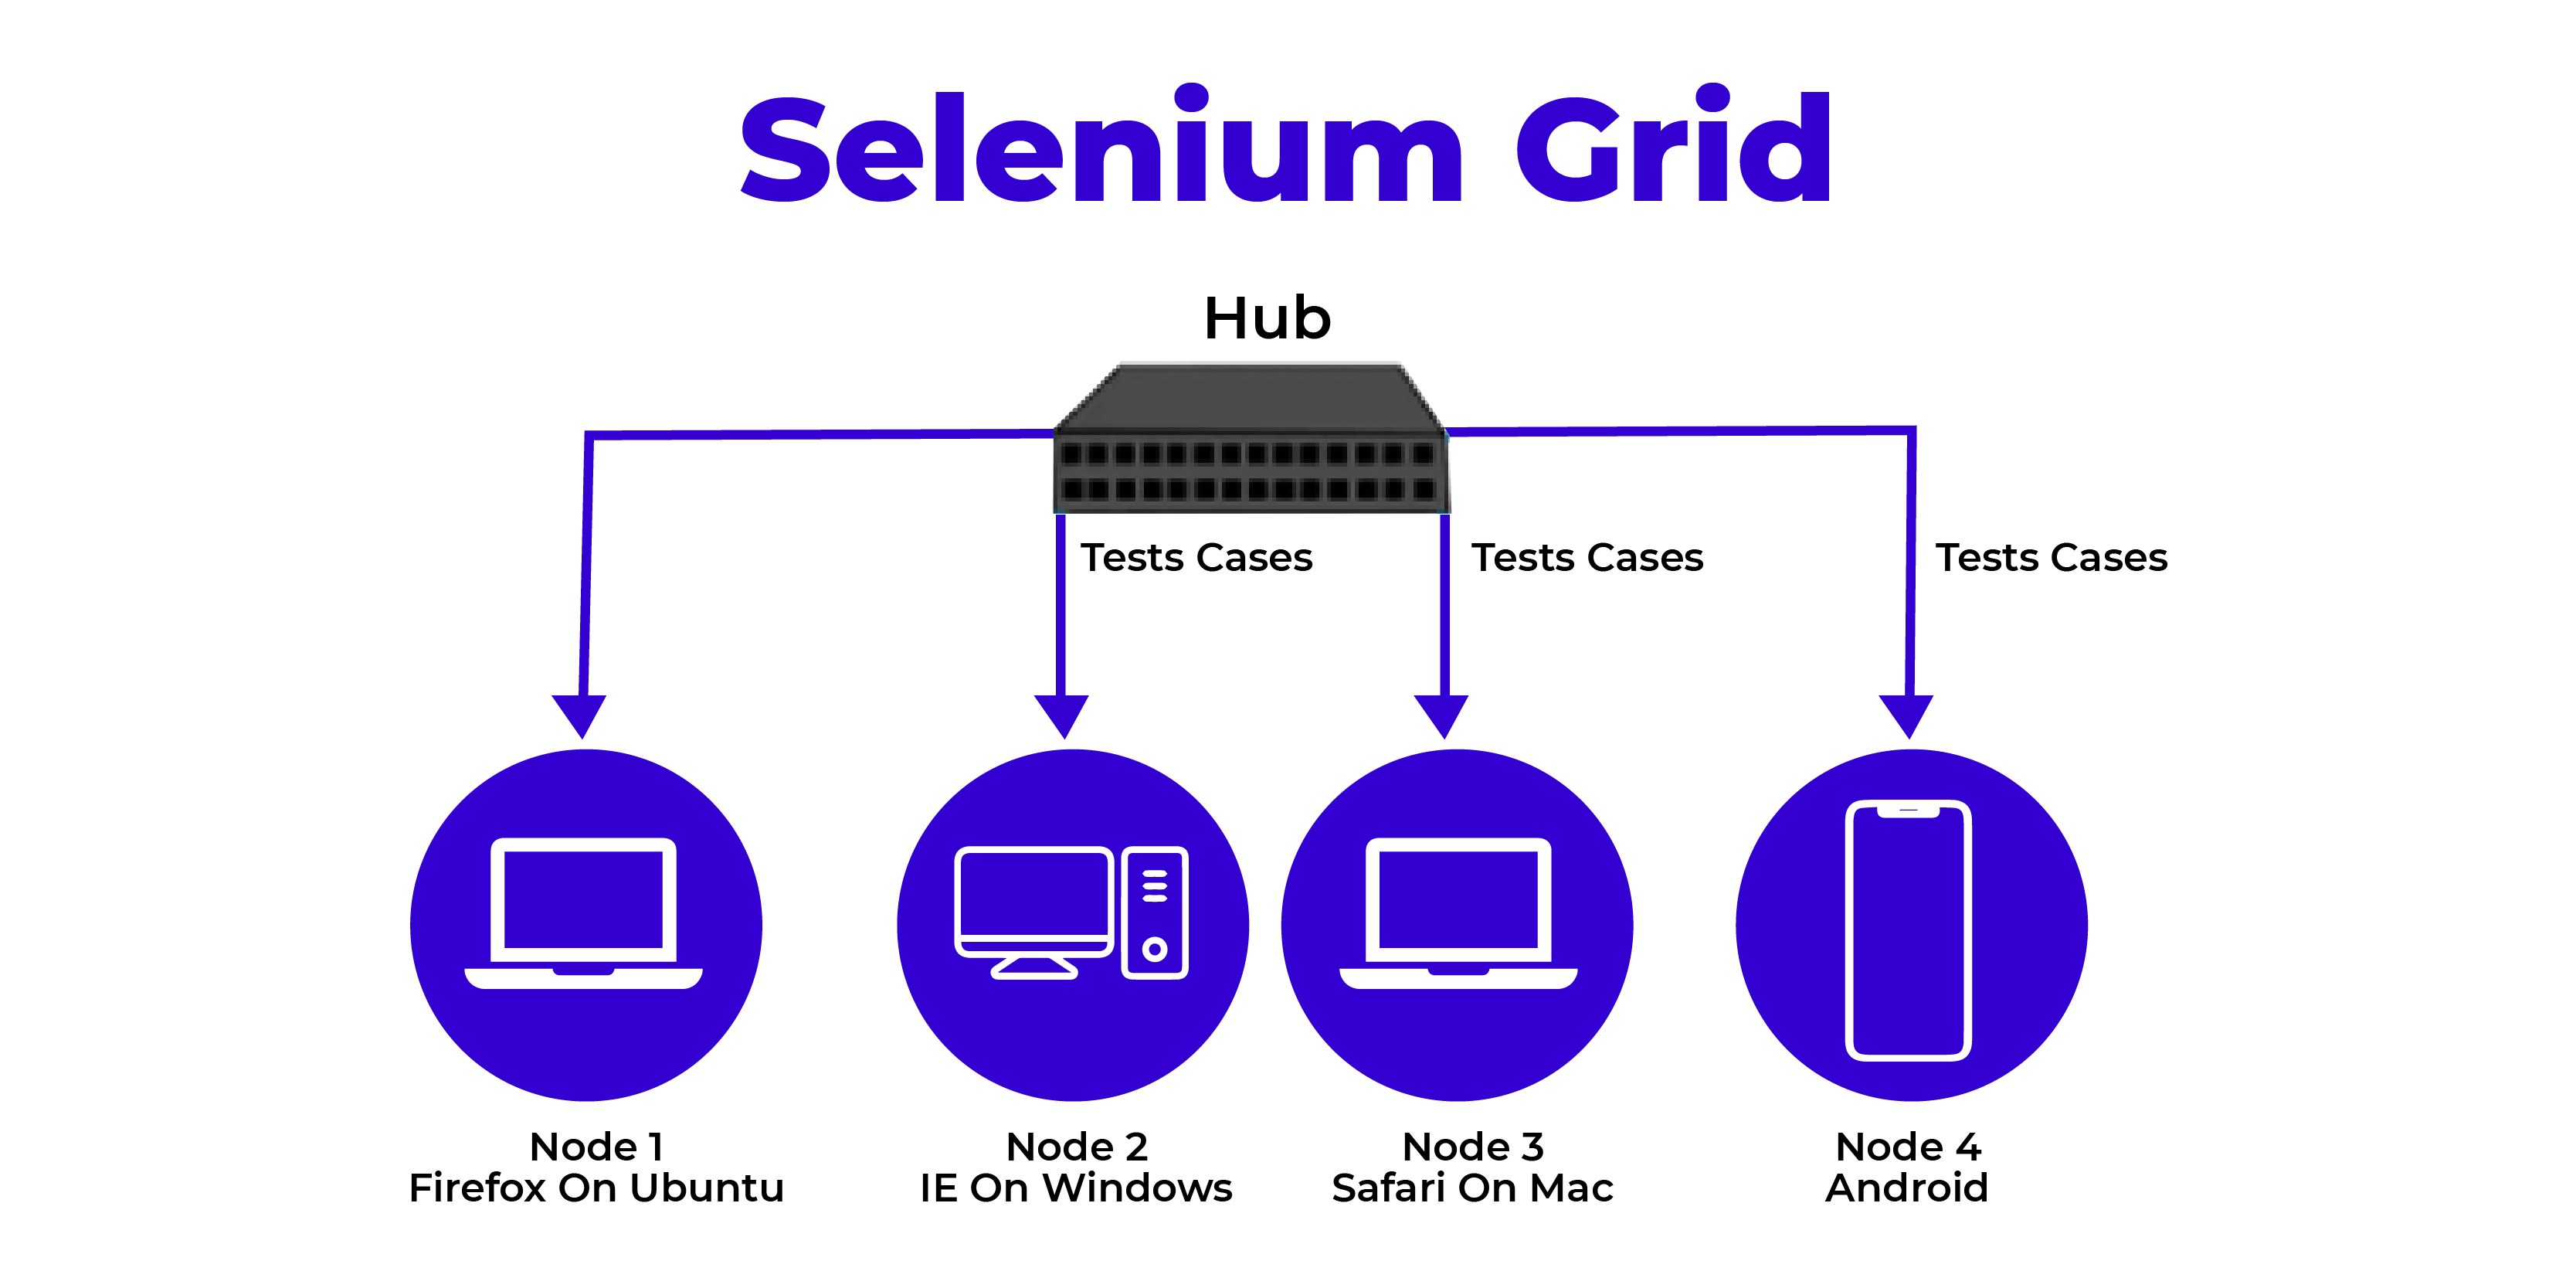
A Grid inherits the hub that is connected with different nodes. It accepts the tests that have to be executed with the information with all the OS and Browsers that should pick and run the node which affirms the respective requirement and it passes on the test to that specific node. The browser is now running on the node, and the selenium commands are being executed within it.
Having seen the different Selenium suites, let us now have a short glimpse at the upsides and downsides of Selenium Testing.
Selenium Testing's Advantages
- The Selenium Automated testing offers numerous benefits like
- It is proven authentic along with the results that make it highly reliable
- It is open-source software and it can be learned by anyone who desires to learn it at free of cost
- Selenium testing concepts can be implemented easily and it does not need any specific qualities or knowledge to implement it
- Selenium has numerous add-ons and re-usability
Downsides of Selenium Testing
- It is open-source and yet its developer community is not that active and resourceful
- We can not use Selenium to test the desktop and mobile applications
- Selenium provides only limited support to perform image testing
- It has restricted support for test management. And this is the major reason why it is generally integrated with tools such as TestNG and JUnit for this intent
- Also, you need to have an idea of the programming languages for using Selenium
Selenium IDE
Selenium IDE is the Open-source and Web automation testing tool that is utilized under the Selenium suite. Selenium IDE does not ask for any programming logic for writing their test scripts when compared to the Selenium RC and WebDriver. Instead, you shall effortlessly record the interactions with the browser for creating the test cases. Consequently, you shall use the playback option for the purpose of re-running the test cases.
Further, creating the test cases on the Selenium IDE shall not need the knowledge of any programming language. However, while using the Selenese commands related to running the script, having the idea of JavaScript shall prove to be useful for you to apprehend the concepts at ease.
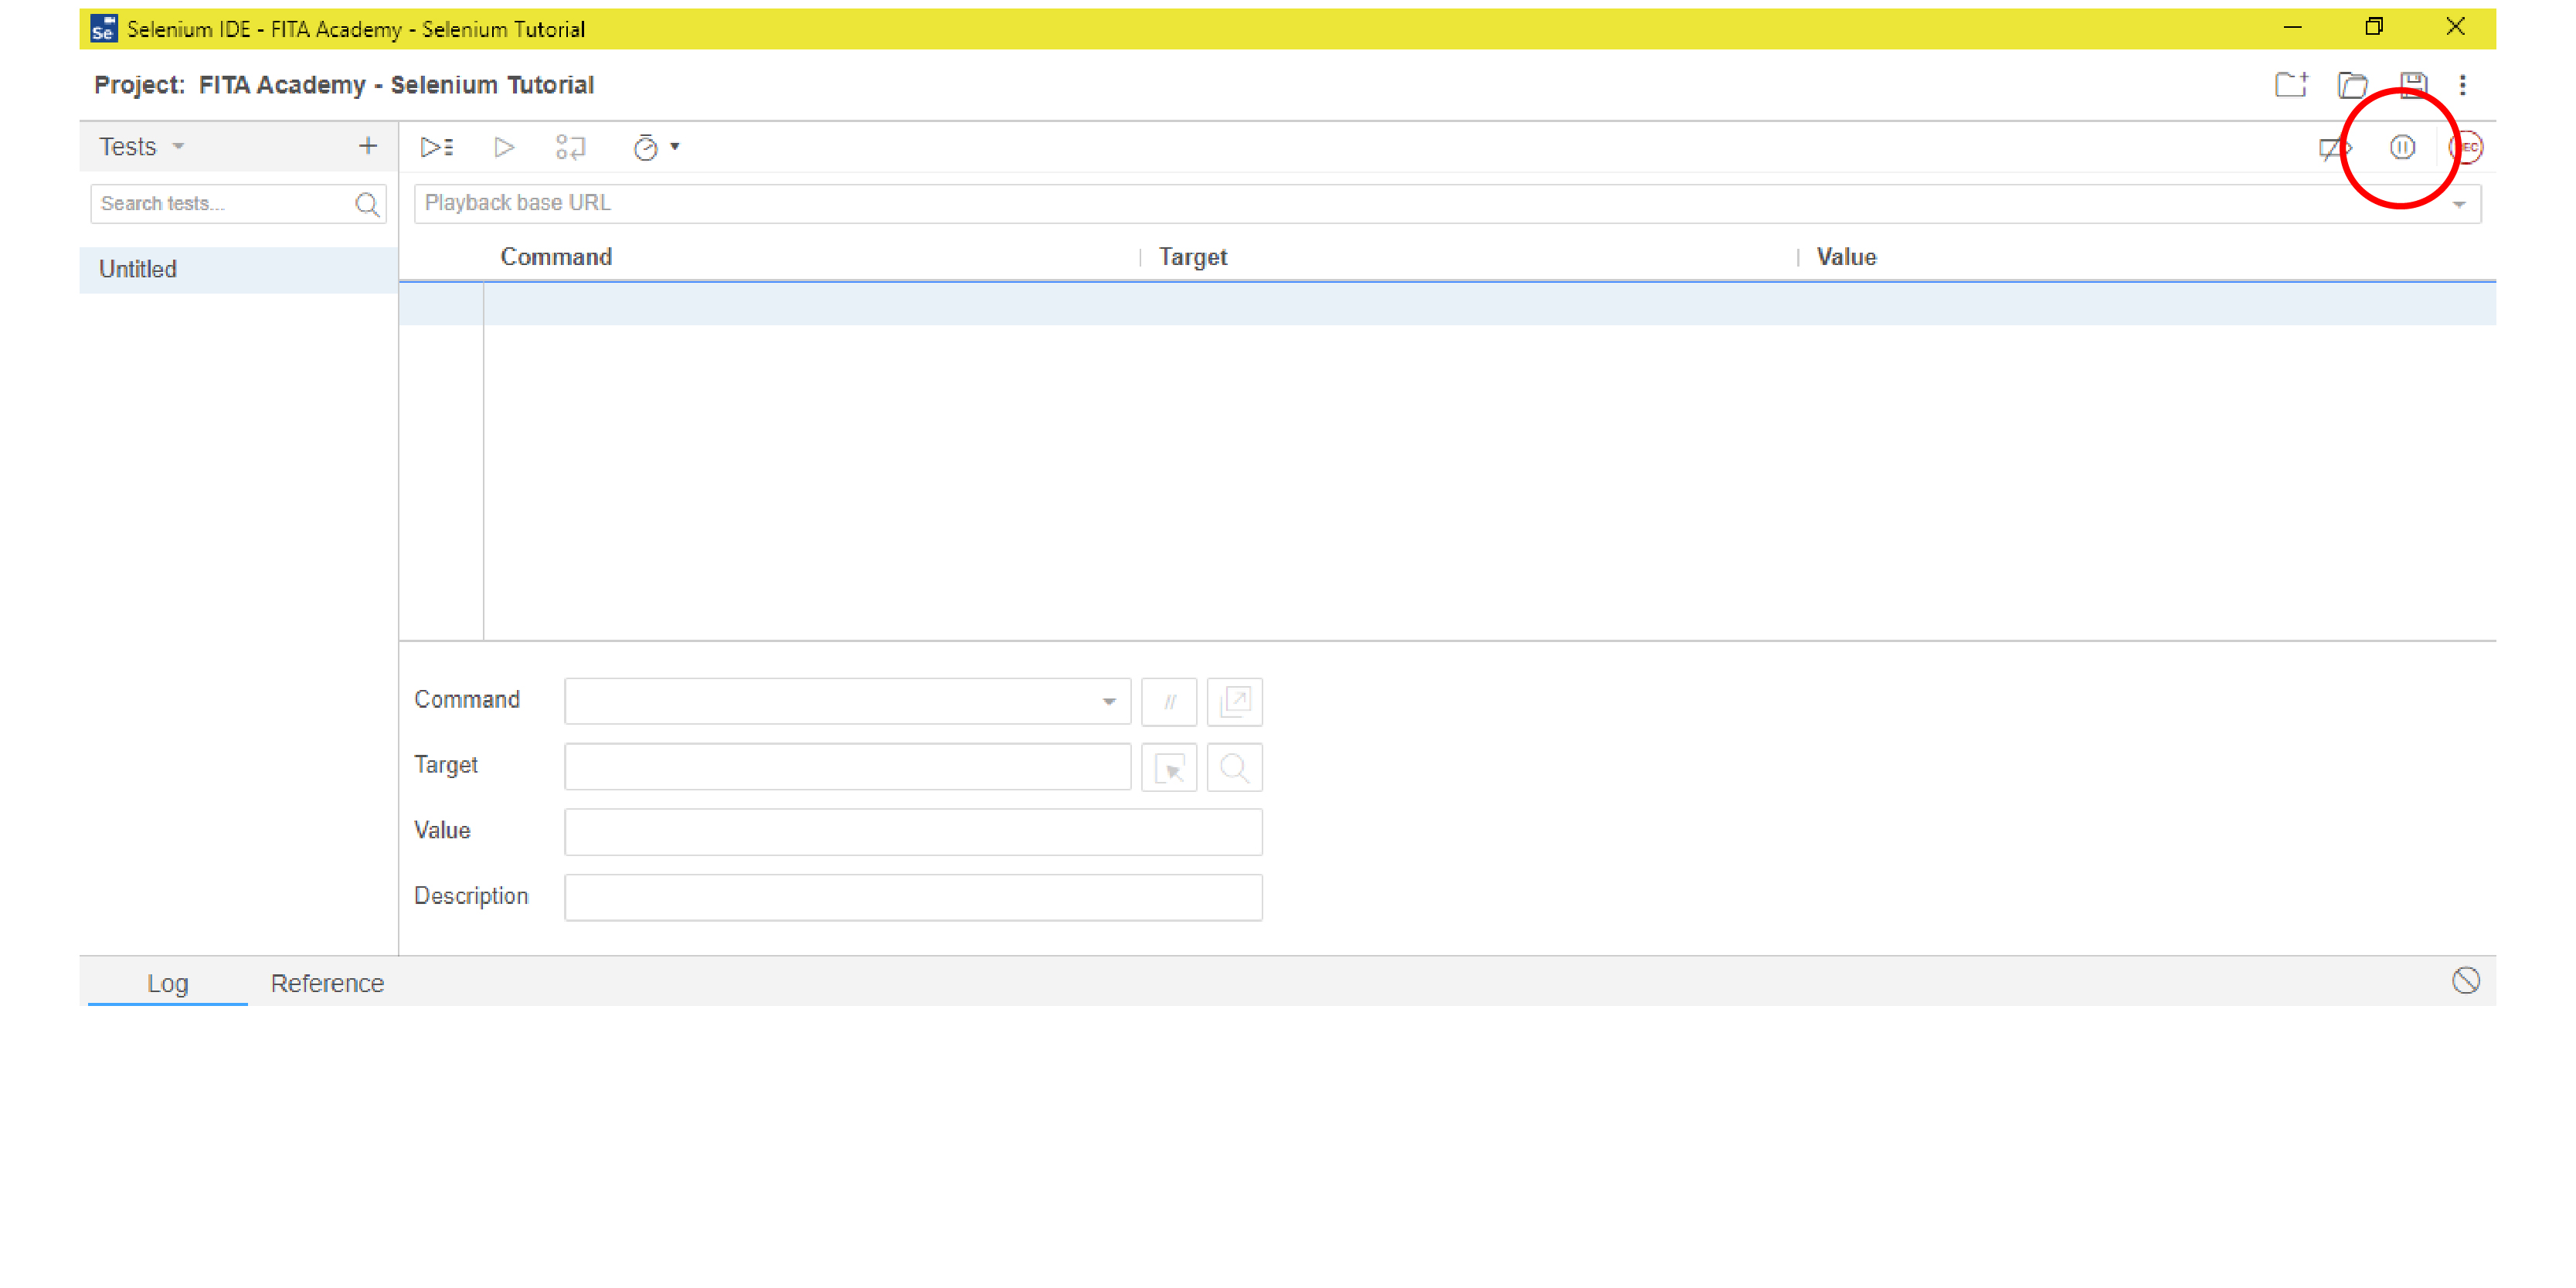
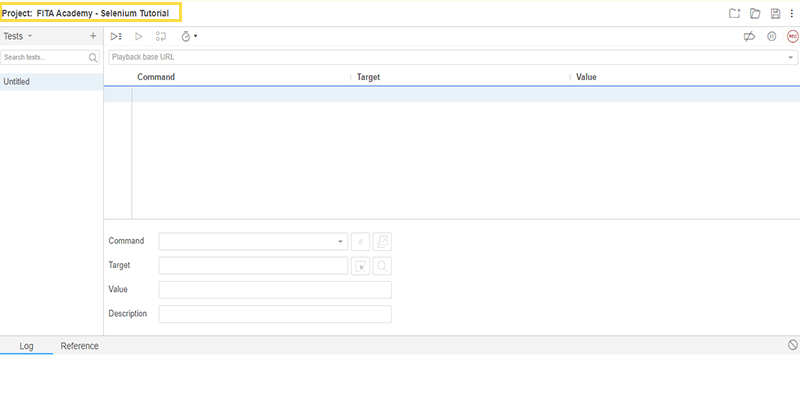
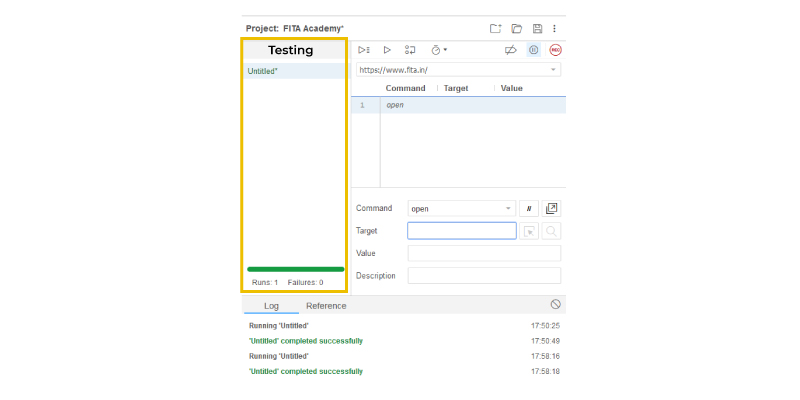
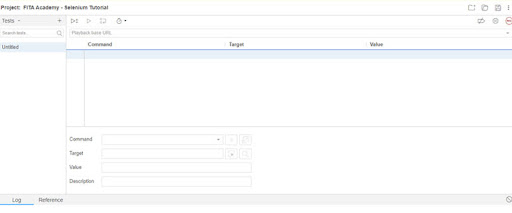
Selenium Notes: A Selenium IDE is found only in the Chrome Plug-in and Mozilla Firefox. It states that it is impossible to record the test cases on browsers other than Chrome and Firefox. In addition, test scripts must be exported to programming languages like Java, Ruby, C#, or Python. The default Selenium IDE interface is depicted in the figure below.
We have just given the title for the project as FITA Academy - Selenium Tutorial.
Selenium Online Training at FITA Academy aids the learners of the Selenium program to have a clear notion of the Selenium suite from its basic to advanced level under the guidance of Expert Mentorship.
Selenium IDE Installation
As Selenium IDE is found only on the Chrome plug-in and Firefox, you can download them easily. You can also download the most recent version if you don't have it.
We presume you already have Mozilla Firefox installed on your machine because Selenium IDE is only accessible as a Firefox and Chrome plug-in. You can, however, download the most recent version of Firefox from their official website, which can be found at the link below.
https://www.mozilla.org/en-US/firefox/new/
Download and Installation of Selenium IDE
Step 1: Download Firefox on your computer.
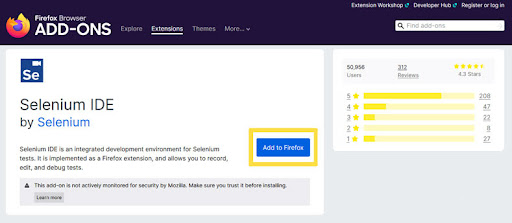
Step 2: Now go to https://addons.mozilla.org/en-us/firefox/addon/selenium-ide/ and it will take you to the official Firefox add-on page.
Step 3: Select "Add to Firefox" from the drop-down menu.
Step 4: Now, you can see a pop-up dialog box that appears on your screen. It also asks you to add the Selenium IDE as an extension to your Firefox browser.
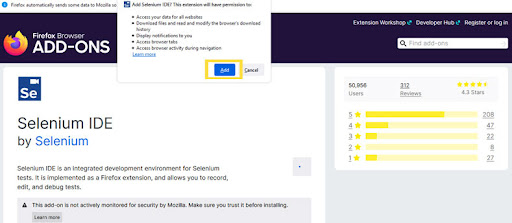
Step 5: From the drop-down option, choose "Add."
Step 6: Now is the time to restart your Firefox browser.
Step 7: Go to the upper right corner of your Firefox browser and look for the Selenium IDE symbol.
Step 8: Now click on the Selenium icon "SE" to download Selenium IDE

Selenium IDE Features
The Selenium IDE is divided into various components and here in this Selenium tutorial, we have enlisted the important features and their functionalities. Below are the Seven important components of the Selenium IDE
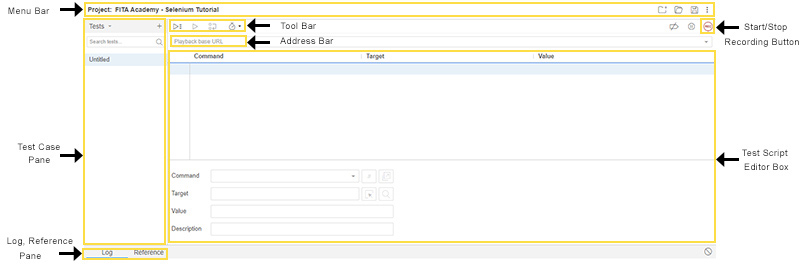
- Menu Bar
- Toolbar
- Address Bar
- Test Case Pane
- Test Script Editor Box
- Start/Stop Recording Button
- Log, Reference Pane
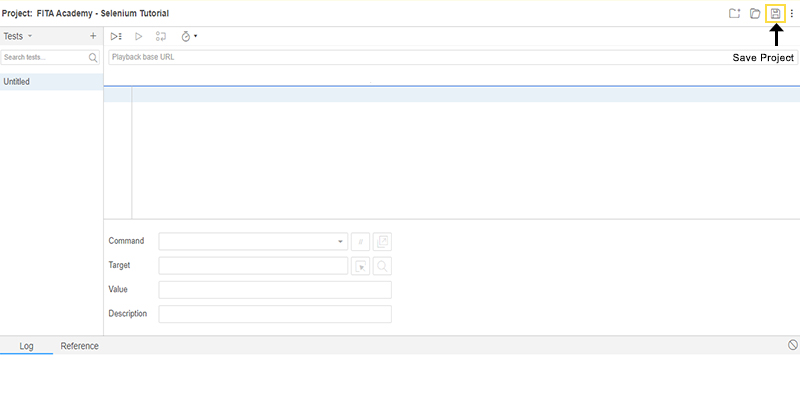
Menu Bar: It is positioned on top of most parts of the Selenium IDE interface. Here you can give the title of your project. Also, it permits you to rename it at any point and how much every time during the complete span of the project. The generally used Menu bar includes
Open Project: It allows you to Open a project. Also, it permits you to load any of the existing projects from the drive (personal drive)
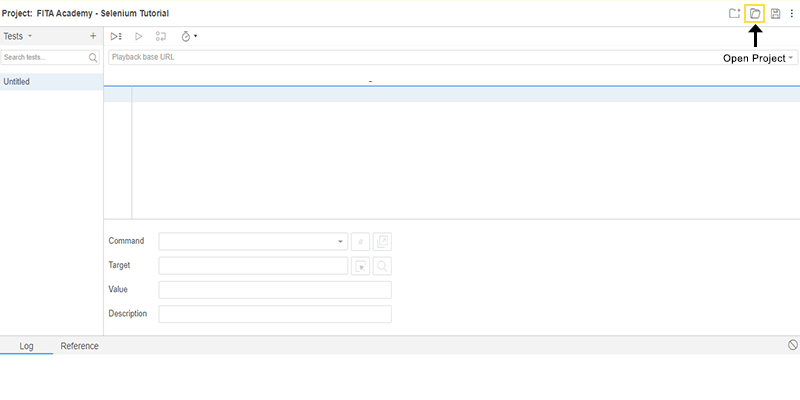
Save Project: It permits you to save the complete project on which you are presently working.
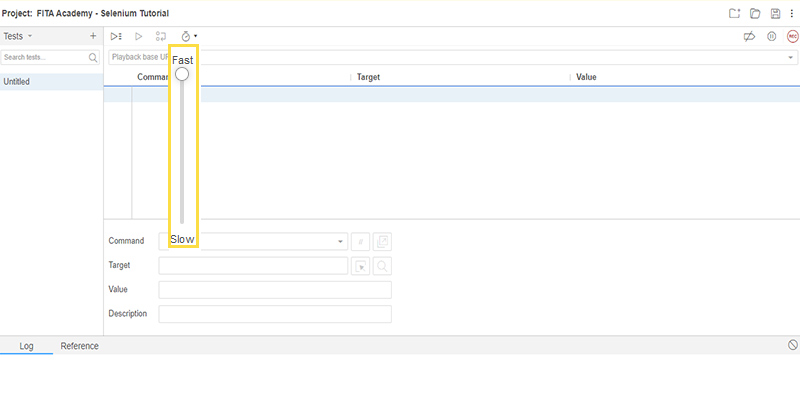
Toolbar
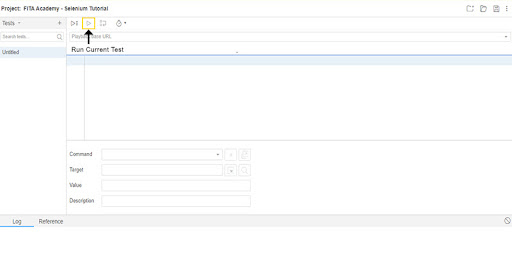
A toolbar consists of the modules that are used for controlling the execution of the test cases. Further, it provides you the steps and features to debug your test cases. The generally used modules of a Toolbar are as follows.
Speed Control Option: It permits you to manage the execution speed of the test cases.
Step Option: It permits you to "Step" via the test case by running one command at a time. It uses debugging test cases.

Run Test: It permits you to run the currently chosen test. When you have only a single test loaded then the " Run Test" or " Run all" all the options have the same effect on it.
Run all: This option permits you to run the complete test suite when the test suite is with different test cases loaded in it.

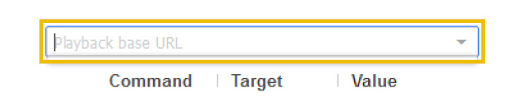
Address bar: This factor gives you the dropdown menu that recognizes all the previous values of the base URL. In short, a Base URL is nothing but the Address bar that retains the websites that were visited by you previously so you can locate them easily later.
Test Case Pane: It is the module that consists of every test case which is recorded by IDE. In a Nutshell, it enlists all the previously recorded test cases at the same time beneath the test case pane so you shall easily drag them among the list of test cases.
Under the Test Case Pane, you shall see that the test execution derives a summary that consists of the pass/fail status of numerous test cases.
A Test Case Pane comprises features namely Navigation panel and it permits the users to locate between test suites and cases.

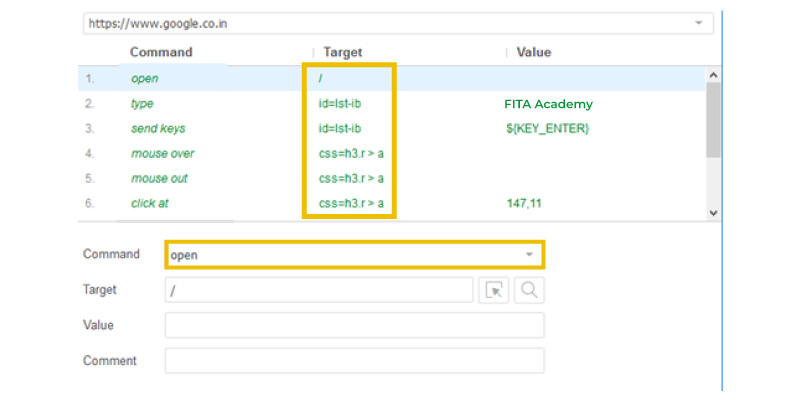
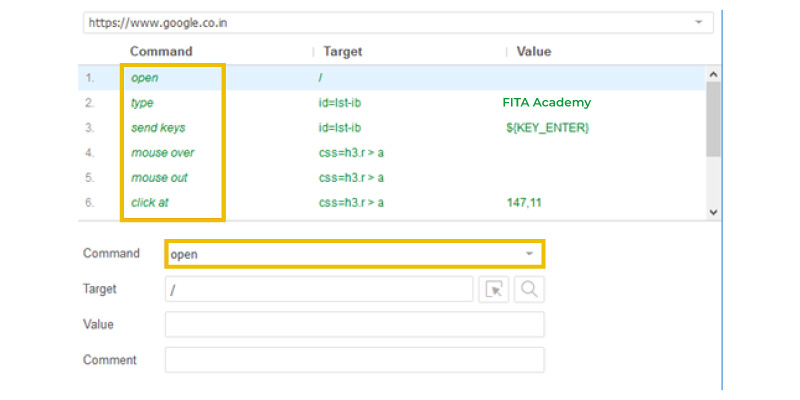
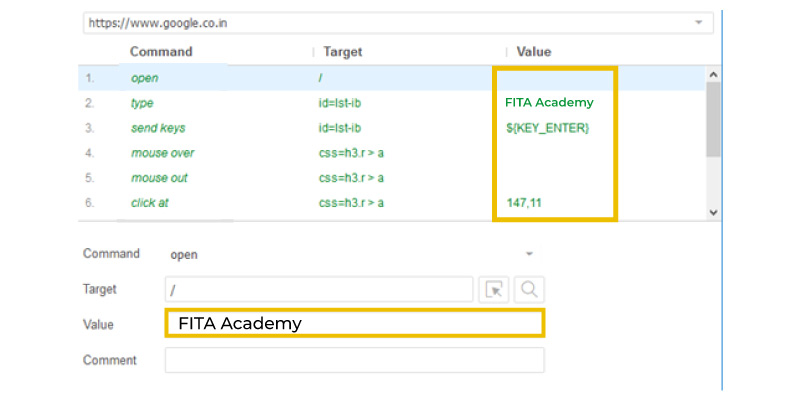
Test Script Editor Box: It showcases all the user interactions and test scripts that were registered by the IDE. All the User interactions are depicted on a method in which it is performed. Generally, an Editor box is divided into three and they are Target, Value, and Command.
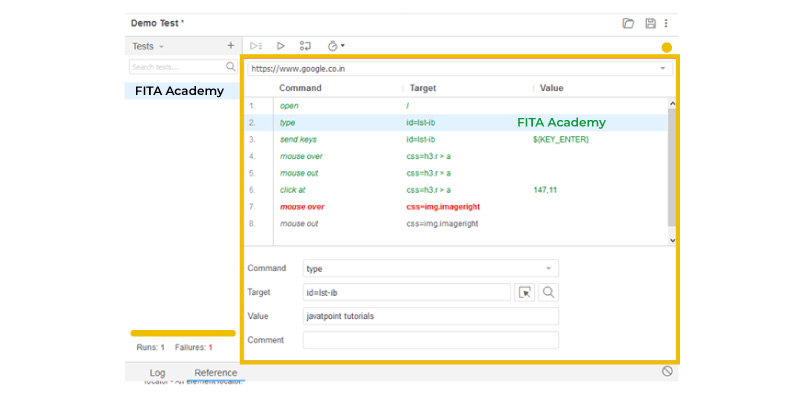
Command: It is recognized as the definite action/operation that functions on the browser elements. For example: When you open the new URL, a command will "open'. When you tap on the button or link on a web page, a command will be clicked.
Target: It particularizes a Web element in which the operation should function in addition to the locator attribute. For example, When you click on the FITA Academy, then the specific target link would be opened.
Value: It is generally considered an optional field. It is used when you must send some of the specific parameters. For example, when you plan to type the Email address and the Password in the text box, then the value consists of the substantial credential.
Start/Stop Recording Button: A Record button helps in storing all the User actions that are found within a browser.

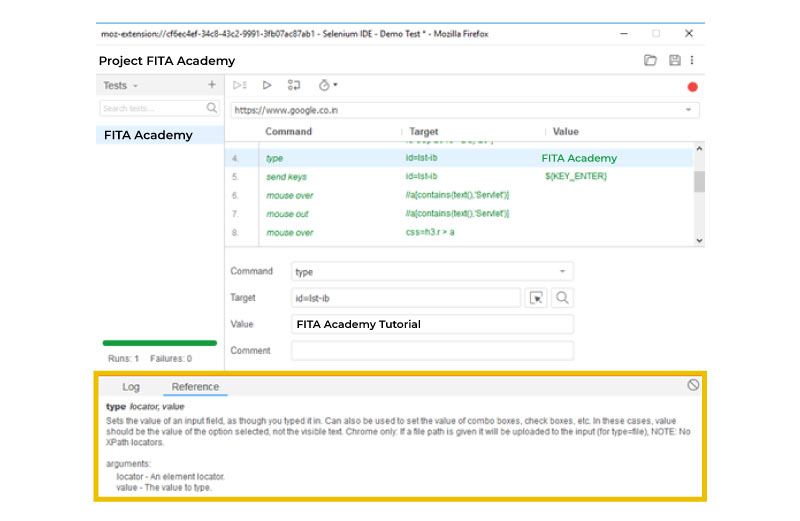
Log Reference Pane: A Log Pane allows you to display the complete runtime message that takes place at the time of execution. It offers real-time updates for all the actions that are performed by IDE. It can be grouped into four different types: error, info, warn, and debug.
A reference Pane demonstrates the complete information of presently selected Selense commands that is found on an editor.
Creation of your First Test Case in Selenium IDE
Here in this Selenium tutorial module, you will be able to have a clear understanding of how to create a fundamental test case in the Selenium ide.
The complete test script creation process in the Selenium IDE could be divided into three major steps and they are
- Recording - (Here you can record all the User Interaction with a Browser)
- Playing Back - (With this option you can execute all the recorded scripts)
- Now you can save all the test suites
As we get into the details in the Selenium testing tutorial, you will know how the above three important steps are implemented.
Recording
Step 1: Install Firefox on your computer.
Step 2: Hover your mouse over the Selenium icon in the upper right corner.
Step 3: Now, it shall download the default interface of the Selenium IDE
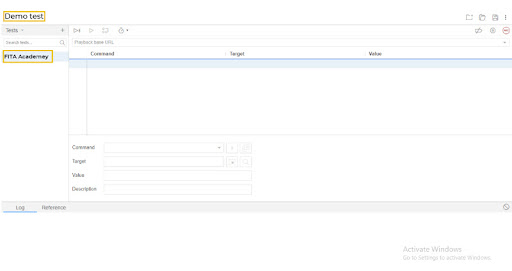
Step 4: Now, you can Rename the Project as the "Demo Test"
Step 5: Rename the test case the "FITA ACADEMY_TEST".
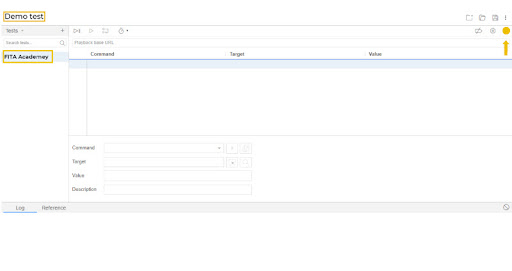
Step 6: In the top right corner of the page, tap "Start Recording." To begin recording the test case, click the IDE.
Step 7: Navigate to your Firefox browser and open the URL: www.google.com
Step 8: You'll be redirected to Google's search engine page.
Step 9: Now you shall type " FITA Academy" on the Google Search box.
Advancements with New IDE’S
Re-usability of Test Scripts
A majority of the test scripts that are found in the original version shall ask for signing in the application for creating the account or for signing out an app. This is a redundant and also time-consuming task to recreate all the steps again and again. However, with Selenium IDE you can easily run one script for the others.
Here in this Selenium tutorial for beginners let us try a test case.
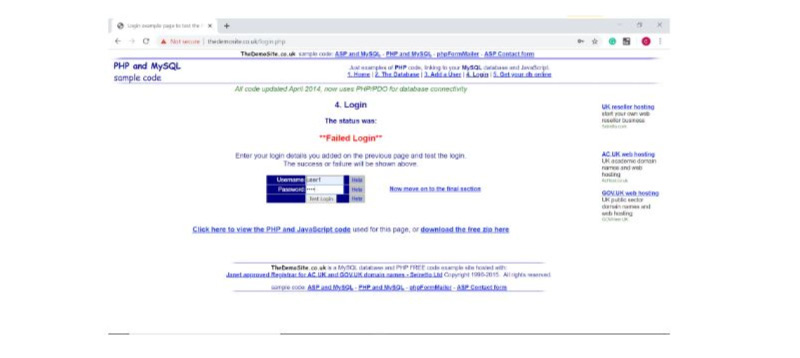
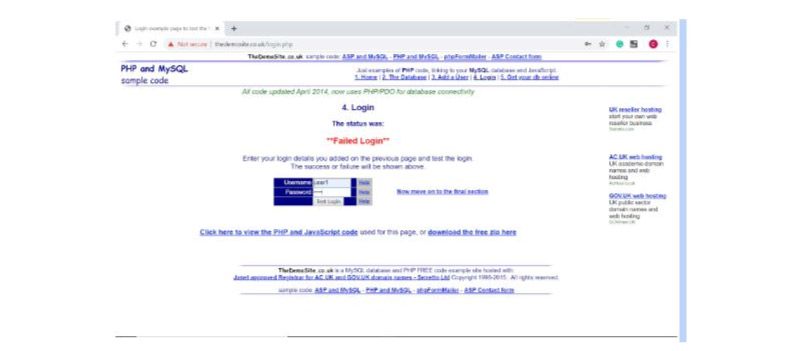
Enter the username and password credentials at http:// thedemosite.co.uk/login.php. If the screen displays the "Failed Login" message then you can assert the text.
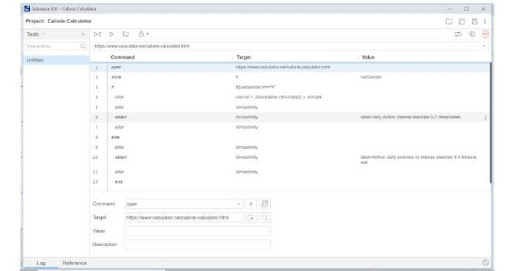
Generally, the Script IDE would look something like this
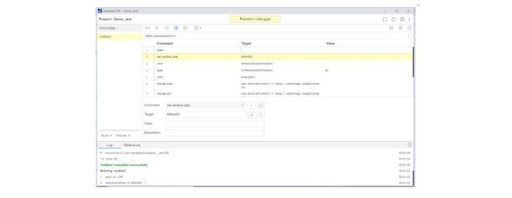
This Login function is tested numerous times with different Usernames and Passwords. For this, we shall create the UserID and the Password. Now, Click on commands for adding the variable instead of hardcoded values.
This is the time to create another test case and name them as "Invalid Credential". Here in this test case. you shall assign those values to the Username and Password variables. If you are done with assigning then you can call in for the original test "Login Test".
Next, you can make use of a Store command and pass the values such as "user1" and "pwd1" for variables Username & Password. A run command shall the targeted test cases (Login Test)
Run the present test case
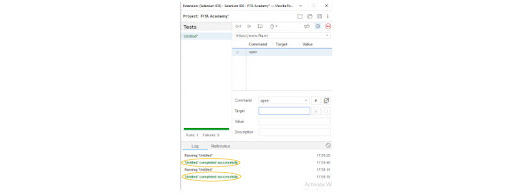
As illustrated in the above picture, "LoginTest" usually runs through the "Invalid Credentials". With this method, the Selenium IDE permits the reusability of the test cases that are relevant to pass on the arguments to the function of a primary function on any of the programming languages.
In the meantime, you will also receive notifications for the actions that are performed by the IDE which takes place at the extreme right corner of your Web browser.
Now, you can navigate to the IDE and hit on the "Stop Recording" option for stopping your recording functions further.
A Test Editor shall now consist of all the list of your interaction with the respective Web browser.
You can now move on to the next step, which is to run and record the script.
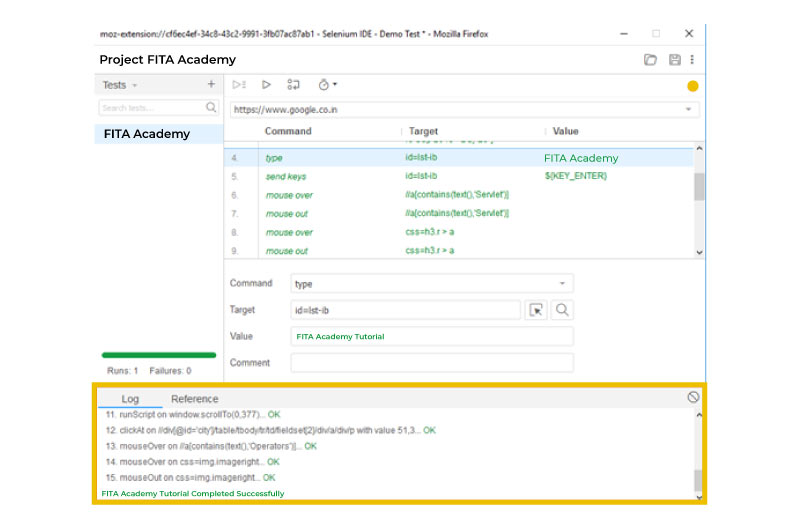
Playing Back
Select the "Run Current Test" option present in the toolbar menu of the IDE.
It will execute all the interactions that are found with the browser and offers a complete outlook of an executed test script.
The whole summary of the executed test scripts is now displayed in a Log Pane.
Saving a Test Suite
Now, you must click on the Save option that is the present extreme right corner of your menu bar.
You can now Save the complete test suite as the "Demo Test".
The Test suite could be identified at the location which is offered in the above steps.
Selenium Note: These test scripts are saved in .side format.
The Selenium Training in Bangalore at FITA Academy is a holistic training program crafted by Testing Experts from the industry. This Selenium course makes the students proficient with important concepts such as Selenium IDE, Selenium Web Driver, Selenium RC, and Selenium Grid with numerous real-time practices and training.
Debugging the IDE
The Selenium IDE allows debugging of all the test Scripts. It enables the users with the support of breakpoints where execution of the test script would halt and thus lets the users check the browser's state.
Debugging in the IDE is supported with the aid of the below steps
Step Execution - Right from the test script, you can run all the steps that are found in control, execution, and succession.
You can do so by following the steps outlined below. Choose the command you want to use.
Then, from the drop-down box, choose "Step-Over Current Command"
Step execution comes particularly handy when the test cases are extensive. At any stage along the process, you might begin looking for flaws. If you do this, you will be able to determine where the test is failing.
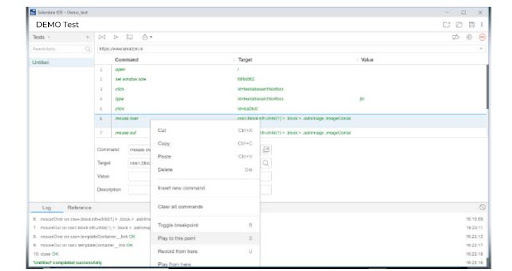
Break Points: For adding Breakpoints, you can click on the digit that syncs to the command which you wish to add to the breakpoint. Once, when you run, the debugger shall execute every step before the breakpoint stops an execution.
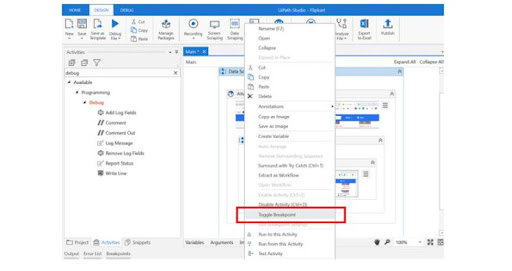
Enter a Debugger by using the option "Play to this Point": It is the easiest method for debugging, and it is performed by using the above option. Now, you can Right-click on a command you would like to stop at then click on " Play to this Point".
Pausing the Exception: It is an excellent feature of the Selenium IDE. It can automatically step into debug mode if there is a case exception. Now, take the example, where the target of the command is modified.

Now, the target value that is missing here is the letter. It is causing the error. And so the Script fails and it tries to find out the incorrect ID.
Control Flow Statements
The different pop-ups, subscription, and notification windows shall be managed easily with the aid of the control flow statements. When the term "X" is displayed, you can do "this" for handling them. Conditional Logic statements could be added to an IDE test script. A Control Flow statement such as Looping and conditional branching could be easily executed by IDE.
Downsides of the Selenium IDE
Though Selenium is one of the earliest tools in the market, it has few drawbacks:
- It won't support mostly the data-driven testing
- It won't perform the database testing
- It is not capable of providing the detailed test report
- Also, it is not capable of exporting it to the WebDriver Script
Selenium IDE - Commands
A Selenium command is called the Selenese. It is the set of commands that are used in the Selenium IDE for running your tests. On using a Selenese one shall execute the activities such as
- Testing the present existence of the UI elements that are based on HTML tags
- To test specific content
- To test the broken links
- To test the selection list options, input fields, table data, and submitting forms over the other things.
- To test the mouse option, window size, Ajax functionality, event handling, pop-up windows, and other Web application features.
And this is the order of Selenium commands (Selenese) is called a test script.
Here in this Selenium Tutorial, we have listed the important Selenium commands and their functions in-depth.
Different types of Selenium Commands
The three important types of Selenium Commands are
- Action
- Accessor
- Assertions
Actions: The Actions are the set of Selenium commands that are used in manipulating a specific state of an application. The process of Execution of an Action generates the events such as select that option, type this box, and click this link. In case, when the action fails or it has a bug in it, then the function of the present test is stopped.
In this Selenium Testing tutorial, you will find the generally used Action commands and they are:
|
Syntax/Command |
Description |
|
Open URL |
It propels the desired URL in a specific browser and it shall accept both absolute and relative URLs. |
|
type (locator, value) |
It aids in setting up the value of the input field that resembles the User typing action. |
|
typeKeys (locator, value) |
This type of command helps tokeystroke the event on a specified element. |
|
click (locator) |
This command permits you to click on the radio button, link, or checkbox. |
|
clickAt (locator,coordString) |
This command allows you to tap on the element with the aid of coordinates and a locator. |
|
Doubleclick (locator) |
It allows you to double click on any web element that is based on a specified element. |
|
focus (locator) |
It aids to move the focus to a described element. |
|
highlight (locator) |
It helps in modifying the background color of the described element to yellow. This kind of highlight is highly recommended for debugging purposes. |
|
close() |
This kind of command helps in replicating the user who clicks on the "close" button on a title bar of the popup tab or window. |
|
store (variable name, expression) |
This kind of command mentions the name of a variable on which the results are stored and the expression on the value to the store. |
|
waitForCondition (script, timeout) |
It helps in executing a described JavaScript snippet that frequently until it is appraised to "true". |
Accessors: These are the Selenium commands that aid to find the state of an application and stack the results to the variable. It is used automatically for generating assertions.
The commonly used Accessor commands are
|
Syntax/Command |
Description |
|
storeTitle (variableName) |
It is the command that receives the title on the present page. |
|
storeText (locator, variableName) |
It helps in receiving the text of the element. |
|
storeValue (locator,variableName) |
It helps in getting the (whitespace-trimmed) value of the input field. |
|
StoreLocation (variableName) |
It aids in getting the accurate URL of the present page. |
|
storeTable (tableCellAddress, variableName) |
It supports getting the text from the cell of the table. |
|
storeElementIndex (locator, variableName) |
This is the kind of command that receives therelative index of the element to their parent (starting from 0) |
|
storeBodyText (variableName) |
This command mainly helps you to receive the complete text of the page. |
|
storeAllButtons (variableName) |
This command supports sending back the IDs of every button on a page. |
|
storeAllLinks (variableName) |
It helps in sending back the IDs of the links on the specific page. |
Assertions: The Assertions are the commands that permit the tester to check the state of an application. The Assertions are usually utilized in three different modes and they are verify, assert, and waitfor.
The commonly used Assertion commands are as follows:
|
Syntax/Command |
Description |
|
verifySelected(selectLocator, optionLocator) |
It helps in checking the chosen option of the drop-down and it elate the options specifier. |
|
verifyAlert (pattern) |
This type of command verifies the alert text that is used within the accessorstoreAlert. |
|
verifyAllButtons (pattern) |
This type of command aids in checking the button that is used with the accessorstoreAllButtons. |
|
verifyAllLinks (pattern) |
It is the command that helps in scrutinizingall thelinks that are used with the accessorstoreAllLinks. |
|
verifyBodyText(pattern) |
This kind of command checks the body text and it is used along with an accessorstoreBodyText. |
|
verifyAttribute(attributeLocator, pattern) |
This is the type of attribute element that is used within an accessorstoreAttribute. |
|
waitForAlert (pattern) |
It is the command type that waits for an alert and it is used within an accessorstoreAlert. |
|
verifyAllWindowIds (pattern) |
It is the command type that checks the window id and it is used along with accessorstoreAllWindowIds. |
|
waitForErrorOnNext (message) |
This is the kind of command that allows you to Wait for the error and is used within the accessorassertErrorOnNext. |
The Selenium Training in Coimbatore at FITA Academy helps the students to become well-equipped with the Selenium commands, Execution, and Debugging of Scripts efficiently under the mentorship of Expert Selenium professionals.
XPath in Selenium
The XPath has been the most important part of the Automation Script development for finding the Web element. For most of the Tester, this was one of the challenging tasks to identify the right, useful, and exact locator in the automation test development process. And this is where the XPath came in handy for the tester to support them with different functions. To make them write effective XPaths.
Here in this Selenium Tutorial session, we will guide you through the important aspects of XPath and make you have a sound understanding of the XPath concepts.
Before diving deep into the XPath let us understand What an XPath is clearly
Selenium's XPath method is used to navigate through a webpage's HTML structure. It is the language or syntax that identifies the element of the Webpage that is potential for using the XML path expression.
In the Selenium automation, there are chances where the element can't identify with the general locators such as Name, Class, and ID. This is where the XPath is used for finding the elements of the Webpage. The XPath in the Selenium could be used in the XML and HTML documents as well. The XPath in the Selenium has the basic format and it is explained below.
Syntax of the XPath
The XPath in the Selenium offers the vital XPath axes and functions for writing the effective XPaths of the Web element and to characterize the unique locators.
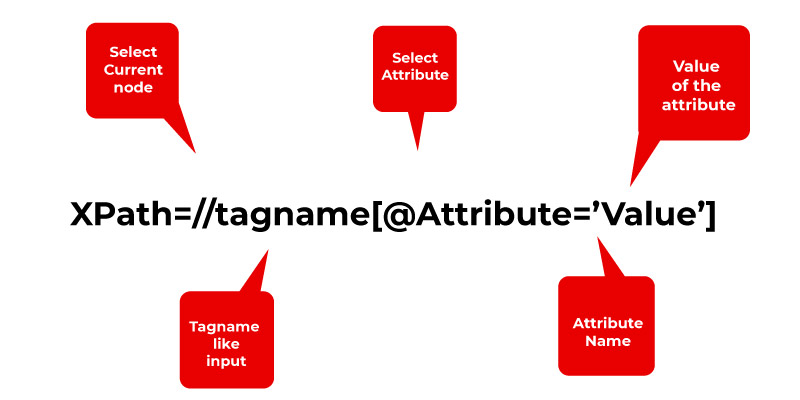
- tag name: It is the tag name of the Specific node
- @: it is used for choosing the attribute
- //: it is used for selecting the present node
- value: it is the value of a given node
- attribute: it is the trace of the name node
Here in this Selenium Testing tutorial let us further see the various types of XPath Locators.
There are many types of locators for identifying the element of the Web page precisely.
|
XPath Locators |
To identify the various elements of the Webpage |
|
ID |
It is used for finding the element by using the ID of an element. |
|
LinkTest |
It is the element that is used for finding the text of the link. |
|
Name |
This element is used for finding the name of an element. |
|
ClassName |
It is used for finding the class name of an element. |
|
XPath |
This is used for identifying the dynamic element and further traversing them among various elements of the Webpage. |
|
CSS Path |
It aids in locating the element that has no name, ID, or class. |
Different kinds of XPath
There are two kinds of XPath and they are:
- Absolute XPath
- Relative XPath
Absolute XPath
The Absolute XPath means the direct method of finding the element. The major setback of the Absolute XPath is that when there is a change in the element's path then the XPath would fail.
Also, the XPath starts with the single forward-slash(/) and it states that the elements are selected directly from a root node.
Below is the Syntax of an Absolute XPath:

Relative XPath
When it comes to Relative XPath, the path shall start right from the middle of an HTML DOM structure. Generally, the structure begins with a doubleforward-slash (//) and it specifies that the element could be identified anywhere on the Webpage.
A Relative XPath permits you to write exactly from the middle of an HTML DOM structure without having to write the long XPath.
Given below is the Syntax of the Relative XPath:

XPath Function in Selenium
There are many places where locating the specific Web Element by using the general attributes and there are elements that have specific properties similar to the same name class or same name. Here is where the simple XPath strategies are not sufficient and the requirement of the XPath functions arises.
The XPath in the Selenium offers the XPath functions for writing the efficient XPaths for finding the elements distinctly. Now, let us see through the various functions of the Selenium.
XPath Contains () Function:
An XPath Contains() is the function that is used for creating the XPath expression. This is mainly used when the part of a value or the attribute changes influentially. Just like the Login information. Also, the function could navigate on the Web element with just a partial text that is present.

A Contain() method generally functions on two parameters:
An attribute of a tag helps you to authenticate and locate the Web element.
Generally, the value of the attribute is the part of the value that an attribute should contain.
XPath Text() Function
An XPath Text() is the kind of function that is used for finding the element on the Web page and it uses the Web element's text. A function usually proves to be worth it when the element consists of things such as a label or text.

Here, the Text() method helps in returning the text of a Web element where it is found by the tag-name. Also, it is generally compared to the value that is provisioned on the right side.
XPath Starts-with() function:
Usually, XPath Starts-with() function is used for finding the element on which the attribute value just begins with a few specific characters or the sequence of the characters. A function occupies an important role when working alongside dynamic web pages.

- A Start-with() function accepts two important parameters:
- An attribute of a tag should be validated for locating the Web element.
- An attribute value is the part value of an attribute along with which an attribute is normal to begin.
XPath Axes
Generally, the XML DOM elements are ordered and they could be located using the Absolute or Relative paths. XPath supports "XPath Axis" attributes for this purpose.
Here, the axis depicts the relation between the present node and it assists in finding the relative nodes that are related to the tree's present node. So, when the XPath Axis utilizes the relation among different nodes for finding those nodes that are found in the DOM Structure.
The table that is given below is the set of Axis that supports finding the elements on a Webpage.
|
Axis |
Description |
|
ancestor |
It is used in finding the ancestor of the present node that includes both the root node and parent node. |
|
ancestor-or-self |
This is used for finding the present node alongside its ancestors. |
|
attribute |
It is used for specifying the attribute of the present node. |
|
child |
It is used for finding the child/children of the present node. |
|
descendant |
This is used for finding the children of the present node that is present up to a leaf node. |
|
descendant-or-self |
It is used for finding the present nodes along with the descendants. |
|
following |
It is used for identifying all the nodes that come right next to the present node. |
|
parent |
This is used for identifying the parent of the present node. |
|
self |
It is used for finding the present node. |
The Selenium Training in Pune at FITA Academy is a skillfully crafted training program that aids the learners of the Selenium testing course to become proficient with different test practices. By the end of the Selenium Testing program, the students would be able to implement the testing practices efficiently.
Selenium WebDriver
A Selenium WebDriver is the crucial component of the Selenium testing tool's suite. In this Selenium WebDriver tutorial session, let us first understand the need for the Selenium WebDriver and further proceed with its architecture, functioning, and benefits.
Firstly, let us understand What Selenium WebDriver is in short!
Selenium WebDriver is a web framework for performing cross-browser testing. It is primarily used in automating Web-based application testing to check whether it functions as planned. Further, the Selenium WebDriver also permits you to select the programming languages for developing test scripts.
The Need for the Selenium WebDriver
A Selenium WebDriver was introduced to address the shortcomings of the Selenium RC. The Selenium Remote Control (RC) is the testing tool that permits you to write the automated Web Application UI tests on any of the programming languages and over the HTTP website using the mainstream JavaScript-enabled browser.
Generally, the Selenium RC Server accepts the Selenium commands from your testing program to interpret them and report the corresponding results promptly to the program. A Web Browser that is infused to the Selenium Core interprets and executes the Selenese commands that are utilized in the Selenium Test Script. A Web Browser shall now communicate with a webserver respectively. Yet, this setup complicates the architecture and consumes more time for execution.
Here, in this Selenium WebDriver tutorial, let us see how the Web Driver supports the testers in overcoming the above-mentioned drawbacks. A WebDriver need not make use of any additional server, rather it could make direct calls to a browser using all browser native support to perform the automation function.
Selenium WebDriver Architecture
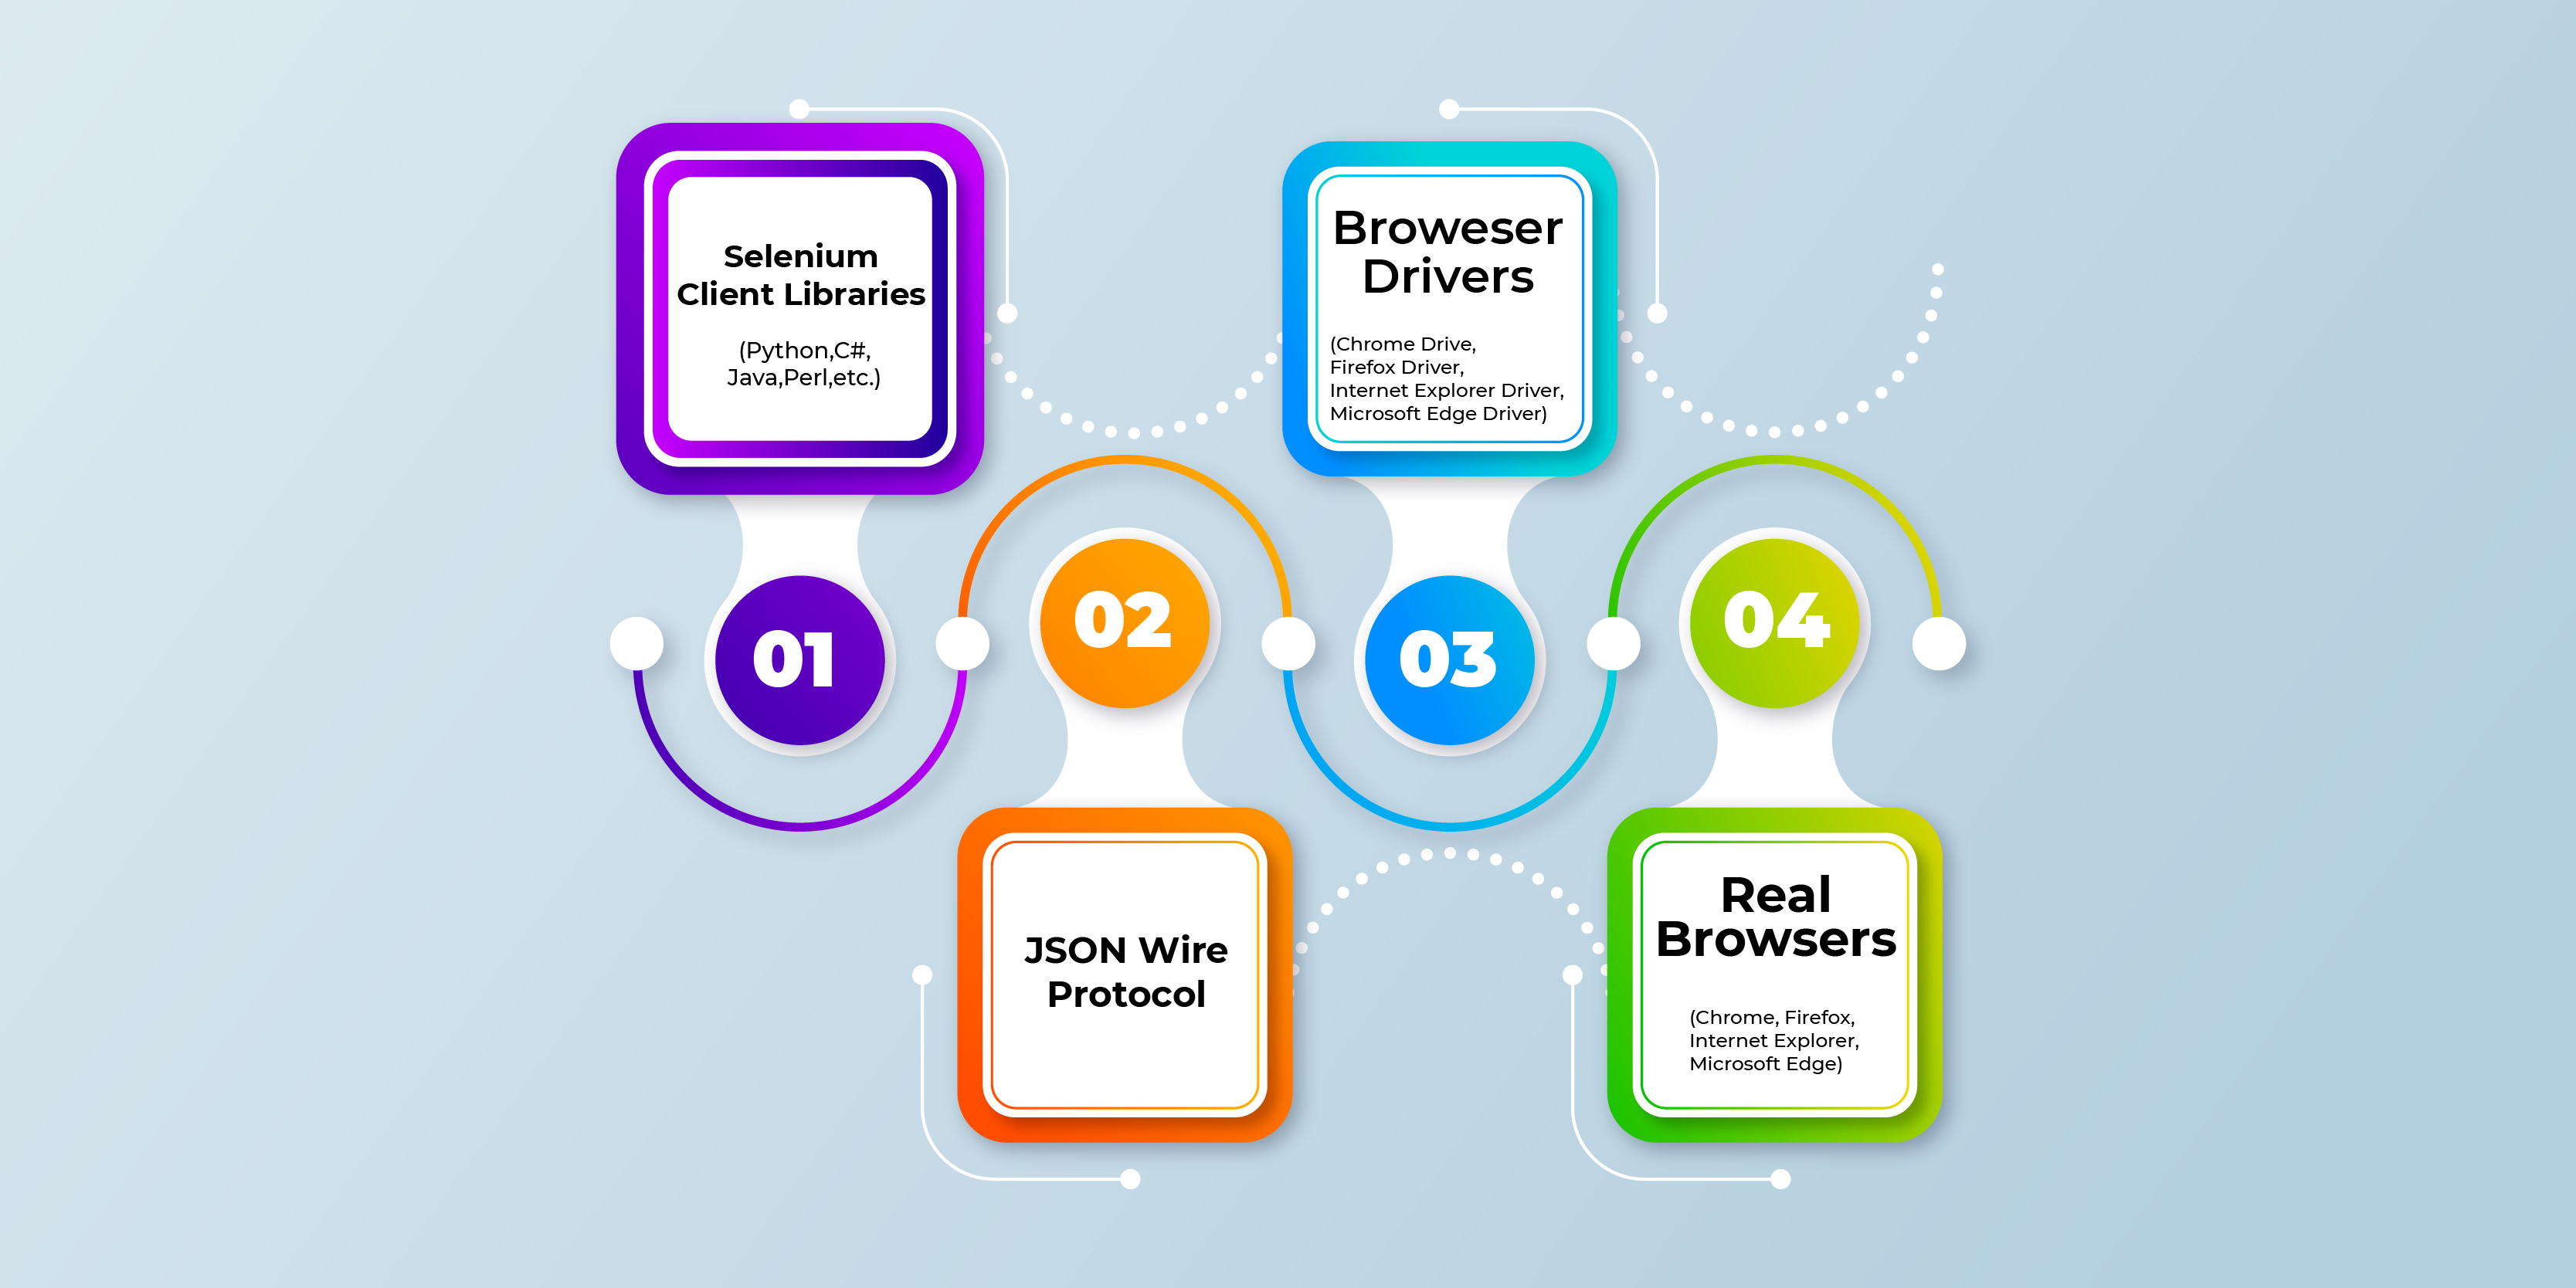
The four major components of a Selenium WebDriver are as follows:
- Selenium Client library
- JSON wire protocol over HTTP
- Browser Drivers
- Browsers
Selenium Client library or Language Building: This offers support to numerous libraries like Ruby, Java, Python, and much more. It is possible because the language bindings are developed by the Selenium developers to offer the compatibility of different languages. Learners can explore these concepts in depth through a Selenium Training in Erode, which provides hands-on experience with multi-language support and automation tools.
Example: In case, if you wish to use the browser driver in Python, you can make use of the Python Bindings. Also, you can easily download every supported language of the bindings according to your preference exactly from the Selenium official suite.
JSON Wire Protocol: The term JSON is the acronym for the JavaScript Object Notation. This is a completely open standard that offers the transport mechanism to forward the data between the server and client on the Web. It also offers support for different data structures namely objects and arrays that makes it easier for reading and writing the data from the JSON. The JSON usually serves as the REST ( Representational State Transfer) REST API that aids in exchanging the details among the HTTP Servers.
Browser Drivers: Selenium offers drivers that are specific to every browser without publishing the internal logic of the browser functionality. Generally, the browser driver communicates with the corresponding browser by setting up a secure connection. Also, these browser drivers are specific to languages that are utilized in test case automation namely Java, Python, C#, etc. Also, you can download the browser driver on your preferences and as per the need of your language.
For instance, you may configure the Selenium Web Driver for Python.
- While a test script is executed with the support of the WebDriver, then the below functions should be performed in the backdrop.
- The HTTP request is usually developed and is rendered to the browser driver for all the Selenium commands.
- An HTTP request is gained by a driver via the HTTP server.
- Every instruction/step should be executed on a browser and it is measured by the HTTP server.
- The HTTP Server later receives all the execution status and forwards all the automation test scripts.
Browsers: Selenium WebDriver supports a variety of browsers, including Safari, Chrome, Firefox, and Internet Explorer.
Fundamental Steps involved in the Selenium WebDriver Script
- Creation of WebDriver instance.
- Navigation of a Webpage.
- Locating the Web element of the Web page through the locators in the Selenium.
- It performs more user-oriented actions on the element.
- It aids in preloading the expected browser/output response to the actions.
- It helps in running the test.
- It supports recording the results and also comparing those results right from the expected output.
Advantages of Using the Selenium WebDriver
- Selenium WebDriver is the widely used Open-Source tool and it is also simpler to get started with the testing of web-based applications. Also, it permits you to implement cross-browser compatibility testing.
- It is capable of supporting various Operating systems to mention a few - Mac, Windows, Linux, and Unix.
- It works well with a variety of programming languages, including Java, Python, Perl, and Ruby.
- Chrome, Opera, Firefox, Safari, and Internet Explorer have all been added to the list of supported browsers.
- A Selenium WebDriver accomplishes the execution of the test scripts rapidly when compared with other tools.
- It is a more concise API when compared to the Selenium RC
- It also enables the feature of compatibility with HtmlUnitDriver, Android Driver, and iPhone driver.
Disadvantages of Selenium WebDriver
- It is not capable of supporting the new browsers readily when compared to the Selenium RC.
- For Automatic Generation of test results, you need built-in commands and the Selenium Webdriver does not enable this feature.
Selenium WebDriver VS RC
Selenium RC has numerous limitations and it eventually paved the way for the development of the Selenium WebDriver.
Here in this Selenium WebDriver tutorial module, let us go through major distinctions between the Selenium RC and Selenium WebDriver:
- Architecture
- Speed
- Object-Oriented
- Browser Support
- Testing Mobile Applications
Architecture: Fundamentally, the structure of the Selenium RC is more complicated as it uses the intermediate RC Server to interact with a browser. Initially, you should install the RC server prior to running the test scripts. Also, it helps in bridging the Selenium commands to the respective browsers.
At the time of the execution of the test script in the Selenium RC, the below operations should be performed internally.
- A Server injects the JavaScript program which is called the Selenium Core into the browser.
- Furtherly, the Selenium Core begins to accept and act according to the instruction received from the Selenium RC server (Selenium commands).
- Once all the instructions are received, then the Selenium Core would move on to the next step which is executing those as the JavaScript commands.
- Now, these JavaScript commands act as the instruction to a browser.
- A Browser would execute all the sets of instructions that are offered by the Selenium Core. Now, it shall forward a complete summary to the respective Server.
- The comprehensive summary serves as the user's ultimate result, which is shown on the screen.
- Also, the architecture of a Selenium WebDriver is much simpler when you compare it with the Selenium RC.
Usually, the browser is managed directly from the OS level. It is the fundamental need to run the test scripts on the WebDriver are listed below:
- The IDE (Integrated Development Environment) that supports any of the programming languages such as Java and C#
- The Browser is used in executing the instructions that are developed by a test script.
Speed: The Selenium WebDriver functions more rapidly than the Selenium RC as it communicates directly along with the browser. Also, without using any of the external proxy servers. Selenium RC, on the other hand, communicates with the browser via an RC Server intermediate. The Execution of the test scripts consumes enormous time on the Selenium RC WebDriver as it utilizes JavaScript commands as the instruction to a browser.
Object-Oriented: A Selenium WebDriver is the object-oriented API, though Selenium RC is a comparatively less object-oriented API. WebDriver is written in C# and Java, which are object-oriented programming languages.
Testing Mobile Applications: A Selenium WebDriver shall also support the Operating Systems of the Mobile applications namely Android, iOS, and Windows Mobile. The Selenium RC, on the other hand, does not allow for the testing of any mobile applications.
Browser Support: A Selenium WebDriver supports the headless HTMLUnit of a browser. Whereas Selenium is not capable of supporting the HTMLUnit browser as it requires the real browser to work with.
Selenium Note: The HTMLUnit is the invisible browser that allows the faster execution of tests as it incurs lesser time for the page elements to load. The Selenium Training in Gurgaon at FITA Academy offers the learners with extensive syllabus and training of the Selenium software under the guidance of Expert Software Testers. The Selenium Course at FITA Academy helps you to get equipped with all the testing concepts and functions proficiently with numerous real-time practices and training.
Reason to use Selenium WebDriver for Automation
Having seen the differences between the Selenium WebDriver and RC, let us now see the important reasons for using the Selenium WebDriver for automation.
Dynamic Web Page Automation: A Selenium WebDriver helps in automating dynamic websites, where the content of the pages modify according to the user's actions.
Working Close to a Browser: A Browser vendor helps in shipping their WebDriver implementation. So, you can tightly couple them to a browser by offering a better testing experience.
Mimics Real User: The Selenium WebDriver permits the QA for micing the User actions right from the Websites. The Selenium WebDriver could typically mimic the user actions such as clicking, form-filling, key-press, and other advanced actions such as click & hold, and drag & drop.
Technology Agnostic: The Selenium WebDriver permits you to automate the test cases mainly for every web application regardless of the technology that is used in the development of an application right under the test.
Supports CrossBrowser Testing: A Selenium WebDriver is the most important prospect to be considered while performing cross-browser testing. Here is where the QA could test for the same website using a similar piece of code over different browsers. It allows validation and verification of test cases that are used over different sets of browsers at the same time.
Supports Parallel Execution: When there are higher chances of Scripts that are required to be executed over different browsers, then performing them one after the other is literally time-consuming. To overcome this hindrance, the Selenium WebDriver should permit parallel execution by using frameworks such as TestNG, so you could execute those test cases rapidly. It permits large-scale execution of the test cases within a short span.
View Execution Results: A Selenium WebDriver permits a QA to view the live execution of the automated tests to run on the computer systems and also on the other CI/CD pipeline machines to support the functionalities namely video-recording and a screenshot of the test cases.
Modern Development techniques are supported: The Selenium WebDriver integrates efficiently with the modern Software Development principles such as Behavior Driven Development through the integration of the Cucumber library.
Reasons for the Popularity of the Selenium WebDriver
Besides the above-mentioned features, the WebDriver being an important part of the Selenium family includes some of the unique features that add to the popularity of the Web Automation tool.
Some of the key features of the Selenium WebDriver are:
Multi-Browser Compatibility: This is one of the important reasons for Selenium's popularity. As it is a cross-browser it supports utilizing a similar piece of code. It provides the feature to run the particular piece of code which mimics the real-world user with the aid of the browser's native support for hitting the direct API calls without having the requirement for any middleware device or software.
Multi-language Support: Not every tester is required to be well acknowledged with specific language. It is because the Selenium offers the support for numerous languages so the tester could use any of the languages that are not enabled by the WebDriver automation. It gives the liberty of writing code in a language with which the users are comfortable.
Rapid Execution: In contradict to the Selenium RC, this WebDriver is not dependent on the middleware server for communicating with a browser. A WebDriver straightly communicates with the browser using the defined protocol (JSON wire) and it allows it to interact faster with the rest of other Selenium tools. Since the JSON Wire itself utilizes the JSON it is lightweight and also the total amount of data that is transferred for each call is minimum. Given below is the interpretation of how a WebDriver interacts with a browser.
Locating the Web Elements: To perform the functions such as Type, Click, Drag, and Drop, you should first find the Web element ( checkbox, button, text area, and drop-down are used for performing the action. For facilitating this, a WebDriver should be given to find the web elements using the different HTML attributes such as class, name, CSS, id, tag name, link text, and Xpath.
Managing the dynamic Web Elements: There are various circumstances where you can find web elements on-page and it helps in changing with each reload of a page. Also, the HTML attributes modify themselves and it becomes a challenge for finding the elements. The Selenium offer different methods to tackle different situations and they are:
- Contains() - By using this functional element you can be easily found with the partial or complete text and it could be used for managing the dynamic elements.
- Absolute Xpath - It consists of the entire XML path of an element in a question.
- Starts-with () - It operates based on identifying the elements that make use of the starting text of an attribute under the question.
Managing the Waiting Elements: Not every page has a similar structure. Few are lightweight while others have a reasonable amount of AJAX call or data handling. Most of the time the Web elements presumes more time for loading. To account for this, the WebDriver has offered a different waiting mechanism that could be utilized for pausing the script execution for a certain period of time. Also, this is based on few conditions and it resumes once when the conditions are full-filled. The illustration which is provided below enhances you with a list of capabilities for the WebDriver that aids in tackling the progressive behavior of the web pages.
Functioning of the Selenium WebDriver
Here in this Selenium WebDriver tutorial session, let us see the functioning of a Selenium WebDriver clearly. Before going deep into the theoretical aspects just give a short glimpse of the image illustrated below. It aids you to have a clear understanding of the functioning of the Selenium WebDriver.
Generally, when the users write the WebDriver Code in the Selenium and execute them, they follow the below procedure and these are the actions that take place behind the screen.
- An HTTP request is generated and it is sent to the respective browser driver like (Firefox, Chrome, and IF). Then, there are individual requests for all the Selenium commands.
- A Browser Driver then receives the request via the HTTP server.
- An HTTP Server decides whether the instructions/ actions are required to be executed on a browser.
- A browser shall later execute the steps/instructions as mentioned above.
- An HTTP Server then accepts the execution status and it forwards the status to the respective automation script and then it displays the result. It can either be passed or an exception error.
Limitations of Selenium WebDriver
Though Selenium functions a long way it aids in resolving the UI and the functional automation of the Web applications. Also, it has some setbacks. Let us look through the setbacks of the Selenium WebDriver.
Needs Programming Language Expertise: As the WebDriver permits you for automating the User actions by using the code that is written in a specific programming language. Anyone who is required to use it must have a fundamental apprehension of how the language functions. In case, if you do not have a basic understanding of the coding then you shall find it difficult to use the WebDriver.
Desktop Applications are not Supported: The Selenium Ecosystem inclusive of the WebDriver was primarily developed with the intent to automate the Web Applications. In case when you are seeking to automate Windows-based applications, then it is not possible to do so.
No Customer Service: Since Selenium along with the WebDriver being open-source, it indicates that it is being driven by the individuals and not by the company. Owing to this there is no specific support team to look after the issues. If the person is stuck somewhere then there are more community forums through which they can get help and not through customer service.
No Built-In Object Repository: The paid tools such as UFT/QTP offers centralized locations for storing the elements/objects also called the Object Repository. Also, it is not offered by default in the Selenium WebDriver. It helps in upcoming approaches namely Page Object Model, however, it needs a considerable amount of coding skills & expertise.
Handling Browser-Selenium Dependencies: As the Selenium depends more on the compatibility between the actual browser and browser driver itself, there are times where owing to incompatibility or the bug in other browser drivers or the browser functionality breaks and the users depend more on the community to get the issue resolved.
There is no built-in reporting: A Selenium WebDriver aids you to run the automation tests. It is done to give a reporting capability and you should integrate them with the testing framework such as TestNG, Junit, Allure, and PyTest.
Selenium WebDriver Commands
The Selenium IDE part has different sets of commands and they are used in running the Selenium tests.
The Selenium WebDriver has a completely various set of commands that is used for executing different operations. As you use the Selenium WebDriver with Java, the commands are easily written using the Java language.
Selenium Note: The Java method is the compilation of statements that are combined for executing the particular operations. Further in this Selenium tutorial, before seeing about the Selenium WebDriver commands it is recommended to go through Java's Object-Oriented programming concepts.
There are different methods that are found in the WebDriver interface. On using the instance variable driver, you can easily access all the methods via driver.methodName(). To see through the methods that are given by the WebDriver, open an Eclipse IDE that is loaded with the Selenium WebDriver jar files, and now create the driver object for a Webdriver and tap on the dot key.
For comprehending the Syntax of the methods, see the example that is given below:
Method Name: Initially, you should create the object of the class for accessing any method. Later, all the public methods are identified in the object.
Parameter: The argument is passed to the particular method for performing the specific operations.
Return type: This method helps in sending value or becoming void i.e, returning nothing. When the void is cited after a method then it indicates that the specific method is returning to no value.
Here in this Selenium WebDriver tutorial let us become familiar with the fundamental Selenium WebDriver commands.
Below we have listed the commands that are offered by the Selenium WebDriver and how they are classified into different categories.
1. Browser Commands
- Get command
- Get Title command
- Get Current URL command
- Get Page Source Command
- Close command
- Quit command
2. Navigation Commands
- Navigate to command
- Back command
- Forward command
- Refresh commands
3. WebElement Commands
- Clear command
- Click command
- GetText command
- IsSelected command
- IsEnabled command
- IsDisplayed command
- getSize command
- GetCssValue command
- getLocation command
- Submit command
- getAttribute command
- gefTagName command
- SendKeys command
Browser command
Below are the commonly used browser commands on the Selenium WebDriver
Get Command
This command helps in loading the new URL in the present browser window. It allows you to accept the String as the parameter and sends back the void. The command accepts the single string type parameter which is in actuality the URL of an application that is under the test.
For most of the Selenium IDE users, the command shall look similar to the open command.

To load the new Webpage, you can use the below command as given below:

// Or can also be written as

Example: The command that is used for loading the Official Website shall be written as mentioned below:

Get Title Command
This command is mainly used for retrieving the title of an existing Web page in which the user is working. This command returns the string and accepts no parameter. The Null String is then returned when a Web page has no title. The respective command could be written as given below to fetch the title of a present web page:

The alternative way to write this is

Get Current URL Command
With this command, you can fetch the URL of the present Web Page. It sends back the String value and needs no parameter.
The respective command that is used for retrieving the string and the one which denotes the present URL and it could be written as:

The alternative way to write this is

Get Page Source command
This command is mainly used for sending back the Source code of a Web page that is loaded in the present browser. Also, it returns the string value and needs no parameter.
For getting the page source, you can write them as:

The alternative way to write this is

This command could be used with different String Operations, namely contains() for finding the presence of a specified string value.

Close command
This command is used for aborting the present windows at the current time. When the present window is the only window that is being operated by the WebDriver, then it shall eliminate the browser as well. Also, it returns void and accepts no parameters.
The Close command can be written as

Quit Command
This command is used for eliminating all the Windows that are operated by the WebDriver. It helps you in eliminating every tab and browser. It returns void and accepts nothing as the parameter.
The respective command is:

2) Navigation Commands
The Navigation commands in the WebDriver allow the browsers to navigate front & back in the browser's history.
Below are the generally used Browser Navigation commands for the Selenium WebDriver:
Navigate to Command
To load the New webpage in the present browser window, you can use this command. The strings are accepted as the parameter and the void is returned.
For Navigating/Loading the New Web Page, the command can be written as:

Back Command
It helps you to click the back button that is present in the current browser window. It shall either accept anything or return anything. It takes you back to pages one by one of the browser's history.
The command is

Forward Command
This command allows the Web browser to click the forward button in the present browser window. And this command accepts anything nor sends back anything.
This command permits you to move the pages forward one by one on the browser history
The code can be written as

Refresh Commands
For loading and refreshing the present web page on the existing browser window, you can make use of this command. This command can either accept anything or return anything.
The Commands for refresh is

3) Web Elements Commands
The Web Elements indicate the HTML element and it consists of the Start tag, End tag, and Content in between. Numerous WebElement commands are used in the WebDriver.

UserName is the Value of an id attribute that is used as the unique identifier for a specific Web element.
Given below are the generally used WebElement commands that are used in the Selenium WebDriver.
Clear Command
It has zero effect on the other elements.

Text entry elements are TEXTAREA and INPUT elements.
The command could be written as:

The alternative way to write this is

Click Command

This command aids you to communicate with the Web elements namely links, elements, radio boxes, and texts.

The alternative way to write this is

GetText Command
It aids in the recovery of the element's visible innerText. This command returns the string value but does not accept anything as a parameter.

It sends the innerText of the element, which is inclusive of sub-elements, that has no trailing or leading whitespace.
It could be written as

IsSelected Command
It is used in finding whether the elements are selected or not. It returns the boolean value (true/false) but it does not accept anything as a parameter.

The operation of this kind is applicable to the input elements like the Radio button, Select option, and Checkboxes. It returns true when the element is presently checked or selected or else it is false.
It can be written as

The alternative way to write this is

IsEnabled Command
We can use this command for finding the current element whether they are enabled or not? It asks nothing as input arguments and outputs the boolean value as (True/False)

The command could be written as

The alternative way to write this is

IsDisplayed Command
You can use this command to check whether an element is presently displayed or not. It usually returns the boolean value(True/False) but accepts nothing as the parameter.

The Command could be written as

The alternative way to write this is

getSize Command
This command is primarily used for getting the height and width of a rendered element. It returns a Point Object, but no parameters are accepted.

The command could be written as

GetCssValue Command
With this command, you can get the CSS property value of any given element. It sends back the String value and in turn, accepts nothing as a parameter.

getLocation Command
You can use this command for finding the element on a location page. It returns the Point Object but does not take any parameters.

The Command could be written as:

Submit Command
This Command functions more efficiently than click() when the present element is the form or rather the element that is within the form. Nothing is returned, and nothing is accepted as a parameter

This causes the present page to modify and this method waits till the new page is loaded.
This command could be written as:

The alternative way to write this is

getAttribute Command
Command of this type is mainly used for getting the value of a specific attribute of an element. It sends back the String value and accepts Strings as the Parameter.

This Command could be written as:

getTagName Command
It is mainly used for getting the tag name of an element. It returns the String Value and does not ask for any parameter.

The Command could be written as:

The alternative way to write this is

SendKeys Command
The command of this type is used for triggering typing an element and thus accepts the CharSequence as the parameter and sends back nothing.

It functions better with the entry text elements such as INPUT and TEXTAREA elements.
The Command could be written as

The alternative way to write this is

Besides the above-mentioned commands, there are few sets of commands which are highly popular among testers. The table which we have provided below enlists the popular Selenium commands and their description.
|
Command |
Description |
|
driver.get("URL") |
It helps in navigating the application. |
|
element.sendKeys("inputtext") |
It helps in the clearance of the content from an input box. |
|
element.clear() |
It helps in the clearance of the content from an input box. |
|
select.deselectAll() |
It aids in deselecting every OPTIONs right from the first SELECT on a page. |
|
select.selectByVisibleText("some text") |
It helps in selecting the OPTION that is within the input and those that are specified by a user. |
|
driver.switchTo().window("windowName" |
It aids in moving the focus right from one window to the next. |
|
driver.switchTo().frame("frameName") |
It helps the users to Swing from one frame to another frame. |
|
driver.switchTo().alert() |
It aids you in managing the alerts |
|
driver.navigate().to("URL") |
It supports you in Navigating to different URLs. |
|
driver.navigate().forward() |
It helps you to move forward. |
|
driver.navigate().back() |
It supports you to step back. |
|
driver.close() |
This helps the users to close the present browser and the ones that are related to the driver. |
|
driver.quit() |
It helps in quitting the driver and closing all the related windows of a driver. |
|
driver.refresh() |
It allows you to refresh the present page |
The Selenium Training in Hyderabad at FITA Academy is tailored by Expert Selenium testers to make the learners of the Selenium Course with Selenium WebDriver and commands efficiently.
Selenium WebDriver First Test case
In this Selenium WebDriver Tutorial, we will learn how to create our first Selenium Automation Test Script.
Here in this test, you are going to automate the below scenarios:
Invoke your Google Chrome browser
Open the URL: www. google.com
Now, click on the Google Search text box
Tap on the Search button
You can procedurally create the test case by giving a complete perceptive to all the components that are given in detail.
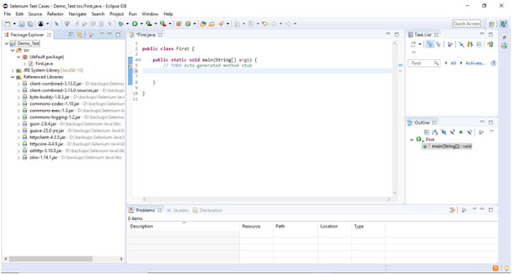
Step 1: Install the Eclipse IDE and open the project "Demo_Test" that should have been developed in the earlier section (Configure the Selenium WebDriver) in this tutorial. In a "First. class" file underneath the "Demo Test" and the test suite, you can write the first Selenium test script.
Selenium Notes: For invoking the browser in the Selenium, you should download the executable file for a specific browser. For instance, the Chrome browser shall implement the WebDriver protocol by using the executable which is called ChromeDriver.exe. These are the executable files to begin the server on your specific system which shall turn into a responsible running for test scripts in the Selenium.
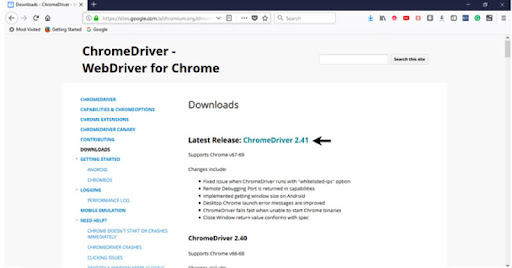
Step 2: Now, open the URL: https://sites.google.com/a/chromium.org/chromedriver/downloads on your browser.
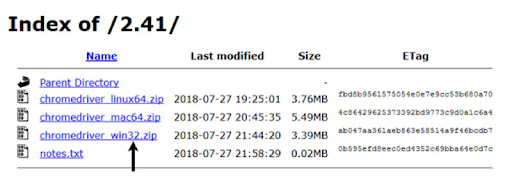
Step 3: Select "ChromeDriver.241" from the drop-down menu. It aids you to redirect to the respective directory of the ChromeDriver and executables files. You can now download them based on the OS you are using.
On Windows, select the "chromedriver win32.zip" download option.
Now, the file which has been downloaded should be zipped in a proper method. You can now unpack the contents into a convenient location.
You can now unpack the contents into a convenient location.

Selenium Notes: The Selenium Developers generally have defined properties for all the browser that requires the location for all the corresponding executable files that has to be parsed for invoking the browser. For example, a property that defines the Chrome browser - webdriver.chrome.driver - necessitates the path for running the Chrome browser - D:ChromeDriverchromedriver.exe.
Step 4:In order to automate the Search button and Google Search text box using the test script, you may require a unique identification for each Web element. And locators may be created using these unique identifications as well as a few syntax/commands. The Locators help us locate a certain web element in the context of a Web application.
This method is mainly used for identifying the unique identification element included in the inspection of the HTML codes.
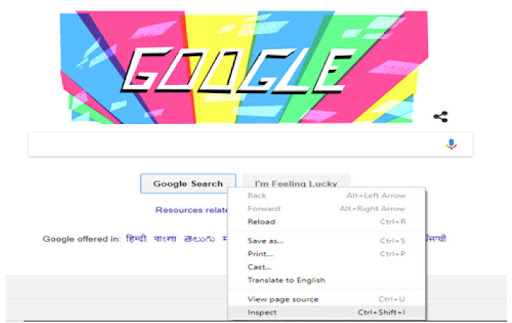
In your Chrome browser, go to https://www.google.com.
Right-click the Google Search text field and select Inspect Element from the menu that appears.
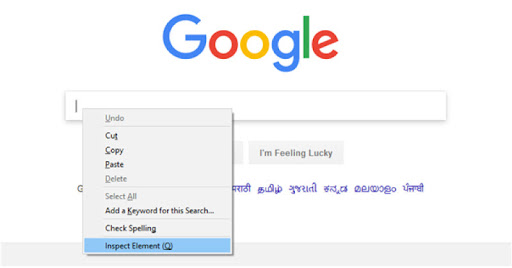
Now, it downloads the window that consists of the particular codes which are covered in the development of a text box.
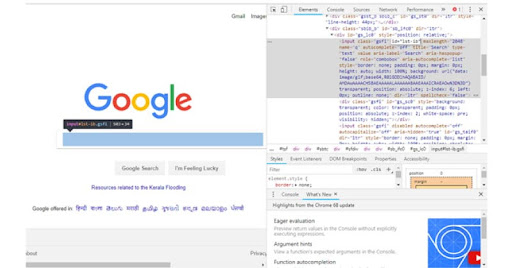
Now, select the value of the id element which is "lst-ib".

Mentioned below is the Java Syntax that is used in finding the element via "id" on the Selenium WebDriver.

Here is the whole code for finding the Google Search text box in the test script.

Right Click on the options Google Search Button and Choose Inspect Element
It will download the window that consists of all the codes that are included in the development of the Google Search button.
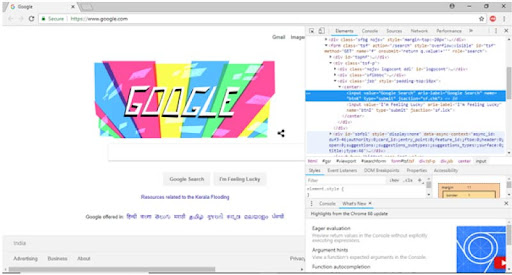
Select the value of the name element that is "btnk"

Listed below is the Java syntax to find elements via "name" on the Selenium WebDriver.

Given below is the complete code that is used for finding the Google Search button on the test script.

Step 5: This is the perfect time for coding. As you have embedded the comments for all the blocks of code, you must explain the steps precisely.

The Eclipse code window would look like as given below:
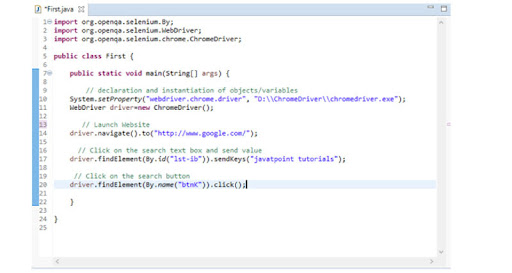
Step 6: Now, Right Click on your Eclipse code and choose Run As > Java Application.
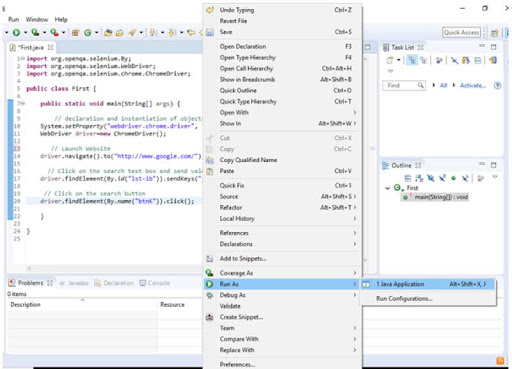
Step 7: The output for the test script which is given above will be displayed on the Google Chrome browser.
The elucidation of the code
Import Statements/Packages
In Java, import statements are used for importing the classes that are available in the other packages. In a nutshell, import the keywords that are used for import user-defined packages & built-in packages on the Java source file.
org.openqa.selenium.WebDriver: The references for the WebDriver interface are needed for instantiating the new web browser.
org.openqa.selenium.chrome.ChromeDriver: The references of the ChromeDriver class are needed for instantiating the chrome-specific driver on the browser by using the WebDriver class.
Instantiating variables and objects
The driver object is instantiated via using the command
WebDriver driver=new ChromeDriver();
Launching the Website:
For launching the new Website, you must navigate().to() method that is used in the WebDriver
driver.navigate().to("http://www.google.com/");
Click on the Element
The instance code that is used for locating and parsing the values on the specific web element is given below.
driver.findElement(By.id("lst-ib")).sendKeys("javatpoint tutorials");
Selenium RC
The Selenium RC occupies a major position in the Selenium Test Suite and it permits you to write the test cases using any of the programming languages for automating the tests. Here in this Selenium Tutorial, you will be able to explore in-depth the Selenium RC, its uses, and how to install and start a Selenium server.
Why use Selenium RC?
The Selenium RC is written using Java and it permits the users to develop the test scripts specifically for web-based applications. The programming language could be anything that the user prefers. There are many drawbacks with the Selenium Core or Selenium IDE and these things have been set right in the Selenium RC. Many restrictions and loopholes were found in the Selenium core. And this is made to enjoy the benefits of a tool completely. Further, the testing process is tiresome to reach the desired goal.
Now, let us know What is Selenium RC is all about?
It is an open-source automated testing suite that is completely free. Selenium has grown tremendously over the years in terms of automated web-based testing. It not only supports different platforms and browsers it also helps to compete efficiently over the other commercially available tools such as HP QTP (Quick Test Professional) or HP UFT (Unified Functional Testing).
This revolutionary movement towards testing is seen in the present industry. The process of repetitive manual test scenarios has surged the need to bring in the practice of automating all the manual test scenarios.
Before getting deep into the functionality of the Selenium RC, here in this Selenium testing tutorial let us know the upsides of using the Selenium RC.
Advantages of using Selenium RC
The method of execution of repeated test cases is backed with the aid of automation. Below we have enlisted the major benefits of using the Selenium RC.
- It supports testing a large test matrix.
- It supports parallel execution.
- It helps in implementing and encourages us to make use of the unattended execution of the testing pro.
- Every task enhances accuracy and helps in reducing human-generated errors significantly.
- Money and time are also saved significantly in this process.
- Also, the benefits do help in reaping higher ROI and faster GoTO market. Numerous automated testing benefits are comprehended and acknowledged in the Software testing industry.
Functions of Selenium RC
The functioning of the Selenium RC is based mainly on its components. All the components have an important role in running those test scripts.
RC Components
Generally, the components of the Selenium RC are held responsible to automate the test scripts. The components are:
The Selenium Server is entitled to propelling and killing the browsers. Also, it will help you to interpret and run all the Selenium commands that are sent right from the test program. It acts as the HTTP proxy for verifying and intercepting the HTTP messages that are passed from an AUT to the browser.
Also, there are client libraries that provide the interface between the Selenium Server and all the programming languages.
Selenium Server
A Selenium Server receives the Selenium statements right directly from the test program and deciphers them. A Server helps you in reporting the output of a program once the tests are completed running. A Selenium RC Server aids in grouping the Selenium Core along with the bundles that are inserted into a browser. A Selenium Core that has been coded in a compilation of the JavaScript methods. Also, these functions help in executing and interpreting the Selenium commands with the aid of a JavaScript interpreter within a browser.
The Selenium commands that are utilized in the test programs could be accessed via simple HTTP requests of a Server. Over here, the programming language can send the HTTP request and it could be used for automating Selenium tests into the browsers.
Client Libraries
A programming platform is required for running the commands right from a designed program that is provided by client libraries. The other client library is backed by every language that is supported by it. The Selenium client libraries provide the application programming interface. It is the compilation of the function that supports you to run all the Selenium commands right inside the program. The Programming functions that are found inside all the interface supports every Selenium commands.
The APIs that are found in the Client libraries are responsible for passing the Selenese commands right into a Selenium Server. The Server later conducts the tests or processes the specific function regarding the AUT which is nothing but the application under test.
The APIs that are found in the Client libraries are more responsible for receiving the results and passing them to a program. The outcomes could be saved in a variable. The program can even report the incident as either success or failure. In the event that an unanticipated error occurs, proper action should be taken.
The Test program could be developed by writing the program that runs using the Selenese commands and also using the APIs that are used on the Client library. When there is a Selenium test script it should be created in the IDE of the Selenium code and it should be created as the alternative method. Also, the IDE can translate the commands into an API function and calls for the client driver. The Selenium Training in Mumbai at FITA Academy supports the students of the Selenium Course to learn the Selenium RC concepts and their role in the Selenium testing suite efficiently under the mentorship of real-time professionals.
Methods to install Selenium
The Selenium need not be installed. There are a group of libraries that are required to be downloaded based on the language you use. Once, you have chosen the language, then you should
Have the Selenium RC Server downloaded on your system,
Setting up the programming project based on the Client driver that applies to your language.
Methods to install the Selenium Server
- A Selenium Server is a single Java jar file and it need not be installed.
- The .zip files should be downloaded to your PC.
- Also, it should now be distilled from the required directory. Following the above-mentioned methods, you can quickly download the Selenium Server.
Methods to get-start with the Selenium Server
The Server should begin right before even a test. The users must move the folders where the Selenium RCs are found and also the command should run properly.

This process could be reduced significantly upon creating the batch file or executables (.bat on Windows or .sh in Linux) that consists of the above command.
The shortcut should be made executable to the file that is found on the desktop. By double-clicking the icon, it will start the server. If you need to run the server, you'll need to make sure Java is installed and the PATH variable is set up correctly. Also, you should see if there is the proper installation of Java and whether it has been created using the command that is given below.

When the Java version is sent back you can use the Selenium RC taking into consideration 1.5 or much later.
The Approach to be followed for reporting the results using the Selenium RC
Here in this Selenium tutorial, we will guide you through the approach and the ups and downs of the Selenium RC.
We do not have any specific mechanism that the Selenium RC should follow for reporting results. The users should be permitted to create the customization based on the needs and also the features must be chosen according to the programming language that could be used. This notion works out pretty well, but the users should do it if they require something that has to be prepared in advance by them. Also, the existing library or test framework should meet the requirement of rapid reporting and the code that is developed by you.
Reporting tools of the Test Framework
A test framework could be chosen for predominant programming languages. Also, they provide a test engine that is flexible for executing the tests. There are library codes that aid to report the results similarly. There are two general test frameworks in Java - JUnit and TestNG. NUnit is used mainly for .NET platforms.
Testing Report Librairies
The third-party libraries are mainly devised to report the test outcomes in a specific programming language. These options are also enabled in this. You have the option of a variety of formats such as HTML or PDF is also supported.
What is the commonly used approach that is used by the Selenium RC?
A predominant of the people who begin with the testing frameworks prefer to begin with the reporting features of the frameworks. Later they begin to explore the libraries that would bother them less to develop anything. Ever since people began to operate the Selenium they started to introduce their signature print statements for reporting the progress. It often results in the users building their reports and using them along with the test framework or the library.
Methods to use the Java Client Driver
When you need to work with the Selenium using Java initially, its Client driver should be installed. The steps that are given below will help you to understand how to use the Java Client Driver
- First, download the needed Java Driver zip files.
- Extract the selenium-java.jar file.
- Now, open the Java IDE namely Eclipse, IntelliJ, or Netbeans.
- Create a Java project
- The selenium-java-jar files should be added to the project
- The selenium-java-jar files should be added to the project classpath
- Run the Selenium server via the console
- The test shall be executed through the command prompt or a JavaIDE.
Methods to Use Python Driver
Initially, you will need the Python Driver to be installed in your system before you could use the Selenium. Mentioned below are the steps involved in the installation of the Python Driver
- Firstly, the Selenium should be installed through PIP, and you can find the downloads here.
- Secondly, the Selenium test should be written in Python code or the script should be exported right from the IDE to the Python files.
- Thirdly, the Selenium Server shall run with the aid of the console.
- Finally, the test could be executed from the Python IDE or the Console.
Methods to use the .Net Client Driver
- First, we have to understand that using DotNet with Selenium could be a little different in the aspects of the installation procedure. Below we have listed the steps to do it:
- On the SeleniumHQ, you may require to download the SeleniumRC.
- Then, you may need to extract the folder as you do for the other languages.
- NUnit requires it to be downloaded and configured. An NUnit could be used as the test engine. The tests could be run with the help of the main() function.
- Now, you should open the .NET IDE just like Visual Studio or SharpDevelop.
- Create the a.dll class library.
- The references are required to be added to the respective DLLs.
- A Selenium test could be written using the .NET languages namely VB.NET and C#. Later, you have to export the script to the C# file right from your Selenium IDE and now the code could be placed in the class file.
- Then you could include the NUnit into the project as it could be used. Further, the test shall run using a main() program.
- A Selenium Server should run from a console.
- Finally, you can run the tests from the respective IDE, it can either be command prompt or NUnit GUI.
Methods to use the Ruby Client Driver
- The Ruby Client Driver is much easier for installing. The only thing you may need here is that you should have worked with this language earlier.
- Initially, install RubyForge in case RubyGems is not there by default.
- Later you can run the command: gem install selenium-client
- You will need to add the required "selenium/client" right at the starting of a test script.
- Now write the test script with the aid of the Ruby harness such as RSpec, Mini:: Test, and Test:: Unit.
- Also, you could run the Selenium Server via a console
- The tests could be executed in the same way as that of other Ruby scripts.
What is the difference between Selenium RC and Selenium WebDriver?
Both the Selenium Remote Control (RC) or the WebDriver permits the testers to make use of their programming languages based on the test scripts. The tests could run on various browsers however they differ in few cases. Let's see the differentiation between the Selenium RC & Selenium WebbDriver.
|
Selenium RC |
WebDriver |
|
The Selenium RC encompasses a much more complex architecture. The Application is named Selenium Remote Control and should run before the tests get started. |
The Selenium WebDriver has the most simple architecture. The browsers are controlled right from an OS level and should just require the language IDE. |
|
The Selenium RC should be much lower as they use the JavaScript program which is called the Selenium core. |
The WebDriver is more rapid since the engine of the specific browser is used for controlling it. |
|
Also, it has access to all the disabled elements. |
Also, the WebDriver communicates with the pages realistically. |
|
The Selenium RC also has a more mature API however there could be redundancies that shall confuse the commands. |
Also, the WebDriver consists of a simpler API and they do not consist of redundancies and confusing commands. |
|
The Headless htmlUnit browsers would not be backed up by the Selenium RC. The Real and Visible browsers are required by the Selenium RC. |
The WebDriver supports the Headless htmlUnit browser. |
Selenium Grid
The Selenium Grid is one of the important parts of the Selenium suite that is mainly specialized in running the different tests over operating systems, machines, and browsers parallel. This is possible because you can do it by routing the commands of the remote browser instance and where the servers act as the hub. The User is required to install the remote to execute all the tests. Grid 1 and Grid 2 are two variations of the Selenium Grid.
Here in this Selenium tutorial, we are going to see about the Selenium Grid functions, applications, and architecture extensively.
A Selenium Grid primarily makes use of the "hub-node" concept where you can run the test on the Single-machine which is called the hub, however, the execution is possible only with the aid of the different machines that are known as nodes.
Use cases of Selenium Grid
You can use the Selenium Grid when you need to do one of the following things that are mentioned below:
Besides the above-mentioned commands, there are a few sets of commands which are highly popular among testers. The table which we have provided below enlists the popular Selenium commands and their description.
Running the test in contrast to machines, operating systems, and browsers at a time: Ensures that the application that is used is tested completely and that it is compatible over a different range of Operating systems and browser combinations.
Save time in executing your test suites: When you set up the Selenium Grid for running, let us take into consideration how to conduct 3 tests at a time, then you must be able to complete the entire test three times faster.
Before getting deep into the waters of Selenium Grid architecture, let us get a clear idea of Selenium grid 1 and grid which are the important aspects in the Selenium basics. The table that is given below will differentiate the features and functionalities of the Selenium Grid 1 and Selenium Grid 2
|
Selenium Grid 1 |
Selenium Grid 2 |
|
The Selenium Grid has its remote control which is way more different from the other Selenium RC Server. Also, they are considered to be two different programs. |
Grid 2 of Selenium The Selenium Grid 2 jar file is kept together with the Selenium Server jar file. |
|
In Selenium Grid 1, you must first download and then configure the Apache Ant before you can Grid 1. |
The installation of the Apache Ant in Grid 2 is not required. |
|
It is capable of supporting only the Selenium RC scripts/commands. |
It could support both the Selenium WebDriver Scripts and RC. |
|
Also, you can automate only one browser for every remote control. |
The remote control is capable of automating up to 5 browsers. |
The architecture of the Selenium Grid
The Selenium Grid consists of the Hub and Node Architecture.
Hub
- A hub is the center point where you will load all your tests into it.
- Also, there must be only a single hub in the grid.
- A hub should be installed only when there is a single machine be it the computer whose browser is Internet Explorer and the Operating system is Windows 7.
- The machine should consist of the hub where the tests could run and you will also see the browser that is being automated on your node.
Nodes
- Generally, Nodes are Selenium instances that help in executing the tests that you want to load on a hub.
- In the grid, there could be several nodes.
- The Nodes could be installed on different machines along with various browsers and platforms.
- The Machines also run the node without needing to be on the same platform as that of a hub.
A Selenium Grid could be set up using two different ways:
- Command Line
- JSON Config file
Setting up of Selenium Grid using the Command Line
Over here, we are going to use 2 machines. The Systems initially begin with the first machine which is the hub. Whereas the other machine would run the node. To comprehend this is easy, we shall now call the machines where the node runs as "Machine X" whereas the machines in which the hub runs will be termed as "Machine Y". Now, you should note down the IP addresses. Let us consider that Machine X has the IP address of 192.168.1.7 and Machine Y - 192.186.1.8.
Step 1: Now, download the Selenium Server by using the URL
https://www.selenium.dev/downloads/

Step 2: Now, Place the Selenium Server.jar file in the HardDrive. Here we are placing it on the C drive for both Machine X and Y. It will help you to accomplish your process with the Selenium Grid installation. To install the Node and Hub, follow the instructions outlined below.
Step 3: Here, we are going to install the hub. Go to Machine X. On using the command prompt you can navigate to the origin of the Machine X's - C drive. The Selenium Server will be installed in this directory.
In the command prompt, you should type

And now the hub has been downloaded successfully.
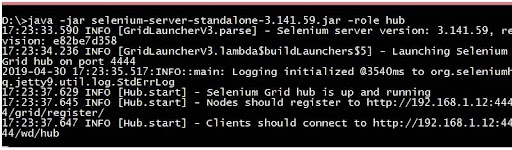
Step 4: You can also use the alternative method to check whether a hub is running via a browser. The Selenium Grid, in default, makes use of Machine X's port 4444 for web interface purposes.
You can simply open the browser and navigate to the URL --http://localhost:4444/grid/console
You can also verify whether the Machine Y could access the hub's Web interface on launching the browser and moving to “iporhostnameofmachineX” where the IP address or hostname on which the hub is running the machine. As Machine X's IP address is 192.168.1.12, then the browser on the Machine Y you must type http://192.168.1.12:4444/grid/console
Step 5: Now, the hub is being set up by default, you are going to install the node. Move to Machine Y and install the command prompt.
Move to the origin of the Drive C and enter the below code. Earlier we utilized the IP address 192.168.1.12 and this is where the hub is running. You can use port 5566 and you can choose any of the free port numbers as you wish to.
Selenium Notes: You may have to provide the path for the Gecko driver while using Firefox. The code that has to be used here is
java -Dwebdriver.gecko.driver=”C:\geckodriver.exe” -jar selenium-server-standalone-3.141.59.jar -role webdriver -hub http://192.168.1.12:4444/grid/register -port 5566
And now when you tap on the Enter button the command prompt would be similar to the image that is provided below.
Here, you should have configured the simple Grid already. You are now ready to remotely conduct the test on Machine B.
Designing the test script which shall Run on the Grid
For designing the test scripts, you can run the grid and you should make use of the RemoteWebDriver objects and DesiredCapabilities.
- The RemoteWebDriver is used for setting the node that the test shall run against.
- DesiredCapabilities is used for setting the different types of OS and Browsers that are used for automating.
For using the DesiredCapabilities object, firstly you must import the package that is given below.

For using the RemoteWebDriver object, firstly you must import the packages that are mentioned below.

Using the method of DesiredCapabilities Object
Navigate to the Grid's Web interface and click on the image of the browser which you need to automate. Make a note of the platform and the browser name that is listed by the tooltip.

Here we can use the browserName "Firefox" and "XP". You can use the platform and the browserName in the WebDriver as depicted below.
Selenium Notes: First you must import the packages.
RemoteWebDriver Object method
Import the required Packages into the RemoteWebDriver and you can now pass on the DesiredCapabilities object that was developed as the parameter to the RemoteWebDriver object.
Know-how to Run the sample test case on the Grid
Mentioned below is the simple WebDriver TestNG code which is used for creating the Eclipse on Machine A. When you run them, then the automation would be performed rightly on Machine B.
The test should be passed
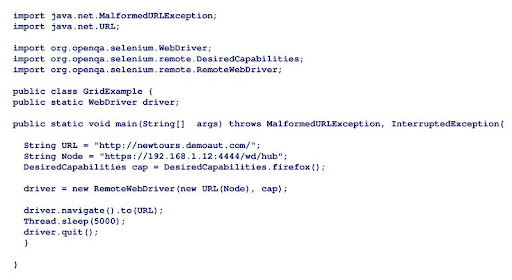
Selenium Grid Configuration using the JSON File
The abbreviation of JSON is JavaScript Object Notation. This is the standard method that is used in the exchange of data between the Web browser and browser. The Selenium has the built-in JSON config file which could be used for setting up the Selenium grid.
Follow the instructions given below for configuring the Selenium Grid using the method JSON config file.
Step 1: Install the code for the JSON config file by using the path mentioned that is mentioned below:
The Code is,
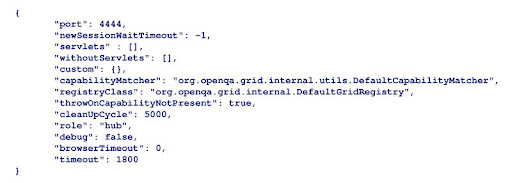
Step 2: Now, Copy and Paste the code to the text editor on your Notepad along with the '.json' extension.
Step 3: Install the hub by using the command prompt that is given below

Selenium Notes: The JSON file and the Selenium standalone jar file must be found in the same directory.
Step 4: Now, the screen would appear and it indicates that the hub is used in setting it up successfully.
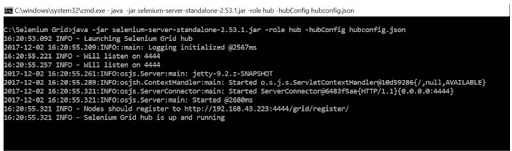
Step 5: Go to the Web browser open and try to connect the URL that is given below.

Selenium Notes: The URL shall differ from one machine to the other. The URL should be followed by the "Nodes must register to" as mentioned on the above screen and it should be used.
Step 6: The Grid Console screen would appear and it denotes that the hub is up and that it is running.
Configuration of the Nodes using the JSON
Step 1: You can download the sample node config file which is given by the Selenium using the URL that is mentioned below
Selenium Notes: It is crucial to note that if you are using Selenium 3.0 or a later version, you must use the JSON file below.
Step 3: Now, run the Command on the Command prompt

Selenium Notes: Prior to running the command, ensure that the drivers for all the browsers are installed into the local machine directory.
Step 4: The screen will appear as depicted below when the key is pressed.
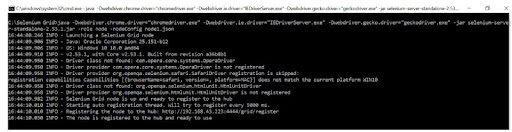
Step 5: Move to the Grid Console for checking whether the nodes are configured successfully.
The browsers shall now interpret the grid console. Now, it is sure that the nodes have been configured successfully.
Given below is the sample test cases that have run on the Selenium Grid
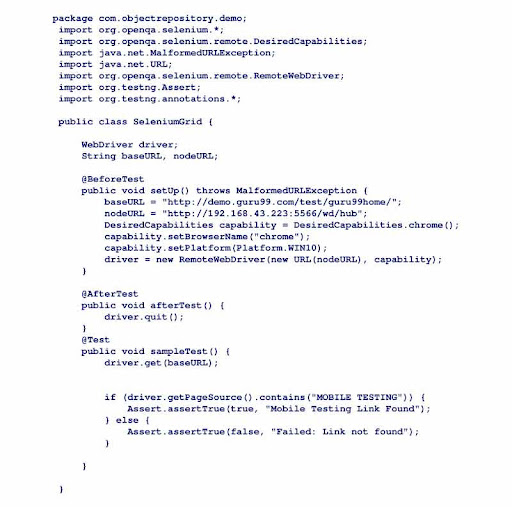
The above code installs the chrome browser and moves to the URL that is mentioned in the 'base URL variable. It can be checked using the link name 'Mobile Testing' and it shall be displayed on the page URL or on the 'nodeURL' variable also it can be changed for reflecting the IP addresses on remote machines. The test result could be checked by default and also the TestNG report is generated.
On the whole,
The Selenium Grid is used for running different tests concurrently on various platforms and browsers. The Grid makes use of the hub-node concept. A hub is a central point wherein you can load all your tests. The Nodes are the Selenium instances that help in executing the tests which are loaded on the hub.
For installing the Selenium Grid, you must download the required Selenium Server jar file and the similar file that is used for running the Selenium RC tests. You can make use of the two different ways to check whether the hub is running by using the command prompt or through a browser.
For running the test scripts on the Grid, you must be aware of the DesiredCapabilities & RemoteWebDriver objects.
The DesiredCapabilities is utilized for setting up the kind of OD and browser which is used for automating. The RemoteWebDriver is used for setting the node that is used for running the test.
The Selenium Training in Delhi at FITA Academy is a holistic course that makes the learners of the Selenium course become proficient with the Selenium grid concepts and their applications under the mentorship of real-time professionals.
Selenium with Python
Here in this Selenium Tutorial for beginners, we are going to see about Python introduction, navigation, interaction, locating elements, and writing tests with Python in-depth.
Selenium's Python module is developed for performing automated testing with the aid of Python. By using the Selenium WebDriver, the Selenium Python bindings provide a straightforward API for writing functional and acceptance testing. By using Selenium with Python API, you could successfully access every functionality of the Selenium WebDriver directly.
Now, let us see the features of the Selenium Python Introduction
The Selenium Python bindings offer a convenient API for accessing the Selenium WebDriver namely Chrome, Firefox, Internet Explorer and much more. The present Python versions are 2.7, 3.5, and above them.
Portable and Open Source: Selenium is a web testing framework that is both portable and open source.
Combination of DSL and tool: Selenium is the mix of DSL (Domain Specific Language) and tools for carrying out different kinds of tests.
Test execution time is reduced: The Selenium supports parallel testing execution and it significantly reduces the time that is taken for executing the parallel tests.
Simple comprehend & implement: The Selenium commands are grouped under different classes and it makes them comprehend and implement easily.
Minimum resources are required: Selenium needs only lesser resources when you compare them with its competitors like RFT and UFT.
Enables support for different OS: This is capable of extending its support in different OS namely Linux, iOS, Android, Windows, Solaris, and Mac.
Supports different Browsers: It can support Mozilla, Google Chrome, Opera, Internet Explorer, Edge, and Safari.
Enables Parallel Test Execution: It also allows parallel test execution and it significantly slows down the time for improving the efficiency of different tests.
Selenium Python Installation Method
Irrespective of any Operating System, the Selenium could be installed when you have the Python installed in the operating system. In case, if it is not, you must download and configure the recent version of Python (3).
Method one
Open the Terminal/Cmd and write the command as written below:

Method Two
You can also download source distribution right here, unarchive them and run the command as given below

Configuring the WebDriver
Once, you Install the Firefox, PhantomJs, Chromium
- To use Firefox you need to configure the GeckoDriver
- To use Chrome you need to configure the Chromium
Here in this Selenium testing tutorial go through the steps that are involved in different Operating Systems.
Procedure for the Linux Operating System
Step 1: Navigate to the geckodriver and release pages. Look for the recent version of your driver and the platform to download it.
For instance:

Step 2: Extract the File

Step 3: Make them executable

Step 4: Move the files to the respective usr/local/bin

Procedure for Windows Operating System
Step 1: The first step is the same here as well. Download the GeckoDriver.
Step2: Extract them using WinRar or any other applications that you have.
Step 3: Add them to the Path by using the Command Prompt.

For instance,

Creating Simple Codes

Output:
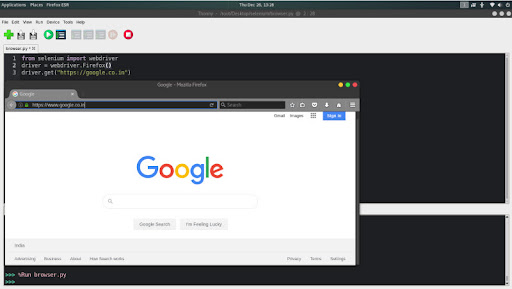
Know-how to navigate the links by using the get method alongside Selenium Python
Selenium's Python Module is developed for performing automated testing along with Python. The Selenium Python binding offers a simple API for writing the functional/acceptance tests using the Selenium WebDriver. With Selenium Python API you shall access all the functionalities of the Selenium WebDriver directly. Here in this Selenium with Python tutorial, we will see how we should use the Selenium Python for navigating into any of the links as given on the web using the get method of the Selenium WebDriver in Python.
Methods to Navigate the links using the Python Selenium
Initially, the thing you have to do with them is that the WebDriver is used in navigating them to the link. The common way to do that is by using the calling the get method:
Syntax:

For instance,

The WebDriver waits until the page is loaded (which is right before the onload event) and before turning the control of your script or test. It is all worth making note of when your pages utilize more AJAX on the load than the WebDriver which shall not know the time when it has been completely loaded. In case if you must ensure, the pages should be loaded completely when you can make use of the waits.
Locate the Single Elements in the Selenium Python
The Locators Strategies in the Selenium Python is the approach that is used in finding the elements from the page. Also, it is done to operate similarly. Selenium's Python Module is used for developing automated testing along with Python. With the help of Selenium WebDriver, the Selenium Python bindings provide a straightforward API for writing acceptance/functional tests.
Given below are the important Locating Strategies for finding the single first elements.
The Selenium Python follows the various locating schemes for the elements. There are eight distinct methods for finding the element. See the list that is given below for locating the schemes using the Selenium in Python-
|
Locators |
Description |
|
find_element_by_id |
The matching location will be returned because this is the first element containing an id property. |
|
find_element_by_name |
It is the first element with a name attribute value that mat ches the location and it will be returned. |
|
find_element_by_xpath |
This is the first element with an xpath syntax that matches the location and it would be returned. |
|
find_element_by_link_text |
It is the first element along with a link text value that matches the location and it shall be returned. |
|
find_element_by_partial_link_text |
It is the first element along with a partial link text value that matches the location and also this will be returned. |
|
find_element_by_tag_name |
This is the first element with the provided tag name and it will be returned. |
|
find_element_by_class_name |
This is the first element that comes along with a matching class attribute name and it would be returned. |
|
find_element_by_css_selector |
It is the first element that matches the CSS selector and it will be returned. |
Locating different elements in the Selenium Python
The Locator Strategies in the Selenium Python are the methods that are used in identifying the single or different elements from a page. Also, it performs similar operations. Selenium's Python Module is used for developing automated testing along with Python. The Selenium Python bindings offer a simple API for writing the acceptance/functional tests with the aid of Selenium WebDriver.
Here in this Selenium tutorial, we are going to see the seven different ways of locating.
|
Locators |
Description |
|
find_elements_by_name |
Every element with the name attribute value that matches along with location would be returned. |
|
find_elements_by_Xpath |
Every element with an xpath syntax matches the location and it shall be returned. |
|
find_elements_by_link_text |
Every element along with the link text value matches the location and it would be returned. |
|
find_elements_by_partial_link_text |
Every element with the partial link text value shall match the location and it would be returned. |
|
find_elements_by-class_name |
Every element along with the matching class attribute name would be returned. |
|
find_elements_by_css_selector |
Every element with the matching CSS selector would be returned. |
|
find_elemnts_by_tag_name |
The tag name is provided for each element, and it is returned. |
The Selenium Training in Kochi at FITA Academy proficiently teaches the Selenium testing framework and its concepts with Expert training and guidance.
Selenium with C#
Selenium, as we all know, is the best automated testing tool that supports a variety of operating systems and browsers. And that it permits the tester to use different languages to work with it. Here in this Selenium with C Sharp tutorial module, we will see about the functions and operations of the C programming language in the Selenium.
Firstly, let us have an overview of the C programming language.
- C# is the object-oriented programming language that runs primarily on the Dot Net framework and is pronounced as the C-sharp.
- The C# Language is developed for running the CLR and it stands for the Common Language Runtime.
- With C# you can break your program into parts with the aid of the functions. So only this is often called the structured programming language.
How C# is useful in automation testing?
- The C# is highly useful in automation testing as it permits the automation test engineer for developing the application with the support of Visual Studio and on the Dot Net framework.
- The C# is one of the programming languages that endeavors support in binding along with the Selenium.
- This language helps in binding and it will be updated in cohesion with the Java program.
- The C# IDE is the Visual Studio that provides faster development & debugging experience when compared to Java's Eclipse.
- The C# has many inbuilt functions and it helps in boosting the development pace.
Fundamental Syntax of C#
The C# program consists of the below sections
- Namespace declaration
- Classes
- Class Attributes and Methods
- Main method
- Program statements
For example
Given below is the sample of the Selenium C# program that helps you to print the "FITA Academy" on your system console.
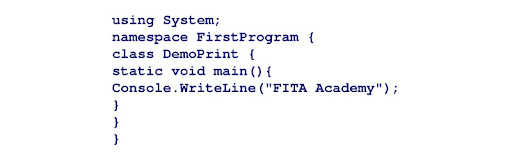
To elucidate further,
The Namespace in the above example of the Selenium C# is the compilation of different classes. All the namespace should be declared using keywords 'using'.
- The Initial Statement of a code must include the namespace "System" in the program. The System namespace explains the fundamental events and classes that are used in the C#. A Namespace should be used based on the requirements of the program.
- The second statement creates a namespace for the class "DemoPrint" called "FirstProgram." The C# file consists of different classes that are found within a similar namespace.
- The third statement comprises the class declaration. The class may consist of multiple methods and attributes.
- The fourth statement comprises the declaration of the Main method. All ‘classes' execution begins with the main method.
- The final statement is the C# syntax that is mainly used in printing the statement for a console. The WriteLine is the method of a class 'Console'.
Setting up of the Visual Studio along with the Selenium Webdriver
Here in this Selenium tutorial module, we will guide you with the step by step process that is involved in setting up the Visual studio along with the Selenium WebDriver:
The Visual Studio is the Integrated Development Environment (IDE) that is utilized by a predominant of the developers for building the applications over different platforms namely iOS, Android, and Cloud-based applications.
Step 1: Move to the URL https://visualstudio.microsoft.com/downloads/ and then choose the option 'Free download' that is displayed in the Visual Studio Community tab 2019
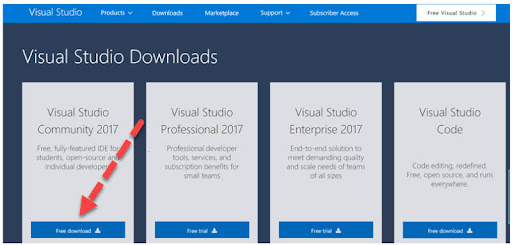
Step 2: Open the extension that is downloaded. Then, click “Yes” when the Admin asks for the rights.
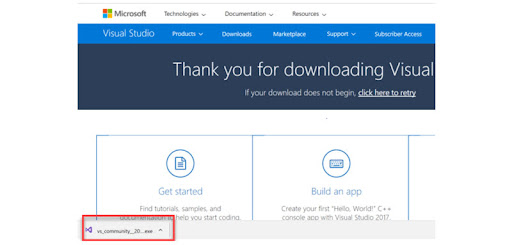
Step 3: A popup will appear below. Now, choose the 'Continue' option.
The file would be downloaded in the manner depicted in the figure below.
Step 4: On the next screen,
Pick the checkboxes for
Net desktop development
Universal Windows Platform Development
Click the 'Install' option.
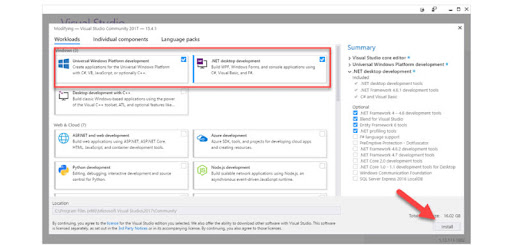
You can wait for the installation of all the components to accomplish. The Files comprise 16GB size and they consume more time.
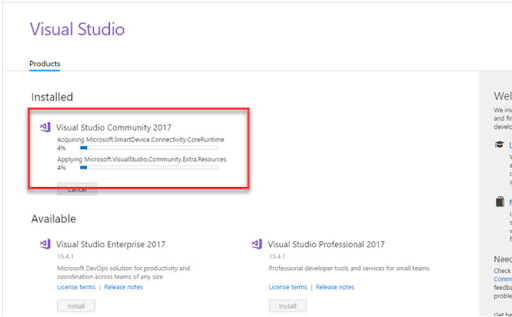
Step 5: The pop-up will be displayed as given below. Now, click on the option "Restart" button.
Step 6: When the computer has restarted, go to the start menu and select "Visual Studio 2017". Now click on the search result option. The below popup would appear. Select the option "Not now, maybe later when you are not having any existing account.
Step 7: On the next screen,
- Select your preferred color scheme on the following screen.
- Click the option "Start Visual Studio"
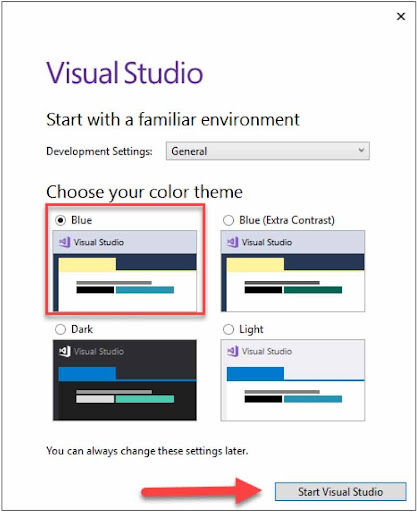
Step 8: The "Get Started" Visual studio screen would appear.
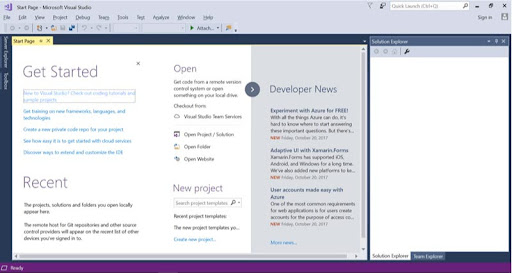
Selenium and C# WebDriver Commands
The C# makes use of the interface 'IWebDriver' for the browser interactions. Below are the set of commands that are found in the Selenium in C#
- Browser commands
- Web Element commands
- Dropdown commands
Here in this Selenium with C Sharp tutorial for beginners, we have focused on all the important commands that any beginner must know.
Browser Commands
|
Command Name |
Description |
|
Url Command |
This command is mainly used for opening the specific URL that is found in the browser. |
|
Title Command |
You can use this command for retrieving the page title of a web page that is kept open currently. |
|
PageSource Command |
This command can be used to obtain the source code of a currently open web page. |
|
Close Command |
You make use of this command for closing the browser instances that were kept open recently. |
|
Quit Command |
You can use this command for closing all the browser instances that are kept open. |
|
Back Command |
You can use this command for moving to the previous page of the browser history. |
|
Forward Command |
You can use this command for moving to the very next page of browser history. |
|
Refresh Command |
This command is mainly used for executing the browser refresh function. |
WebElement Commands
All of the elements on a Web page are represented by the Web element. It is represented using HTML tags. Every button, link, textbox, table, frame, and image comes under the Web elements. Generally, the Operations of the Web elements could be triggered using an IWebelement of the Webpage. For interacting with the Web element, you must identify the elements of a web page and you must perform all the operations on them. The tools such as Firepath and Firebug are used in finding the Xpath of a Web element.
Listed below are the important Web element commands that are found in the C#
|
Command Name |
Description |
|
Click Command |
You can make use of this command for clicking on the Web element. To click the element, first, it must be seen on the webpage. You can use this command as they are used in the radio button and checkbox operations. |
|
Clear Command |
The purpose of this command is to clear the existing contents of a textbox. |
|
Send Key command |
You can use this command as the input value that is found in the text boxes. Also, the value must be entered and passed as a parameter. |
|
Displayed Command |
The purpose of this command is to find the particular element that is shown on a webpage. With this command, you can return the Boolean value; true or false on the basis of the visibility of a web element. |
|
Enabled Command |
With the aid of this command, you can seamlessly find the specific web element that is enabled along with the Web page. Also, with this command, you can send back the Boolean value; true or false as the final result. |
|
Selected Command |
You can use this command for finding the specific web element that is being opted for. Further, this command is used in the radio buttons, checkboxes, and select operations. |
|
Submit Command |
This command resembles more of the click command. The major difference is that whether the HTML form has the button that is along with the type submit. Whereas the click command clicks on any button, but submits the command and clicks only on the buttons with the type submit. |
|
Text Command |
The main purpose of this command is to send back the inner text of the Web element. Also, this command helps in sending back the string value as the final result. |
|
TagName Command |
With this command, you can send back the HTML tags of the Web element. It helps in sending back the string value as a final result. |
|
GetCSSValue Command |
On using this method we can return the color of the web element that is found in the form of the rgba string (Blue, Red, Green, and Alpha) |
Dropdown Command
The Dropdown operations in the C# shall be reached using a Select Element Class.
The below are the different dropdown operations that are found in the C#
|
Command Name |
Description |
|
SelectByText Command |
You can use this command for choosing the option of the dropdown on the basis of the text option. |
|
SelectByIndex Command |
This command is used for choosing the option that is based on the index. The Index of the dropdown begins at 0. |
|
SelectByValue Command |
With this command, you can choose the option that is based on the option value. |
|
Options Command |
By using this command, we can restore the set of options that are displayed on the dropdown. |
|
IsMultiple Command |
With the aid of the command, you can find the dropdown. A multi-select dropdown allows the user to choose the above one plus option right from the dropdown at a specific time. Also, this command helps in sending back the Boolean value. |
|
DeSelectAll Command |
This command is mainly used for the multi-select dropdowns. It aids in clearing the options that are selected already. |
|
DeSelectByIndex Command |
By using this command you can easily deselect the portion which was previously selected by using the index. |
|
DeSelectByValue Command |
With this command, you can easily deselect the previously chosen value upon using its value itself. |
|
DeSelectByText Command |
Most of us use this command for deselecting the value which is been chosen already by using the text. |
The Selenium Training in Ahmedabad at FITA Academy immersively trains the students on how the Selenium testing framework functions and different languages that are supported by the Selenium testing framework. The concepts are taught by Expert Automation testers from the industry to provide real-time exposure to the testing tool.
On the whole,
- To use the Selenium WebDriver along with C# you must install the Visual Studio.
- The NUnit is one of the Unit Testing frameworks that is backed by the Selenium Webdriver and Visual Studio.
- Further, you should NUnit Test Adapter and NUnit Framework onto the Visual studio for using it.
- An NUnit framework could be integrated along with the Selenium on creating the NUnit test class and it shall run the test class by using the NUnit framework.
- The NUnit also permits the tester for using the annotations like SetUp Test and also TearDown for performing the actions right before & after running a test.
- A Selenium WebDriver command could be grouped into three types and they are - Browser commands, Dropdown Command, and Web element Commands.
Selenium with Maven
This tool is mainly used in Java projects. Also, it makes the build more consistent and reliable with other projects. Before knowing about Maven, let us have a clear understanding of what a build tool is all about.
What is a Build Tool?
A Build Tool is fundamentally used in setting up the things that need to run on the Java code independently. It can be applied to the complete Java project. Also, it aids in generating the source code, packaging code, compiling code, to the jar. The Maven offers the common platform to execute all these activities. And this makes the work of a programmer easier and more seamless to handle the bigger projects.
Generally, working on the project for the test automation, you shall need all the Selenium dependencies that are related to it. Usually, the dependencies are upgraded and downloaded manually in the complete cycle of the project. And as the project begins to grow bigger, handling the dependencies could be challenging. And here is where you need an automation tool like Maven to tackle them automatically.
A Maven could be specifically mentioned as the Software Project Management tool and it uses the concepts of the POM - Project Object Model. It allows the users to create the first folder structure and it performs the testing and compilation and also deploying and packing to the final product. Also, it profusely reduces the numerous steps that are followed in the build for processing and making the build a single-step process.
Here in this Selenium tutorial, you will get to know about, What is Maven, and the Maven installation process, Maven Lifecycle in Selenium.
Reason to use Maven
Maven occupies a major role in the handling of the project lifecycle. Maven generally involves code generation, packaging, compilation, and testing. This is the software build tool that functions on phases instead of tasks (just like the case of the Ant). It is mostly used for managing the project's lifespan. Maven helps in the build management process and it is much easier to use. As you are required to mention only certain dependencies on the pom.xml files and the rest other things are taken care of by the Maven.
The key reasons to use the Maven enlisted below
- It aids in simplifying the build process and offers the uniform system
- It manages the distribution, dependency management, and compilation tasks effortlessly.
- It boosts the reusability factor.
- It decreases the steps tremendously like building reports, adding the jar files to a project library, creating jar/war/files for deployment, JUnit test cases.
- It has a repository that is centralized and it handles all the jar files.
What is Maven?
Maven is a Java project management system developed by the Apache Software Foundation. Initially, this was developed for making the build process of the Jakarta Turbine project and it is a much simpler and widely used build process that is uniform and easy.
To be more exact, it is characterized as a software project management solution that employs POM - Project Object Model ideas. It allows the users to develop an initial folder structure to perform the testing and compilation. Later packages and deploy them as the final product. It significantly decreases the number of phases in the construction process, reducing it to a single step.
Listed below are the important terms that you must know for the Selenium Maven tutorial.
Maven Local Repository: This is the local repository that is found in the Developer's machine and it comprises every project artifact. Upon executing the Maven build, every project is dependent on the jars and they are loaded into a local repository.
Maven Central Repository: This is a default repository for all the new projects that are officially found in the Maven. Whenever there are dependencies and if they are not found in the local repository the Maven immediately calls in the central repository to download them.
Project Object Model: The Page Object Model (POM) XML consists of the project detail & configuration that are used by Maven build. It is found in the root directory of all projects.
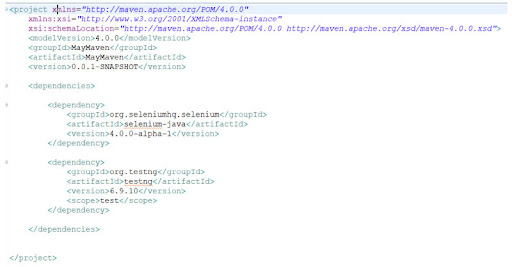
Dependency: In any library on which the Java project is dependent should build or run is called dependency. For instance, Log4j jars, Selenium jars, and Apache Poi jars. Generally, the dependencies are defined using the pom.xml as given below:
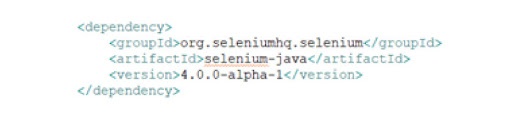
Surefire PlugIn: For executing the unit tests of the application at the time of a test phase of a build cycle, you can use the Surefire Plugin. A Surefire report is also found in two different file formats and they are XML file(.xml) and Plain text file (.txt). This Plugin should be used as it aids the Maven to find the tests even when they don't use the Junit frameworks or TestNG.
Steps to install Maven in Windows
Maven could be installed using Eclipse IDE or the Command line. Firstly, here we are going to see how Maven could be installed using Eclipse IDE in Windows.
Guidelines for installing Maven in the Eclipse IDE
Step 1: Click on the Help option right from the top menu that is found in the Eclipse and choose the Install New Software option.
Step 2: In the newly opened window, you can tap on the Add option.
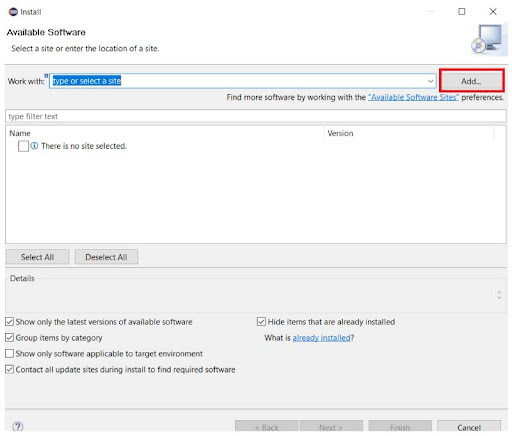
Step 3: On the name text box enter "Maven" and here on the Location text box enter http://download.eclipse.org/technology/m2e/releases/”. This is the URL location from where the Maven could be downloaded.
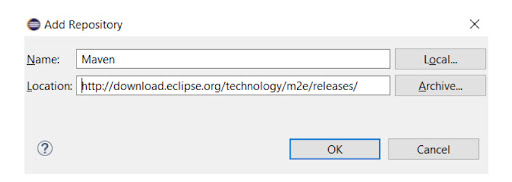
Step 4: The check-box would appear on the pop window. Now verify the check-box and tap on the Next option.
Step 5: Now, wait for the certain minutes for the window to accomplish the process.
Step 6: You can keep default settings and tap on the Next button.
Step 7: Now agree to the Terms and Conditions agreement and tap on the Finish option.
Step 8: You can wait for the installation to accomplish.
Step 9: When the installation is completed, it would ask you to restart the complete eclipse. Select the "Yes" option to see the changes that are being reflected.
Guidelines to install the Maven using the Command Line
Step 1: Launch and configure Java
You should install Java into the system when it is not completed. The recent version of Java could be downloaded right from the link.
Run and type cmd to install the command prompt and verify the different Java versions on the system. You can type the Java version and Enter to check whether the Java version is configured.
Step 2: Create a Java Environment Variable
Once, the installation of Java is completed, you can set up the Java environment variable. Then, open the system settings for framing the Java Environment variable.
Hover to this PC and right-click the empty anywhere within the select Properties.
Select the Advanced System Settings and a new open-up will appear.
Right, from a pop-up window and tap on the Environment variables.
Under System Variables, you can select the New button option.
Save the Variable name box with JAVA HOME and the Variable value box with C\Progra\Files\Java\jdk1.8.0 20 JDL path.
Also, now you could see the newly developed Java variable under our System Variables.
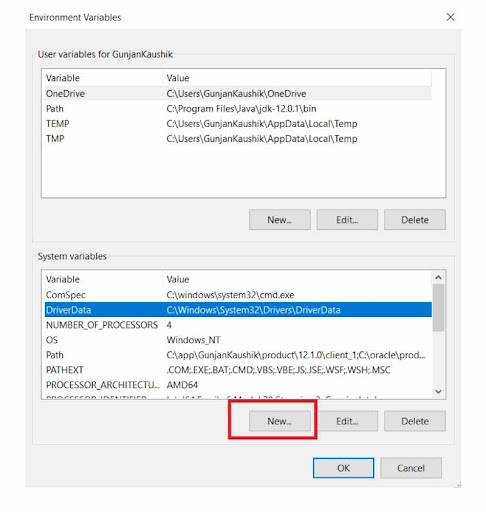
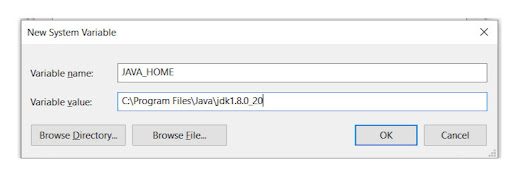
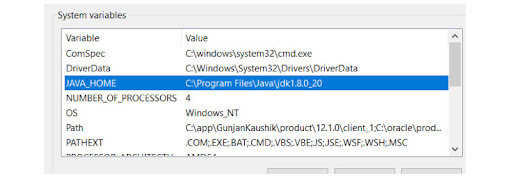
Step 3: Launch Maven and Configure the Maven Environment Variable so Maven could be downloaded directly from here: https://Maven.apache.org/dowmload.cgi

Now, Extract them to some of the locations onto your machine as per convenience. This is located at C:/apache-Maven-3.61 for me.
You can also now set the Maven Environment variable that shows how to set the Java environment in the above-mentioned steps.
Type the Maven_Home in your Variable name box and C:\apache-Maven-3.61.' on the Variable value box.
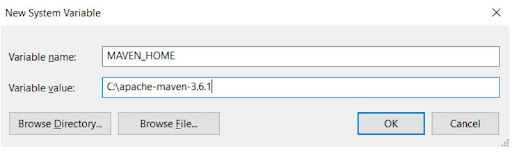
You can now see the recently developed Maven Variable under the banner of the System Variables.
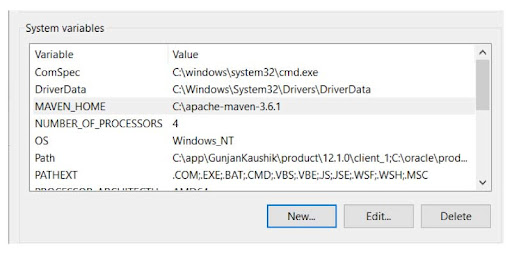
Step 4: Path Variable should be updated.
To run the Maven right from the Command line, you must update the Path Variable that is within the Maven's installation 'bin' directory.
- Using My Computer, go to System Properties.
- Move to the Advanced System Settings option
- Select Environment Variables from the drop-down menu.
- Select the Edit Button that is identified under the User variables.
- In the Variable name box, type PATH, and in the Variable value box, type C:apache-Maven-3.6.1-bin.
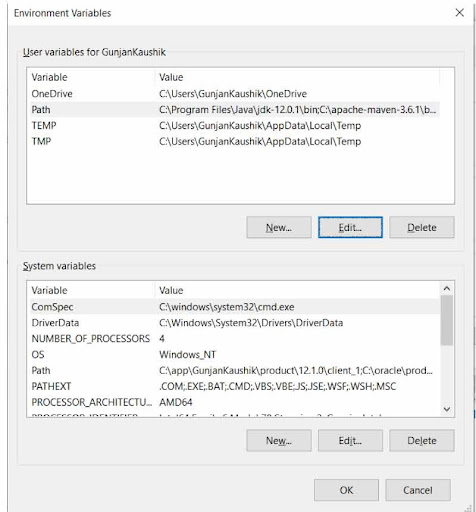
Step 5: Test the Maven Installation
Now, that the Maven is successfully installed into your systems. A Windows command line can be used to inspect them. Now, Open the Command prompt and enter ‘mvn-version’ and tap the Enter option.
Verify and see the different versions of the Maven that are installed on your System that displays the results.
Also, now you are all set with the Maven installation and you can proceed with developing projects using the Maven.
The Selenium Training in Trivandrum at FITA Academy renders the students of the Selenium testing course with the best training practices of the Selenium framework and its applications in real-time practices. By the end of the Selenium Training at FITA Academy, you would have obtained a wider understanding of the Selenium testing concepts and their applications.
Life Cycle of Maven in Selenium
There is the Maven Lifecycle in the Selenium and all the Maven build the following. the various methods are just goals. Before proceeding further, let us first see what these goals are all about.
First, Open the Command line on your system and enter 'mvn' and then tap the Enter button.
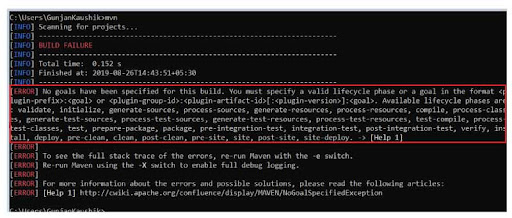
Now you can see the Build Failure Message with the error of being displayed stating no goal is identified on this Selenium Maven tutorial. As you set to parse through this pop-up, you can now see through the different goals that are being mentioned for the Maven project. Here we are going to see some of the default goals for the Selenium testing with Maven.
Compile: This means you must compile the source code of the project
Validate: It indicates to check whether the project is right and other details are available in this.
Test: It denotes that unit test that is compiled for the source code of a project.
Package: It aids in packaging the compiled code into a distributable format, namely JAR.
Integration-test: It aids in deploying the Packages to the environment where you can run all the integration tests.
Verify: It helps in checking whether the Packages are valid.
Install: It indicates the locally installed packages.
Deploy: This is used for the integration or the release environment on copying the final projects onto the remote repository where they are accessed by the other developers or projects.
Clean: It helps in cleaning up the build artifacts that are found previously.
Site: It aids in developing the site documentation of a project.
The above-mentioned default goals are the three important factors for the Selenium test automation and they are:
- Clean
- Install
- Test
We can use these goals alone or we can use them as a combo such as clean-install over here.
Clean: It aids in cleaning the target folder. For example, The folder where all the previous build's libraries like build files (tar, war, or jar files), output files, reports are stored.
Upon executing the 'mvn' - clean this target folder would be extricated.
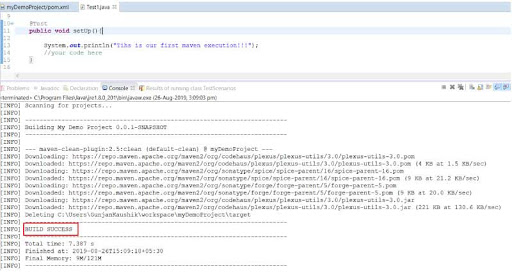
Install: Now, it would launch all the dependencies in terms of the missing jar and build the deployment file(war/jar files of Java). Also, it would now run all these tests.
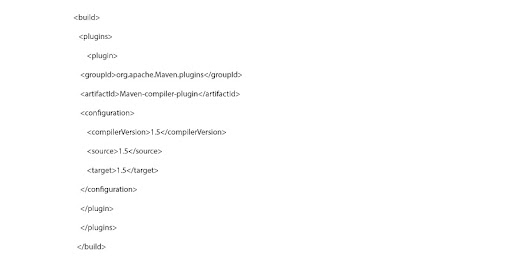
Test: It just simply run all the tests without having to create any of the deployment files.
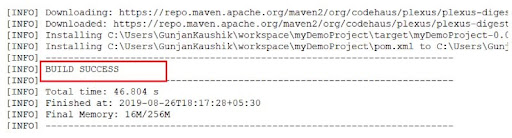
While using the Eclipse IDE, you can directly make use of all these three goals, by right-clicking on the pom.xml and then Run As and choosing any of the options that are given below.
On the whole,
With this Selenium Maven tutorial. you would have got a clear picture of what a build tool is? How Maven is installed and its cycle in the Selenium. With Maven you need not think about how to upgrade and install the project libraries as this tool can automatically perform them once configured.
Selenium Load Testing
Every piece of software that is created must be thoroughly tested. This is done to ensure the application's trustworthiness. However, testing on other aspects is not an easy task. There are certain procedures and protocols involved in it. For an application to undergo all these protocols and procedures involved in it shall consume more time. Now, imagine what happens if it takes more than the estimated period. The clients would just rush into you to deliver the software or the application fastly. It is because time is the most precious thing and this is a well-known factor.
Now, keeping the above statement in mind, let us also consider the situation where you own a website and due to some technical glitches the response of the website is slower and this, in turn, would make the visitors of the website move to the next site. As a result, it would have a tremendous impact on the overall performance as well. Let us say a group of 50 people is trying to find out something from your page. But, your page fails to respond immediately. It is obvious that your leads are being deviated to the next best option. So, have you ever wondered how you can overcome these kinds of problems? The only answer is “Selenium Load Testing” it can help you significantly to overcome the crunches of these kinds. The Selenium Load Testing aids you in optimizing the Website speed and supports you to generate much higher revenue for your business.
Here in this Selenium Tutorial for beginners, we are going to see how the Selenium Load Testing is being performed and also the significance of doing the load testing.
By now this a known fact that Selenium is the open-source testing tool that not only performs Performance and Functional testing. It also proliferates to reuse the functional tests that are found existing and run them to have the concurrent users virtually.
Load Testing is the test functionality accredits that the software will not under-perform under any circumstance and that it permits the complete program to run smoothly under a different condition with "loads" and onto it. Here we have categorized the load testing as Non-functional and Performance testing as the behavior of the program is not completely functional aspect by itself. This has to do more with how a program "performs" in a given set of conditions. Few goals load the testing software and it would take into consideration the things such as the load testing process and over here Selenium is in no way an exception. Below are some of the important goals that have to be considered:
- Finding the response time of any transactions
- Knowing the System performance in different levels of load
- Understanding the Database performance in different levels of the load
- Interpreting the delay of the network and is an inevitable factor for both the server and client.
- Issues that are included in the Software design
- Restriction of hardware where the program is launched and to which a program primarily communicates.
The above are the objectives that have to be fulfilled by load testing and it can easily initiate the steps to perform a load of the testing process while standardizing the step for Selenium testing. However, few improvisations are essential for few outcomes.
Building of a committed Load Testing environment: It is done to ensure that the code that is developed and the unit is being tested on different environments assures that there is no dependency on the local variable of an environment that influences the performance. Also, this Testing environment ensures that you have a production-like environment with endless possibilities of any situation that shall take place in the real-life.
Developing the browser configuration: Here the user can configure the browser-based setting to reflect the real-time situation. For instance, one can configure the HTTP protocol for simulating the HTTP request on a Chrome browser with this step.
Uploading of the Test Case scenarios: Here in this step, the user shall upload the different test case scenarios that are developed for assessing the performance of any software under the specified load. There are few situations to ensure that you have sufficient cases for finding the glitches of a program and there are possibilities to enhance the performance or you could be the weakest link for the failure of any program.
Loading the Testing transaction for finding the application: Here the use follows some guidelines like preparing a separate set of data for all the transactions. All these data must be gathered from real-world circumstances. Also, over here one should place the predicted number of users who are accessing the system. Also, you should simulate the connection lines that speed up the users who may not have access to a high-speed connection. Later you should arbitrate different browsers and the one that needs the compatibility of the program alongside the OS from the users that the real-world users use. Properly aligning all of these shall determine the lead for successful load testing. Also, the thing that has to be noted here is that adding specific and relevant logs at specific "stop points" helps to determine fastly everything if all are running according to the guidelines.
Monitoring and Execution of the test scenario: When the tests are completed then execution of different metrics that are been collected already is set by the instances at the time of running the test scenario and later you can analyze them properly.
Recommendations: When the results are analyzed in-depth, then the team shall put in few recommendations and there are few areas for the enhancement of performance.
Fine-tuning the system: Based on the recommendations that are done in the previous steps, some actions should be taken for fine-tuning the system so all the glitches are removed and the system is advanced to the fullest.
Re-testing: When the fine-tuning is completed all the steps that are mentioned above are practiced again and in some cases, a certain level of testing is performed finally to release them into production.
Significance of Load Testing
- Some of the advantages of doing Selenium Load testing is listed below:
- It not only permits the Load testing also offers the complete suite for other testing frameworks that are found within the hood.
- It helps to find the performance and helps in finding the glitches in the application prior to moving them to the production environment.
- It aids in downsizing the total cost of failure which actually could be a big overhead when you aggregate the values. Once the application is released it helps in minimizing the overall risk of downtime of a system.
- A BrowserMob tool loads testing in the Selenium and aids you to keep the track of the performance statistics for any web application.
- One can also exploit the JMeter addon for the Selenium to benefit from other seamless features.
The Selenium Training in Kolkata at FITA Academy provides the students of the Selenium testing course with broader coverage of Selenium testing concepts and applications. The Testing Experts at FITA efficiently cover all the important topics that are included in the Selenium Automation testing.
Careers in Selenium
The popularity of the Selenium testing tool is growing profoundly as the days pass by. In case if you are planning to begin a career in the Web Testing domain then this is going to be the perfect time to begin. Before stepping deeper into the career prospects in this Selenium Tutorial let us see the important aspects that have made Selenium the most popular tool among the testers and developers.
- It is a Non-proprietary software
- It has the feature of Multi-Browser compatibility
- It can work with a variety of platforms
- It renders support in the Cross Browser Testing
- Multi Programming Languages are supported by it
- It also Supports Test and Mobile Web Applications
- It offers comprehensive documentation assistance.
The Selenium is one of the highly in-demand skills in the testing area with great traction in Australia, India, the UK, and the USA. Where jobs are plentiful and remuneration is high. Some of the top companies namely Google, LinkedIn, Facebook, and Microsoft highly prefer Selenium for automation testing needs.
The job titles vary according to the company you step into. The following are the general job profiles available at the company:
- Selenium Tester
- Selenium Quality Engineer - Automation
- Selenium Test Analyst
- Selenium Automation Engineer
- Mobile Testing Lead
- Java Selenium Automation Engineer
- Software Development Test Engineer
The following companies hire Selenium Certified professionals:-
Oracle, Dell, Tech Mahindra, ADP, IBM, UnitedHealth Group, L&T, Deloitte, Cognizant, ValueLabs, Capgemini, CGI, and Hitachi.
Salary Packages: The Selenium job packages differ according to the companies depend on the skill sets. According to Indeed, the average compensation for a Selenium Tester in the United States is from $62,509 to $100,971 per year. The Global Automation Testing Market is expected to grow up to USD 28.8 billion by the end of 2024 according to the reports submitted by Markets and Markets. It shows that the Selenium industry is booming and that there are no signs of it slowing down. This is an excellent opportunity for testers to stay current and pursue the finest career path possible.
Selenium Tester's Major Responsibilities
- The tester must determine the strategy that is needed for automation testing while using the Selenium according to the business needs.
- You can create the test plan and also build the test scripts
- The tester should maintain the current regression/test scripts
- A tester should attend the Agile meetings for the assigned projects and it includes Sprint planning, Daily Scrum meeting, and backlog refinement.
- The tester should execute all the regression suites
- A tester must give the solution to developers, project managers, manual testers, and also stakeholders.
- Also, the test should evaluate the APIs and New tools.
Additional Resources
Selenium Interview Questions and Answers
To sum up
After extensive discussion, we can conclude that for people interested in pursuing a career in Selenium, the sector is brimming with prospects to succeed. Furthermore, because automation is the pillar of the computer sector, individuals with expertise in this field will reap significant rewards in the coming years. Also, we hope that this Selenium Tutorial was helpful to you and that it gave you a clear outlook of the Selenium Testing tool and its role in the automation testing industry.
The Selenium Course offered at FITA Academy provides both Selenium Online Course and Selenium Classroom Training in important cities in India. The Selenium Training at FITA Academy is delivered by Testing Experts from the automation industry with immense knowledge and expertise. The Selenium Testing trainers at FITA Academy ensure that the students are well-acquainted with the testing concepts and that they apply them in real-time practices.
In addition to this, we also provide Placement Support and Assistance to the students which helps the aspirants to pursue further with their dream careers.
Interview Questions
Interview Questions on Digital Marketing Java Interview Questions For Experienced Selenium Interview Questions and Answers For Experienced Hadoop Interview Questions and Answers For Experienced Python Interview Questions and Answers For AWS Interview Questions and Answers For Experienced DevOps Interview Questions and Answers Oracle Interview Questions PHP Interview Questions For Freshers AngularJs Interview Questions RPA Interview Questions Software Testing Interview Question and Answer Mobile Testing Interview Questions and Answers Salesforce Interview Questions Networking Interview Questions and Answers Pega Interview Questions NodeJS Interview Questions Ethical Hacking Interview Questions Data Science Interview Questions and Answers Javascript Interview Questions Blue Prism Interview Questions SEO Interview Questions Android Interview Questions MS Excel Interview Questions Cloud Computing Interview Questions Cyber Security Interview Questions Interview Question on Tableau Power BI Interview Questions and Answers Artificial Intelligence Interview Questions and Answers Azure Interview Questions and Answers SQL Interview Questions and Answers Full Stack Interview Questions and Answers Dot Net Interview QuestionsFull Stack Interview Questions and Answers UI UX Interview Questions and Answers ReactJs Interview Questions Full Stack Interview Questions and Answers Linux Interview Questions
Contact Us
For Business
Testimonials
Resources
Follow Us
TRENDING COURSES
JAVA Training In Chennai Core Java Training in Chennai Software Testing Training In Chennai Selenium Training In Chennai Python Training in Chennai Data Science Course In Chennai C / C++ Training In Chennai PHP Training In Chennai AngularJS Training in Chennai Dot Net Training In Chennai DevOps Training In Chennai German Classes In Chennai Spring Training in ChennaiStruts Training in Chennai Web Designing Course In Chennai Android Training In Chennai AWS Training in Chennai
iOS Training In Chennai SEO Training In Chennai Oracle Training In Chennai RPA Training In Chennai Cloud Computing Training In Chennai Big Data Hadoop Training In Chennai Digital Marketing Course In Chennai UNIX Training In Chennai Placement Training In Chennai Artificial Intelligence Course in ChennaiJavascript Training in ChennaiHibernate Training in ChennaiHTML5 Training in ChennaiPhotoshop Classes in ChennaiMobile Testing Training in ChennaiQTP Training in ChennaiLoadRunner Training in ChennaiDrupal Training in ChennaiManual Testing Training in ChennaiWordPress Training in ChennaiSAS Training in ChennaiClinical SAS Training in ChennaiBlue Prism Training in ChennaiMachine Learning course in ChennaiMicrosoft Azure Training in ChennaiSelenium with Python Training in ChennaiUiPath Training in ChennaiMicrosoft Dynamics CRM Training in ChennaiUI UX Design course in ChennaiSalesforce Training in ChennaiVMware Training in ChennaiR Training in ChennaiAutomation Anywhere Training in ChennaiTally course in ChennaiReactJS Training in ChennaiCCNA course in ChennaiEthical Hacking course in ChennaiGST Training in ChennaiIELTS Coaching in ChennaiSpoken English Classes in ChennaiSpanish Classes in ChennaiJapanese Classes in ChennaiTOEFL Coaching in ChennaiFrench Classes in ChennaiInformatica Training in ChennaiInformatica MDM Training in ChennaiData Analytics Courses in ChennaiFull Stack Developer Course in ChennaiHadoop Admin Training in ChennaiBlockchain Training in ChennaiIonic Training in ChennaiIoT Training in ChennaiXamarin Training In ChennaiNode JS Training In ChennaiContent Writing Course in ChennaiAdvanced Excel Training In ChennaiCorporate Training in ChennaiEmbedded Training In ChennaiLinux Training In ChennaiOracle DBA Training In ChennaiPEGA Training In ChennaiPrimavera Training In ChennaiTableau Training In ChennaiSpark Training In ChennaiGraphic Design Courses in ChennaiAppium Training In ChennaiSoft Skills Training In ChennaiJMeter Training In ChennaiPower BI Training In ChennaiSocial Media Marketing Courses In ChennaiTalend Training in ChennaiHR Courses in ChennaiGoogle Cloud Training in ChennaiSQL Training In Chennai CCNP Training in Chennai PMP Training in Chennai OET Coaching Centre in Chennai
Are You Located in Any of these Areas
Adambakkam, Adyar, Akkarai, Alandur, Alapakkam, Alwarpet, Alwarthirunagar, Ambattur, Ambattur Industrial Estate, Aminjikarai, Anakaputhur, Anna Nagar, Anna Salai, Arumbakkam, Ashok Nagar, Avadi, Ayanavaram, Besant Nagar, Bharathi Nagar, Camp Road, Cenotaph Road, Central, Chetpet, Chintadripet, Chitlapakkam, Chengalpattu, Choolaimedu, Chromepet, CIT Nagar, ECR, Eechankaranai, Egattur, Egmore, Ekkatuthangal, Gerugambakkam, Gopalapuram, Guduvanchery, Guindy, Injambakkam, Irumbuliyur, Iyyappanthangal, Jafferkhanpet, Jalladianpet, Kanathur, Kanchipuram, Kandhanchavadi, Kandigai, Karapakkam, Kasturbai Nagar, Kattankulathur, Kattupakkam, Kazhipattur, Keelkattalai, Kelambakkam, Kilpauk, KK Nagar, Kodambakkam, Kolapakkam, Kolathur, Kottivakkam, Kotturpuram, Kovalam, Kovilambakkam, Kovilanchery, Koyambedu, Kumananchavadi, Kundrathur, Little Mount, Madambakkam, Madhavaram, Madipakkam, Maduravoyal, Mahabalipuram, Mambakkam, Manapakkam, Mandaveli, Mangadu, Mannivakkam, Maraimalai Nagar, Medavakkam, Meenambakkam, Mogappair, Moolakadai, Moulivakkam, Mount Road, MRC Nagar, Mudichur, Mugalivakkam, Muttukadu, Mylapore, Nandambakkam, Nandanam, Nanganallur, Nanmangalam, Narayanapuram, Navalur, Neelankarai, Nesapakkam, Nolambur, Nungambakkam, OMR, Oragadam, Ottiyambakkam, Padappai, Padi, Padur, Palavakkam, Pallavan Salai, Pallavaram, Pallikaranai, Pammal, Parangimalai, Paruthipattu, Pazhavanthangal, Perambur, Perumbakkam, Perungudi, Polichalur, Pondy Bazaar, Ponmar, Poonamallee, Porur, Pudupakkam, Pudupet, Purasaiwakkam, Puzhuthivakkam, RA Puram, Rajakilpakkam, Ramapuram, Red Hills, Royapettah, Saidapet, Saidapet East, Saligramam, Sanatorium, Santhome, Santhosapuram, Selaiyur, Sembakkam, Semmanjeri, Shenoy Nagar, Sholinganallur, Singaperumal Koil, Siruseri, Sithalapakkam, Srinivasa Nagar, St Thomas Mount, T Nagar, Tambaram, Tambaram East, Taramani, Teynampet, Thalambur, Thirumangalam, Thirumazhisai, Thiruneermalai, Thiruvallur, Thiruvanmiyur, Thiruverkadu, Thiruvottiyur, Thoraipakkam, Thousand Light, Tidel Park, Tiruvallur, Triplicane, TTK Road, Ullagaram, Urapakkam, Uthandi, Vadapalani, Vadapalani East, Valasaravakkam, Vallalar Nagar, Valluvar Kottam, Vanagaram, Vandalur, Vasanta Nagar, Velachery, Vengaivasal, Vepery, Vettuvankeni, Vijaya Nagar, Villivakkam, Virugambakkam, West Mambalam, West Saidapet
FITA Velachery or T Nagar or Thoraipakkam OMR or Anna Nagar or Tambaram or Porur or Pallikaranai branch is just few kilometre away from your location. If you need the best training in Chennai, driving a couple of extra kilometres is worth it!
© 2024 FITA. All rights Reserved.