In the world of web development, choosing the right framework can greatly influence the success and efficiency of your project. Django, a high level Python web framework, has gained immense popularity due to its simplicity, scalability, and extensive feature set. This blog explores the fundamentals of building web applications using Django, highlighting its key components, best practices, and benefits.
What is Django?
Django is a high level, open source Python web framework renowned for its robustness and efficiency in building web applications. It follows the model view controller (MVC) architectural pattern, facilitating the development process by providing a clear separation of concerns. With its comprehensive set of tools and libraries, Django simplifies common web development tasks, including URL routing, database integration, form handling, and user authentication. Its adherence to best practices, such as the DRY (Don’t Repeat Yourself) principle, promotes code reusability and maintainability. Django’s versatility, extensive documentation, and active community support make it an excellent choice for developers seeking to create scalable and feature rich web applications.
Setting up a Django Project
Setting up a Django project involves a series of steps to establish a structured development environment. Firstly, Django must be installed, preferably within a virtual environment, to isolate project dependencies. Once Django is installed, a new model in django project can be initiated using the command line interface. This creates the project directory along with essential files and folders. Next, an app is created within the project to encapsulate specific functionality or modules. Configuration settings for the project, such as database connection details and middleware components, can be defined in the project’s settings.py file. Additionally, URL routing is configured to map incoming requests to corresponding views. The overall project structure is organised according to Django’s conventions, providing a clear separation of concerns. Finally, Django’s built in development server can be utilised for testing the project locally. By following these steps, developers can quickly set up a model in django project and commence building web applications efficiently.
Enrol FITA Academy’s Python Training in Chennai to gain in depth knowledge in Python and learn different frameworks like Django.
Django Models and Database Integration
Django’s model component serves as a bridge between the application’s data and the underlying database. Models in Django are Python classes that define the data structure, relationships, and behaviour of the application’s data entities.

Through the use of Django’s powerful Object Relational Mapping (ORM) layer, developers can seamlessly integrate various databases without writing complex SQL queries. The ORM facilitates tasks such as creating, reading, updating, and deleting records, as well as handling database migrations for schema changes. This abstraction allows for database independence and simplifies the development process by providing an intuitive and efficient way to interact with the database through Python code.
Creating Views and Templates
Creating views and templates professionally in Django involves following best practices and organizing your code in a maintainable and scalable manner. Here’s a step by step guide to help you create views and templates professionally:
Project Structure
- Start by creating a Django project using the `django admin startproject` command. This will create the basic project structure.
- Create an app within your project using the `python manage.py startapp` command. This will create an app directory with the necessary files.
- Organize your code by separating concerns. Create directories for templates, static files, and any additional modules you may need.
URLs and URL Patterns
- Define the URL patterns for your app in the `urls.py` file. This file will map the URLs to their respective views.
- Use named URL patterns to make your code more maintainable and to easily reference URLs in templates and views.
Views
- Create views in your app’s `views.py` file. Views handle the logic behind each URL.
- Use class based views (CBVs) whenever possible as they provide reusable and structured code. Django provides many generic CBVs that you can subclass and customize to fit your needs.
- Follow the Single Responsibility Principle (SRP) and keep your views focused on a specific task. If a view becomes too complex, consider splitting it into smaller, more manageable views.
Templates
- Create HTML templates in your app’s template directory.
- Use template inheritance by creating a base template that defines the common structure and elements shared across multiple pages. Extend this base template in other templates and override specific blocks as needed.
- Keep your templates organized by creating subdirectories for different sections of your website. Use the `{% include %}` and `{% include … with %}` template tags to reuse common elements.
Context Data
- Pass data from views to templates using the context dictionary. The context contains variables that can be accessed in templates.
- Use the `render` function to render the template and pass the context data.
Static Files
- Store your static files (CSS, JavaScript, images, etc.) in the app’s static directory.
- Use the `{% static %}` template tag to include static files in your templates. This tag ensures that the correct URL is generated, even if your project is served from a different location.
Testing
- Write unit tests for your views and templates to ensure they function correctly.
- Django provides a testing framework that makes it easy to write and run tests. Use this framework to validate the behavior of your views and templates.
Documentation and Comments
- Document your code, especially if you plan to share it with others. Use comments to explain complex logic or to provide context.
- Follow the official Django documentation and PEP 8 guidelines for writing clean and readable code.
Remember to regularly refactor and optimize your code as your project grows. Follow Django’s best practices, such as using querysets efficiently and implementing caching mechanisms, to ensure your views and templates perform well.
Python Training in Pondicherry will help you understand and learn Python with real time projects with industry experienced expert trainers. Make development your career with us.
Django Forms for User Input
Creating Django forms for user input professionally involves following best practices and leveraging Django’s built in form functionality. Here’s a step by step guide to help you create forms for user input in Django:
Define a Form Class
- Create a new file (e.g., forms.py) within your app directory or use an existing one.
- Import the necessary modules: `from Django framework for python`.
- Define a form class that inherits from `forms.Form` or `forms.ModelForm`.
- Specify the fields you want to include in the form as class attributes.
Field Types and Validation
- Choose the appropriate field types for each form field based on the data you expect to receive (e.g., `CharField`, `IntegerField`, `EmailField`, etc.). Django framework for python provides a wide range of field types.
- Utilize field options to customize the behavior of each field (e.g., `max_length`, `required`, `label`, `help_text`, etc.).
- Take advantage of Django’s built in validation by adding appropriate validation rules to your form fields. Django will automatically validate the user input based on these rules.
Rendering the Form
- In your view, import the form class you created in forms.py: `from .forms import YourForm`.
- Instantiate the form class within the view: `form = YourForm()`.
- Pass the form instance to the template context: `return render(request, ‘your_template.html’, {‘form’: form})`.
- In the template, render the form using the `{{ form }}` template variable.
Handling Form Submission
- In your view, check if the request method is POST: `if request.method == ‘POST’`.
- If it is a POST request, bind the form to the submitted data: `form = YourForm(request.POST)`.
- Validate the form using `form.is_valid()`. If the form is valid, process the data and redirect the user to a success page. If the form is invalid, re-render the form with the validation errors.
- If it is not a POST request, render the form as mentioned in Step 3.
Displaying Form Errors
- In your template, you can access individual fields and their errors using `{{ form.field_name.errors }}` to display error messages next to the corresponding fields.
- Use the `{% if form.non_field_errors %}` template tag to display non field specific errors, if any.
Form Customization
- Customize the form’s appearance and behavior by utilizing Django’s widget options. Widgets control how the form fields are rendered (e.g., `TextInput`, `Select`, `CheckboxInput`, etc.).
- You can also customize the form’s layout by overriding the default rendering in the template. Manually render each field using the `{{ form.field_name }}` template variable and add additional HTML markup or CSS classes as needed.
Testing
Write unit tests for your form to ensure it behaves correctly and validates user input accurately. Use Django’s testing framework to create test cases and simulate different scenarios.
Security Considerations
- To avoid security flaws like SQL injection and cross site scripting (XSS), validate and sanitise user input.
- Consider implementing additional validation and security measures, such as CSRF protection, to safeguard your forms against malicious attacks.
Authentication and User Management
Authentication and user management in Django development are crucial aspects of building professional web applications. Here’s a guide to implementing these features professionally:

User Model
- Extend Django’s built in `User` model or create a custom user model to add additional fields and functionality as per your application’s requirements.
- Implement fields like username, email, password (hashed), and any other relevant user data.
Authentication
- Use Django’s authentication system, which provides features like login, logout, and session management out of the box.
- Utilize authentication backends to support different authentication methods such as username/password, email/password, or third party providers (OAuth, LDAP).
- Implement security measures like password hashing, password reset functionality, and enforcing strong password policies.
User Registration and Profile
- Design user registration forms to collect necessary information like username, email, and password. Validate and handle form submissions securely.
- Create user profiles to store additional user data. Use one to one relationships or extend the user model with a profile model.
Authorization and Permissions
- Implement authorization by using Django’s permission system, assigning permissions to users or user groups. Restrict access to specific views or API endpoints based on user roles.
- Utilize decorators like `@login_required` or DRF’s `@permission_classes` to enforce access control.
User Interface
- Design user interfaces for registration, login, password reset, and profile management.
- Utilize Django’s built in authentication views and forms or customize them to match your application’s design.
Account Activation and Email Confirmation
- Implement email verification for user registration using unique activation tokens sent via email.
- Utilize Django’s email sending functionality or third party packages like Django authentication allauth to manage email confirmation.
Third Party Authentication
- Integrate third party authentication providers like OAuth or social login using packages such as Django-Allauth or Django authentication on OAuth Toolkit.
- Allow users to authenticate with existing accounts from platforms like Google, Facebook, or GitHub.
User Management
- Implement features like user listing, user search, user role assignment and user deactivation or deletion in an administrative interface.
- Utilize Django’s admin site or build a custom admin panel to manage user accounts.
Security
- Implement security best practices such as protection against CSRF attacks, enforcing secure password policies, and securing sensitive user data.
Testing
- Write unit tests to validate authentication flows, user registration, and profile management.
- Cover edge cases like invalid login attempts, incorrect passwords, and unauthorized access.
- By following these professional practices, you can implement authentication and user management in Django, ensuring secure and user friendly web applications.
Learn Data Science Training in Chennai which will help you build a career in being a data scientist or an analyst. Let’s hope on the trend and explore the possibilities.
Building RESTful APIs with Django
Building RESTful APIs with Django professionally involves following best practices for designing and implementing APIs. Utilize Django’s built in features like the Django Rest Framework (DRF) to streamline API development. Design endpoints based on REST principles, ensuring proper HTTP methods and status codes. Implement authentication and authorization mechanisms, such as token based authentication or JWT. Utilize Serializers to convert data between Django models and API responses. Implement pagination, filtering, and sorting for efficient data retrieval. Write comprehensive unit tests to ensure API functionality. Properly document the API using tools like Swagger or Django Rest Swagger.
Testing and Debugging Django Applications
Writing tests and debugging are essential for ensuring the quality and reliability of web applications. Django development offers a comprehensive testing framework and several debugging tools. Here, we cover writing tests, running tests, and using Django’s debugging features to identify and fix issues effectively.
Testing in Django
- Write unit tests using Django’s testing framework to validate individual components, models, views, and forms.
- Conduct integration tests to ensure the seamless interaction between different components and functionalities.
- Perform functional testing to validate user workflows and features using tools like Selenium or Django’s built in `Client`.
Test Driven Development (TDD)
- Practice TDD by writing tests before implementing code. This helps ensure that your code meets requirements and improves code quality.
Error Handling and Logging
- Configure Django’s error handling to catch and log exceptions.
- Utilize Django’s logging framework to gather detailed information for debugging purposes.
Debugging Tools
- Enable Django’s debug mode during development to access the debugging panel, which provides insights into the request/response cycle, SQL queries, and template rendering.
- Utilize third party tools like Django Debug Toolbar to analyze database queries, view performance metrics, and gain valuable debugging information.
Continuous Integration (CI) and Automation
- Implement a CI pipeline to automatically run tests on code changes, ensuring consistent quality.
- Use tools like Jenkins, Travis CI or GitLab CI/CD to automate testing and streamline the development process.
Test Coverage and Code Metrics
- Measure test coverage using tools like coverage.py to identify areas that require additional testing.
- Employ code quality metrics tools such as pylint or flake8 to enforce coding standards and identify potential issues.
By following these professional practices, you can effectively test and debug Django applications, leading to robust, bug free code that meets user expectations and delivers a high quality user experience.
Explore the new possibilities of data science with FITA. Join Data Science Training in Bangalore and make an exciting career in being a data analyst with us.
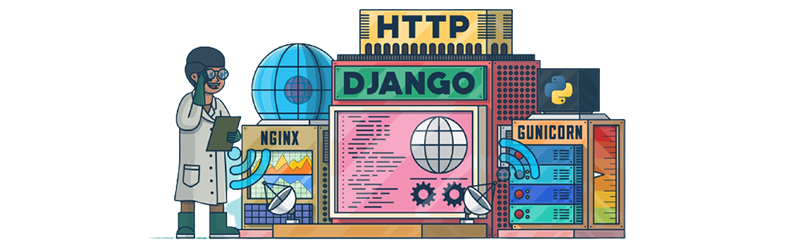
Django Deployment Options
Django offers multiple deployment options for hosting your applications professionally. These include traditional methods like deploying on a dedicated server or virtual private server (VPS) using tools like Nginx and Gunicorn, as well as more modern approaches such as using Platform as a Service (PaaS) providers like Heroku or containerization with Docker and container orchestration platforms like Kubernetes.
Additionally, cloud providers like AWS, Google Cloud, and Azure offer managed services specifically designed for Django development, simplifying the process further. Choose the option that aligns with your project requirements, scalability needs, and expertise to ensure a stable and scalable deployment.
Django empowers developers to build robust, scalable, and secure web applications efficiently. This article provided a comprehensive overview of Django, covering its core components, best practices, and deployment options. With its extensive documentation and supportive community, Django continues to evolve, making it an ideal choice for web application development in Python. Django’s simplicity and flexibility make it a valuable tool for developers aiming to build sophisticated web applications rapidly.
